


 3390Likes
Thread: 55 Wagon Progress


Results 1,171 to 1,185 of 1865
 LinkBack URL
 About LinkBacks
-
03-29-2018 04:51 AM #1171
 CHR Member

- Join Date
- Jun 2008
- Location
- Leonardtown
- Car Year, Make, Model: Walking
- Posts
- 1,228
I advised them of the 7 day window, but I think they will be scuffing it out of habit...Robert
-
Advertising

- Google Adsense
- REGISTERED USERS DO NOT SEE THIS AD
-
03-29-2018 04:52 AM #1172
CHR Member
- Join Date
- Jun 2008
- Location
- Leonardtown
- Car Year, Make, Model: Walking
- Posts
- 1,228
Made a new tool Tuesday night, this is inspired by the bench mount shear that you saw at our last metal shaping class at the shop, made by Charlie Cerutti. This mimics the Beverly Shear on a much smaller scale, and for those who have arthritis issues and find difficulty in the squeezing process of using hand snips, this could prove invaluable.
This was made using two (right and left hand cut) pair of 90* Midwest shears. First step is to remove handle covers, a utility knife makes short work of it.. Then the handle toward the jaws is trimmed off, as shown in the picture. A one inch diameter tube is used as the pull handle, welded onto the remaining handle of the shears. 5/8 round stick is used for the cross piece and upright supports, and an angle provides the base for clamping (for portability) or screwing to the front edge of your workbench.
Here shown fully assembled:
https://www.youtube.com/watch?v=MdaX4GJ-PHI
.....and here in operation...
https://www.youtube.com/watch?v=i2oCHf_lm9M
The intent here is not to increase capacity by adding more leverage, I would still recommend adhering to manufacturer's recommendations. This is merely another tool that may make the job easier..Last edited by MP&C; 03-29-2018 at 05:06 AM.
Robert
-
03-29-2018 08:21 AM #1173
CHR Member/Contributor
- Join Date
- Sep 2007
- Location
- Gardner, KS
- Car Year, Make, Model: '33 HiBoy Coupe, '32 HiBoy Roadster
- Posts
- 11,245
That's a very cool, innovative approach! I was wondering about attachment, but the second video showing it in use shows the big C clamp securing it to the bench, so it's not in the way when not needed. Another bonus! Nice job, and thanks!!Roger
Enjoy the little things in life, and you may look back one day and realize that they were really the BIG things.
-
03-29-2018 07:51 PM #1174
CHR Member
- Join Date
- Apr 2011
- Location
- Prairie City
- Car Year, Make, Model: 40 Ford Deluxe, 68 Corvette, 72&76 K30
- Posts
- 7,301
- Blog Entries
- 1
Very nice and thanks for sharing that with us!Ryan
1940 Ford Deluxe Tudor 354 Hemi 46RH Electric Blue w/multi-color flames, Ford 9" Residing in multiple pieces
1968 Corvette Coupe 5.9 Cummins Drag Car 11.43@130mph No stall leaving the line with 1250 rpm's and poor 2.2 60'
1972 Chevy K30 Longhorn P-pumped 24v Compound Turbos 47RH Just another money pit
1971 Camaro RS 5.3 BTR Stage 3 cam, SuperT10
Tire Sizes
-
03-31-2018 05:15 PM #1175
CHR Member
- Join Date
- Jun 2008
- Location
- Leonardtown
- Car Year, Make, Model: Walking
- Posts
- 1,228
We were blocking out the wagon's roof today, and had a few low spots to bump upwards. To locate the lows on the inside, I thought to use one of our rare earth magnets in the center of the low, and use the body hammer on the bottom side of the roof to pinpoint the magnetic pull. These are 65 lb pull magnets that we use for our paper patterns. By a stroke of luck (blind squirrel finds acorn) we noticed in scuffing the inside of the roof that the magnet location readily appeared, for a more accurate locating method.
Video:
https://www.youtube.com/watch?v=Ubq89aPMJjY
.Robert
-
03-31-2018 07:51 PM #1176
CHR Member
- Join Date
- Jan 2005
- Location
- Doon, Ia
- Car Year, Make, Model: 53 Chevy 3100
- Posts
- 2,716
That's pretty neat, there's so much that I would do different on my 53 if I would have seen this build first.Seth
God cannot give us a happiness and peace apart from Himself, because it is not there. There is no such thing. C.S.Lewis
-
03-31-2018 08:20 PM #1177
CHR Member
- Join Date
- Sep 2005
- Location
- Hamilton
- Car Year, Make, Model: 69 nomad, 73 charger, 74 vega
- Posts
- 3,900
Scatter some iron filings on top, you'll see the magnet exactly..
Education is expensive. Keep that in mind, and you'll never be terribly upset when a project goes awry.
EG
-
04-01-2018 06:37 PM #1178
CHR Member
- Join Date
- Jun 2008
- Location
- Leonardtown
- Car Year, Make, Model: Walking
- Posts
- 1,228
Had a couple questions on what the heck I'm showing in the video.. Haha... so let's clarify..
We were blocking out the primer on the roof and came across a few low spots. These were low enough to be seen in the paint if left alone, and yet mixing and sanding any filler "repair" would have taken longer than some simple bumping of the low area.
Since I don't have a Bullseye Pick, we thought to use some gentle hammering with a crowned body hammer beneath into a small shot bag on the top (outside) of the roof. We have some 65 lb pull rare earth magnets that we typically use for our paper patterns, and this showed to have enough strength to pull through the roof skin. So we placed the magnet in the center of the low area, and in order to locate on the underside, would skim across the roof from beneath with the hammer face to see where the pull was strongest. The location was then marked underneath with a sharpie, magnet removed and replaced with the shot bag, and the area was tapped into the shot bag until blocking showed the area where it should be.
On one of these "marking with a sharpie" efforts, there was a slight bit of dust on the bottom side of the roof, so I gave it a wipe with my hand to displace the dust and instantly saw the outer circle of the magnet. This was much more accurate than using the magnetic pull test, so we changed to this, and the metal bumping effort worked well. We surmise that this "dust" that clings to the magnetic field is likely sanding residue from the primer, or sanding residue from dressing welds inside the car, or both. In any case, it worked well to help transpose the low spot locations to the bottom side for more accurate hammering.Robert
-
04-02-2018 11:22 AM #1179
CHR Member
- Join Date
- Apr 2011
- Location
- Prairie City
- Car Year, Make, Model: 40 Ford Deluxe, 68 Corvette, 72&76 K30
- Posts
- 7,301
- Blog Entries
- 1
That is a very cool and time saving trick!Ryan
1940 Ford Deluxe Tudor 354 Hemi 46RH Electric Blue w/multi-color flames, Ford 9" Residing in multiple pieces
1968 Corvette Coupe 5.9 Cummins Drag Car 11.43@130mph No stall leaving the line with 1250 rpm's and poor 2.2 60'
1972 Chevy K30 Longhorn P-pumped 24v Compound Turbos 47RH Just another money pit
1971 Camaro RS 5.3 BTR Stage 3 cam, SuperT10
Tire Sizes
-
04-02-2018 05:37 PM #1180
CHR Member
- Join Date
- Sep 2007
- Location
- New Bedford
- Car Year, Make, Model: 34 Ford 3W Coupe Replica
- Posts
- 14,754
I had to read this a few times... I couldn't fathom that there is a tool that you don't own or make! Originally Posted by MP&C

 Just teasin'..
  The magnet "ring" is a cool tip, could be handy in many situation.
-
04-11-2018 06:12 PM #1181
CHR Member
- Join Date
- Jun 2008
- Location
- Leonardtown
- Car Year, Make, Model: Walking
- Posts
- 1,228
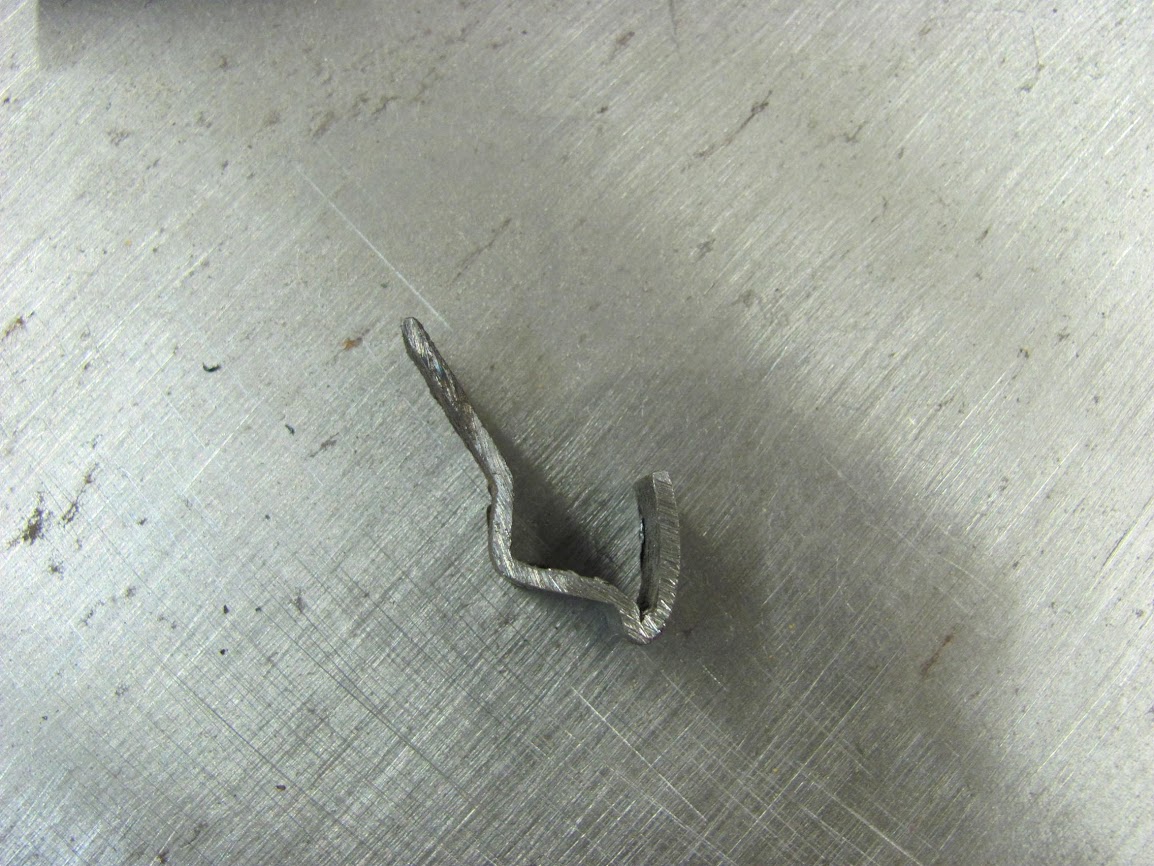
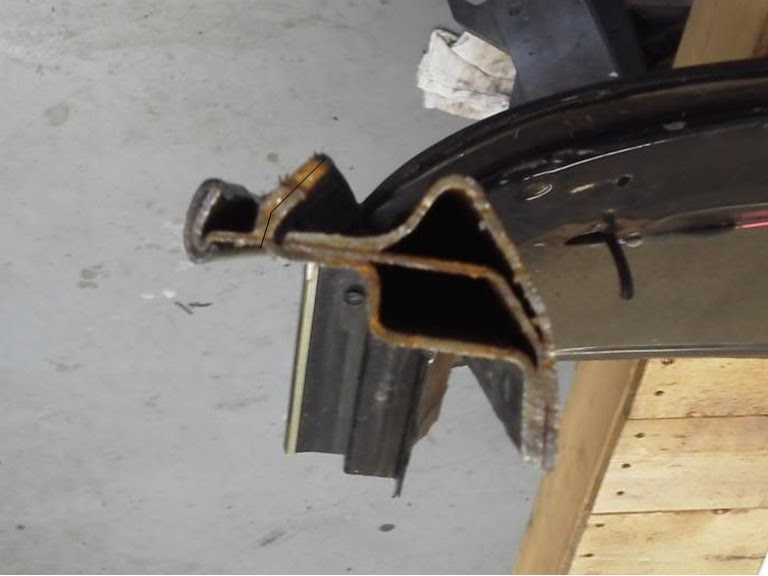
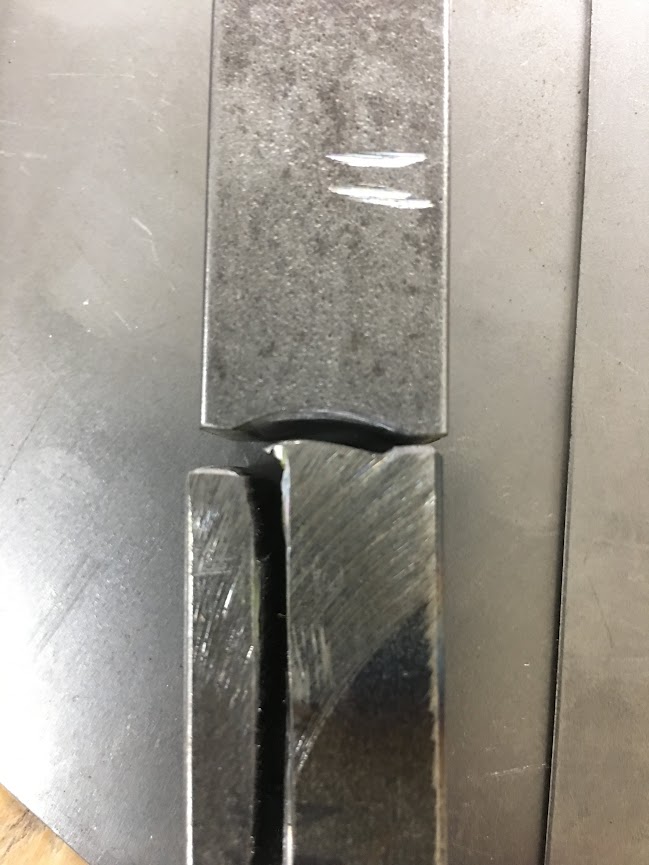
Spent last week in Rock Hill SC for a metalshaping workshop. My project was going to be making a section of drip rail to match a section cut from a vehicle.. I was going to use the bead roller but any attempt showed distortion was difficult to control. Just to clarify where this is situated, this is welded along the outside of the A-pillar with the tail comprising part of the windshield opening.
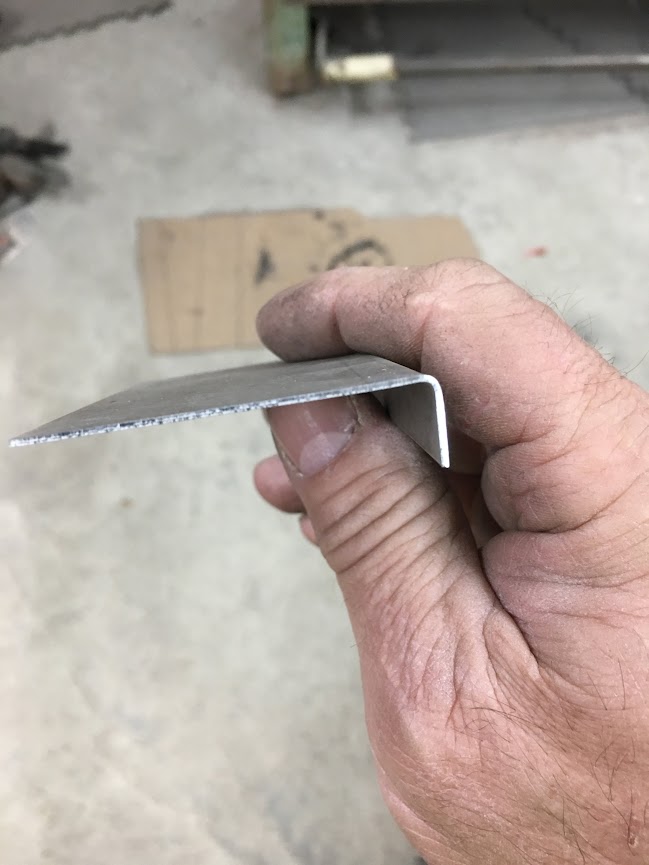
After looking at some of the home made Pullmax dies others had brought, I think eliminating the deformity can be best addressed by making dies for the Lennox (Pullmax). Here's what we started with, a section of 18 gauge (to match OEM) and folded the lip that will form the outside face of the drip rail..
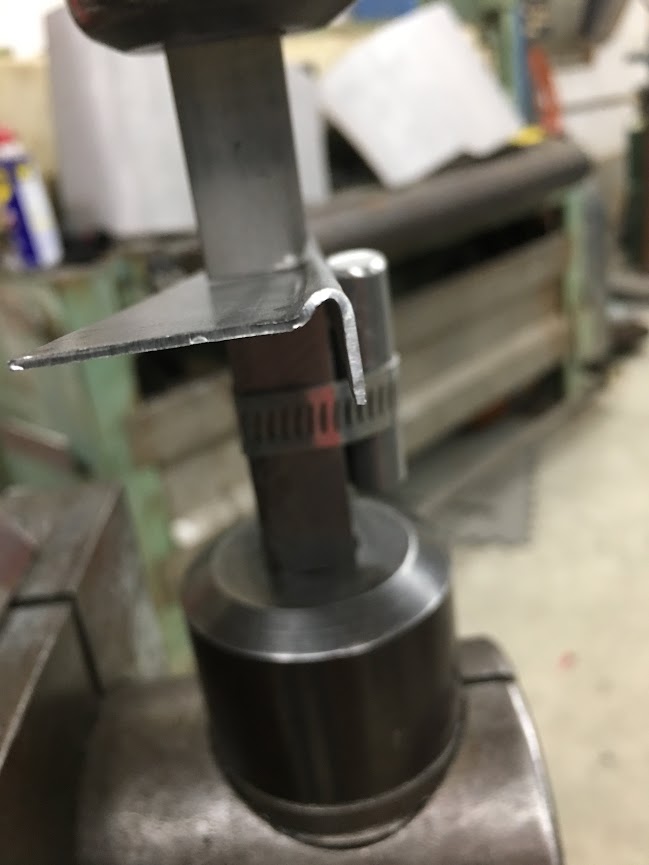
Next, a die is used to add the joggle seen at the bottom, and a clamped-on guide prevents the flange from wanting to move skyward.
Next operation is to add the slight bit of radius to the front face of the drip rail. Here's our die configuration for this step..
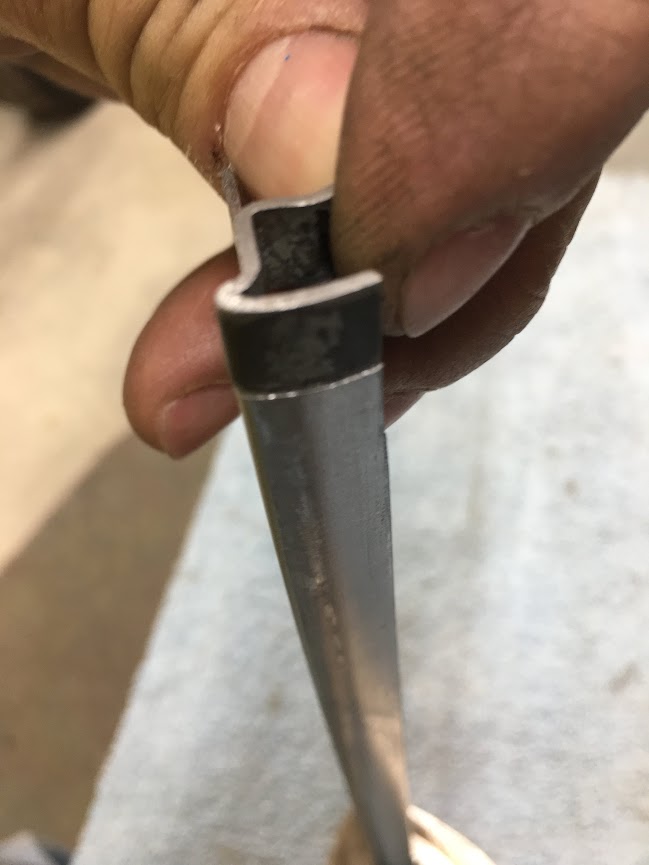
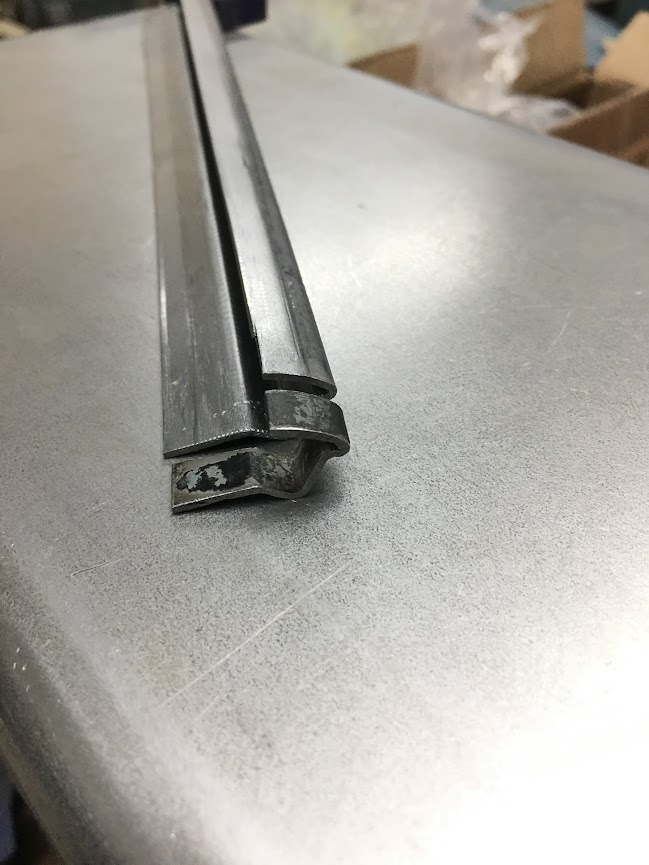
Shown here with the original cross-section piece...
Robert
-
04-11-2018 06:22 PM #1182
CHR Member
- Join Date
- Jun 2008
- Location
- Leonardtown
- Car Year, Make, Model: Walking
- Posts
- 1,228
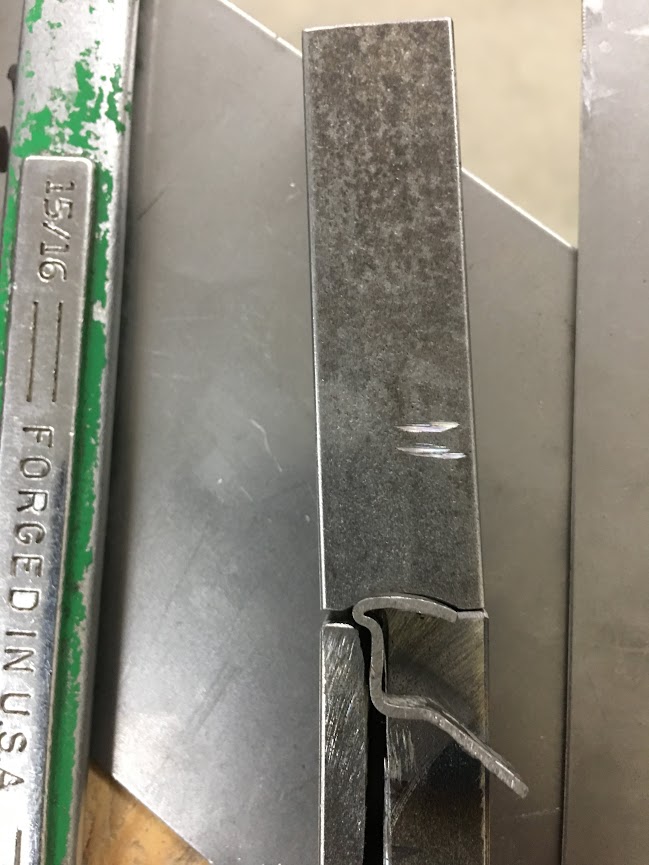
Our first task tonight was to modify die set #2 from last night so it would also tighten up the reverse joggle.
Next, Die set #3 for adding the remaining folds. A partial bend is done in the magnetic brake, and then the die set forms them more accurately.
Before:
After....
Comparison:
I like this method much better, looks to be more easily repeatable with better consistency.Robert
-
04-11-2018 08:24 PM #1183
CHR Member
- Join Date
- Sep 2005
- Location
- Hamilton
- Car Year, Make, Model: 69 nomad, 73 charger, 74 vega
- Posts
- 3,900
Have you ever considered making a cabinet (I'm picturing a mail sorting rack) to hold your custom dies? You could tack cross section of the pattern the dies make on the cubby.
I would HAVE to find some means of storing the dies else I would absolutely forget what they did..
Education is expensive. Keep that in mind, and you'll never be terribly upset when a project goes awry.
EG
-
04-11-2018 08:34 PM #1184
CHR Member
- Join Date
- Apr 2011
- Location
- Prairie City
- Car Year, Make, Model: 40 Ford Deluxe, 68 Corvette, 72&76 K30
- Posts
- 7,301
- Blog Entries
- 1
That is absolutely awesome! You are really good at making those dies too!Ryan
1940 Ford Deluxe Tudor 354 Hemi 46RH Electric Blue w/multi-color flames, Ford 9" Residing in multiple pieces
1968 Corvette Coupe 5.9 Cummins Drag Car 11.43@130mph No stall leaving the line with 1250 rpm's and poor 2.2 60'
1972 Chevy K30 Longhorn P-pumped 24v Compound Turbos 47RH Just another money pit
1971 Camaro RS 5.3 BTR Stage 3 cam, SuperT10
Tire Sizes
-
04-11-2018 08:34 PM #1185
CHR Member
- Join Date
- Nov 2016
- Location
- rocklin
- Posts
- 656
Very clever work, I admire your patience to make things right, wish I had that much.
 Reply With Quote


Posting Permissions
- You may not post new threads
- You may not post replies
- You may not post attachments
- You may not edit your posts

i've enjoyed the years here . made a lot of friends. most who have left. i see no reason to continue with this so hope to see you somewhere else. i dont think this site will ever be back. it's lived...
Dead!