


 8Likes
Thread: Diy no sew upholstery thread


Results 46 to 60 of 71
 LinkBack URL
 About LinkBacks
-
05-01-2011 06:26 AM #46
 CHR Member/Contributor

- Join Date
- Sep 2007
- Location
- Gardner, KS
- Car Year, Make, Model: '33 HiBoy Coupe, '32 HiBoy Roadster
- Posts
- 11,245
Glue
One thing that I am very thankful for is the advice on glue that my local interior guy gave me when I was getting ready to start working on panels, etc. I mentioned 3M General Trim Adhesive to him, and he told me that I needed a stronger glue, and even offered to sell it to me from his bulk supply. I took in a 1 gallon jug, and he filled it with glue, and then showed me his old siphon spray gun hanging by the work table. It has glue in it 24/7, and very seldom plugs - if it does it's a simple matter to blow it out with a blast of air, and back in business. To do the inside panels and trunk I used 2.5 gallons of this stuff at $26/gallon, and I figure I would have dropped at least $350 had I used rattle cans.
Weldwood Glue.gifRoger
Enjoy the little things in life, and you may look back one day and realize that they were really the BIG things.
-
Advertising

- Google Adsense
- REGISTERED USERS DO NOT SEE THIS AD
-
05-03-2011 06:44 AM #47
CHR Member
- Join Date
- Jan 2004
- Location
- Macomb
- Car Year, Make, Model: '32 Ford 3W Coupe, 383 sbc
- Posts
- 1,593
Good idea. I went through a lot of cans of 3M adhesive, Superglue, and contact cement.
Lynn
'32 3W
There's no 12 step program for stupid!
http://photo.net/photos/Lynn%20Johanson
-
06-07-2011 06:13 PM #48
CHR Member/Contributor
- Join Date
- Apr 2009
- Location
- Middle Tennessee
- Posts
- 51
I'm back..
I've been out of touch for a bit, since I started this thread. I've done a bit more work on the Studebaker. I'll post some pictures soon. Lots of good info being passed around.Keep on cuttin and gluein.. No needles required... ~robert
"Life's too short.. Eat your cake first"
Pleasant View, Tennessee
-
01-07-2012 11:54 AM #49
CHR Member
- Join Date
- Jan 2012
- Location
- montague
- Car Year, Make, Model: 1959 Cadillac
- Posts
- 9
Sweet job! You just made my day my friend. Can't wait to show the Hubby this thread! Thank you!
-
01-07-2012 09:08 PM #50
CHR Member
- Join Date
- Mar 2009
- Location
- miami,coconut grove
- Car Year, Make, Model: 28rodster 292Y-block and HenryJ Olds V8
- Posts
- 262
I love this info,very handy stuff,I combined it with my home done sewing on a few projects so far and got real nice efects. Originally Posted by Retired

Looking forward to updates. Thanks
My tech was here;
HOME MADE rod seats and panels
-
03-16-2012 09:56 AM #51
CHR Member
- Join Date
- Sep 2005
- Location
- Hamilton
- Car Year, Make, Model: 69 nomad, 73 charger, 74 vega
- Posts
- 3,900
I am probably going to do custom panels in my 73 charger, as the interior was completely stripped when I got it.
One thing I have noticed is that panel clips are a pain, and delicate to boot. No one seems to use screws to attach panels. Seems to me, not only easier, but if nice chrome bezel washers were used, would look pretty nice..
Education is expensive. Keep that in mind, and you'll never be terribly upset when a project goes awry.
EG
-
03-16-2012 10:31 AM #52
CHR Member
- Join Date
- Jan 2004
- Location
- Macomb
- Car Year, Make, Model: '32 Ford 3W Coupe, 383 sbc
- Posts
- 1,593
I would build your panels and attach them with these clips if you don't want to use the plastic ones.
Lynn
'32 3W
There's no 12 step program for stupid!
http://photo.net/photos/Lynn%20Johanson
-
05-22-2015 09:32 AM #53
CHR Member
- Join Date
- Feb 2013
- Location
- Loveland
- Posts
- 427
I've been searching for articles on how to make your own door panels and came across a couple of videos from Hagan street rods. They show how to use their products to make really professional looking panels, with no sewing. They also use no padding on the panels. Note how they use wire clips to attach the panels and avoid the clips showing through by laminating a second layer onto the base, after installing the clips.
https://www.youtube.com/watch?v=dsDDFvs9t8k
https://www.youtube.com/watch?v=WsKmAMiDnQ0
I've also learned that 1/8" ABS sheet is now a popular material for making upholstery panels. It's heat formable and totally water proof.
Nothing on my car turns out to be simple and the door panels are no exception. Thin flat panels won't work, because I have thick 3/8" bolt heads at the door hinges to go over, plus another eight 1/4" bolt heads for the window channels and power window brackets. The inside door skins are also not flat - they have numerous reinforcing ribs that make high and low areas. It won't be easy to go over all the bolt heads and not leave gaps at the edges of the panels.
The thickness of the panels must also be kept to a minimum due to restricted working spacing. If the panels are very thick they'll hit the seats and the doors won't close. The racing seats don't have much give to them, along the sides, by the door panels.
Here's a picture that I took some time ago. About the only difference is the diagonal brace. It's been removed. Removing the braces and doubling the thickness of the fiberglass where the hinges mount has actually made the doors stiffer.
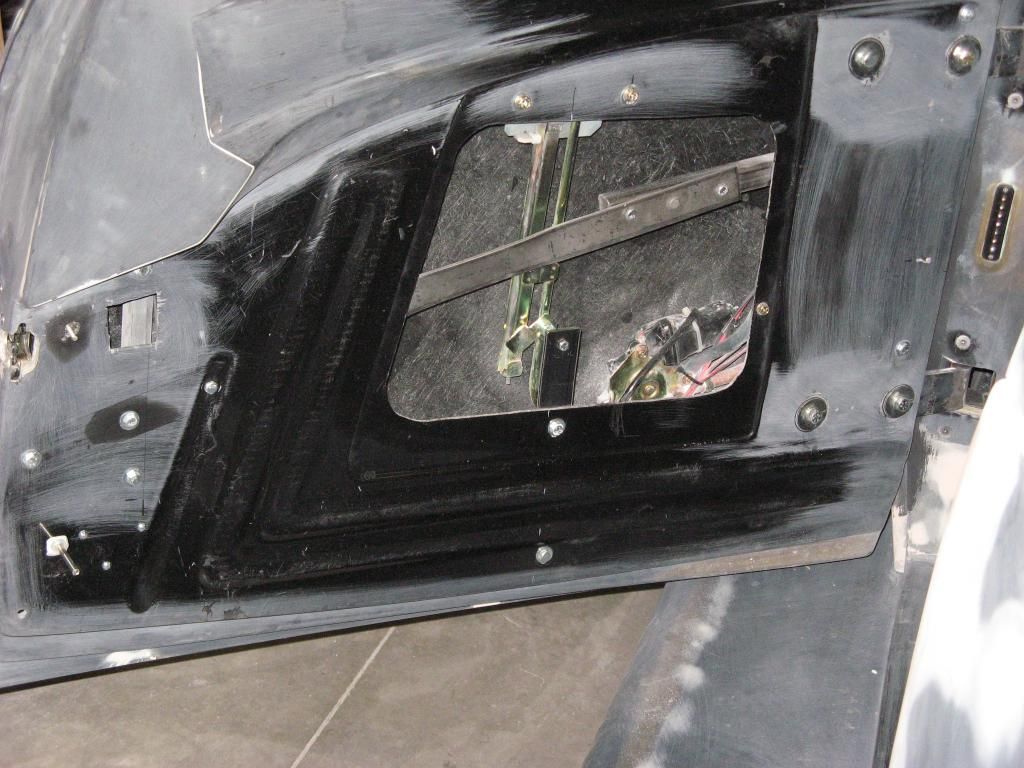
Last edited by daveS53; 05-23-2015 at 06:30 AM.
-
05-22-2015 10:44 AM #54
CHR Member
- Join Date
- Sep 2005
- Location
- Hamilton
- Car Year, Make, Model: 69 nomad, 73 charger, 74 vega
- Posts
- 3,900
First thought I had, is cut holes in the backing ( let's assume 1/8" abs) so the bolt heads poke through. Then start with say, 1/2" foam to make your designs, lay the cloth. Put the 'high spots' over the bolt heads, then you can gouge out the foam a little if the bolt heads need more clearance..
Education is expensive. Keep that in mind, and you'll never be terribly upset when a project goes awry.
EG
-
05-22-2015 11:05 AM #55
CHR Member
- Join Date
- Feb 2013
- Location
- Loveland
- Posts
- 427
1/2" foam is probably the thickest that might work. It would be easy to put some up against the cardboard templates I've made to see how it works. The 3/8" bolt heads are .220 inch thick, plus a .06 thick flat washer, for a total of .280". I can also make the bolt heads a little thinner, if necessary.
I thought about trying some 1/4" ABS, but then I might have to use thinner foam and have problems with clips showing.Last edited by daveS53; 05-22-2015 at 02:45 PM.
-
05-22-2015 06:02 PM #56
CHR Member
- Join Date
- Oct 2014
- Location
- Clinton
- Car Year, Make, Model: '32 Ford Hi Boy, '37 wildrod sedan
- Posts
- 561
Dave, don't give up I have the same inside doors, here is a pic of what I did on mine, if I remember correctly my 1/4" (laminated together to form the pleats) are 1/2" thick and I blocked my hinge strap out an additional 1/8" but recessed the screws that go in the strap by countersinking as my door interiors are almost exactly like yours but the hinge strap is on the inside of the panel complicating it even more, So I then cut out the panels to go around the straps and contact glued 20 gauge aluminum on top to bridge the gap before adding my 1/8" layer of foam, I covered the holes for all the bolts the same way, hard to explain but not terribly difficult. The pic I am sending, there is nothing sewn you see except the binding on the carpet I did the entire interior myself (armrest I built out of fiberglass). Do yourself a favor and order the Sid Chavers video's on streetrod upholstery, you could borrow mine but they are borrowed out to everyone right now as I have 3 people waiting to view them, they aren't cheap but worth every penny, reselling them afterwards would be easy but I would never sell mine! I have a whole collection of upholstery books and his videos beat them all combined, I viewed the Hagan videos also, you'll save $$ I think if you watch the Chavers videos and have way more possibilities as he goes over all fasteners too as well as glue etc. Why the door insides have all the ribs, curves and extra BS is beyond me, I guess so we have to learn what we're doing! Keep at it! Matthyj
IMG_5047.jpgLast edited by Matthyj; 05-22-2015 at 06:18 PM.
Why is mine so big and yours so small, Chrysler FirePower
-
05-23-2015 06:41 AM #57
CHR Member
- Join Date
- Feb 2013
- Location
- Loveland
- Posts
- 427
I'll order the DVDs before doing much more. I'm sure they're each worth $40. It's easy to spend more than that on materials that don't work properly. A 4'x8' sheet of 1/4" ABS costs around $125 and 1/8" about half that. It's basically proportional to the volume of plastic you're buying. I need about 3 sheets for the whole job.
Here's a link to the website.
Sid Chavers Co. - Auto Interior Artist - About Sid Chavers
One of my recent thoughts is to use 1/8" ABS as a base, so it would be easier to heat shape it to fit the curvature of the door skin, then apply foam in two 1/4" layers. The first layer would have the same clearance holes for all the bolt heads, as the base, but the second would not, so you'd get a smooth layer to apply fabric to, plus plenty of clearance space for the bolt heads.Last edited by daveS53; 05-23-2015 at 06:44 AM.
-
05-23-2015 02:31 PM #58
CHR Member
- Join Date
- Feb 2013
- Location
- Loveland
- Posts
- 427
I've copied some pictures from another build of the Oze hard-top model, to show one solution to the raised reinforcing rib issue.
This picture shows the pair of raised ribs that make sort of an L shape. The lowest rib on my door protrudes 1/4" more that than the lower edge, where the door panel will stop, only about 2 inches lower. The upper part of the rib is only about an inch below the "swoop" formed into the door panel.
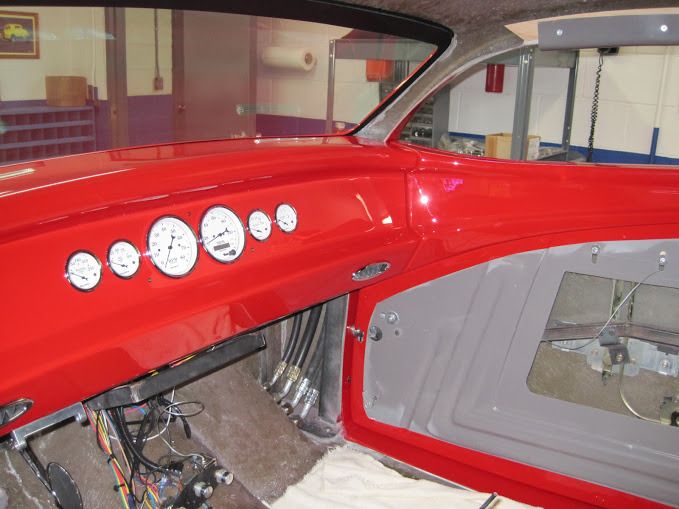
This picture shows a nicely made, but too thick (IMO) door panel. It just doesn't look right when the panel protrudes beyond the "swoop" that's just above it. To avoid that, the panel must be kept very thin and held tight to the ribs.
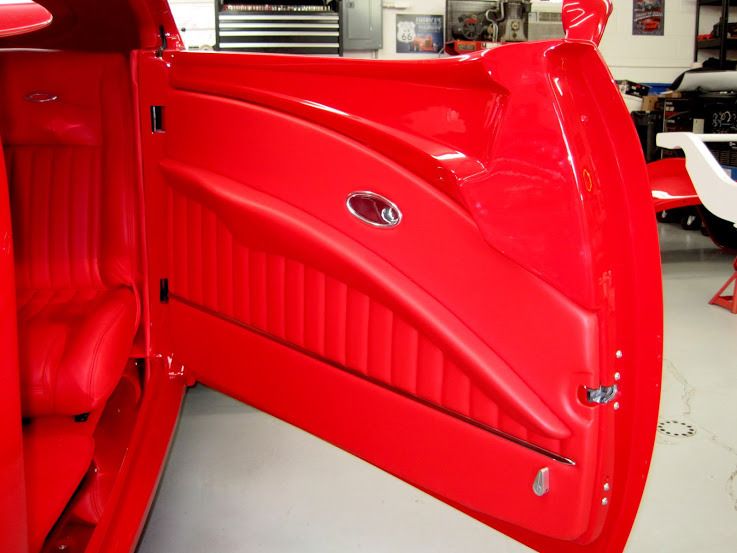
This more like it:
https://youtu.be/7C7OTkW69Ps?t=146Last edited by daveS53; 05-29-2015 at 02:07 PM.
-
05-23-2015 06:37 PM #59
CHR Member
- Join Date
- Oct 2008
- Location
- Rio Rancho
- Car Year, Make, Model: 1940 Ford Sedan
- Posts
- 537
Change your bolts over to button head bolts. They are rounded and do not stick up near as far as standard bolts.
Also don't use those clips, use metal Chrysler ones. They have a flat heat and will not show like the wire ones, plus stronger. (ebay)Last edited by Scooting; 05-23-2015 at 07:08 PM.
-
05-24-2015 03:21 PM #60
CHR Member
- Join Date
- Feb 2013
- Location
- Loveland
- Posts
- 427
Thanks for the tip on the clips. As long as at least some foam padding is used, the clips shown would be an improvement over some of the wire types. If no padding is used, the Hagan method of applying a second layer of panel material would still be needed. Originally Posted by Scooting
12 Pcs 79 on Chrysler Dodge Plymouth Door Panel Retainer Clips | eBay
As for the button heads, they aren't as much of an improvement as you might think. The 3/8-16 hinge bolts would have a head height that's only .035 inch thinner than hex head. I still might get some of these high torque button heads. Every bit helps.
McMaster-Carr
 Reply With Quote


Posting Permissions
- You may not post new threads
- You may not post replies
- You may not post attachments
- You may not edit your posts

i've enjoyed the years here . made a lot of friends. most who have left. i see no reason to continue with this so hope to see you somewhere else. i dont think this site will ever be back. it's lived...
Dead!