Thread: Diy no sew upholstery thread
-
05-24-2015 07:21 PM #61
Wife just finished doing these for her 57Last edited by cffisher; 05-24-2015 at 07:23 PM.
Charlie
Lovin' what I do and doing what I love
Some guys can fix broken NO ONE can fix STUPID
W8AMR
http://fishertrains94.webs.com/
Christian in training
-
Advertising

- Google Adsense
- REGISTERED USERS DO NOT SEE THIS AD
-
05-27-2015 03:46 PM #62
Here's my solution to the Oze door panel problems.
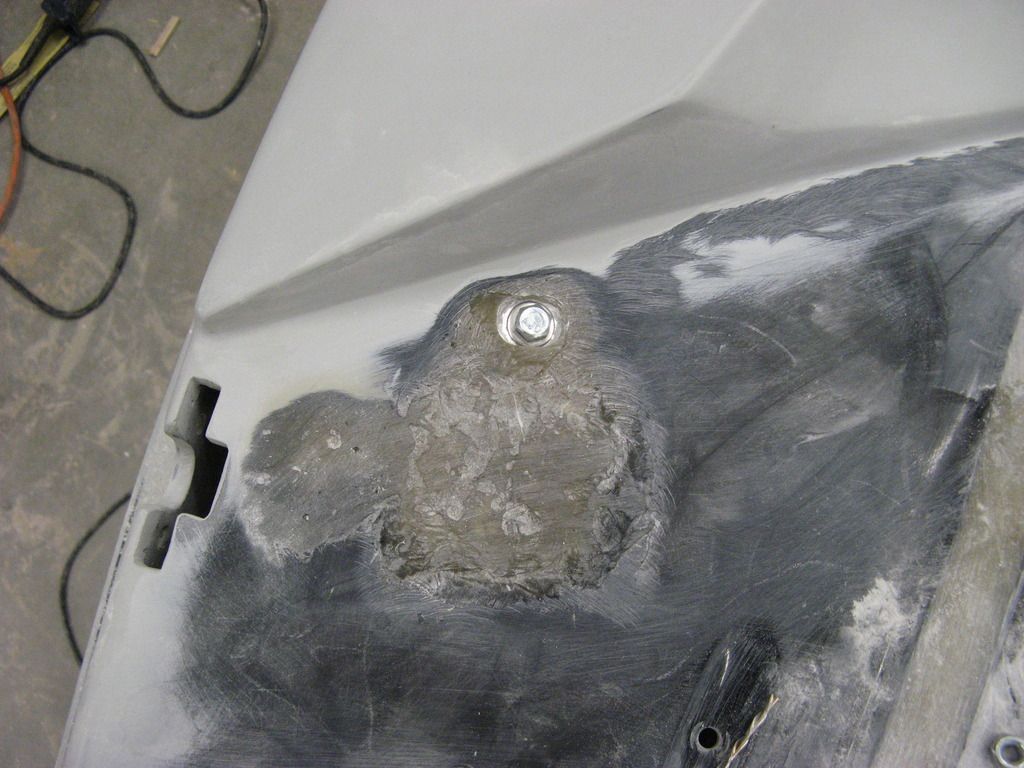
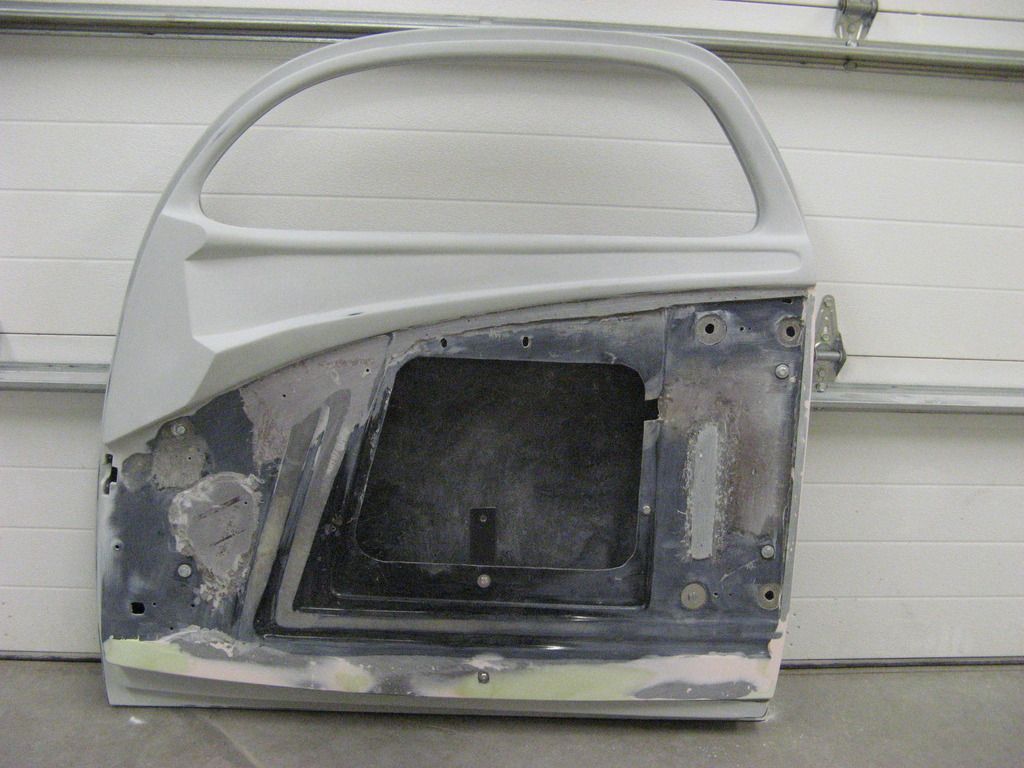
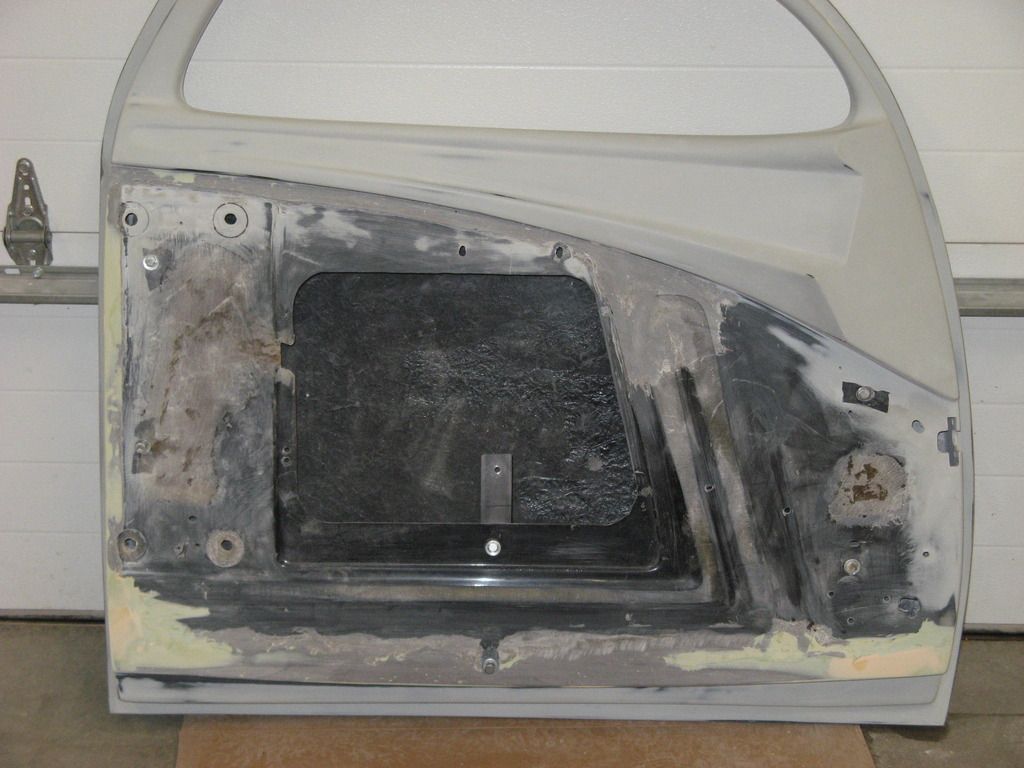
To keep it brief, I countersunk all four hinge bolts about 1/16" with a dremel router, to start. I got out the belt sander and sanded nearly all the way through the raised reinforcing ribs, near the top of of the L, just below the "swoop". I reinforced the back side of the ribs, where they were paper thin, with fiberglass and .040 aluminum sheet, bonded to the underside.
The entire lower edge of the door skin was built up about 1/4" thick and 2" wide, with bondo hair, so it would be flush with the raised reinforcing ribs. One bolt head was countersunk in this area, with a dremel router.
I created a raised edge from bondo glass, 1/2" to 3/4" wide and about 1/4" thick, all along the back and just below the "swoop" that's formed into the door skin.
One of the mounting bolts for the window run channel, located just below the "swoop", had to be countersunk nearly 1/4", to avoid building up the front edge of the door skin. Since this is more than the thickness of the fiberglass, I used 1/8" x 2" aluminum bar bonded with about 1/8" thick fiberglass, to the underside of the door skin. The door skin was then routed out to a depth that exposed the aluminum plate and created a new, lower surface for the bolt to mount to. The aluminum bar stock also served as a backer to patch a hole that was cut out a long time ago, to remove an unneeded cross brace.

When it was all done, I created a surface that's nearly straight front top to bottom, with only about a 1/4" concave curve, from front to back. The front edge of the door skin remains unchanged. I can now mount a panel with no clearance holes in it, that's up to 1/4" thick and not have any part extend beyond the "swoop", or hit any bolt heads. The areas that created the biggest problems were at the top of L shaped reinforcing ribs and that one pesky bolt that holds up one end of the window channel. Without those issues, it would be possible to build-up the back side of the upholstery panel, to do the same thing that I accomplished with a build-up of bondo hair on the door skin. Either way, it takes a lot of hours to produce a smooth surface for the upholstery material.

Now I have to get more serious about the material to use for the door panels, and whether to use the two-layer, no-padding method, suggested by Hagan. I also haven't ruled out using using exposed aluminum for some panels. I need to find some pictures of aluminum used in car interiors.Last edited by daveS53; 05-28-2015 at 07:57 AM.
-
05-27-2015 08:06 PM #63
Dave, I don't know why those doors where made that way, as I said before, kinda crazy but looks like your addressing the issue. I still think once you view the Chavers videos it will give you a bunch of different techinques to approach your issue, knowing that the top of your panel can only be 1/4" thick doesn't mean that the thickness can't change lower on the panel to a thicker panel. I personally use 1/8' baltic birch for my panels, yes its not 100% waterproof but I used watershields on the door (plastic to cover the holes) also baltic is dead flat. For about 75 years automobiles used a warpable pressed board (cardboard) door panels with watershields and now everyone due to marketing thinks it has to be waterproof I believe (and these cars don't see the water of daily drivers) I am 100% comfortable with the product I used, I co-owned a cabinet shop for 21 years and I am very familiar with different products and substrates so the type is personal prefernence, my roadster used the same material and has been soaked! Your on the right track it looks like but I am interested to see what you do after seeing Chavers videos as I think you might be in way better shape than what some start with! The Hagan methods fine, and looks nice but was developed to sell product to DIY and pro trim shops I am sure aren't going that route, kind of like Rod Doors did in the past, I think you will save $$ and be way happier. Keep up the good work it will [pay off I am sure.Why is mine so big and yours so small, Chrysler FirePower
-
05-28-2015 08:33 AM #64
Matt, what's your favorite mounting clip? So far I've seen the wire type and the Chrysler sheet metal type. If I use foam padding, it would probably only be 1/4" or 3/8" thick, at least around the edges, and I'm thinking that it needs to be fairly firm. Seems like the clips might still show through thin foam.
Ultimate Guide to Baltic Birch Plywood: Why It’s Better, When to Use It «
This place seems to have a lot of foam types, thicknesses and grades of firmness.
https://www.foamorder.com/
-
05-28-2015 11:14 AM #65
I have 1/8" and 1/4" foam in places, the Chrysler clips do not show through on either.
-
05-28-2015 05:44 PM #66
Its the wire, but thats the part that is confusing, the way the panels are constructed is the back panel is 1/8" thick (or whatever thickness desired, thats where the holes are for the clips and its the size of your finished panel, a second piece of 1/8" is made the exact same size as the back panel, this is the piece your design is drawn on and its cut to that shape you have designed , the back side is relieved of that 1/8" a small amount, the thickness of the clip to allow it to eventually at the end be slipped in from the back panel, this is done only where clips will be located. After all the design is cut out and laid out the foam (if desired) is cut to the same shape as the pieces you have cut, heck the center can have 1/4" scrim foam and the outside none if desired or vice versa, hard pleats are done without foam and a gap left between the panels for the material to roll into the grooves when glued, that is if you like the look of hard pleats The individual pieces then have the fabric wrapped around the part that faces the inside of the door and the design is the stapled to the back side of the original 1/8" back panel, fabric lifted up foam is applied and then the outside of the fabric then is pulled around the edge of both panels and stapled or glued to the back of the 1/8" back panel, so your clip is actually going in between to layers of paneling, not even under the foam or fabric so its really irrelavent, I personally use the wire variety as you can get them for different thickness doors (ex fiberglass) the brand used is AuVeCo and they can be bought by the box (try Larry Dennis in Texas for supplies) E bay also has them and your local Fastenal can get them too. Since they are wire and are actually spring wire they can be inserted and pulled many times as the Chrysler clips tend to bend (used both and both work fine) I probably confused the heck out of everyone about a fairly simple but time consuming process! This process is used for complex patterns as well as simpler ones and many variations can be made. This means you don't use one giant piece of fabric for the face, which is what the companies generally push for the DIYer but you could if you wanted, but then you go for the "carved" look that I personally didn't want. The red paneled Oze car I can bet was done this exact same way. Let me know if I can help any, or clarify! MatthyjLast edited by Matthyj; 05-28-2015 at 05:47 PM.
Why is mine so big and yours so small, Chrysler FirePower
-
06-05-2015 12:53 PM #67
I finished modifying the driver's side door to accept a simple door panel, a couple of days ago. It required all of the modifications done to the other door, except a little thicker build-up, all along the lower edge. It may not look pretty now, but it provides a smooth surface for a door panel to attach to.

I got the upholstery DVDs from Sid Shavers, yesterday and watched two of them today. There's lots of good information about building panels and headliners. I haven't looked at the DVD on seats yet. I still plan on using the upholstered racing seats that I have, but I'll watch the video, just for the knowledge.
The headliner video confirmed just what I thought. If you've got a bare fiberglass shell with no provisions for a headliner, you can spend a huge number of hours adding wood to the body, in order to provide attachment points for a headliner and a lot more, building headliner panels. I wouldn't want to pay someone $65 an hour to do the work.Last edited by daveS53; 06-05-2015 at 04:16 PM.
-
06-05-2015 03:00 PM #68
Dave, I'm glad you like the videos, sort of takes some of the mystery out of some of the work, even if you paid somebody to do it you now know whats going on at least. On my sedans top wood its put in with black RTV silicone on the roof, I read somewhere thats the ticket for expansion and so far its worked well and you couldn't yank the wood down as it bonded to the fiberglass inside well. My buddy had a great 'glass pickup the upholstery shop fiberglassed a 2' x 2' piece of plywood to the roof to mount the overhead console, naturally it buckled the roof, which was noticed the first sunny day when the car was done (at the NSRA Mid America show!)
It took me several months to completely do my cars interior (nights & weekends) and like I mentioned I was a professional woodworker for 21 years, but there is alot of woodwork involved. Gives a fella new respect for their trade, but after the wood was installed on my headliner it really was quite easy after watching the videos as I really worried about that part. Best of luck MatthyjWhy is mine so big and yours so small, Chrysler FirePower
-
06-05-2015 03:14 PM #69
All the little details shown in the Sid Shavers videos can be critical - like how to cut and fold the fabric around tight corners and cutting out small areas on a panel, so multiple layers of fabric seams have a place to hide.
The video also showed how a fiberglass inner door skin should be made - ready to install a door panel to it, without all sorts of protrusions to work around.
The heavy weight, but flexible (like cloth) clear plastic they used for pattern making is also interesting, but I've never seen where to get that stuff. Maybe something like this:
http://www.tapplastics.com/product/p...l_sheeting/248
After your mention of a fiberglass top buckling, it makes me think that I'll roll my car out into the sun, on the next hot day (if we ever get one). I added a lot of bondo glass to the A-pillars and area above the top of the door opening. I need to be sure that it's not going to create a future problem. It also makes me think strongly about using 3/4" or 1" upholstery foam over a large expanse of the headliner area, for a base to apply headliner material to. It would be easier and cheaper than using core-foam, coated with fiberglass resin, as a base.
One question I had, after watching the panel video, was why they used a spray can of adhesive to secure 1/4" foam to a wood panel base, rather than the same spray gun applied contact adhesive, used for gluing on the fabric. Others have mistakenly used a spray can product with insufficient heat resistance and suffered a complete failure.Last edited by daveS53; 06-05-2015 at 04:25 PM.
-
06-05-2015 06:09 PM #70
Dave, I have used ALOT of contact glue in my life, I use Wilsonart 950 & 951 which is a laminate contact glue (different colors) but also it is heat resistant (I checked) the difference between a DIY grade of glue & pro grade is extreme, way more solids & the use of neopreme is its mixture, if its says Dap brand or waterbased (the green) don't waste your time. Call some of your local cabinet shops and see if they will sell you a gallon of what they use if you want. I have pressure pot for big jobs but small jobs I shoot with a plain ol' cheap O HVLP gun with as big a tip as you can, the "hotter" the glue (no non flammable) the better the stick. Now the hotter the glue (solvent base only) it can melt some foam, but generally if you spray it very lightly in coats and let it build you will be fine as the solvents evaporate fast and most are gone when being sprayed lightly, thin with MEK and use for cleanup. Now even though I have guns to shoot contact on small items you can't beat spray cans of contact as there is no clean up with it, 3m's Super 77 is heat resistant but its hold is marginal compared to the professional use contact adhesives, but generally once the foam is there, it can't really move. In KC I use Liberty Hardwoods house brand of contact aeresol and its great, great hold similar to the 950 and it runs about $9-10 per can if I remember and heat resistant, they do ship also but have a limited web store so a call is needed. Alot of the convertible top contact is good also. Always let the sprayed contact dry before touching them together also. You are right there has been many failures with bad glue, not only in the upholstery trade as I am sure you know.
Keep all your wood structure small, I patterned wooden bows for the roof and then cut slits in the bow with a band saw almost all the way thru on edge that way it can move a little when secured with the RTV silicone, I looked for old pics but don't have any,these bows where then used to secure a large piece of 1/8" plywood to it just as Chavers did, it is able to bow from front to back but remains straight across the width of the car, this is a pretty good article to start with at Lookin for some examples of coupe headliner installation | The H.A.M.B. also
I used small wood pieced around all the windows to block it out, small pieces are ok because they can move individually. For the clear plastic look to Larry Dennis supply as they have it in many thicknesses, ebay also generally has it cheap. The thicker stuff is used for convertable tops but is pricey.
The bow on the pickup roof I talked about was a nightmare, custom paint job almost ruined, the interior shop managed to cut out the large plywood piece and then moved the rod into the sun, in & out for weeks to expand it and it turned out almost unnoticable but at first it looked ruined.Why is mine so big and yours so small, Chrysler FirePower
-
10-11-2018 06:48 PM #71
We need some more people to respond to this thread, wealth of info on here. I've bought some round foam at Home Depot in various diameters, 3/8, 5/16, that you can make cheap windlace with.


 8Likes

 LinkBack URL
 About LinkBacks
 Reply With Quote

I bought the 76 in August , but haven't been able to work on it. When I get a chance I'll post some pictures.
Corvette Resurrection?