


 815Likes
Thread: 1940 Ford Pickup


Results 1 to 15 of 1085
 LinkBack URL
 About LinkBacks
-
03-25-2013 07:39 PM #1
 CHR Member

- Join Date
- Mar 2013
- Location
- Seguin
- Car Year, Make, Model: 1940 Ford p/u 1937 Caddy Coupe
- Posts
- 782
1940 Ford Pickup
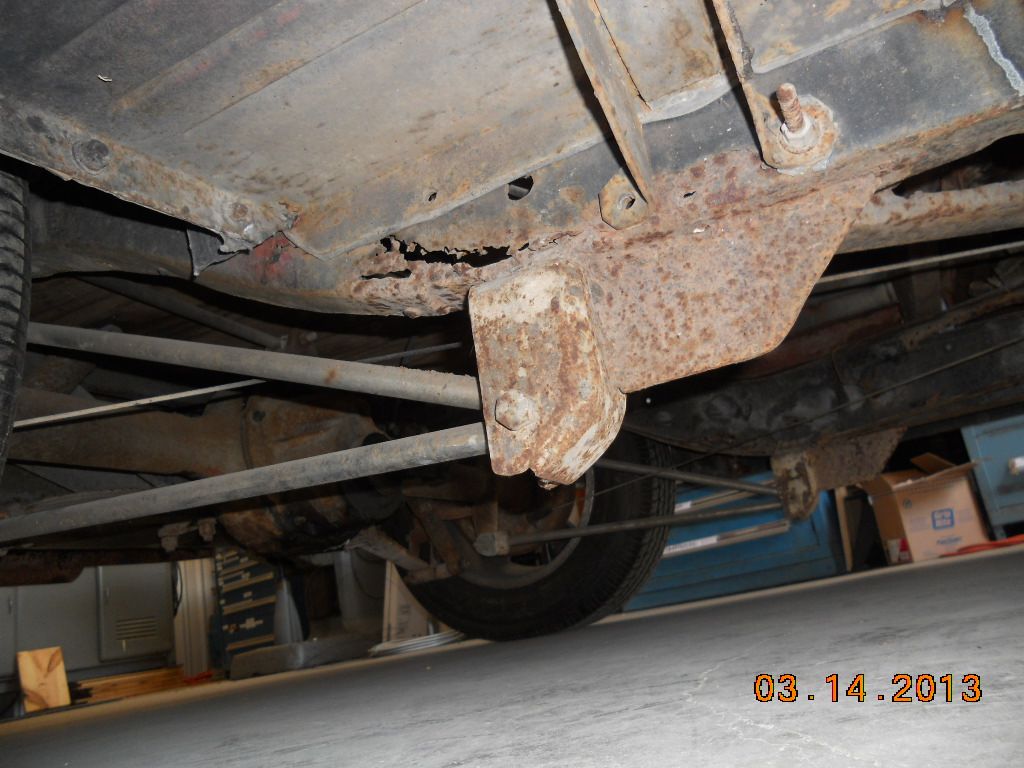
Here's the start of my new project. Picked this truck up a few weeks ago and now have it down to the frame to start the repairs. See anything I'm doing wrong let me know.


-
Advertising

- Google Adsense
- REGISTERED USERS DO NOT SEE THIS AD
-
03-26-2013 04:00 AM #2
CHR Member
- Join Date
- Jun 2008
- Location
- Leonardtown
- Car Year, Make, Model: Walking
- Posts
- 1,228
A common rust area for those trucks....Robert
-
03-26-2013 06:41 AM #3
CHR Member/Contributor
- Join Date
- Sep 2007
- Location
- Gardner, KS
- Car Year, Make, Model: '33 HiBoy Coupe, '32 HiBoy Roadster
- Posts
- 11,245
A cool old truck! Looking forward to seeing the transformation on this one. Welcome to CHR, too!!Roger
Enjoy the little things in life, and you may look back one day and realize that they were really the BIG things.
-
03-26-2013 01:00 PM #4
CHR Member
- Join Date
- Apr 2011
- Location
- Prairie City
- Car Year, Make, Model: 40 Ford Deluxe, 68 Corvette, 72&76 K30
- Posts
- 7,301
- Blog Entries
- 1
Nice old ford! Good work on the repairs! Are you going to plate it on the inside after the repair?Ryan
1940 Ford Deluxe Tudor 354 Hemi 46RH Electric Blue w/multi-color flames, Ford 9" Residing in multiple pieces
1968 Corvette Coupe 5.9 Cummins Drag Car 11.43@130mph No stall leaving the line with 1250 rpm's and poor 2.2 60'
1972 Chevy K30 Longhorn P-pumped 24v Compound Turbos 47RH Just another money pit
1971 Camaro RS 5.3 BTR Stage 3 cam, SuperT10
Tire Sizes
-
03-26-2013 07:25 PM #5
CHR Member
- Join Date
- Mar 2013
- Location
- Seguin
- Car Year, Make, Model: 1940 Ford p/u 1937 Caddy Coupe
- Posts
- 782
I'm thinking that's the right thing to do. At least on the lower lip. It will be a boxed frame when I'm done. Originally Posted by 40FordDeluxe

-
03-26-2013 07:29 PM #6
CHR Member
- Join Date
- Apr 2011
- Location
- Prairie City
- Car Year, Make, Model: 40 Ford Deluxe, 68 Corvette, 72&76 K30
- Posts
- 7,301
- Blog Entries
- 1
That will make for a real strong repair!Ryan
1940 Ford Deluxe Tudor 354 Hemi 46RH Electric Blue w/multi-color flames, Ford 9" Residing in multiple pieces
1968 Corvette Coupe 5.9 Cummins Drag Car 11.43@130mph No stall leaving the line with 1250 rpm's and poor 2.2 60'
1972 Chevy K30 Longhorn P-pumped 24v Compound Turbos 47RH Just another money pit
1971 Camaro RS 5.3 BTR Stage 3 cam, SuperT10
Tire Sizes
-
03-26-2013 07:36 PM #7
CHR Member
- Join Date
- Mar 2013
- Location
- Seguin
- Car Year, Make, Model: 1940 Ford p/u 1937 Caddy Coupe
- Posts
- 782
3-26-13
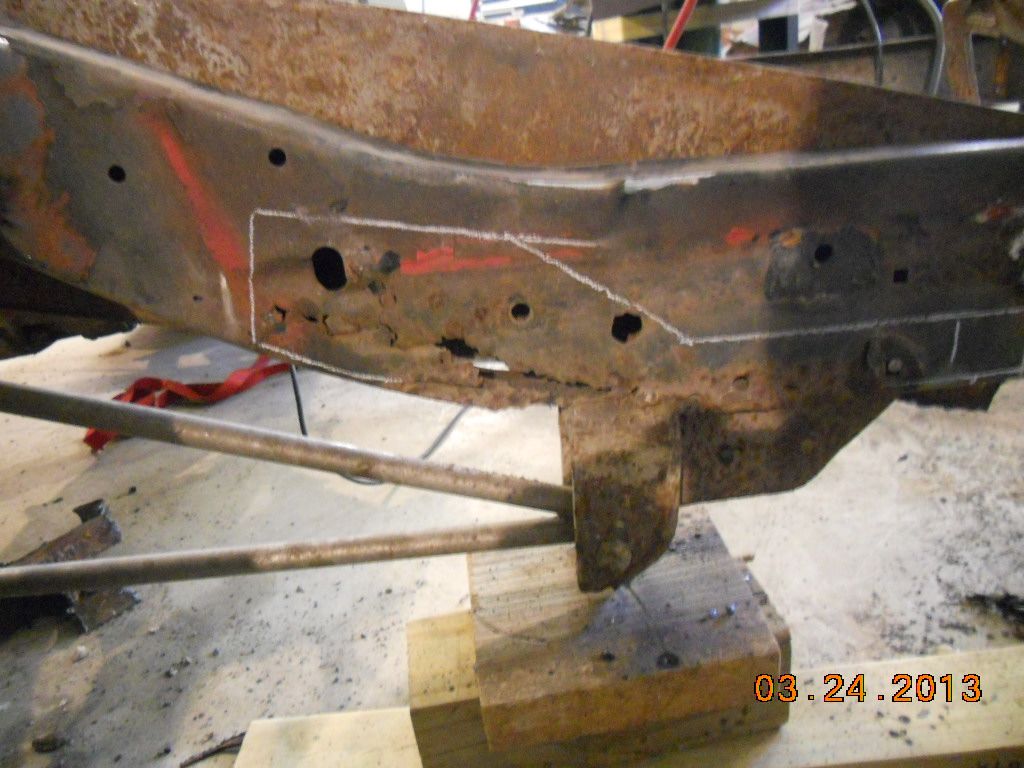
Here's todays work on the other side.
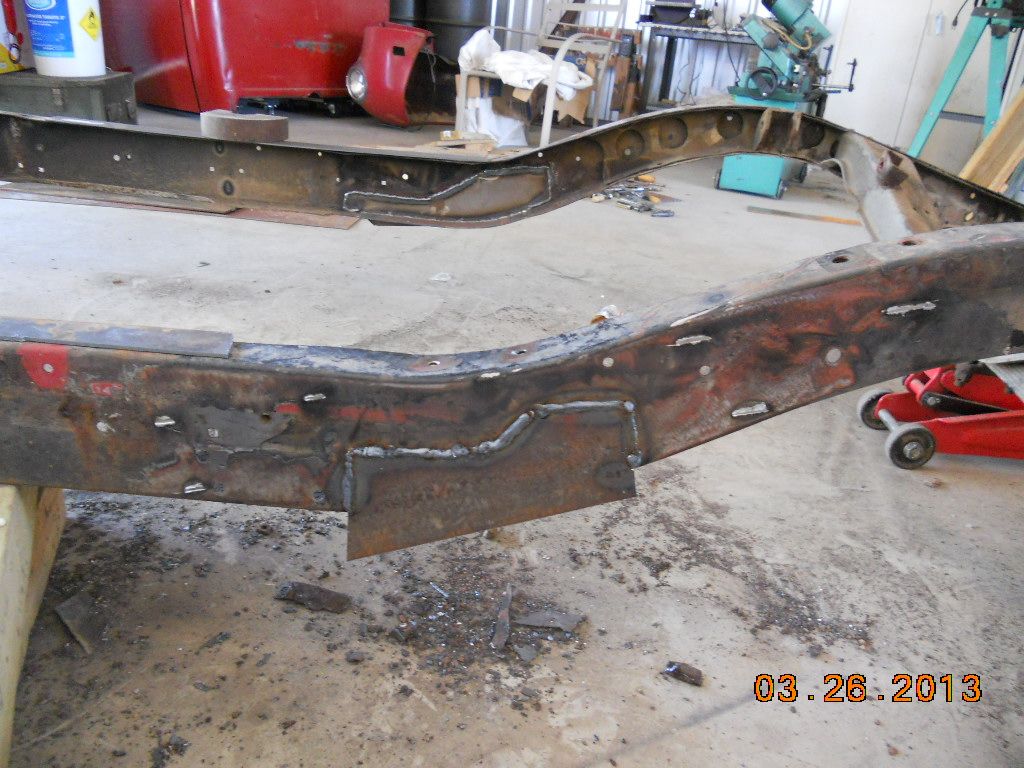
Just need some inside plating and this side is done. I think.

I'm going to box the frame completely, I'm thinking I should remove the rear crossmember, box the frame and then cut the cross member to fit weld it in or build a completely new one for the rear. I'm going to use a 2 leaf spring setup on the rear. What do you all think ?
-
03-26-2013 08:28 PM #8
CHR Member
- Join Date
- Oct 2008
- Location
- Rio Rancho
- Car Year, Make, Model: 1940 Ford Sedan
- Posts
- 537
Wow! what part of the country did that come from to rust the frame like that? Lots of work.
Did you set in the cab and see if you fit? I bought one and swapped a motor in, waiting on paint, and was starting to work the interior when I found out with the seat against the rear wall, there was no way I was going to fit in the car. Hunched over the steering wheel was the only position. Sold the truck the next week.
55-57 Thunderbirds are also high on my list of wants but in those, your legs stick almost straight out, again no fit for me. I am not huge, just 6 feet tall.
Anyway, get behind the wheel and check it out by doing a little day dreaming crusing.
-
03-27-2013 06:47 AM #9
CHR Member
- Join Date
- Apr 2001
- Location
- Salado
- Car Year, Make, Model: 32, 40 Fords,
- Posts
- 10,898
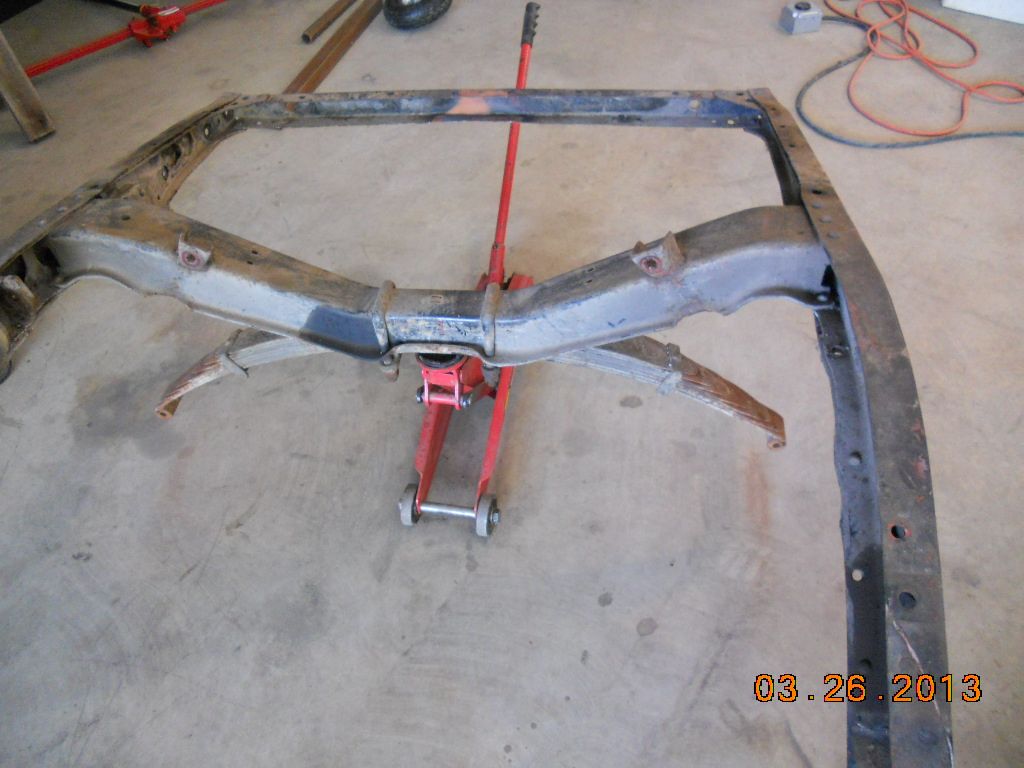
As Robert mentioned that's a real common area for the tin worm. It gets that way because of the way the original X member and it's rear extensions fit inside the outer rails and form a pocket of sorts in that area that holds debris then moisture.
Which brings some questions to mind on what's in the pictures but not in your commentary. It appears the X member was taken out, presumably to make room for the repair shown. Likewise, the corresponding portion of the X member that was inside of that rail rot suffered similarly? I'm not sure you need an inner plate or boxing if you intend to replicate/restore the original design which effectively acted as a doubler for the frame rail. I don't see where any tie bars were welded to the rails to maintain geometry when the X member was removed. I would hope you have some way of jigging the rails to return them to their proper position for frame integrity before final welding. The more welding you do without holding them rigidly in their proper orientation, the more twisted/bulged/disformed they will become. Not trying to rip on what you're doing, just throwing out questions/thoughts. You might want to rethink those short ladder bars too if you haven't already. The combination of short travel, and straight down the side rails with the spring being a center mount is going to be real bindy. Look at some of the commercially available rod frames with a transverse rear spring and notice how they typically have long bars or wishbones that pivot more toward the forward center of the chassis which gives the outer axle ends more ease of movement. Drag cars can get away with that short style, side mounted ladder bar because they're on a relatively flat road surface and are intended to function best only in a straight line. Road driving is another kettle of fish. The front wheels look to be too far back in that first picture, but then they're turned a might so it could just be the angle of the pic.
The cab size can start getting tight for a driver approaching 6 foot or more, though we're not all proportioned the same as far as leg length even when we're the same overall height. If that is an issue one trick is to make the seat back cushion thinner. With the variety of foam densities available today, a thin back rest that is still supportive is very doable. It's easy to gain a couple inches, perhaps more depending on you comfort needs, that way. And, if you're going to change up the steering column for a number of reasons you can tailor that angle/position for improvement as well.Last edited by Bob Parmenter; 03-27-2013 at 06:55 AM.
Your Uncle Bob, Senior Geezer Curmudgeon
It's much easier to promise someone a "free" ride on the wagon than to urge them to pull it.
Luck occurs when preparation and opportunity converge.
-
03-27-2013 08:35 AM #10
CHR Member
- Join Date
- May 2005
- Location
- tucson
- Posts
- 3,043
[QUOTE=Scooting;490260]Did you set in the cab and see if you fit? I bought one and swapped a motor in, waiting on paint, and was starting to work the interior when I found out with the seat against the rear wall, there was no way I was going to fit in the car. Hunched over the steering wheel was the only position. Sold the truck the next week. QUOTE]
I am helping a paint and body customer with a '40 pickup build. He found a solution for that problem. He had the chance to buy a project that came with an extra cab! They cut the two cabs and welded them together... which produced a "stretch cab". :-)~ Of course they shortened the bed to make space for it.
-
03-27-2013 12:16 PM #11
CHR Member
- Join Date
- Oct 2008
- Location
- Rio Rancho
- Car Year, Make, Model: 1940 Ford Sedan
- Posts
- 537
Pop a photo of the stretch when you can. Wish I would have done that. Then I could of had a pickup and sedan too.
-
03-27-2013 12:40 PM #12
CHR Member
- Join Date
- May 2005
- Location
- tucson
- Posts
- 3,043
He only added a few inches... though an "extra cab" concept might be interesting. Or a longer version you could even add a quarter window similar to the coupes.
It may be a few weeks, but I'll post it.Last edited by HOTRODPAINT; 03-30-2013 at 01:16 PM.
-
03-27-2013 04:58 PM #13
CHR Member
- Join Date
- Mar 2013
- Location
- Seguin
- Car Year, Make, Model: 1940 Ford p/u 1937 Caddy Coupe
- Posts
- 782
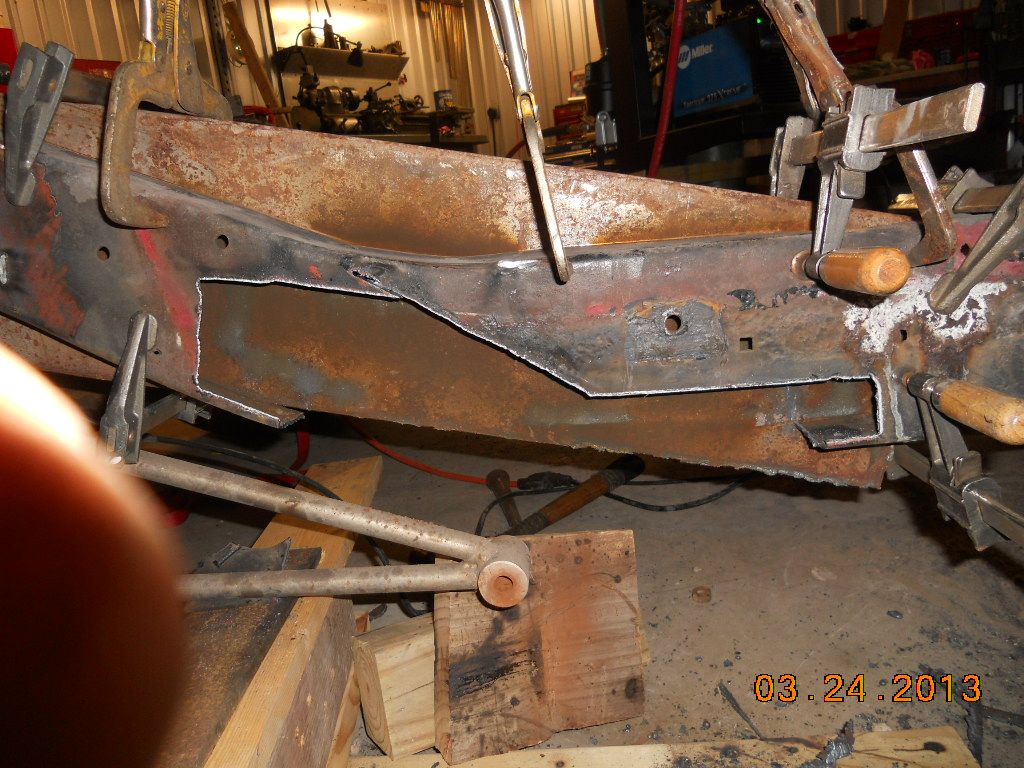
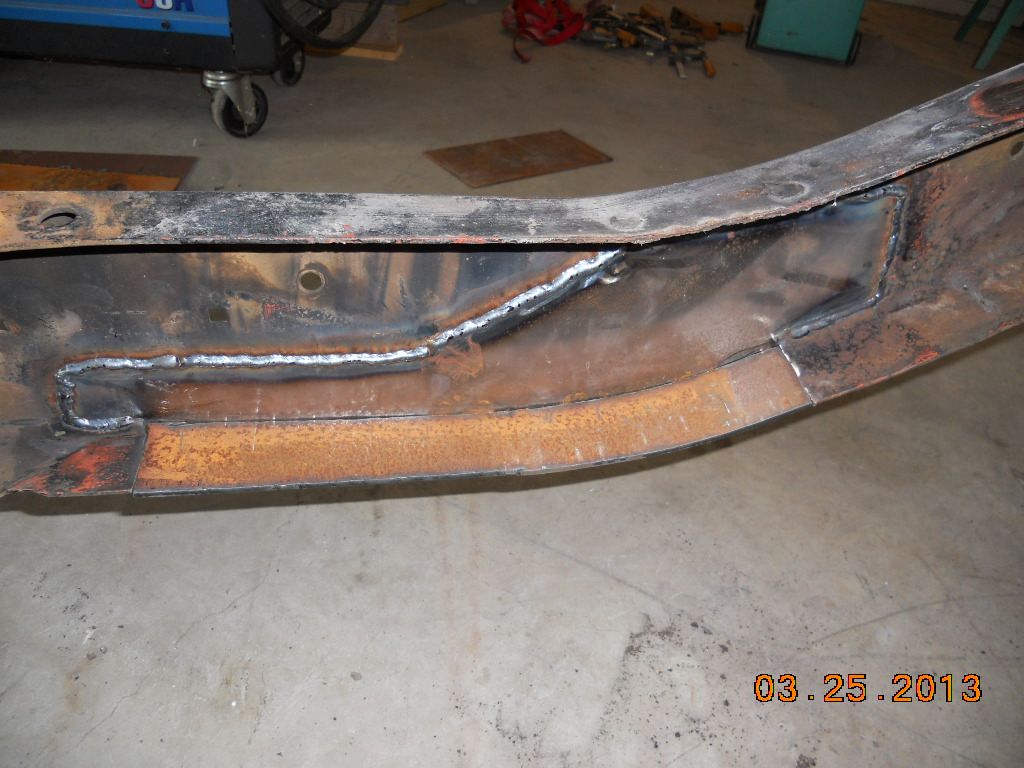
last 2 days work
Here's some pic's from the last 2 days of tinkering with the 40.
Still have to plate the insides.

Finished repairs just have to plate the inside and this side is done.
My intentions are to remove the cross member pictured and box the frame all the way to the end. I will be using a 2 leaf spring set up vice the single across the back. I'll still need a crossmember so after boxing the frame I'll either fit the original member to the boxed frame or build a new one from scratch. Gotta put shocks somewhere.
Didn't feel like welding much today so I started making the wood blocks that support the cab. Took some big oak pallets and cut them up and after you run them through a plainer there as good as any oak at the store.
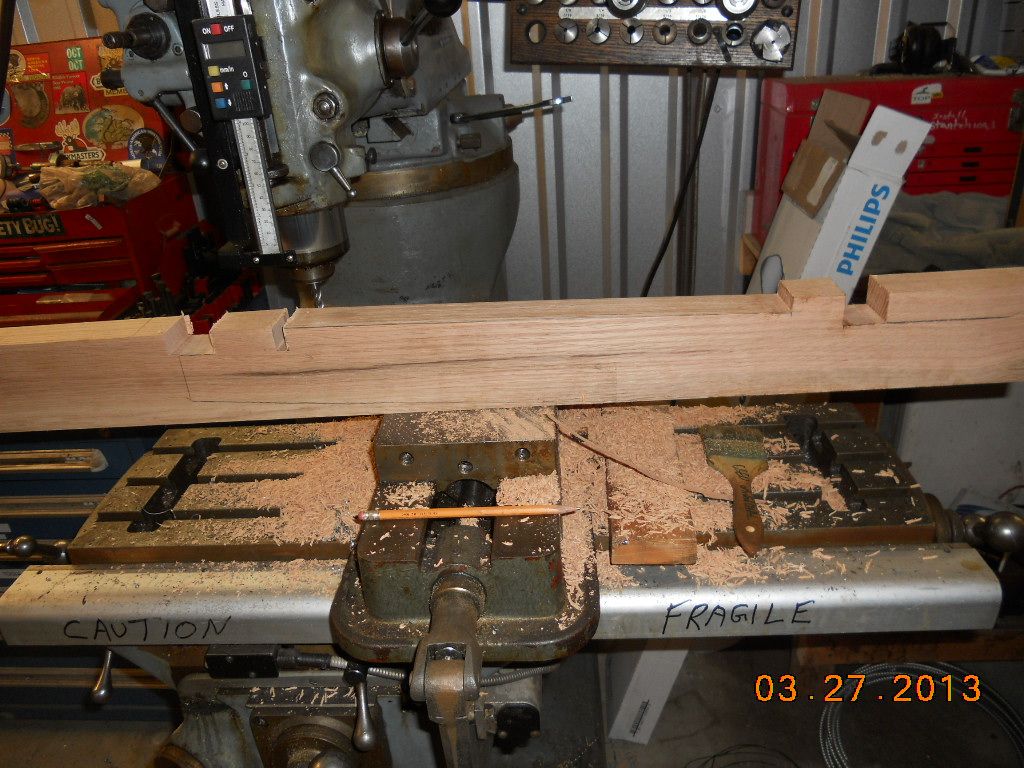 The reason I'm messing with the blocks/shims is that I want to weld nuts inside the frame to bolt the cab down, gotta do it before I box the frame.
-
03-27-2013 05:12 PM #14
CHR Member
- Join Date
- Mar 2013
- Location
- Seguin
- Car Year, Make, Model: 1940 Ford p/u 1937 Caddy Coupe
- Posts
- 782
Bob Thanks for your input. Originally Posted by Bob Parmenter
The X member was totally gone, rusted and cut up by last owner. Planning on a new version of the x member, round tube 1.5 inch type. The short ladder bars are gone, going to replace the rear suspension with 2 leaf springs. I can only hope that the front end /wheels are in the right place because the Mustang front end is welded in place. As far as fitting in the cab, well I'm 6' 2" and just have to put the seat back all the way !
-
03-28-2013 04:20 PM #15
CHR Member
- Join Date
- Mar 2013
- Location
- Seguin
- Car Year, Make, Model: 1940 Ford p/u 1937 Caddy Coupe
- Posts
- 782
Been trying to post for the last couple days and nothing has been showing up except my reply to Bob. So here's another try.
Wood spacer for the bottom of cab .
 Reply With Quote

Posting Permissions
- You may not post new threads
- You may not post replies
- You may not post attachments
- You may not edit your posts

i've enjoyed the years here . made a lot of friends. most who have left. i see no reason to continue with this so hope to see you somewhere else. i dont think this site will ever be back. it's lived...
Dead!