


 11Likes
Thread: My 26T Coupe build thread


Results 46 to 60 of 426
 LinkBack URL
 About LinkBacks
-
06-10-2010 03:28 PM #46
 CHR Member

- Join Date
- Jan 2006
- Location
- fort myers
- Car Year, Make, Model: '27 ford/'39 dodge/ '23 t
- Posts
- 11,033
You've heard of "Computer wrist", I bet you now have "Drill press wrist". Funny how a bunch of holes in something make it look so cool.......I like it.
Don
-
Advertising

- Google Adsense
- REGISTERED USERS DO NOT SEE THIS AD
-
06-10-2010 03:39 PM #47
CHR Member
- Join Date
- Feb 2010
- Location
- Pukekohe, New Zealand
- Car Year, Make, Model: '23 Ford T Roadster
- Posts
- 2,199
Now I believe that you enjoy polishing things so why not chrome those backing plates. I had my Mk3 Zephyer brake calipers chromed on my bucket plus almost every other part including the leaf springs on the front end and man ,do I curse myself at clean up time after each run out..Oh the joys of hot rodding,I wouldn't want it anyway else..
-
06-10-2010 03:48 PM #48
CHR Member
- Join Date
- May 2003
- Location
- Zephyrhills, Florida, USA
- Car Year, Make, Model: '32 Henway
- Posts
- 12,423
If you have them chromed, have them baked afterward to remove free hydrogen atoms. Read up on hydrogen embrittlement. These are brakes you're dealing with.
http://www.finishing.com/1600-1799/1747.shtmlPLANET EARTH, INSANE ASYLUM FOR THE UNIVERSE.
-
06-10-2010 04:14 PM #49
CHR Member
- Join Date
- Oct 2007
- Location
- Petaluma
- Car Year, Make, Model: 48 Ford F1
- Posts
- 9,795
Good info to know Richard!"  "No matter where you go, there you are!" Steve.
-
06-11-2010 02:13 AM #50
CHR Member
- Join Date
- Apr 2009
- Location
- watford
- Car Year, Make, Model: 26T Coupe, 32 Roadster, 41 Willys Coupe
- Posts
- 2,363
Yep thanks, I know all about hydrogen embrittlement.
 Originally Posted by techinspector1

Its aweful lonesome in the saddle since my horse died.
-
06-11-2010 02:38 AM #51
CHR Member
- Join Date
- Apr 2009
- Location
- watford
- Car Year, Make, Model: 26T Coupe, 32 Roadster, 41 Willys Coupe
- Posts
- 2,363
Surprisingly enough Don it didn't take long to drill really, I would guess at about an hour, marking out however took a little longer
I've thought overnight and reckon i will flake them as the paint will add a little contrast to all the shiny bits and also the polished rivets will be a highlight. thanks for the positives.
Originally Posted by Itoldyouso
Its aweful lonesome in the saddle since my horse died.
-
06-12-2010 03:05 AM #52
CHR Member
- Join Date
- Apr 2009
- Location
- watford
- Car Year, Make, Model: 26T Coupe, 32 Roadster, 41 Willys Coupe
- Posts
- 2,363
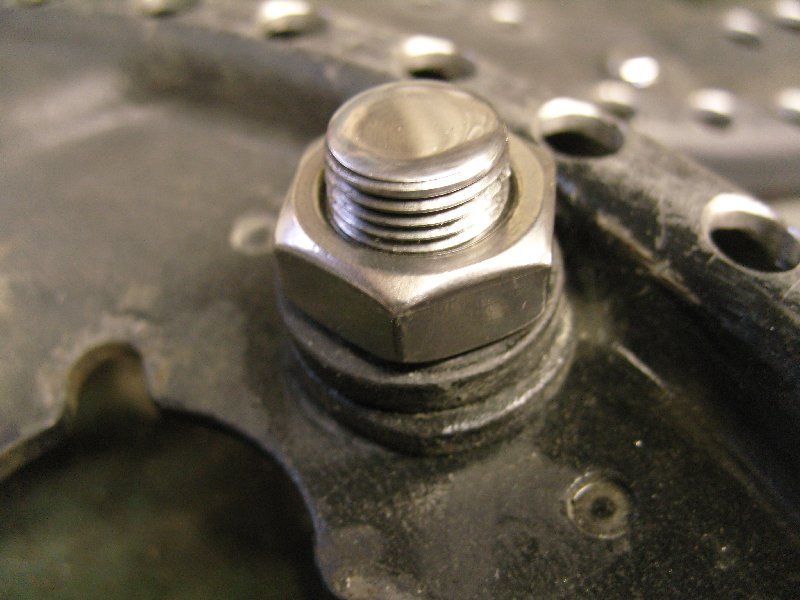
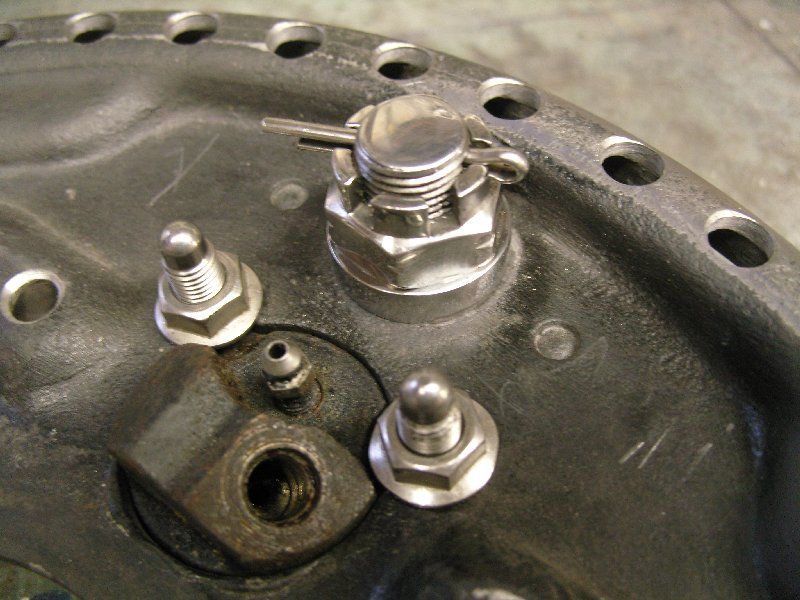
I used a 5/8" UNF stainless jam nut to hold the pivot in place but wasn't completely happy with it then i remembered i had some 5/8" stainless castle nuts, i think it looks much better now. I'm using them all over as i think they look old car if you know what i mean.
Its aweful lonesome in the saddle since my horse died.
-
06-12-2010 05:42 AM #53
CHR Member
- Join Date
- Jan 2006
- Location
- fort myers
- Car Year, Make, Model: '27 ford/'39 dodge/ '23 t
- Posts
- 11,033
I'm like you Steve, I like the contrasts between painted and chromed parts. I have seen cars with too much chrome, if that makes sense. I much prefer seeing painted parts with touches of chrome or stainless. I saw a 32 coupe on another forum recently where the guy must have had a job as a night watchman in a chrome factory.........everything was chromed, and it was just a big blur to look at, no definition.
Don
-
06-12-2010 02:38 PM #54
CHR Member
- Join Date
- Apr 2009
- Location
- watford
- Car Year, Make, Model: 26T Coupe, 32 Roadster, 41 Willys Coupe
- Posts
- 2,363
I agree Don, I have virtually all my frontend in chrome or stainless so need a little colour otherwise you won't see the wood for the tree's
Originally Posted by Itoldyouso
Its aweful lonesome in the saddle since my horse died.
-
06-12-2010 04:44 PM #55
CHR Member
- Join Date
- Feb 2010
- Location
- Pukekohe, New Zealand
- Car Year, Make, Model: '23 Ford T Roadster
- Posts
- 2,199
Come on be honest, you just don't want that bright English sun glare reflecting of those backing plates . Now ,I have been doing some reseach and as you may know, I have,or thought I had , decided on the colour of my bucket but now I would like to know,what colour is that Bucket that you build? You know, it has a chopped '32 griile,caddy aircleaner,sits prefectly on the road with those chrome steelies and white walls and is painted Itoldyouso (Don) pink. I love the colour but how would it look with the heavy flake as after seeing your '32 ,thats the finish I want..
-
06-13-2010 03:08 AM #56
CHR Member
- Join Date
- Apr 2009
- Location
- watford
- Car Year, Make, Model: 26T Coupe, 32 Roadster, 41 Willys Coupe
- Posts
- 2,363
It was a special mix i did at our local paint factors Whip, i just mixed it up till it looked like a mettalic bubblegum.
I have some Pink flake which is absolutely awesome, Sue had me repaint our kitchen doors as she wanted something unusual so i did them in gloss black with pink flake insert panels. Its an amazing colour, If your serious about flake i can send you some samples.
i was originally going to use it on my 26T but thought i would go different with the copper flake.

Originally Posted by Whiplash23T
Its aweful lonesome in the saddle since my horse died.
-
07-07-2010 02:56 PM #57
CHR Member
- Join Date
- Apr 2009
- Location
- watford
- Car Year, Make, Model: 26T Coupe, 32 Roadster, 41 Willys Coupe
- Posts
- 2,363
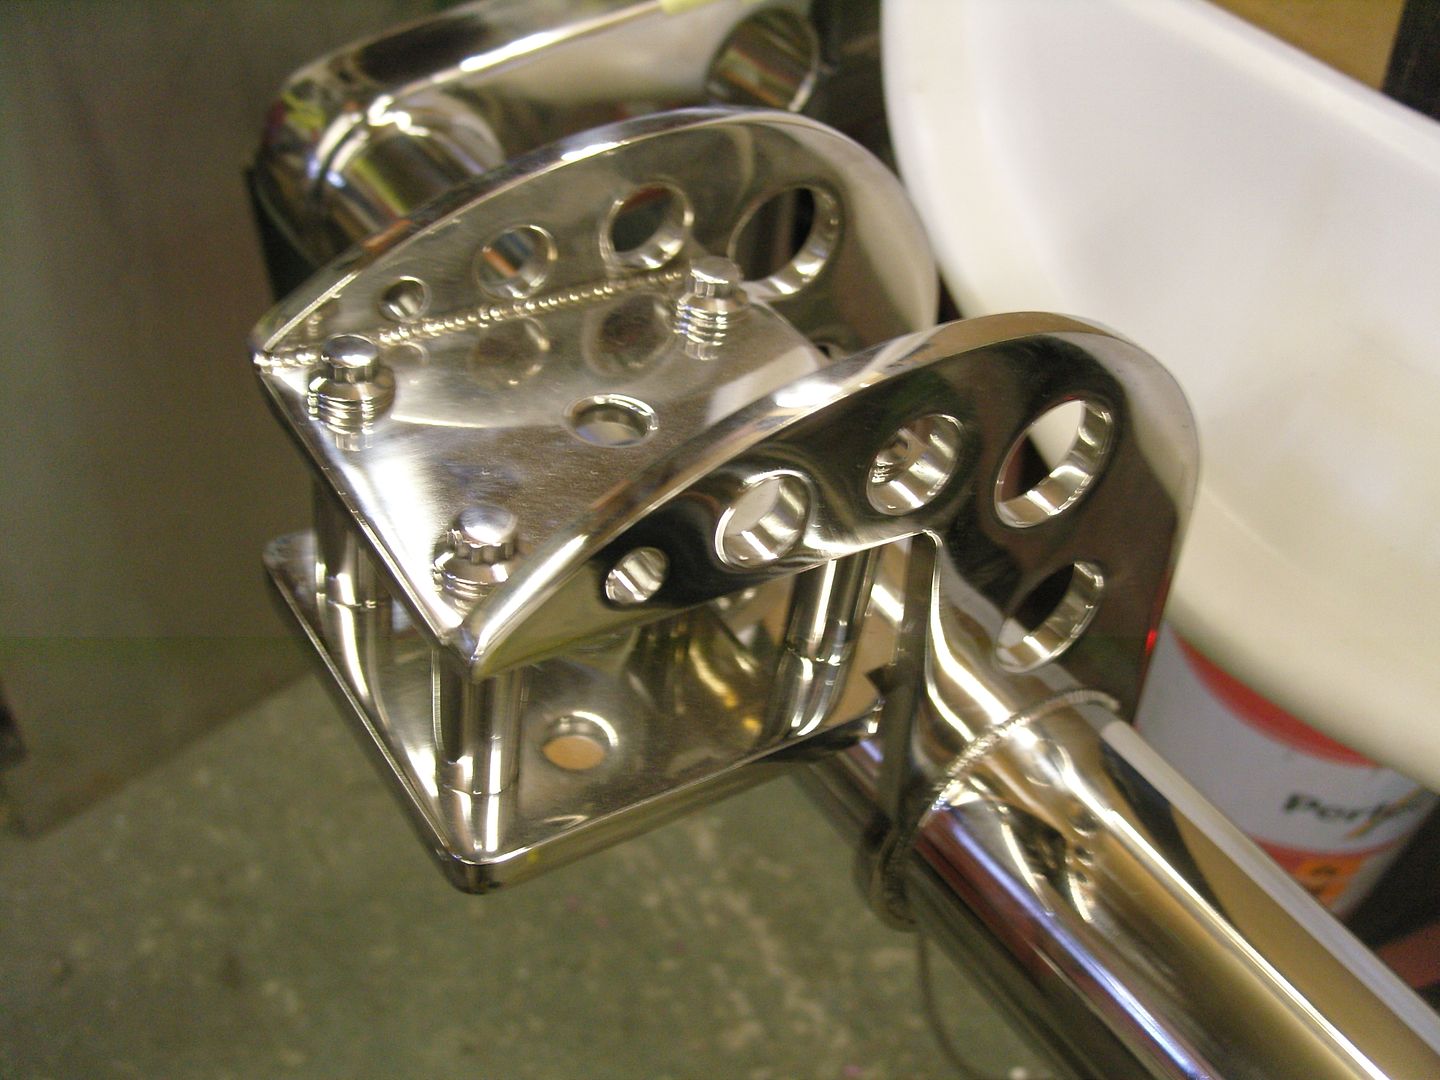
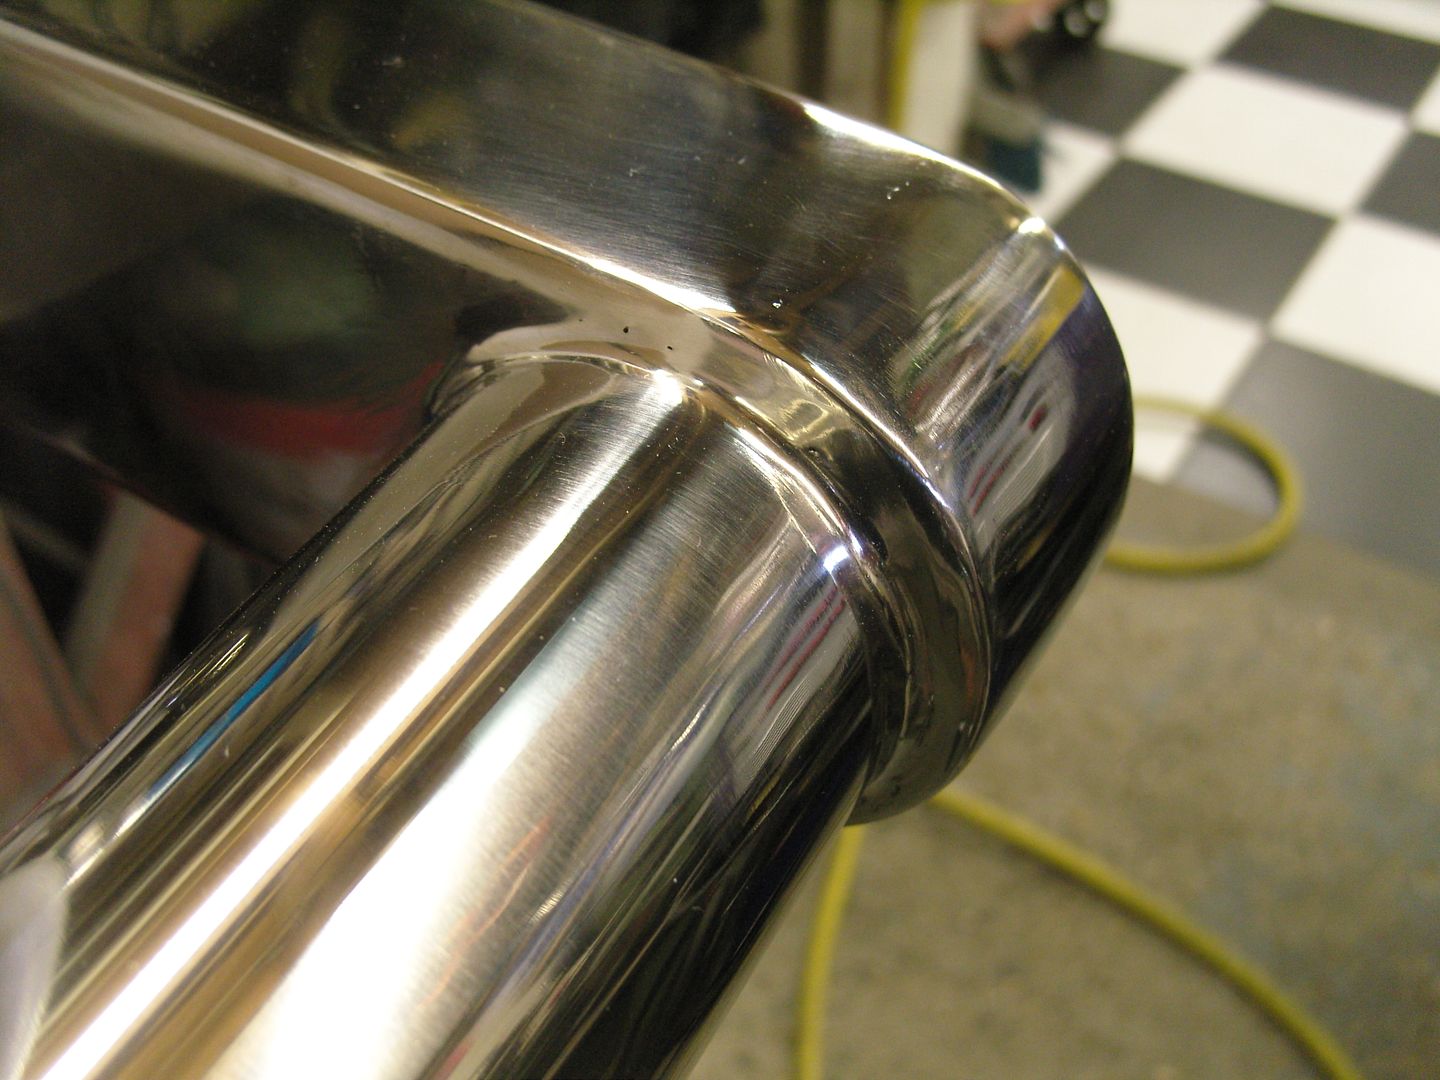
Well not much progress but its getting there, here is the suicide mount all finished and polished.
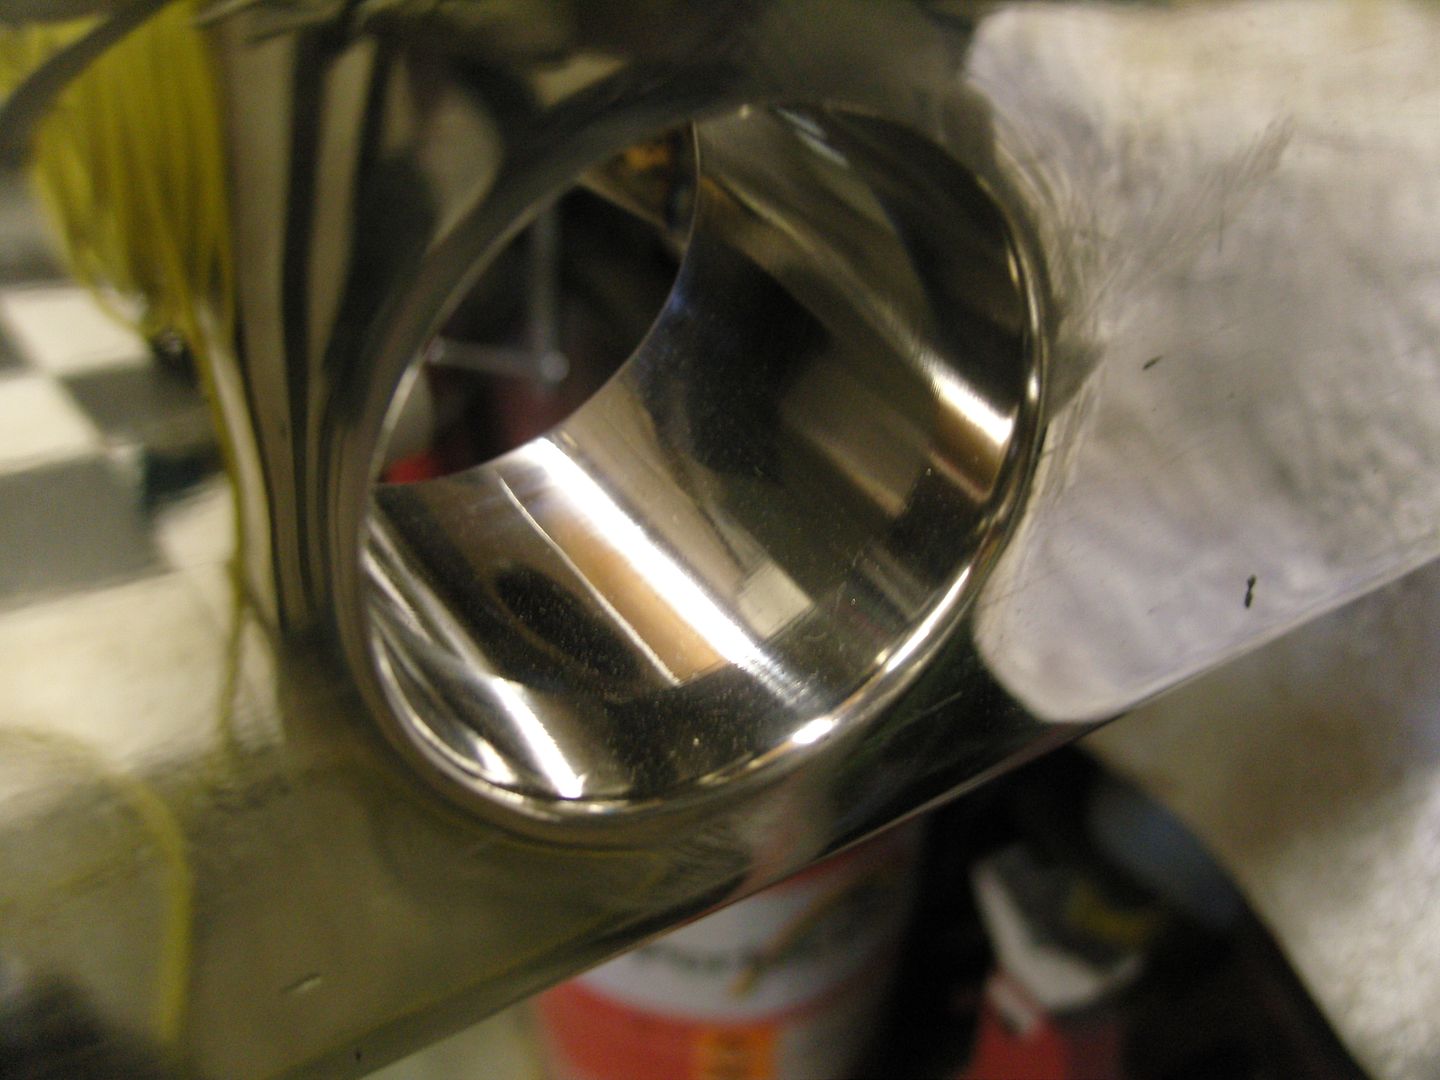
Perch is welded in at 10 degrees, 7 is the castor angle and the other 3 degrees is the cars rake.
I got one side of this joint perfect but *floop*ed the other up so decided to polish out the weld completely.
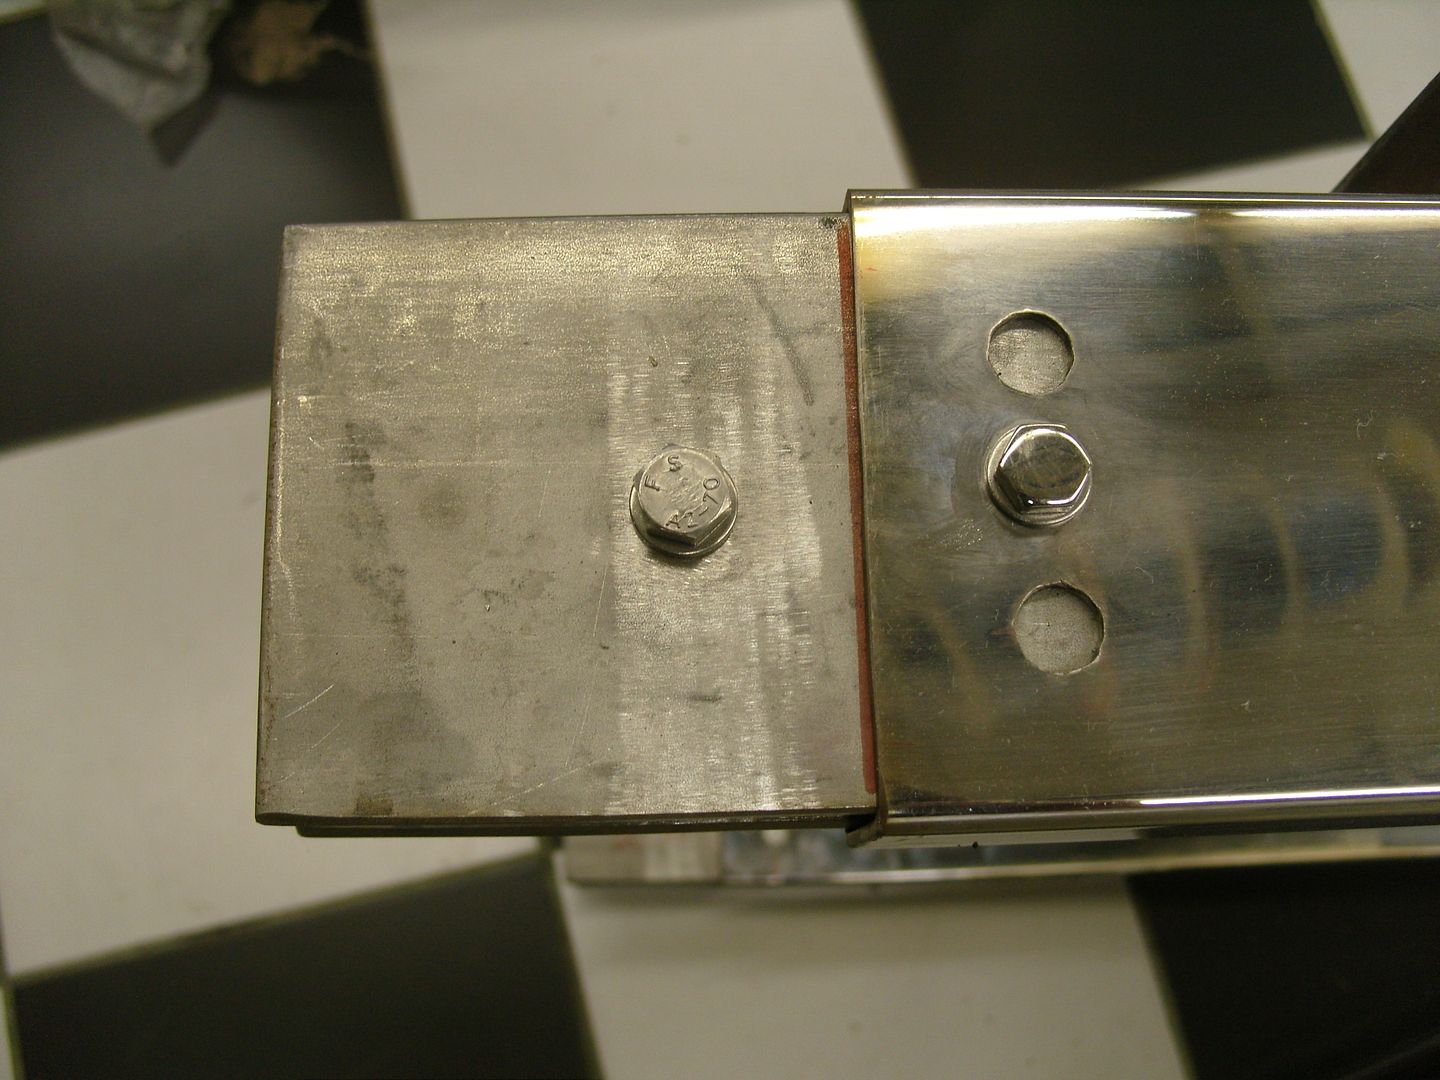
Here's some polished holes just for Brizey
The joining of the 2 halves is imminent so the joining plates were cut, they have been sized to snugly slide inside the box section and are secured by a bolt to pull everything together nicely and inline (this will be done on the jig) the bolt goes in the centre hole and the other 2 holes are for rosette welds then the bolts are removed and again rosette welded, then the joint is welded and polished out.
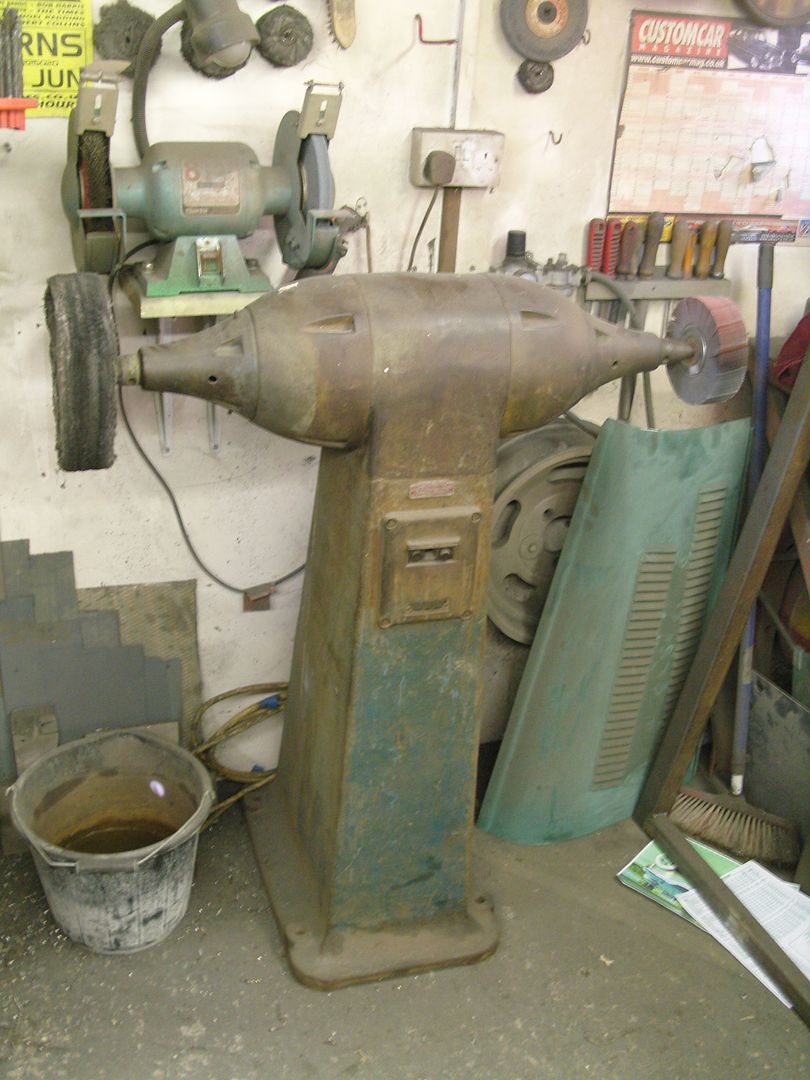
Polishing has vastly improved timewise due to my latest buy Its a 4HP 3 phase Pro polisher 2800 rpm that i'm running off a single phase to 3 phase digital convertor, its an amazing bit of kit that i reckon saves me 50% polishing time as its impossible to slow down and you can really lean on stuff.
My rad supplier in the states made me up a chopped radiator in ally, Looks like the grille shell needs a bit out of it
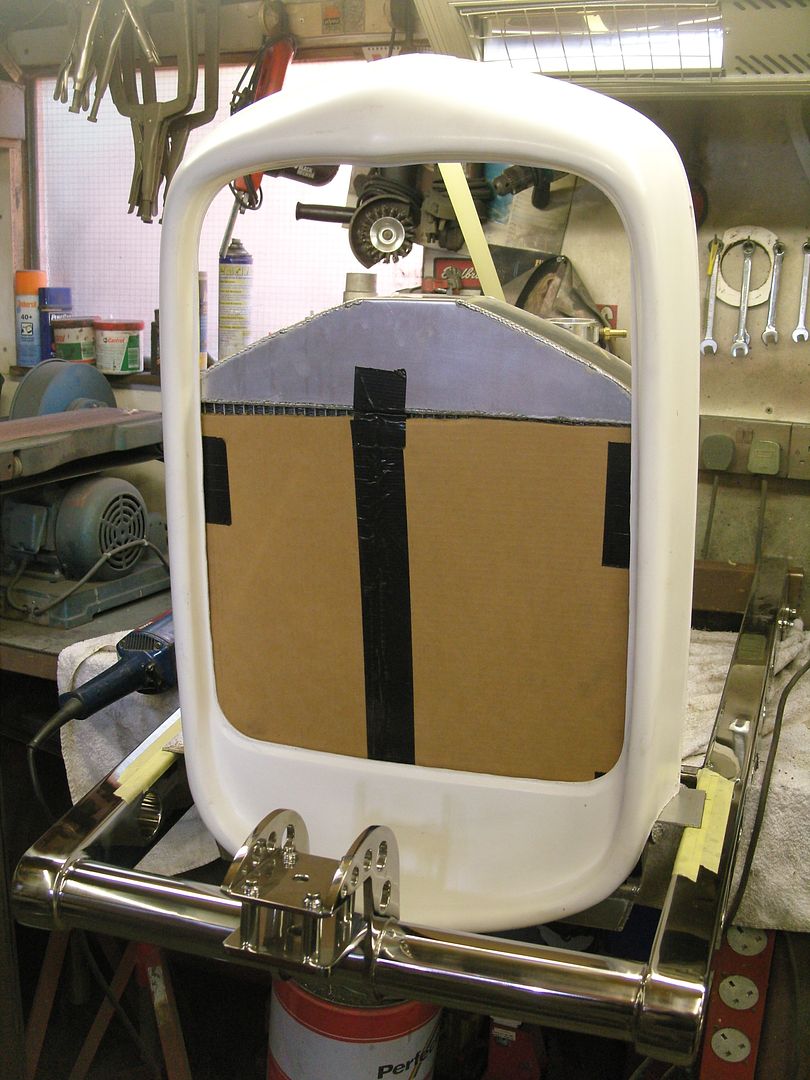
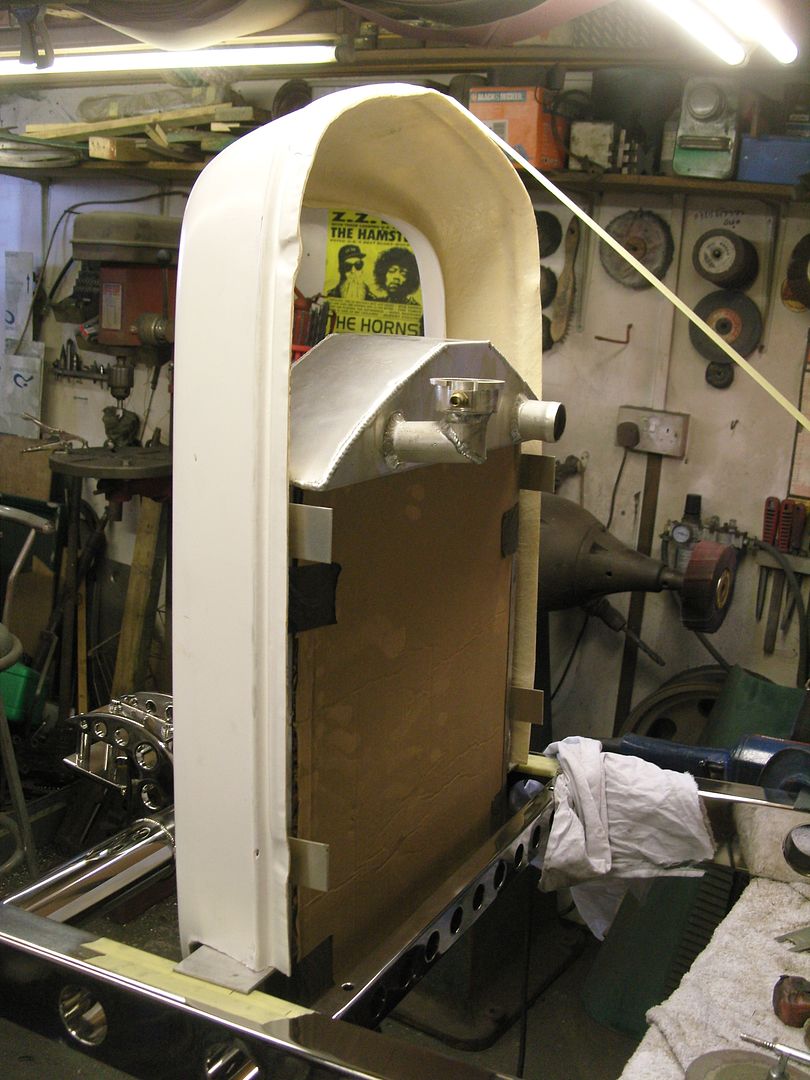
I will be losing the brackets from the sides as the rad will be mounted on some custom stainless brackets with the original Fords springs and bolts, in stainless of course
I will be welding some 10mm ally with tapped holes to the rad sides to take 2 bolts to hold the rad brackets.
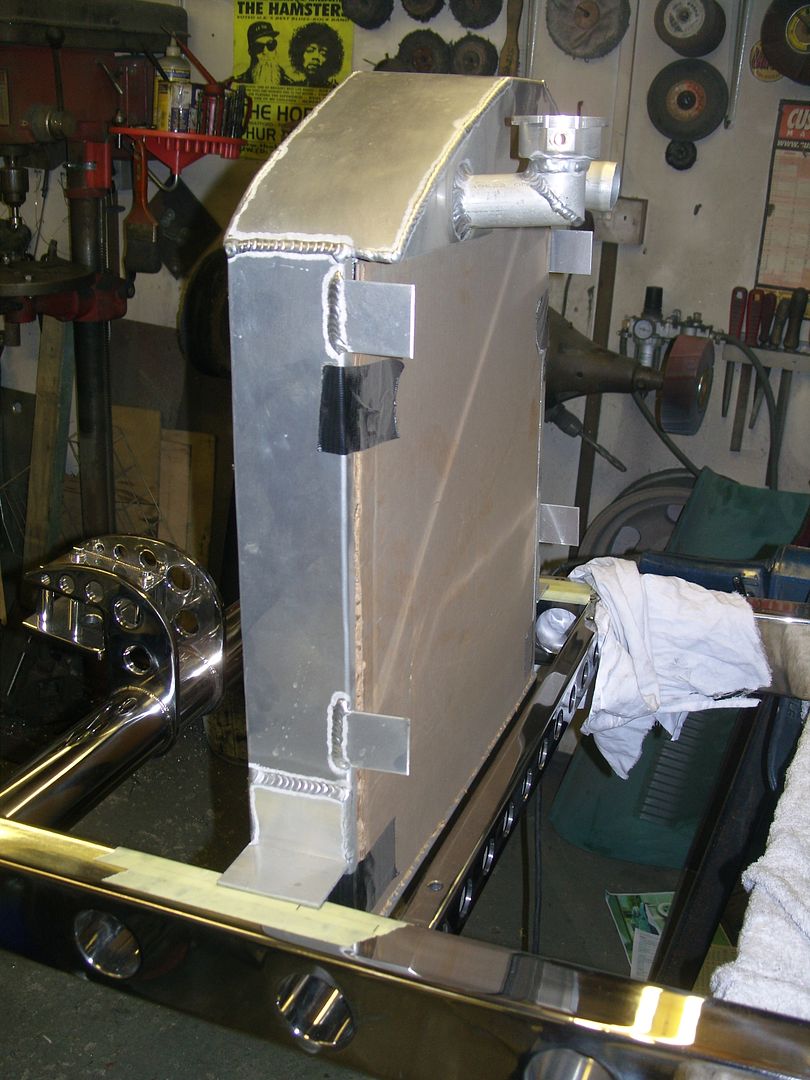
Rad brackets (yet to be polished)

-Its aweful lonesome in the saddle since my horse died.
-
07-07-2010 06:43 PM #58
CHR Member
- Join Date
- Jan 2006
- Location
- fort myers
- Car Year, Make, Model: '27 ford/'39 dodge/ '23 t
- Posts
- 11,033
Steve, that is one SERIOUS polisher. I could really hurt myself on that one. Bet it really has sped up your work time a lot.
Rest of the stuff you are doing is just as nice as the first batch........simply stunning.
Don
-
07-07-2010 09:40 PM #59
CHR Member
- Join Date
- Feb 2008
- Location
- Caldwell
- Car Year, Make, Model: 34 ford 3 window/461 pontiac
- Posts
- 918
Jeemaneeze 32,
After looking at this build project I'm going to delete my build project and sell it for scrap. What a hell of a build.
Jack.
-
07-08-2010 02:00 AM #60
CHR Member
- Join Date
- Apr 2009
- Location
- watford
- Car Year, Make, Model: 26T Coupe, 32 Roadster, 41 Willys Coupe
- Posts
- 2,363
Sure is Don, it warrents a bit of respect !!!
Cheers for the positives.
Originally Posted by Itoldyouso
Its aweful lonesome in the saddle since my horse died.
 Reply With Quote

Posting Permissions
- You may not post new threads
- You may not post replies
- You may not post attachments
- You may not edit your posts

time for a new forum to visit. when they sold sr.com it went down hill fast. no more forum just a cheap site selling junkie cars. the canadians killed hr.com. mods are real pricks. as with any site...
Where is everybody?