


 11Likes
Thread: My 26T Coupe build thread


Results 136 to 150 of 426
 LinkBack URL
 About LinkBacks
-
09-06-2010 01:41 AM #136
 CHR Member

- Join Date
- Apr 2009
- Location
- watford
- Car Year, Make, Model: 26T Coupe, 32 Roadster, 41 Willys Coupe
- Posts
- 2,363
Pat your not alone there mate
I too have had bits ripped out of my hands by the buffer, The worst things are stainless washers, I put them on a taper to polish but sometimes they fly off and usually never get seen again !!! There must be a pile of them in my workshop somewhere
 Originally Posted by pat mccarthy

Its aweful lonesome in the saddle since my horse died.
-
Advertising

- Google Adsense
- REGISTERED USERS DO NOT SEE THIS AD
-
09-06-2010 01:59 AM #137
CHR Member/Contributor
- Join Date
- Apr 2005
- Location
- bay city
- Posts
- 10,546
for buffing washer i had a some round stock alum that i tap the end to a head size in a flat head allen bolt that would hold them on the stick then buff them one at a time or you could drill and tap some 3/4 by3/4[] stock then hold more then one washer with flat heads i used a bench grinder with a buffing wheel to buff the small stuffLast edited by pat mccarthy; 09-06-2010 at 02:01 AM.
Irish Diplomacy ..the ability to tell someone to go to Hell ,,So that they will look forward to to the trip
-
09-06-2010 12:04 PM #138
CHR Member
- Join Date
- Apr 2009
- Location
- watford
- Car Year, Make, Model: 26T Coupe, 32 Roadster, 41 Willys Coupe
- Posts
- 2,363
Pat i meant polishing the face of the washer, the edge is easy
I tried an old polishing pigtail today to do the washers and it worked really well, dunno why i didn't think of it before
Been polishing 3/8" castle nuts today, what a pain they are
Originally Posted by pat mccarthy
Its aweful lonesome in the saddle since my horse died.
-
09-06-2010 02:16 PM #139
CHR Member/Contributor
- Join Date
- Apr 2005
- Location
- bay city
- Posts
- 10,546
well i did not mean the edge Originally Posted by roadster32
 i bolted the one side of the washer down with a flat head then i buff the washer face . i did all my button heads and bolts this way bolt them in a stick .them button heads are EZ to buff . the STICK your calling a pig tail
  .i make up my .AN washer i buy the bigger washer with big O.D then if i need a good fitting 3/8 i buy a 5/16 id washer .i can buy them cheap stack up 15 to 20 on a long bolt and lock them all down with a nut the drive the 3 jaw off the nut and the bolt is a center drill in one end for the live center .then face them all down on the lathe sure beats cutting them out of flat plate and a hole saw that s abit of a pain i needed a off size and made up some like that too
Last edited by pat mccarthy; 09-06-2010 at 02:30 PM.
Irish Diplomacy ..the ability to tell someone to go to Hell ,,So that they will look forward to to the trip
-
09-07-2010 12:16 AM #140
CHR Member
- Join Date
- Apr 2009
- Location
- watford
- Car Year, Make, Model: 26T Coupe, 32 Roadster, 41 Willys Coupe
- Posts
- 2,363
Gotcha, them button heads are easy to polish, I'm using hex heads as i think they look more old car, I especially like the castle nuts but they are a pain
Originally Posted by pat mccarthy
Its aweful lonesome in the saddle since my horse died.
-
09-07-2010 05:26 AM #141
CHR Member/Contributor
- Join Date
- Apr 2005
- Location
- bay city
- Posts
- 10,546
yep hex look good on some things i used the buttons on my inner tins in on my old chevy i bet castle nuts are fun to buff the key slots out on the slots.when did my stuff i sanded then first with a da sander with fine paper 320 and up.have you tried that small sanding cord it only go,s as fine as 180 a good file would works as well .we use to prep the GM concept rims we came up with many ways to get to the hard spots the only bad thing was alot of it was by hand .were i could not buff a spots i like the MX mounted points run them at a lower speed on a die grinderLast edited by pat mccarthy; 09-07-2010 at 05:54 AM.
Irish Diplomacy ..the ability to tell someone to go to Hell ,,So that they will look forward to to the trip
-
09-07-2010 11:44 AM #142
CHR Member
- Join Date
- Apr 2009
- Location
- watford
- Car Year, Make, Model: 26T Coupe, 32 Roadster, 41 Willys Coupe
- Posts
- 2,363
I'm pretty lucky Pat i have a pro buffer setup in my workshop and i also have a good friend that is a pro polisher and chromer so he gives me what i need to do the job the best way.
He supplied me with a load of felt wheels (he calls them bobs) that you glue up and then roll them in different grits 80, 180 & 320 they are absolutely fantastic for getting in places and especially good for raduising welds, They have speeded up the polishing process by 50% i reckon.
Originally Posted by pat mccarthy
Its aweful lonesome in the saddle since my horse died.
-
09-07-2010 03:36 PM #143
CHR Member/Contributor
- Join Date
- Apr 2005
- Location
- bay city
- Posts
- 10,546
well i not a pro but we did all GM s concept show car line up were some stuff hade to be good to go from raw alum rims to sealer to paint .some we put a brush finsh on and some did go to buffer but had to be better then 400 grit . this is what i was know for not a big deal i could whip one out about 5 hours this is not the best one i did this was ran for some time was my old 572 was back in the shop for a rebuild and welded the block they let it freeze i did not use any mx points on this just rollup s and flaps i make up still like them the best
Irish Diplomacy ..the ability to tell someone to go to Hell ,,So that they will look forward to to the trip
-
09-08-2010 11:19 AM #144
CHR Member
- Join Date
- Apr 2009
- Location
- watford
- Car Year, Make, Model: 26T Coupe, 32 Roadster, 41 Willys Coupe
- Posts
- 2,363
Very nice work Pat

Its aweful lonesome in the saddle since my horse died.
-
09-11-2010 11:32 AM #145
CHR Member
- Join Date
- Apr 2009
- Location
- watford
- Car Year, Make, Model: 26T Coupe, 32 Roadster, 41 Willys Coupe
- Posts
- 2,363
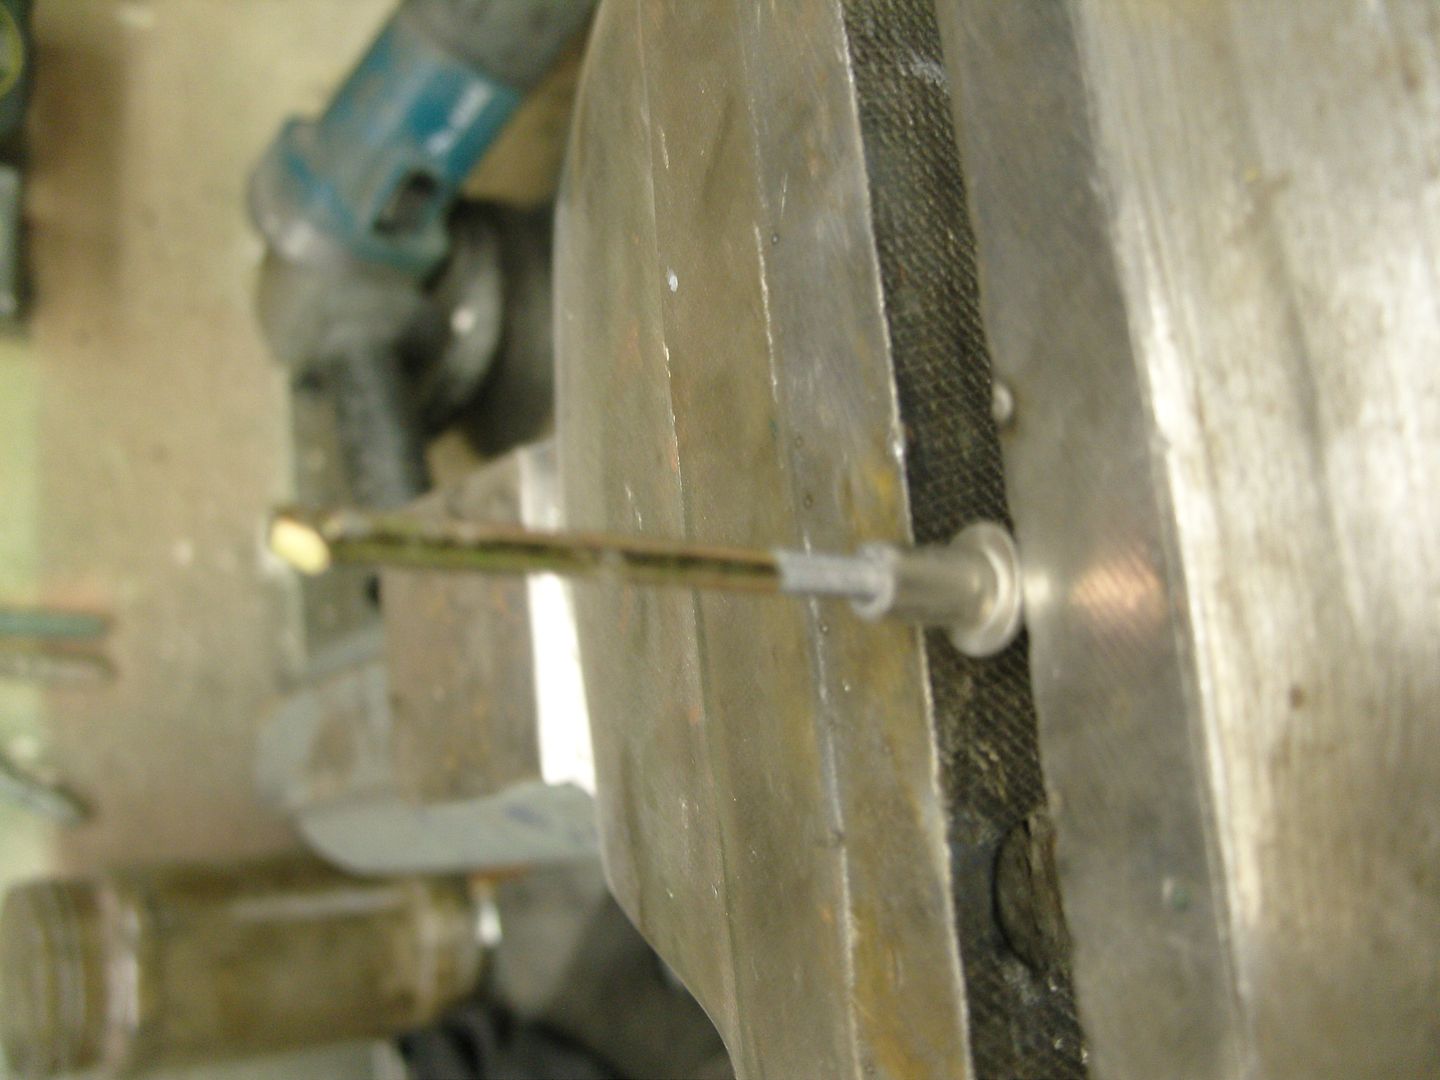
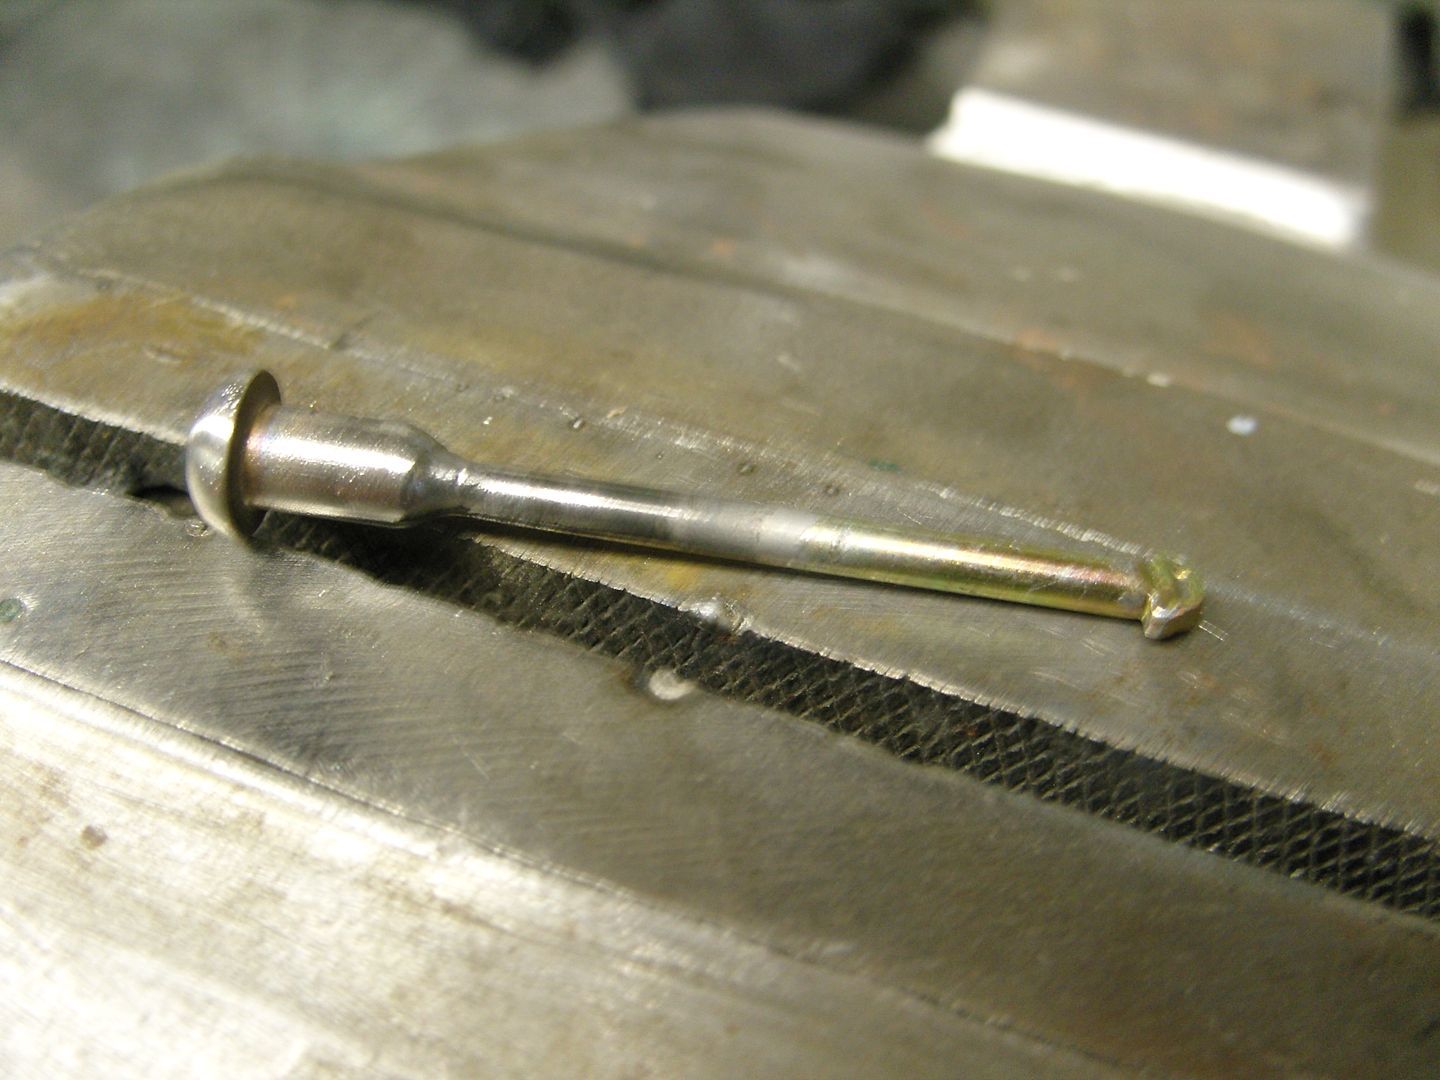
Managed to solve a small problem today, The little pins that hold the brake shoes in place by being put through the backplates and held in place by a top hat and spring were bugging me as they always go rusty and spoil the look of the backplates, was thinking about what to do with them last night and it suddenly came to me
Firstly i ground the flat head off so they were just a 3mm shaft, Next i took some 6mm stainless rivets and made a simple jig to hold them so i could drill a 3mm hole in them, The jig was a bit of 20mm aluminium bar that i drilled and counter bored for the rivet and then drilled a 3mm hole right through, a hole in the side to hold the rivet in place was drilled & tapped 4mm for a grub screw.
(Sorry the pics ain't great, took them with my phone.)
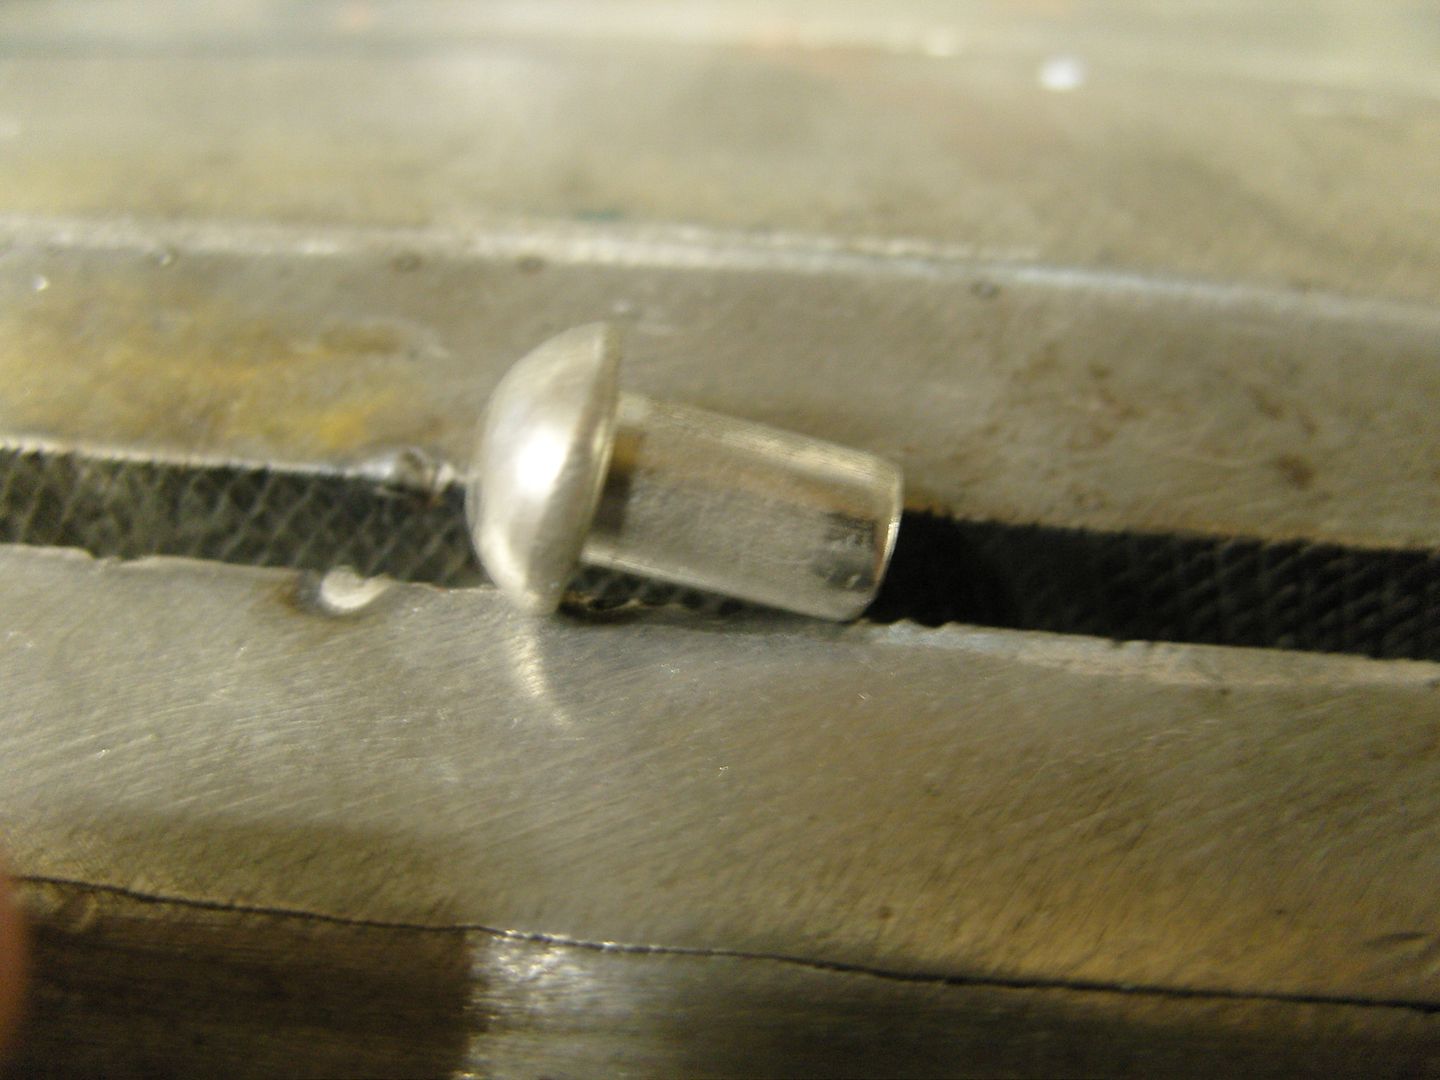
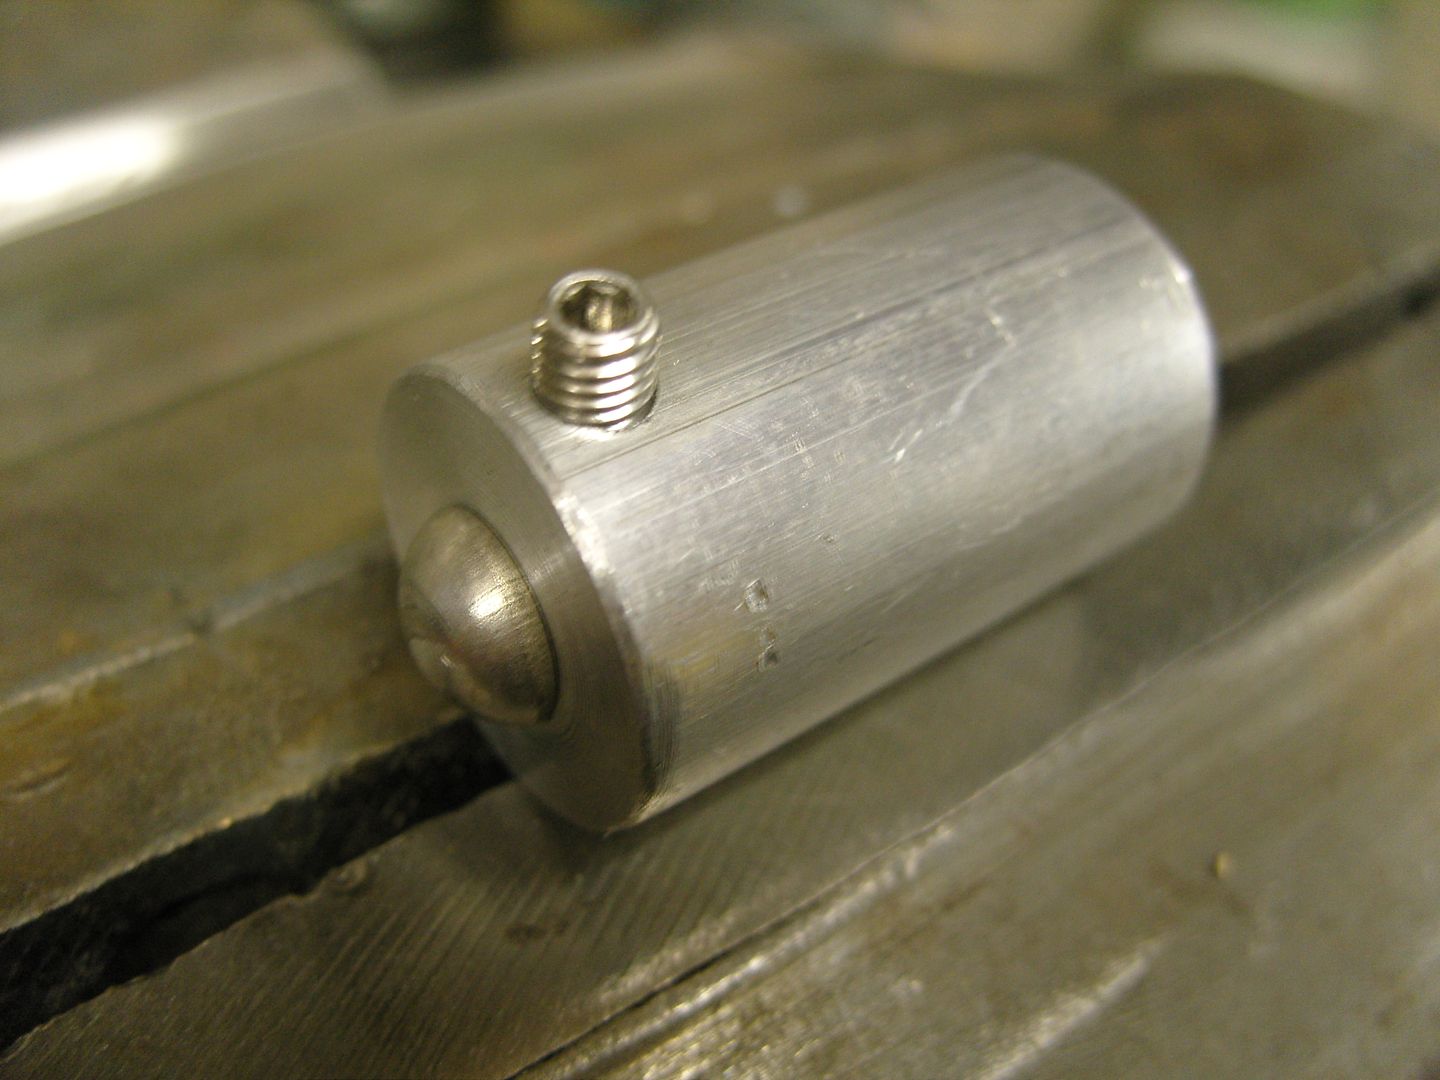
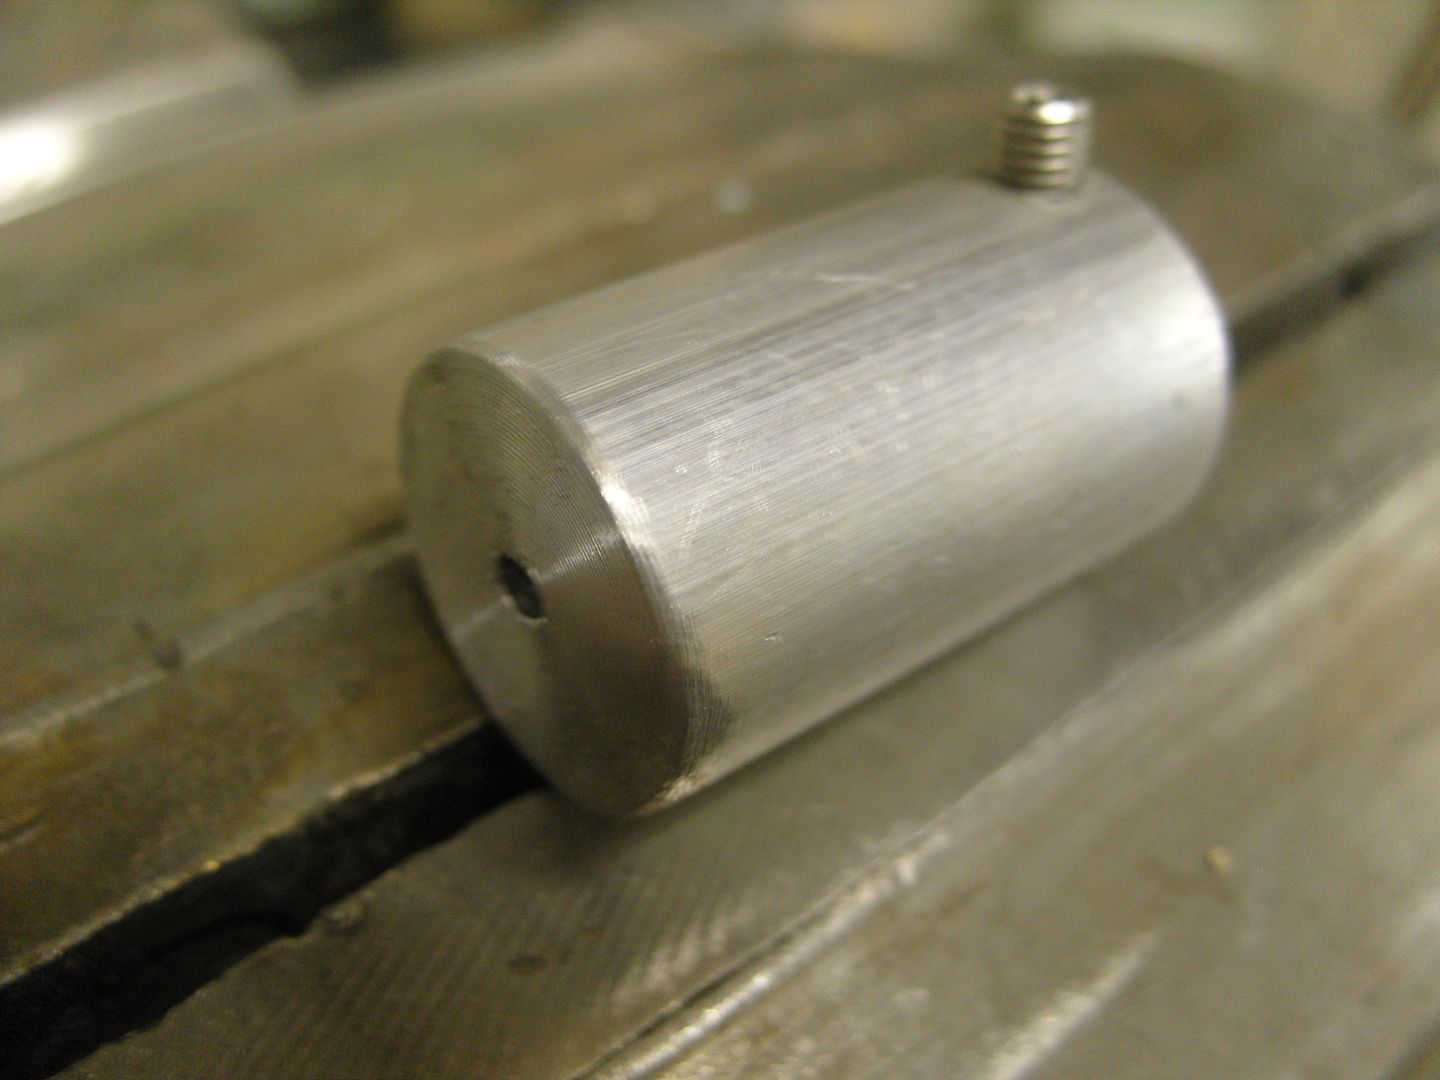
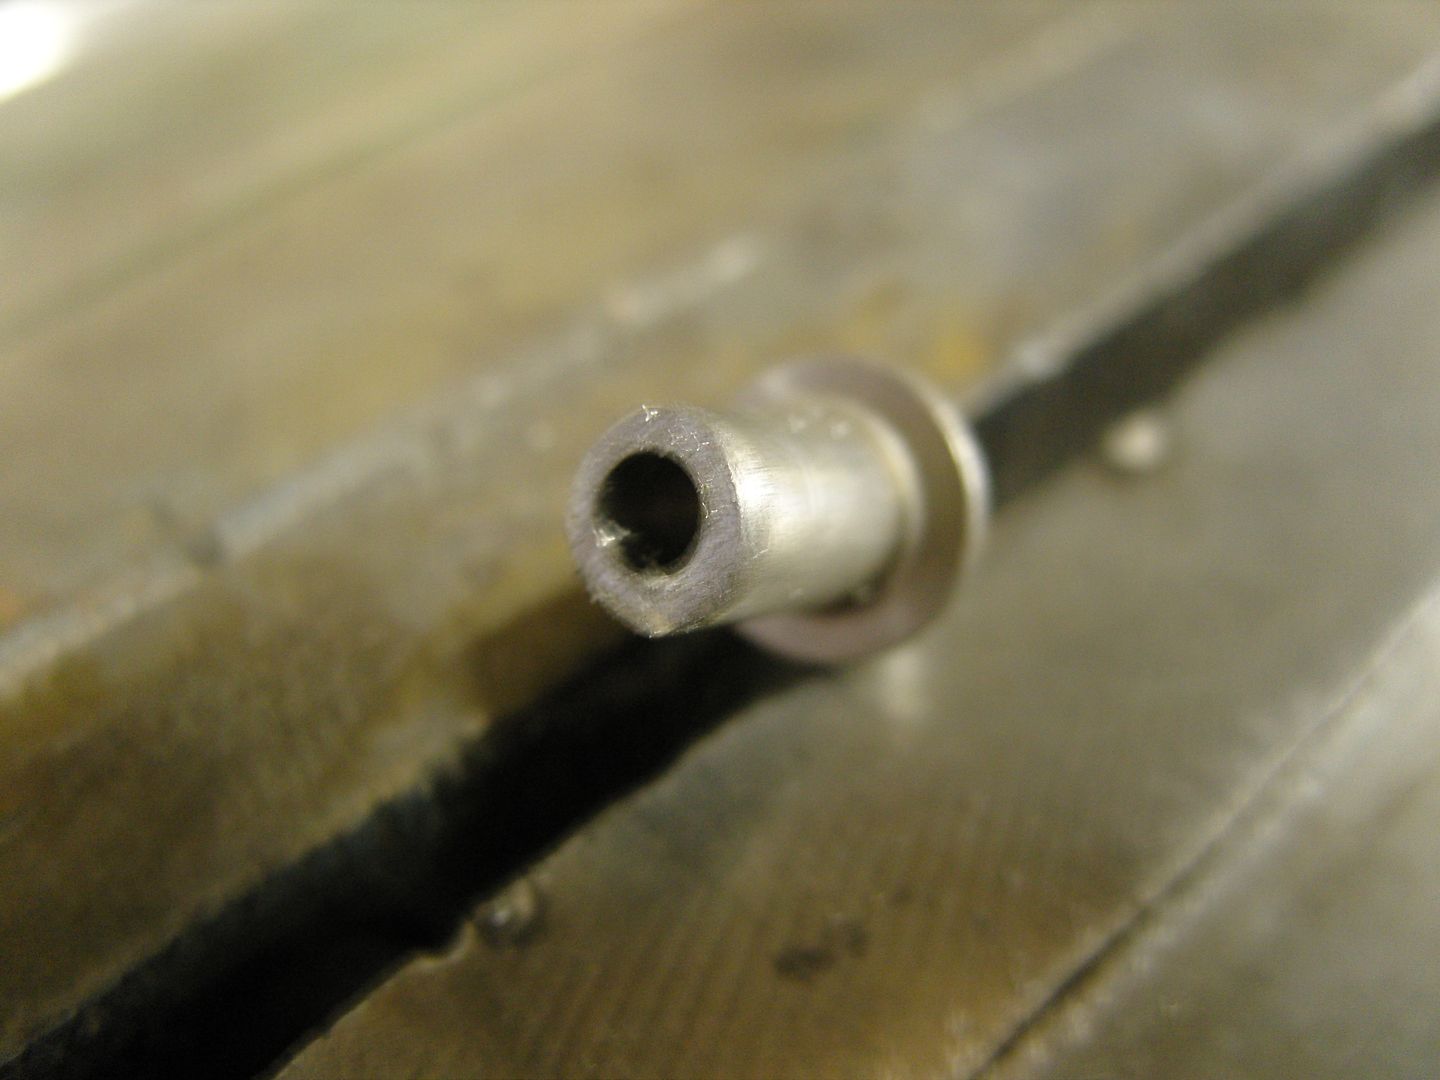
The 3mm shafts were pressed into the hole drilled in the rivet and welded, then the heads were polished. The rest of the day was spent sanding the paint off the fibreglass body as it had never been primed
.Last edited by roadster32; 09-11-2010 at 11:38 AM.
Its aweful lonesome in the saddle since my horse died.
-
09-23-2010 01:15 PM #146
CHR Member
- Join Date
- Apr 2009
- Location
- watford
- Car Year, Make, Model: 26T Coupe, 32 Roadster, 41 Willys Coupe
- Posts
- 2,363
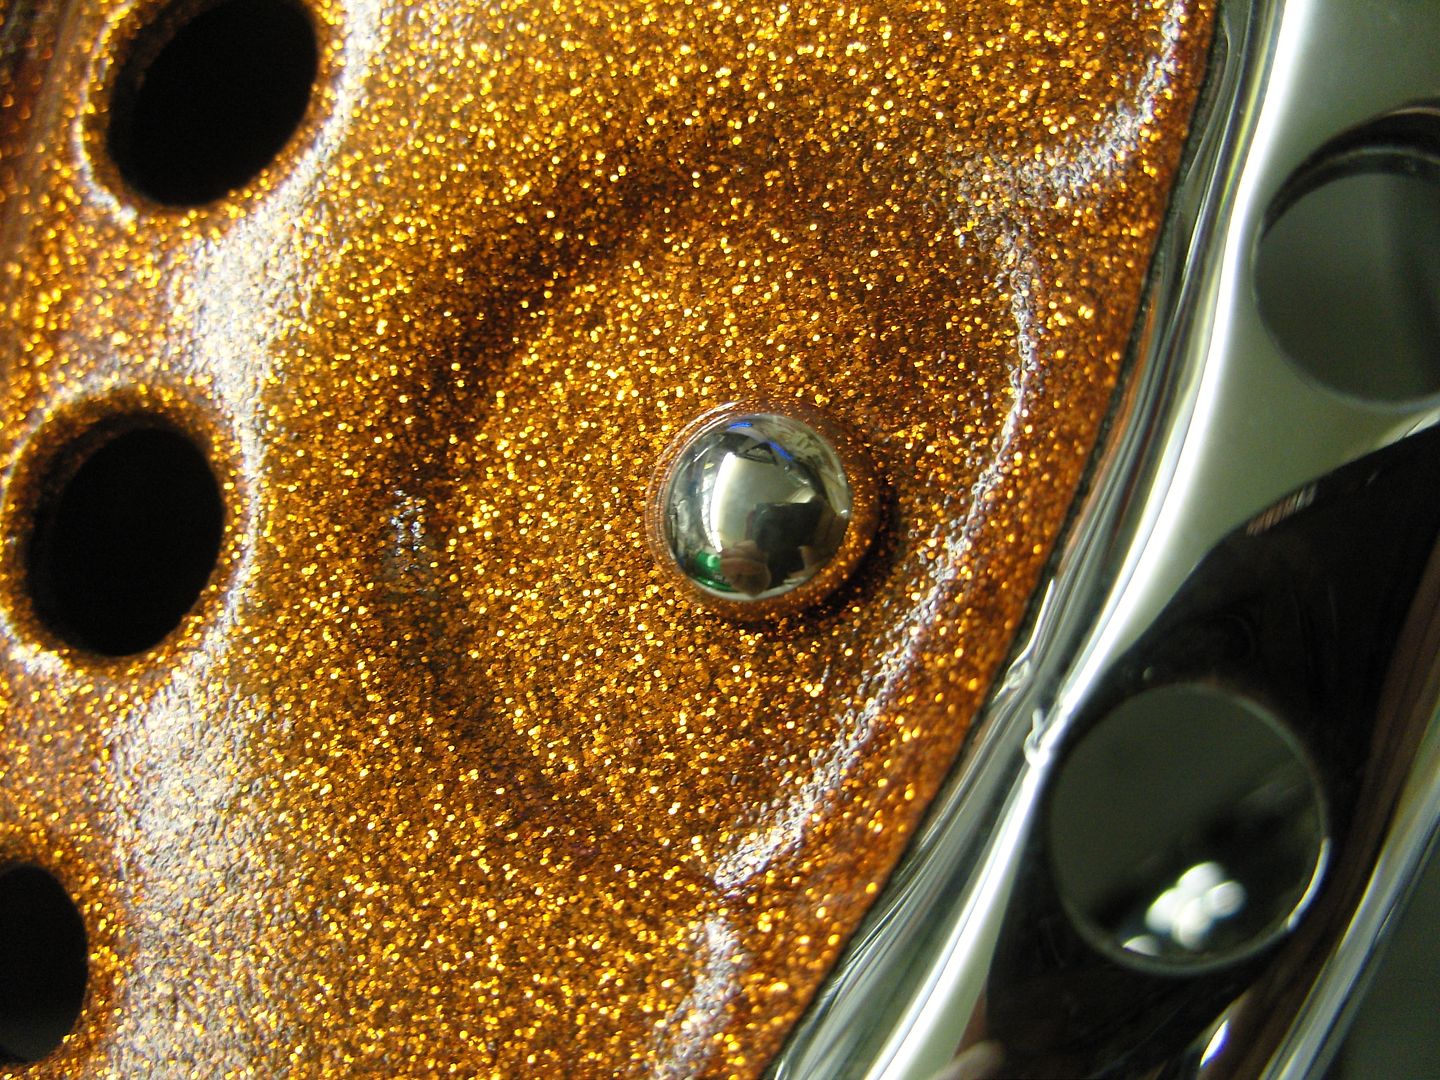
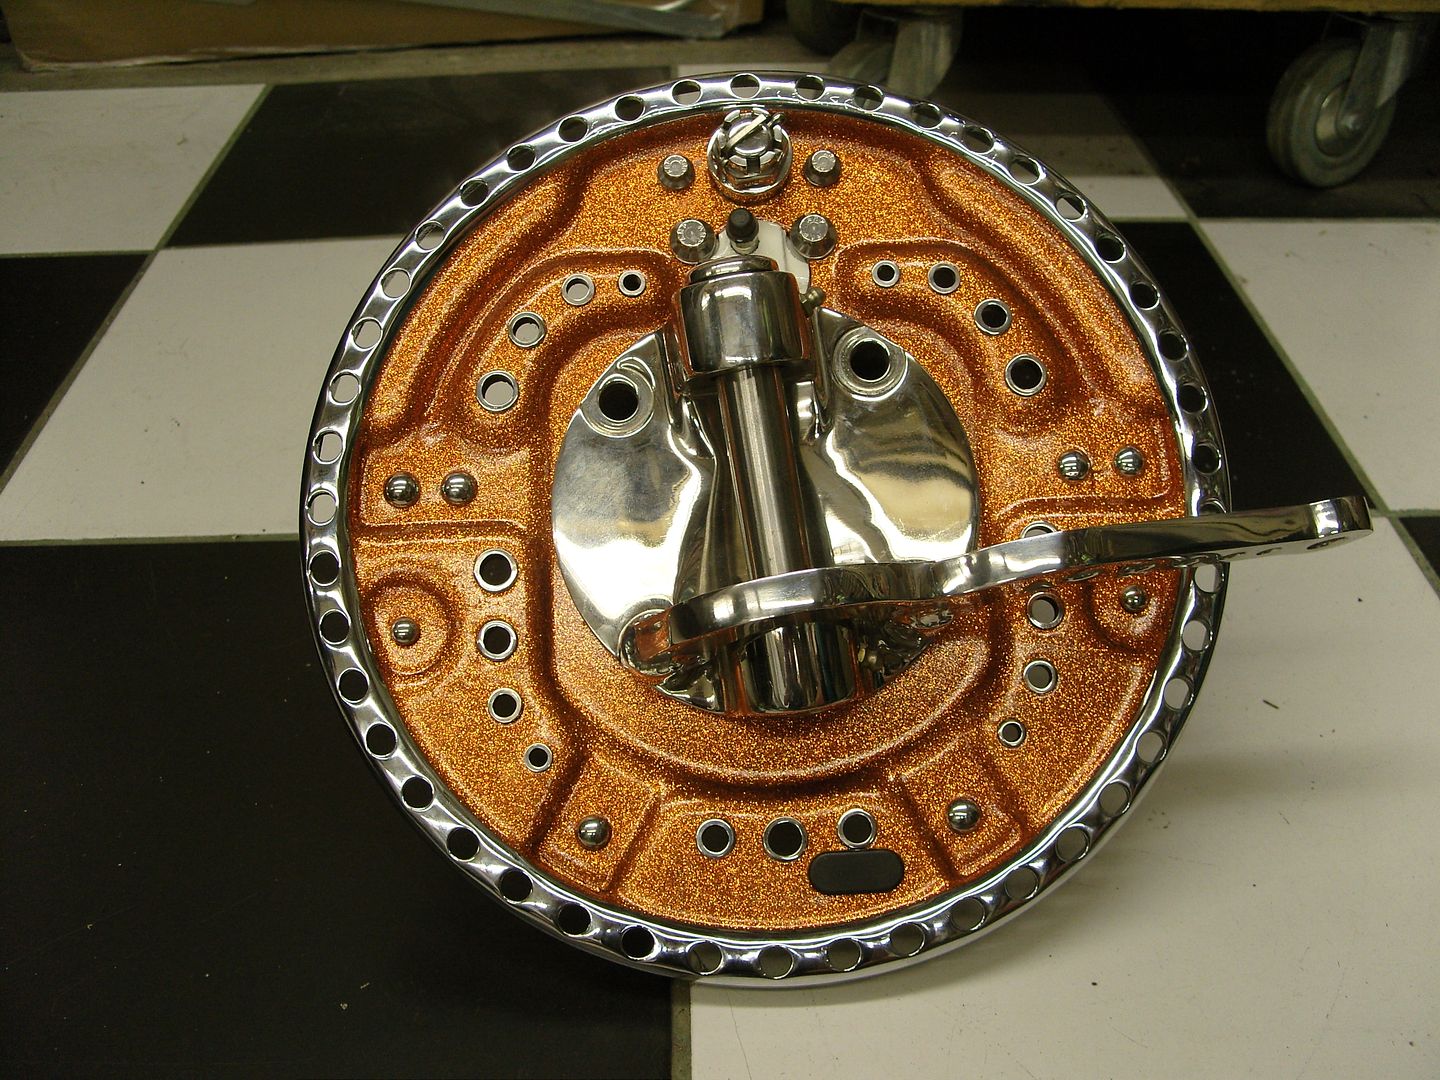
The more i looked at the backplates i wasn't completely happy with them, so i made up some stainless rings for the drilled holes, Yes it was a lot of turning on the lathe.
Its aweful lonesome in the saddle since my horse died.
-
09-23-2010 02:03 PM #147
CHR Member
- Join Date
- Jan 2006
- Location
- fort myers
- Car Year, Make, Model: '27 ford/'39 dodge/ '23 t
- Posts
- 11,033
Oh yes, those backing plates were just pathetic before.") You remind me of someone I live with who can't ever say something is done.
You remind me of someone I live with who can't ever say something is done.
That does look nice though.
Don
-
09-23-2010 04:19 PM #148
CHR Member
- Join Date
- Sep 2009
- Location
- Georgetown
- Car Year, Make, Model: 48 Ford Truck
- Posts
- 471
I've said it before, but Damn Man you do NICE work. Question are you gonna drive this when it's done. I've seen show cars that didn't look quite that nice and they were afraid to take em out of the trailer. Someone might drool on em.............................
-
09-23-2010 04:24 PM #149
CHR Member
- Join Date
- Nov 2004
- Location
- orange
- Car Year, Make, Model: 4- 32 fords
- Posts
- 1,609
Nice touch, to me that's the kind of detail that really makes a difference. Nice work Steve. It only takes a few hours, but last a life time.
Ken
-
09-23-2010 04:24 PM #150
CHR Member
- Join Date
- Sep 2009
- Location
- Georgetown
- Car Year, Make, Model: 48 Ford Truck
- Posts
- 471
Opps........... I spoke too soon. Just had another look and that cotter pin ain't polished. Subtract 2 points............. Normally I wouldn't save a pic of a backing plate, unless I needed it for refrence. But that one I have to save. Might give me a little inspiration to do my stuff just a wee bit better...
 them backers look good looks alot like the old metal flake paint line glowable marigold i had on my gto back in 1981
 Reply With Quote

Posting Permissions
- You may not post new threads
- You may not post replies
- You may not post attachments
- You may not edit your posts

i've enjoyed the years here . made a lot of friends. most who have left. i see no reason to continue with this so hope to see you somewhere else. i dont think this site will ever be back. it's lived...
Dead!