


 11Likes
Thread: My 26T Coupe build thread


Results 106 to 120 of 426
 LinkBack URL
 About LinkBacks
Hybrid View
-
01-10-2011 12:36 PM #1
 CHR Member

- Join Date
- Apr 2009
- Location
- watford
- Car Year, Make, Model: 26T Coupe, 32 Roadster, 41 Willys Coupe
- Posts
- 2,363
--------------------------------------------------------------------------------
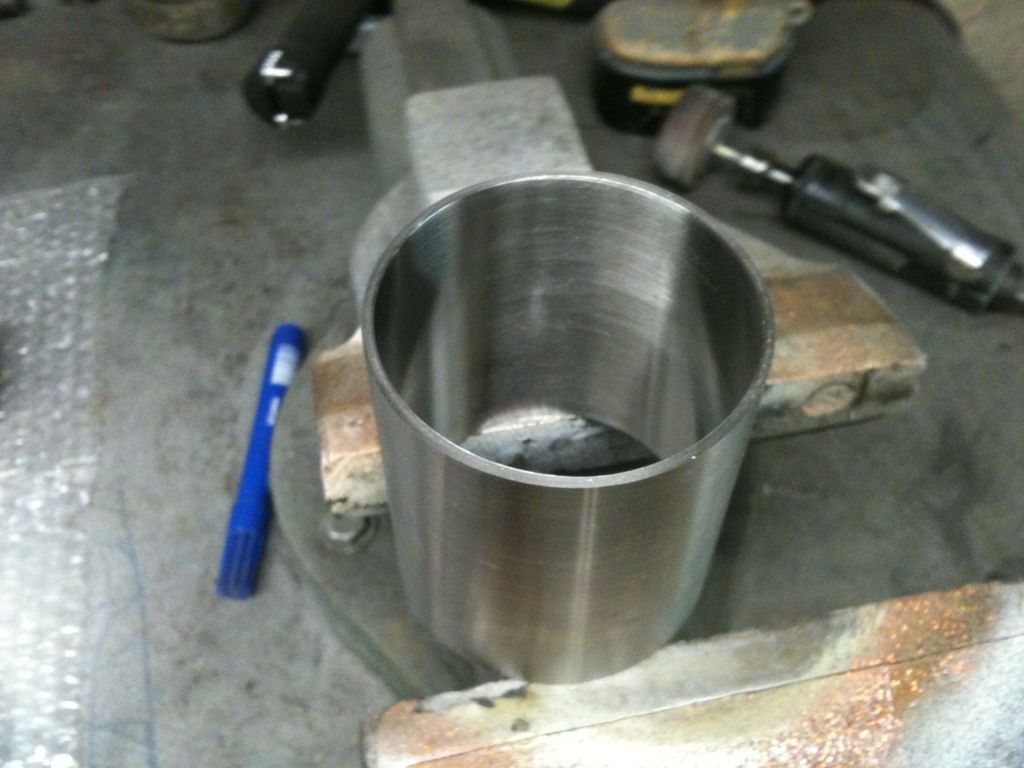
Been scratching around doing small jobs while i wait for my new conrods, finished off my tailpipes last night.
I belled the ends initially but decided i didn't like it as everybody does that so thought i would do something different so the bells were cut off.
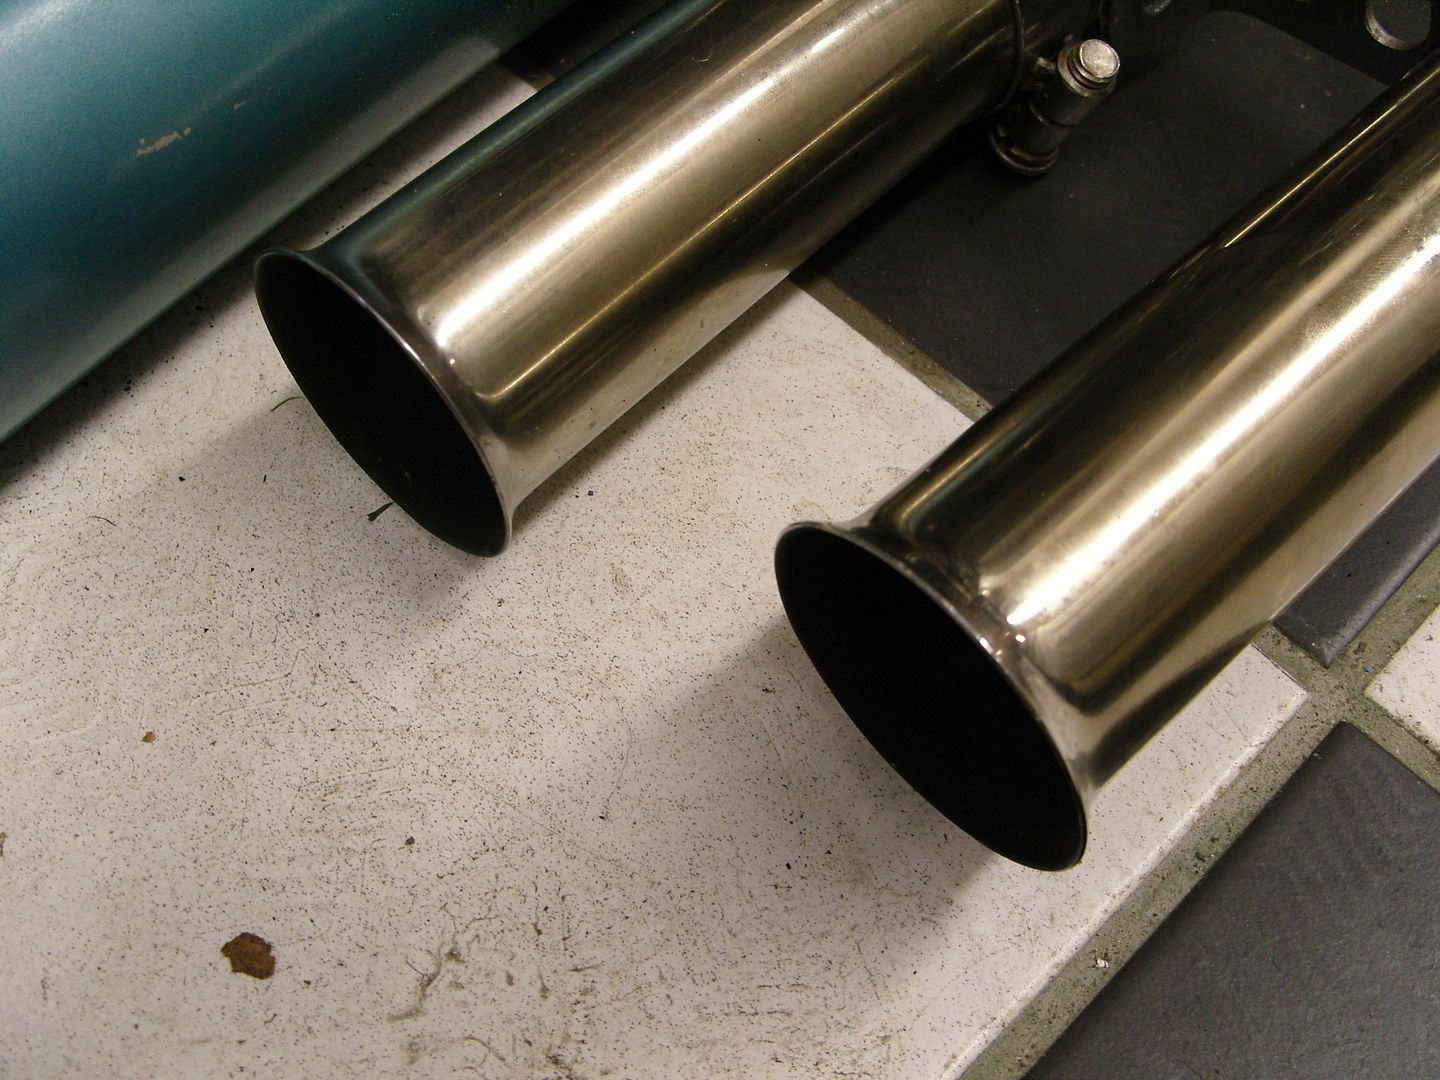
Came up with a trim piece that mirrors the chassis bracket shapes.
I started looking for some stainless tube that would slide over the 2.5" tailpipes but couldn't find anything, anyway Steve (rusty coupe) managed to find a piece of stainless pipe that was slightly under 2.5" so i could bore it out and slightly thick wall at 3/16", the outside would be easy to turn down.
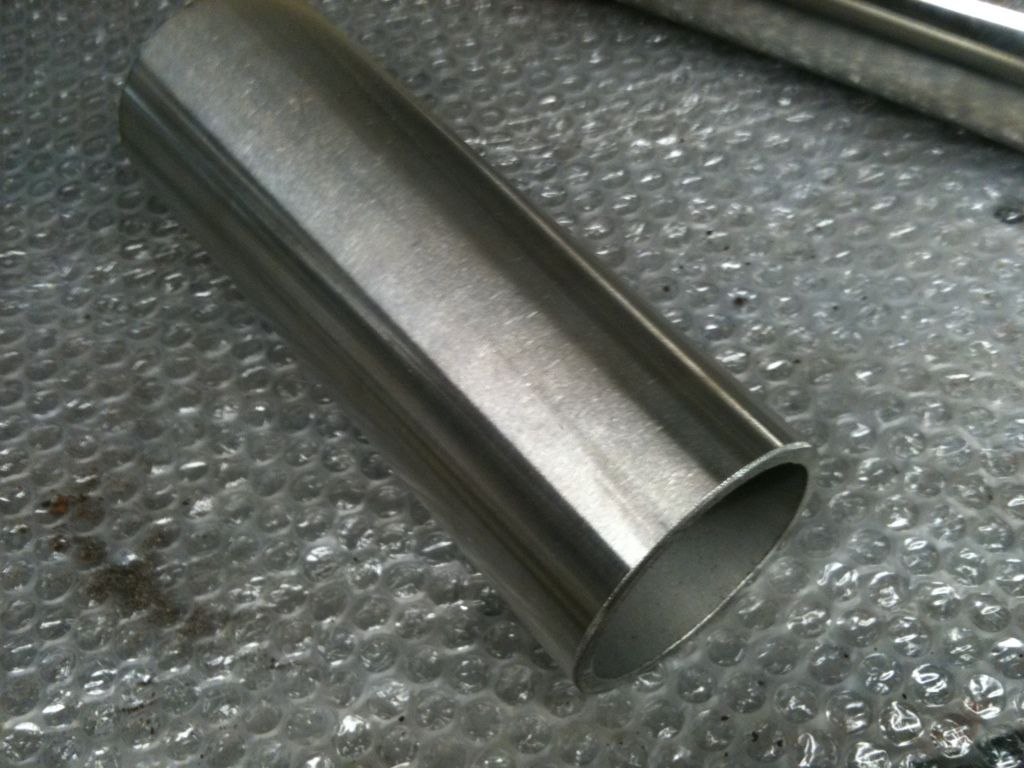
First the piece was cut into 2.5" long pieces and bored out to be a nice slide fit over the 2.5" tube.
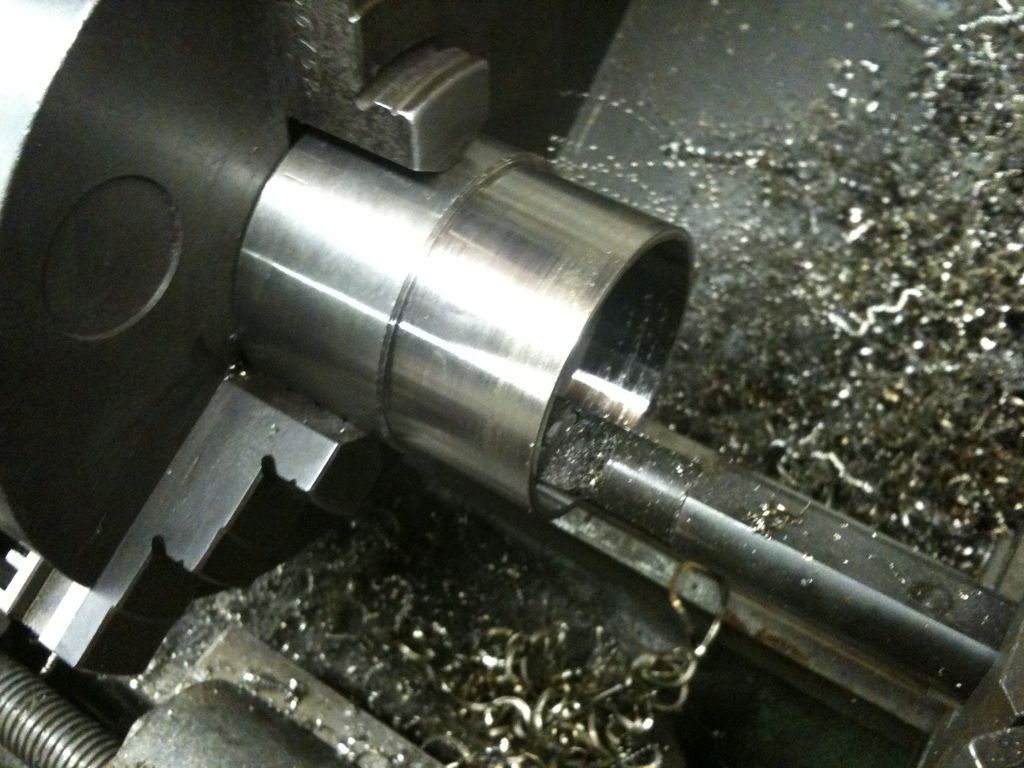
Once the inner was bored the outside was turned down to size, here you can see it half done, its then turned round and turned down to suit.
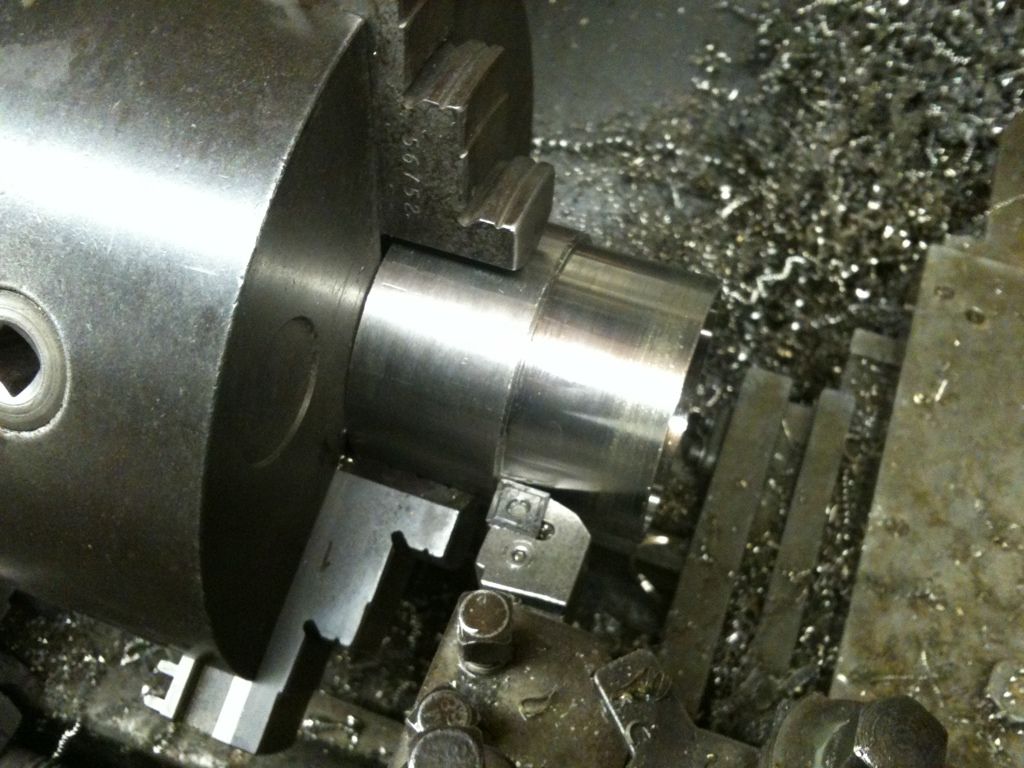
We now have our tube to size, the inside was semi polished to get a nice slide fit onto the polished tailpipes to avoid scratching them.
Next the shape was marked and cut out and ground smooth and then polished.
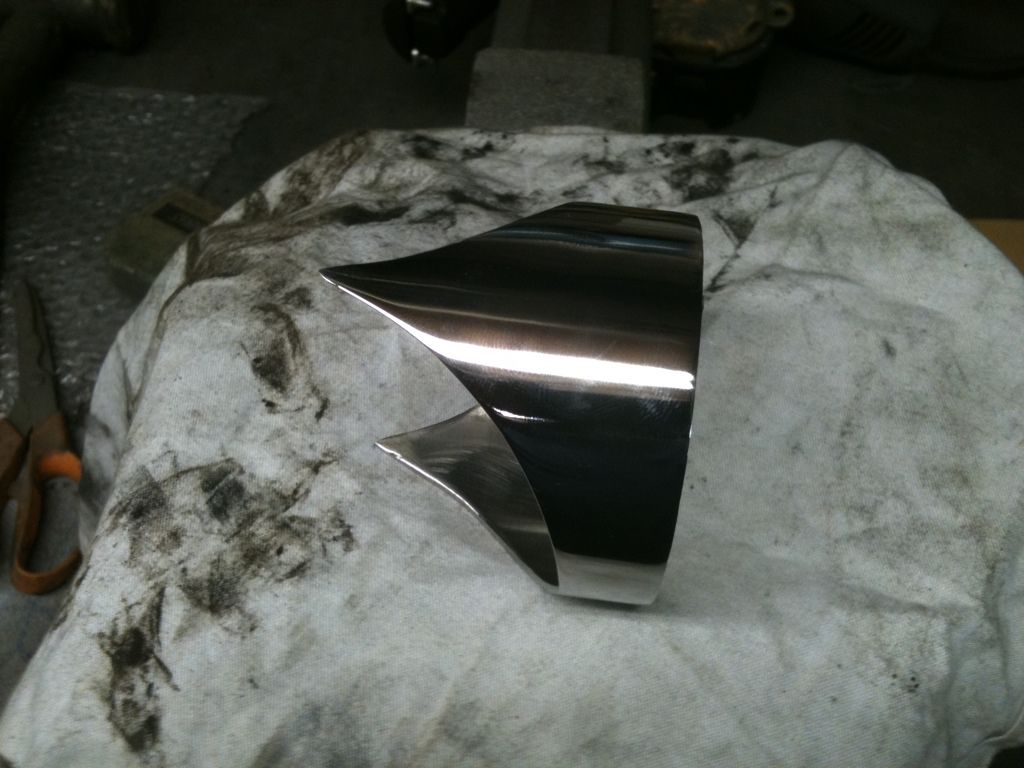
Once they were polished they slipped on to the tailpipes a treat, They will be welded on the ends once the tailpipes are finished and the weld polished out.

.Its aweful lonesome in the saddle since my horse died.
-
01-10-2011 12:45 PM #2
CHR Member
- Join Date
- Apr 2001
- Location
- Salado
- Car Year, Make, Model: 32, 40 Fords,
- Posts
- 10,898
Nice touch! How you going to keep fine debris from getting (and later peeking back out) in between the trim and the pipe body?Your Uncle Bob, Senior Geezer Curmudgeon
It's much easier to promise someone a "free" ride on the wagon than to urge them to pull it.
Luck occurs when preparation and opportunity converge.
-
01-10-2011 12:47 PM #3
CHR Member
- Join Date
- Apr 2009
- Location
- watford
- Car Year, Make, Model: 26T Coupe, 32 Roadster, 41 Willys Coupe
- Posts
- 2,363
Theres no gap Bob, Its as tight as i could get it.
 Originally Posted by Bob Parmenter

Its aweful lonesome in the saddle since my horse died.
-
01-11-2011 10:25 AM #4
CHR Member
- Join Date
- Oct 2007
- Location
- Petaluma
- Car Year, Make, Model: 48 Ford F1
- Posts
- 9,795
Another personal touch Steve. I think we need to tally these up somehow! It looks great, of course!
"  "No matter where you go, there you are!" Steve.
-
01-11-2011 02:52 PM #5
CHR Member/Contributor
- Join Date
- Apr 2005
- Location
- bay city
- Posts
- 10,546
HMMMMM i am thinking some one heated the outer and slip them on .. hot .or primer and 620 loctie . i press big stuff in smaller holes all the time there is trick s.. dry ice works to sitting in methanol to shrink stuff to...pipes look good did some thing like what you did on some harley ex pipes i built Originally Posted by roadster32
Last edited by pat mccarthy; 01-11-2011 at 03:18 PM.
Irish Diplomacy ..the ability to tell someone to go to Hell ,,So that they will look forward to to the trip
-
01-13-2011 12:59 PM #6
CHR Member
- Join Date
- Feb 2010
- Location
- Pukekohe, New Zealand
- Car Year, Make, Model: '23 Ford T Roadster
- Posts
- 2,199
Very very nice Steve, that's 50 pound you saved for Sue to spend on new shoes.LOL LOL...I maybe a little crazy but it stops me going insane.
Isaiah 48: 17,18.
Mark.
-
01-13-2011 11:42 PM #7
CHR Member
- Join Date
- Apr 2009
- Location
- watford
- Car Year, Make, Model: 26T Coupe, 32 Roadster, 41 Willys Coupe
- Posts
- 2,363
Whip never mention shoes to Sue Originally Posted by Whiplash23T
 I would guess she already has around 150 pairs handbags are not far behind either
Its aweful lonesome in the saddle since my horse died.
-
01-19-2011 01:11 PM #8
CHR Member
- Join Date
- Apr 2009
- Location
- watford
- Car Year, Make, Model: 26T Coupe, 32 Roadster, 41 Willys Coupe
- Posts
- 2,363
Well my Con-rods finally arrived so dropped them into the machinest so he could finish balancing all the reciprocating parts so should soon be able to button up the short motor
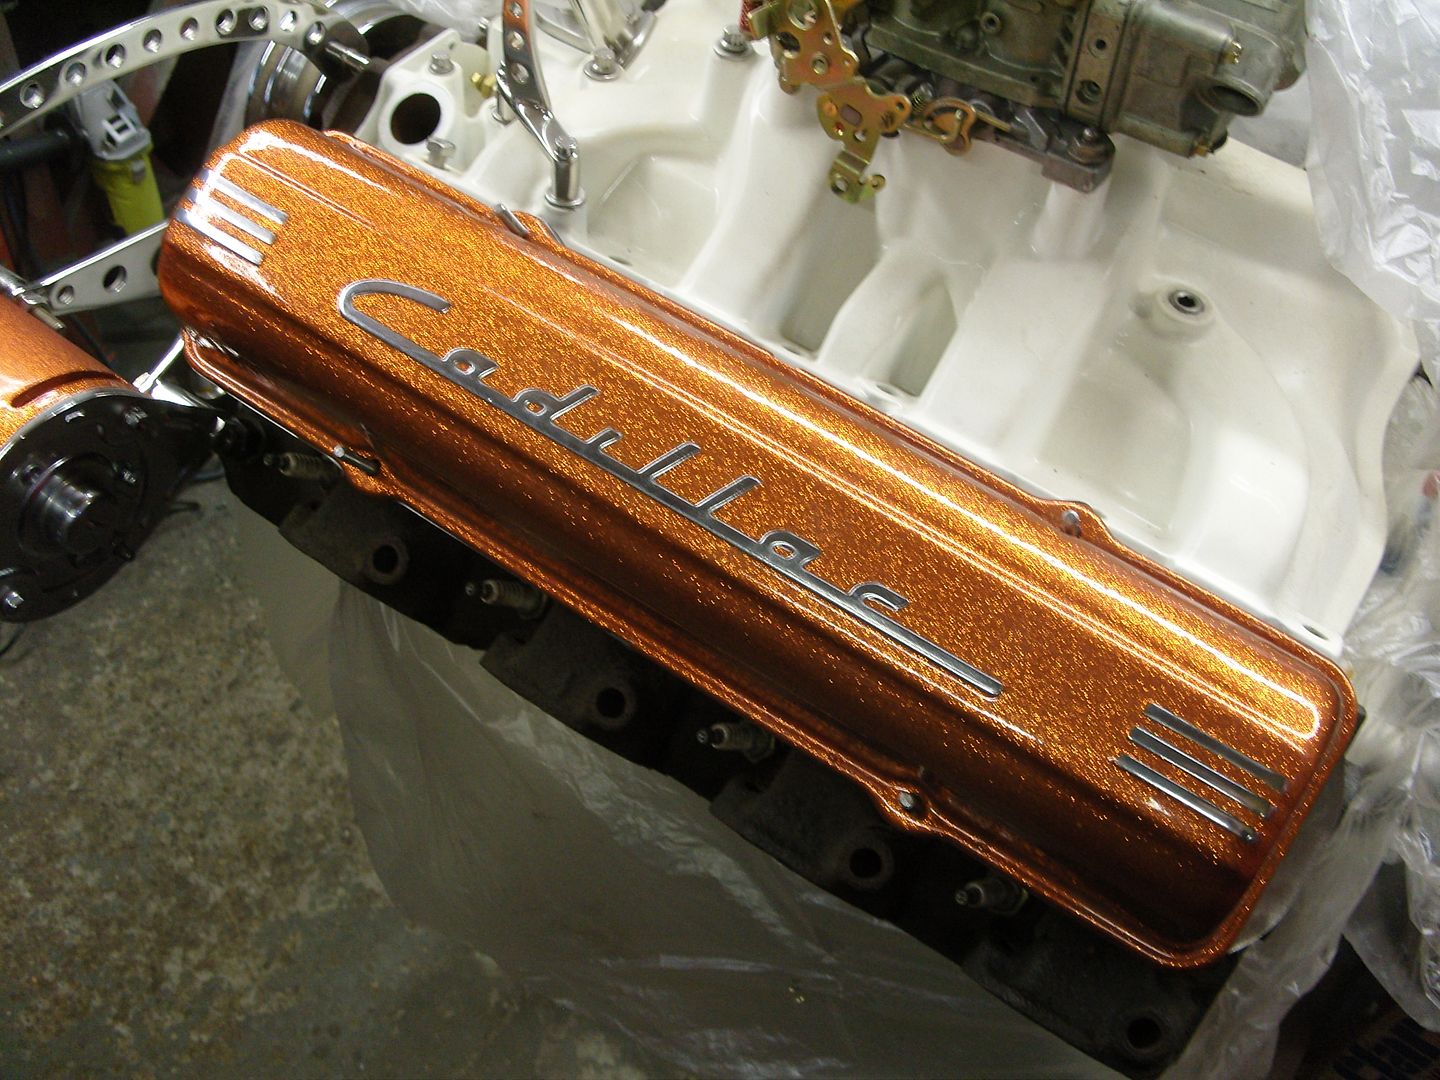
Another thing i wanted to sort was the adapters for the early Cadillac valve covers i'm using, I was going to get them from the states but after waiting an eternity i decided to make my own.
I decided to make them in 2 parts for a couple of reasons, the first being that the 2 lower holes in the early covers conflict with the original lower holes, the other reason was i needed a little extra rocker clearance as i may go to full roller rockers at a later point so the 2 parts would give me a minimum of 5/8" extra lift.
First i made a plywood template as the early covers are a bit shorter than the 500 covers.
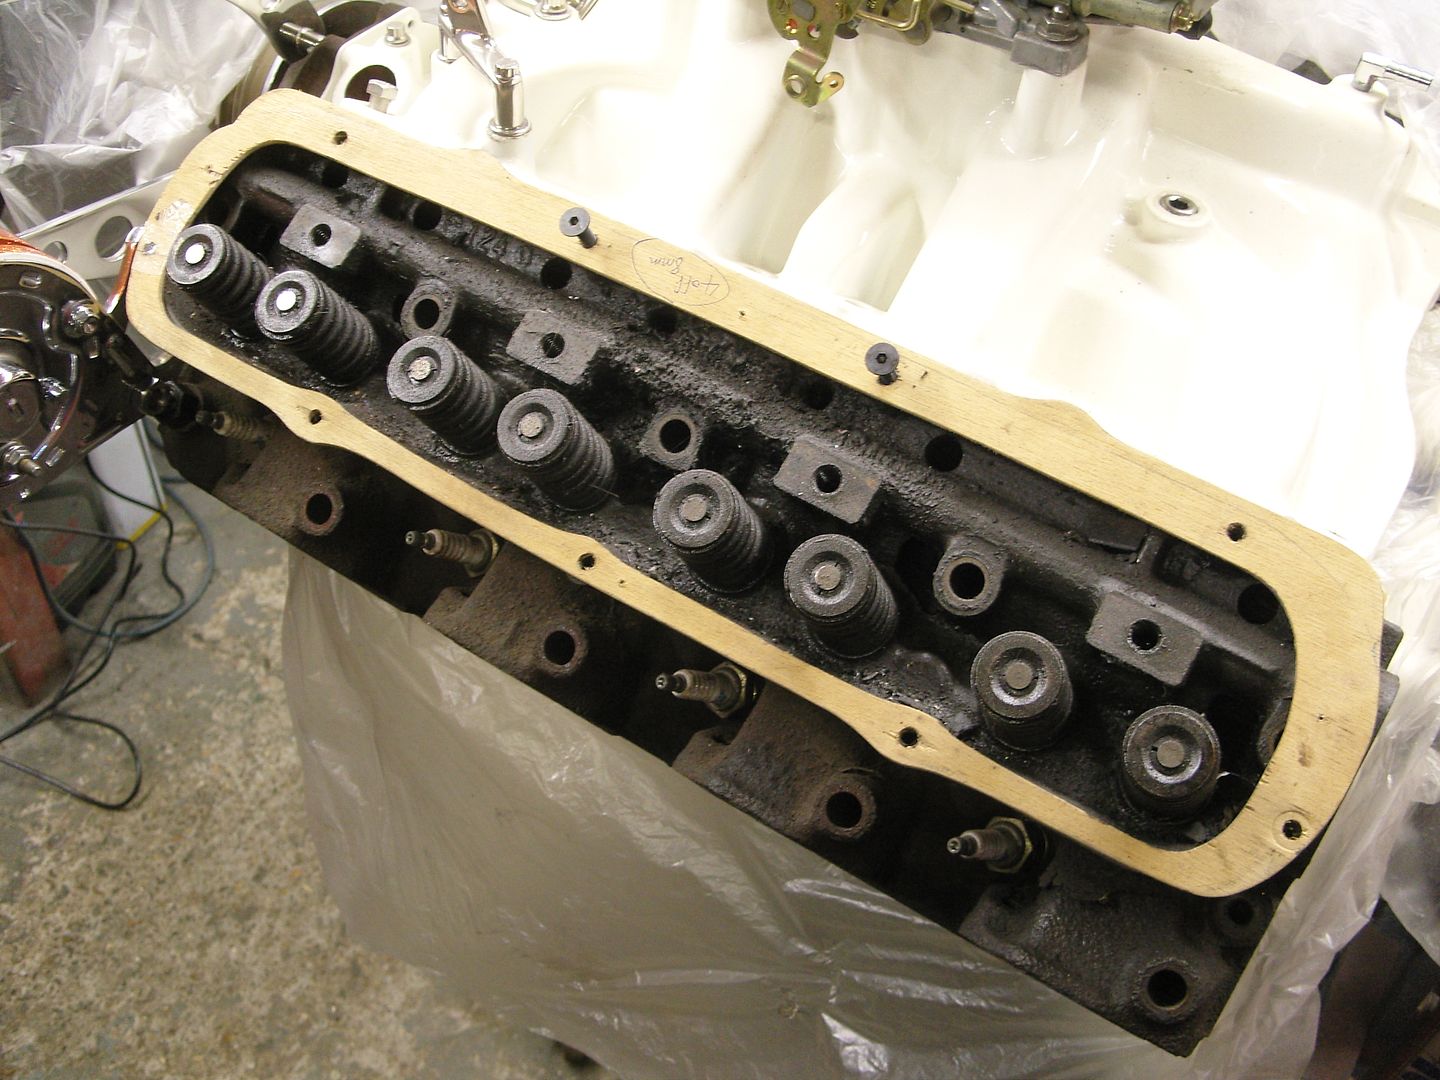
The local laser cutter first made up a thin sheet to check fitment before cutting the 8mm plate.
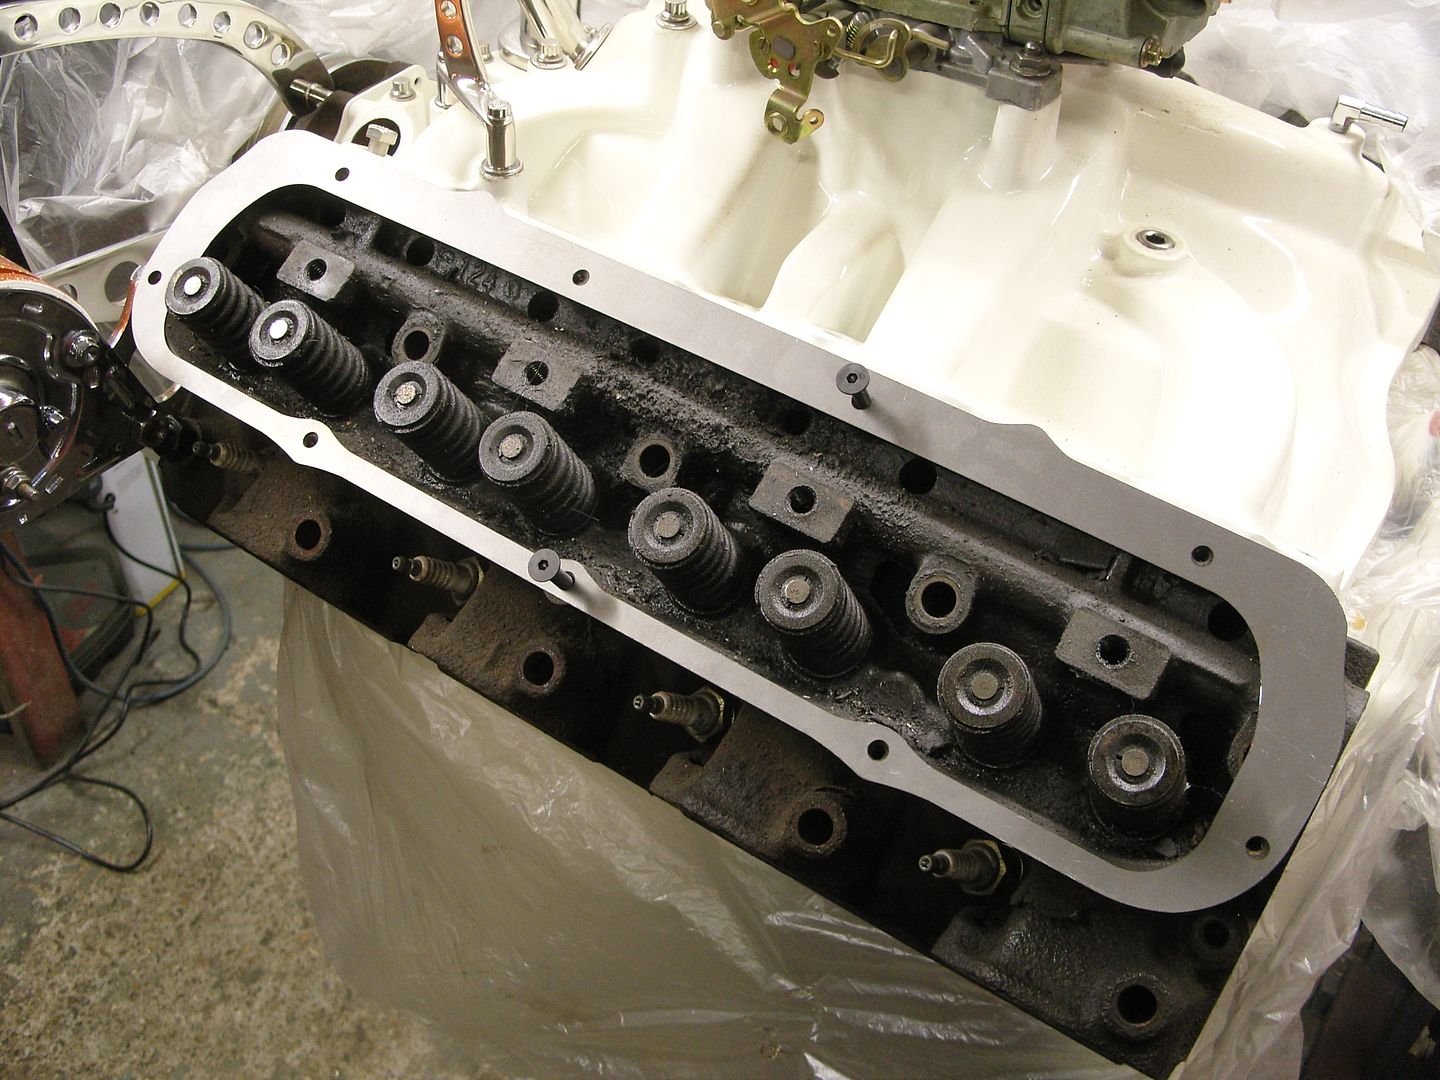
The sheet try out was a little out on some of the holes so the laser cutter modded the drawing slightly and cut 4 plates in 8mm steel.
The holes were cleaned out with a drill as the laser leaves a small pip where it starts and finishes, then the holes were countersunk to accept 1/4" UNC countersunk socket head screws, the heads are flush with the plate.
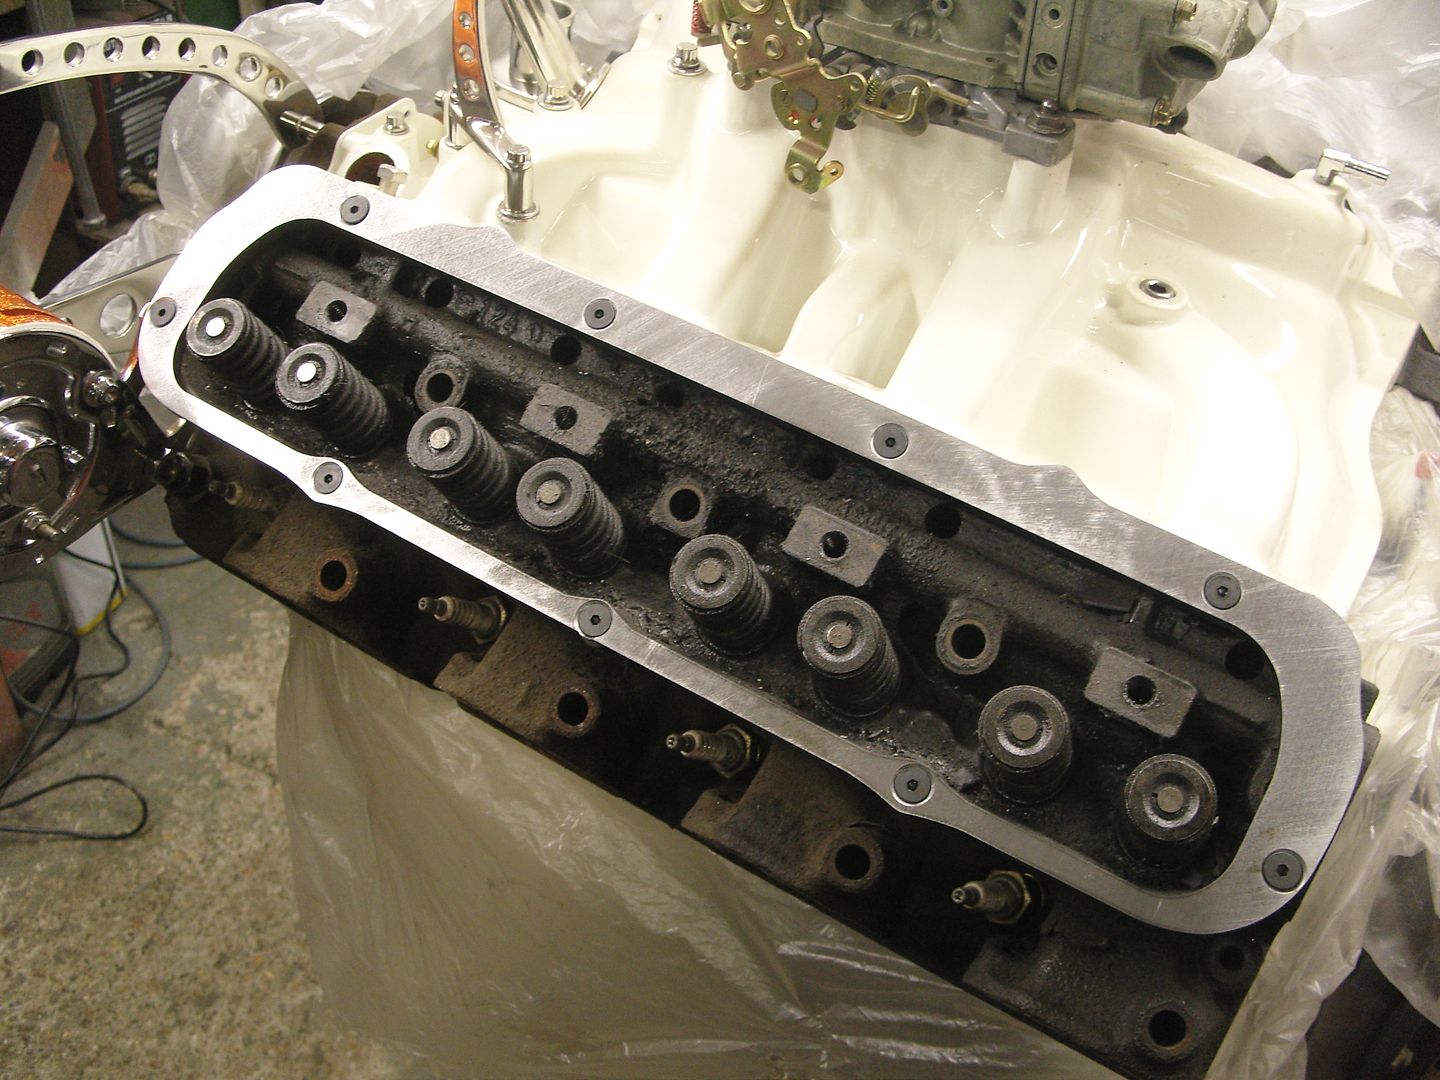
It was here i suddenly realised that the laser cutter had put holes in all 4 pieces as i had asked for 2 to be blank, Not a massive problem as i can weld up the holes that matter and those that don't matter will be covered by the gasket but annoying.
4.2mm holes were drilled at the clamping points and the top plate drilled out to 5mm and the bottom plate tapped 5mm, the top plate was then countersunk to accept 5mm countersunk socket cap screws.
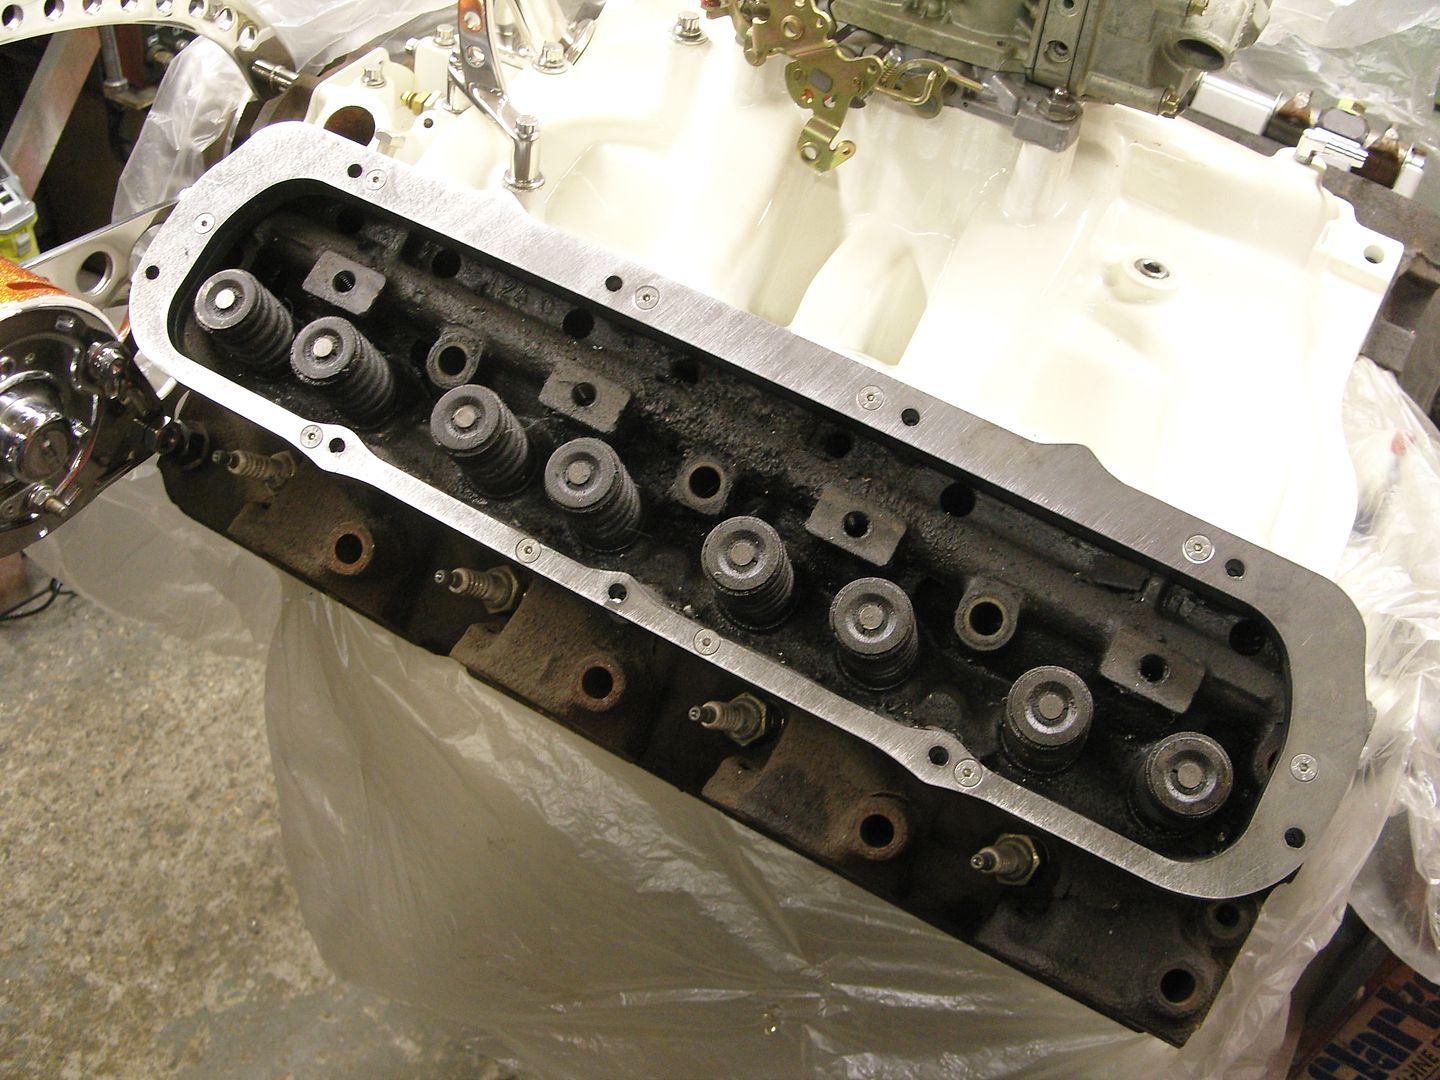
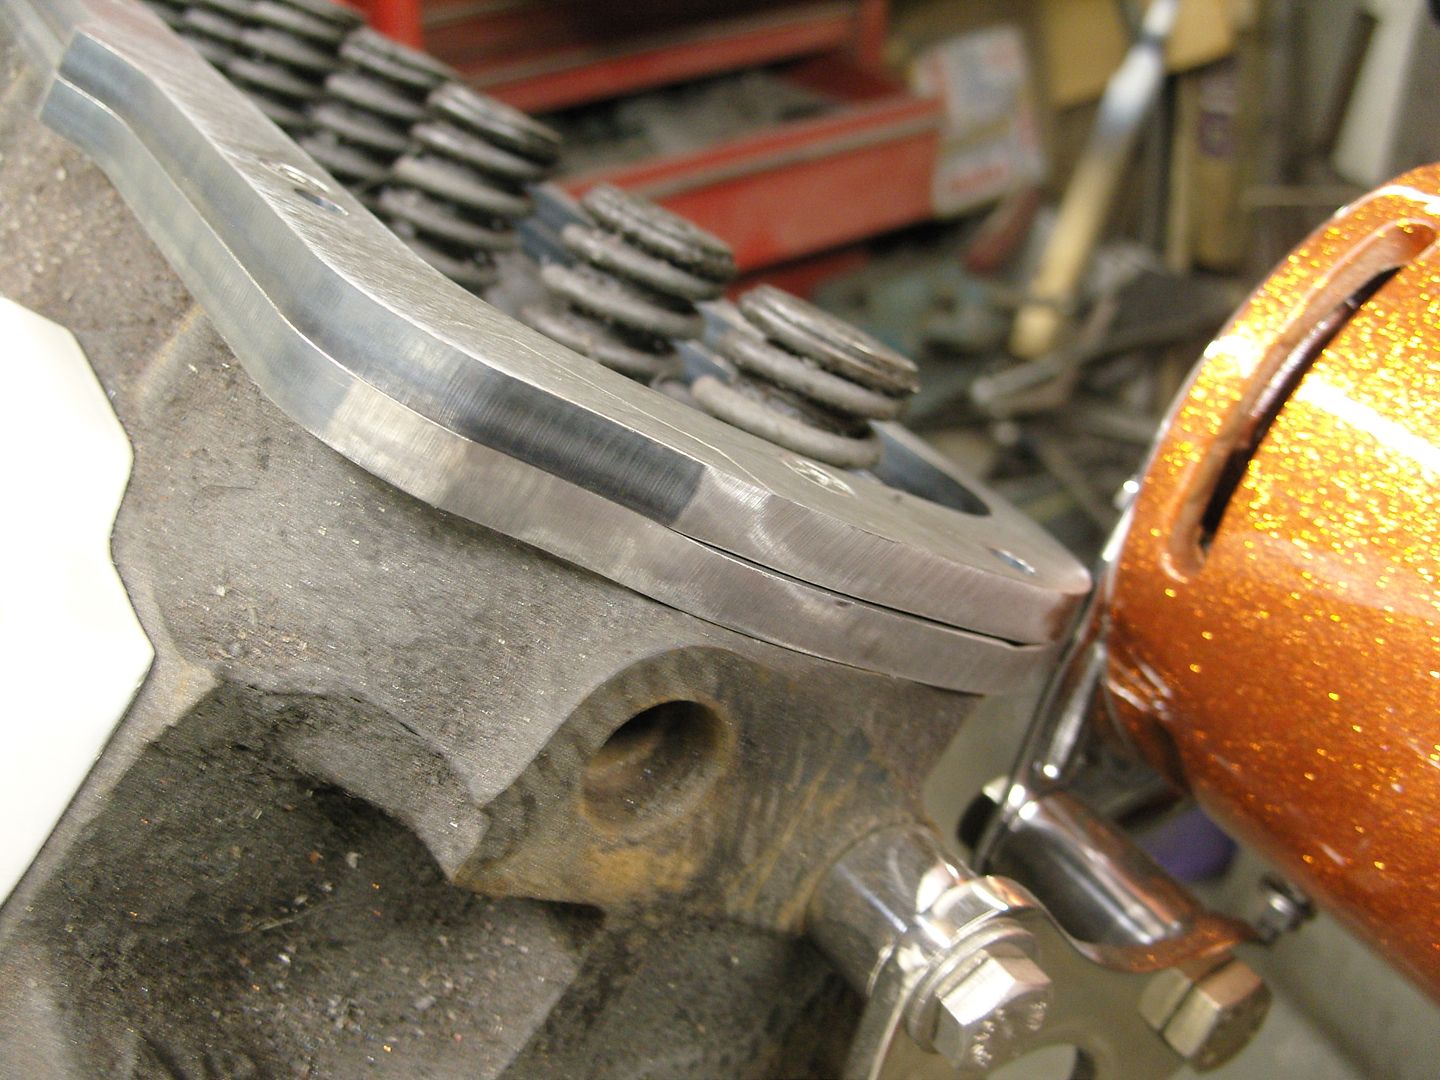
Next job was to mark the 4 stud holes that hold the valve cover, these were drilled and tapped 6mm for studs.
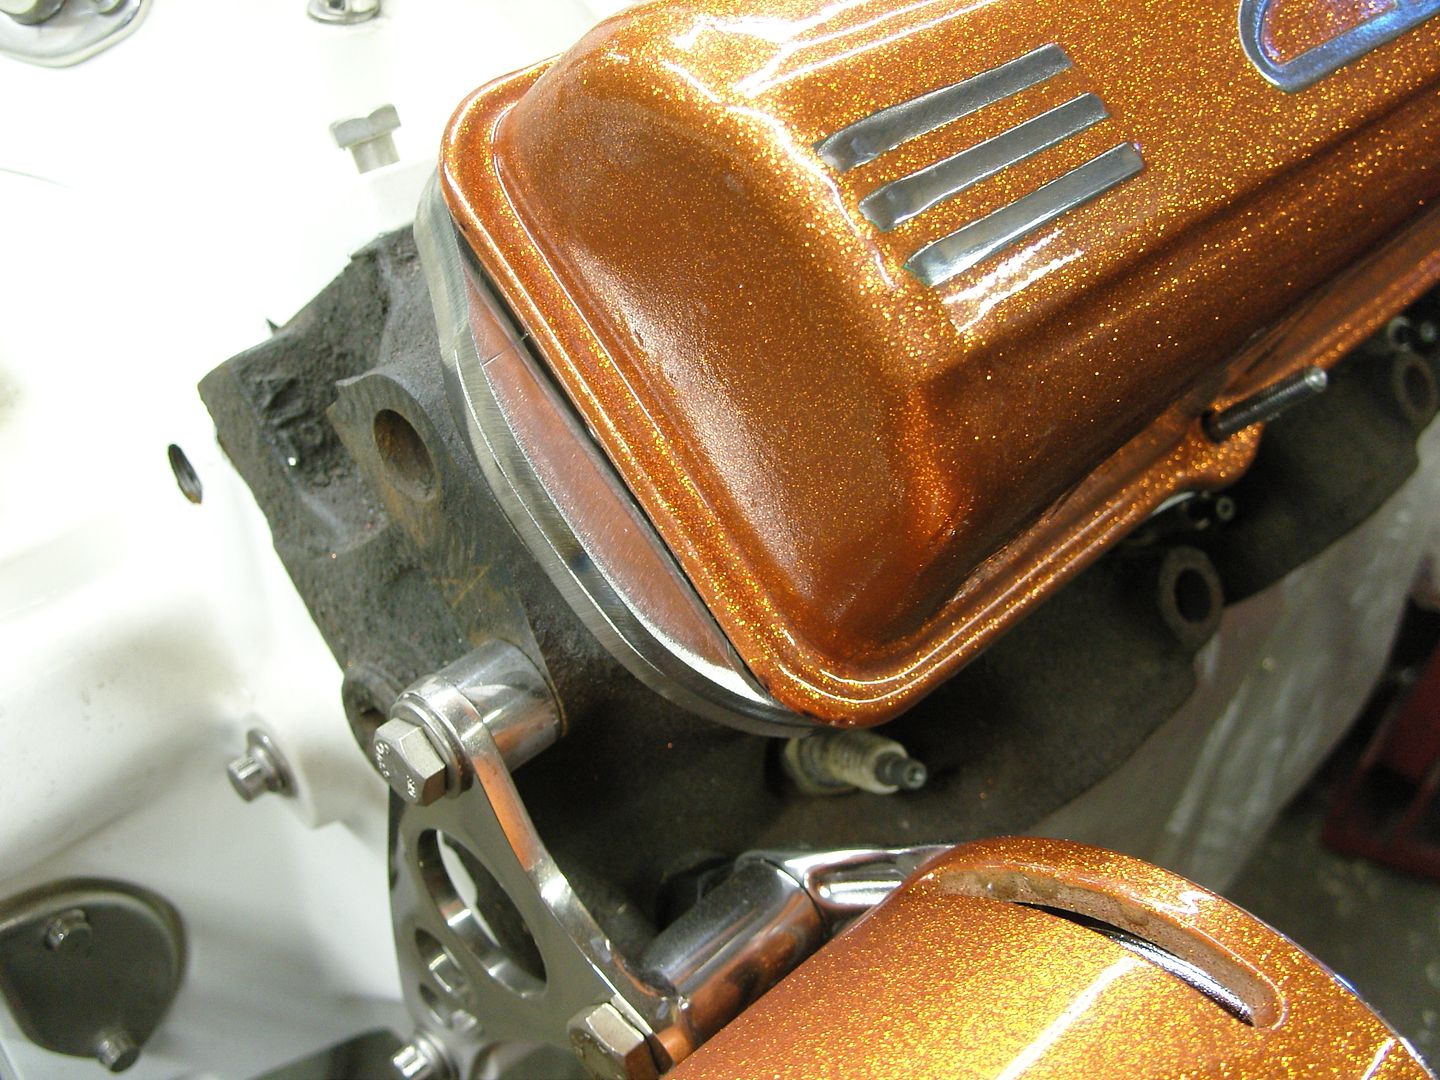

Next the rocker gear was fitted and marked for a notch either end for clearance.

The plates and heads will be painted the same white as the block so should be barely noticeable.

Its aweful lonesome in the saddle since my horse died.
-
01-19-2011 01:20 PM #9
CHR Member
- Join Date
- Feb 2010
- Location
- Pukekohe, New Zealand
- Car Year, Make, Model: '23 Ford T Roadster
- Posts
- 2,199
Hey Steve in some of those photos it looks like you have that motor set up on the engine stand in your lounge at home,I bet Sue is pleased with you if that is the case on her shag pile carpet????Nice work though.....
I maybe a little crazy but it stops me going insane.
Isaiah 48: 17,18.
Mark.
-
01-19-2011 01:44 PM #10
CHR Member
- Join Date
- Apr 2009
- Location
- watford
- Car Year, Make, Model: 26T Coupe, 32 Roadster, 41 Willys Coupe
- Posts
- 2,363
Thats the concrete floor in my dirty room Whip but you have given me an idea, I will have a chat about it with Sue and let you know how i get on Originally Posted by Whiplash23T
Its aweful lonesome in the saddle since my horse died.
-
01-22-2011 04:28 PM #11
CHR Member/Contributor
- Join Date
- Jul 2003
- Location
- Madison
- Car Year, Make, Model: '67 Ranchero, '57 Chevy, '82 Camaro,
- Posts
- 21,160
The adapters worked out really nice, Steve!!! Oh yeah, the paint on the valve covers is absolutely double throw down way big kewl!!!!!Yesterday is history, tomorrow is a mystery, Live for Today!
Carroll Shelby
Learning must be difficult for those who already know it all!!!!
-
01-23-2011 03:24 AM #12
CHR Member
- Join Date
- Apr 2009
- Location
- watford
- Car Year, Make, Model: 26T Coupe, 32 Roadster, 41 Willys Coupe
- Posts
- 2,363
Thanks Dave, the covers need more clear but it gave me a good idea of colour. Originally Posted by Dave Severson
Its aweful lonesome in the saddle since my horse died.
-
02-12-2011 04:12 PM #13
CHR Member/Contributor
- Join Date
- Jul 2003
- Location
- Madison
- Car Year, Make, Model: '67 Ranchero, '57 Chevy, '82 Camaro,
- Posts
- 21,160
More great looking detail work on top of the engine Steve!!!! Thanks for the inspiration, keeps all of us on are toes!!!!Yesterday is history, tomorrow is a mystery, Live for Today!
Carroll Shelby
Learning must be difficult for those who already know it all!!!!
-
02-12-2011 04:39 PM #14
CHR Member
- Join Date
- Sep 2009
- Location
- Georgetown
- Car Year, Make, Model: 48 Ford Truck
- Posts
- 471
Steve, hope you feel better soon. Your throttle spring bracket is exactly what I was talking about in an earlier post. I would be tickled to turn out one as nice as the first one. But off to the rubbish bin. But I hope you like the second one, it's killer.......... But those little details, and the willingness to redo and redo again is what makes for a super nice car.
-
02-13-2011 12:53 AM #15
CHR Member
- Join Date
- Apr 2009
- Location
- watford
- Car Year, Make, Model: 26T Coupe, 32 Roadster, 41 Willys Coupe
- Posts
- 2,363
Originally Posted by dlotraf33
Thanks mate i think i'm on the mend, can't believe how just a stupid virus can make ya feel so knackered !!!
That bracket is actually mk3 as mk2 wasn't right either
Its aweful lonesome in the saddle since my horse died.
 Reply With Quote

Posting Permissions
- You may not post new threads
- You may not post replies
- You may not post attachments
- You may not edit your posts

i've enjoyed the years here . made a lot of friends. most who have left. i see no reason to continue with this so hope to see you somewhere else. i dont think this site will ever be back. it's lived...
Dead!