


 1Likes
Thread: Aoto Body explained..


Results 46 to 60 of 61
 LinkBack URL
 About LinkBacks
-
02-12-2012 05:18 PM #46
 CHR Member

- Join Date
- Oct 2010
- Location
- Duluth
- Car Year, Make, Model: 37 Ford Tudor Slantback
- Posts
- 234
Now wouldn't that work on all dents?? They are all basicly stretched metal??
-
Advertising

- Google Adsense
- REGISTERED USERS DO NOT SEE THIS AD
-
02-12-2012 07:01 PM #47
CHR Member
- Join Date
- Jun 2008
- Location
- Leonardtown
- Car Year, Make, Model: Walking
- Posts
- 1,228
Yes, all dents are stretched metal... Just to clarify on and off dolly.
On-dolly:
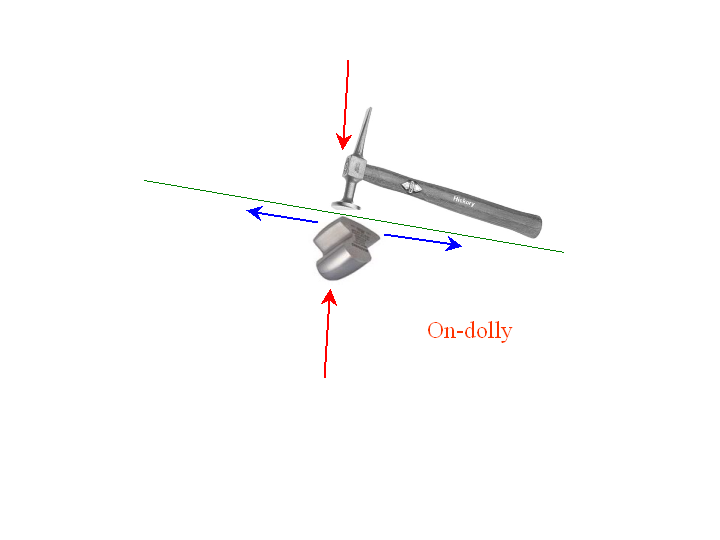
As the hammer stikes the panel with the dolly held directly beneath, the forces come together (red arrows) and the panel is compressed between the two. With nowhere else to go, the metal is forced outward (blue arrows) in the form of a stretch.
Off-Dolly:
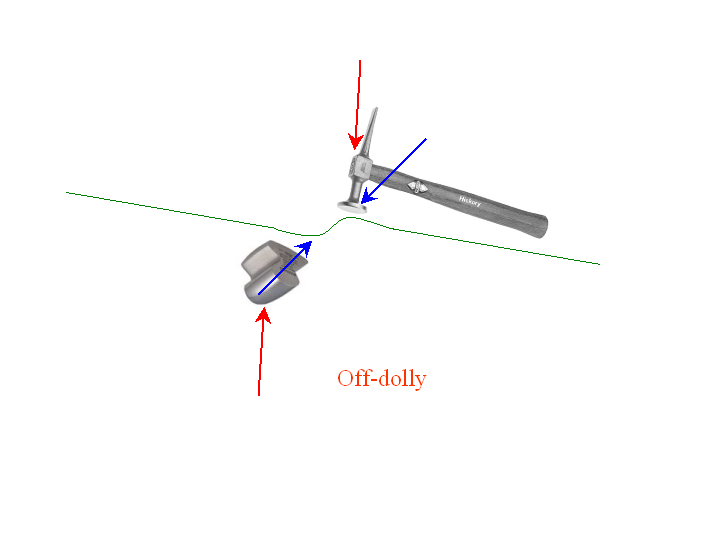
This time as the hammer strikes the apex of the dent from above, and the dolly rests against the one from below, their offsetting positions will cause the resulting forces in the direction of the blue arrows, forcing the metal back into itself, or causing a shrink.
Seldom is the case where we have a one-sided dent as shown above. Typically with an off-dolly scenario in fixing a dent, you are using off dolly and working around the perimeter of the dent to bring things back where they were.
With the process shown earlier with the donut dolly, you basically are supporting the stretched metal from two points, so we can off-dolly with more effectiveness, as the forces we are now introducing with the hammer strike will be more concentrated, forcing the stretch into the hollow of the dolly. But lets back up a second and look at the forces at work when a dent forms.
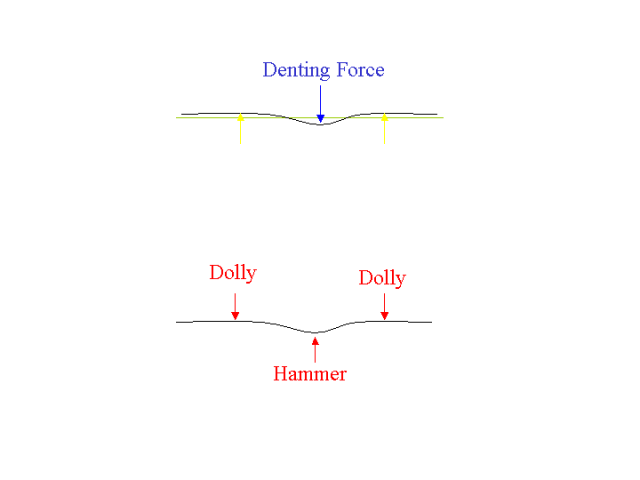
As an outside force is applied to the door of your new car (blue arrow), the direct reaction is a stretching of the metal, causing it to cave in. But we also have an indirect reaction to this stretching as the panel "springs back" slightly and in many cases you'll now notice a slight bulge or high spot around the perimeter of the dent (yellow arrows) So in some cases, depending on how the panel reacts to these forces, effective dent removal may include working both sides of the panel. And anything we can do to assist with the shrinking process, like heat application, will speed up the process of dent removal that you would normally see with off dolly alone..Last edited by MP&C; 02-12-2012 at 07:11 PM.
-
02-13-2012 04:52 AM #48
CHR Member
- Join Date
- Oct 2010
- Location
- Duluth
- Car Year, Make, Model: 37 Ford Tudor Slantback
- Posts
- 234
So you just couldn't do that that heat process alone. I am getting a good understanding of all of this. Now tell me about hammers. You had two different kinds of pick hammers. One was crowned, and the other was flat. Is there a hammer used only for shrinking the metal? , and with that doughnut dolly. Would the doughnut go right over the dent, and hammer from th bottom up??
-
02-13-2012 09:28 AM #49
CHR Member
- Join Date
- Jun 2008
- Location
- Leonardtown
- Car Year, Make, Model: Walking
- Posts
- 1,228
Normally you will use whatever gets the job done, so in most cases you will use multiple processes.... Off dolly tends to move the metal around, getting it closer to where it was, but the shrinking is minimal, as compared to the other methods. Next, the donut dolly is a bit more effective, then a shrinking tip is a bit more effective, with the torch shrinking likely accomplishing the most shrinking. But much of this all depends on the panel, what is needed to correct the damage, persons skill/comfort level with different methods, etc.
With your quarter, as the rear side access is challenged, some of your alternatives to off-dolly are to use heat and dent puller combinations or load it full of bondo or cut out the inner panel to provide the needed access for off-dolly. IMO a heating tip and dent puller/stud welder + stud puller combo would tackle about 90% or so of that damage if you did wish to leave the inner panel intact. This would leave a minimal amount of filler required to fix the remaining defects. I doubt you'll be able to get the panel back out where it needs to be with shrinking alone (ie: using pencil torch only), it will need pulling also. Not having a stud welder/dent puller anymore, unless you plan to get one, the option of cutting out the inner panel would seem more appealing....
With rear access provided, you can use whatever works to get the job done. In this scenario, I would suggest some off dolly to bump up the severe low spots, then go with a shrinking method (or if panel is too tight to push outward, some shrinking may be needed first). The Donut dolly method can be accomplished with minimal cost, There is a reducer bushing that would work a bit better than the elbow I showed earlier. A straight through hole in the reducer bushing allows you to use a finger in the hole to locate the dent for positioning the tool. The issue here is likely going to be free and clear access for swinging the hammer, so for tight areas, you may want to use the heating tip or your pencil torch. When you get to a point where you've shrunk enough and need to bump up some low spots, I've found the small shot bag I showed works a bit quicker than trying to use on-dolly hammering to stretch the metal. Of course, using the shot bag on the outside to bump the panel outward would require swinging room for the hammer, so sometimes you'll need to be creative with bumping devices......as long as what you are doing doesn't create more damage.
For the hammers, even though one is "flat", it still has a slight crown, in order that the edges of the hammer will not damage a flat panel by leaving semi-circular marks from the edge hitting the panel. But really, the higher crowned hammer is used where it more closely matches what you are striking, such as the back side of a crowned panel. If the inside of your quarter has such a low crown that the "flat" hammer leaves marks, then you would want to use the higher crowned one. But use it with restraint, as you don't want to pound dents back the other direction.
Regarding hammers, all will shrink, just depends how they are used. Given an on-dolly scenario, all will stretch as well. There are also what I consider "gimmick" hammers that may have a waffle face that are touted as shrinking hammers. In most cases, any waffle face device will take a stretched piece of metal and basically "accordian" the length to pull in any stretch. The reason I call these gimmick devices, is that they really didn't shrink anything, and now that your panel has this waffle shape deformity, you have locked yourself into using body filler to fix the area. Not saying anything is wrong with that, it all depends on your level of finish you are trying to attain. But there are plenty of methods that actually shrink the metal, such as those we've been discussing, that will leave the panel flat/original crown where filler isn't a requirement to cover damage left by the tooling.
As to the hammer used for the donut dollly, it goes back to the springback condition that was described above in the formation of a dent. As we use the donut dolly, the same condition will need to occur. So if you have a flat sheet, and a flat hammer, you'll be there forever as nothing is getting pushed into the hollow of the dolly (the shrinking effect) so nothing is going to happen. If you have a flat panel, such as the bus door shown earlier, then a slightly crowned hammer is needed so that once the metal is forced in the hollow, and the slight bit of springback occurs, our result we are looking for is the return of the flat (original crown). When hammering on an outward crown, such as the outward facing roof dent sample experiment, you can use the flat hammer as is does force the high dent crown down into the hollow. Using a crowned hammer in this case would be like these two surfaces coming together: -------)(--------- , where you will have more chance of creating dents the other direction, so hammer selection will depend on your panel shape and what you are trying to accomplish.
On positioning the donut dolly, hammer strikes against the high side (convex) and dolly supports against the low side (concave)Last edited by MP&C; 02-13-2012 at 04:04 PM. Reason: kant spel
-
02-13-2012 12:05 PM #50
CHR Member
- Join Date
- Oct 2010
- Location
- Duluth
- Car Year, Make, Model: 37 Ford Tudor Slantback
- Posts
- 234
Thank You. You are a very good teacher. I am going to cut out some more of that inner panel, and make a crowned hammer long enought to get in there. I will also try that pencil torch. Though I have the same problem as you showed on the deck lid, only I didn't blast it. I also have dents on he roof without a headliner. I am also going to make one of those doughnut dollys out of a steel reducer. I will show you hat I have made before I use it.. Al
-
02-13-2012 12:24 PM #51
CHR Member
- Join Date
- Jun 2008
- Location
- Leonardtown
- Car Year, Make, Model: Walking
- Posts
- 1,228
Don't use steel !! With any mis-alignment it will act just like any other on-dolly and stretch. The PVC will be less than $5 at your hardware store, and the softer material has less chance of providing an on-dolly planish.
-
02-13-2012 01:16 PM #52
CHR Member
- Join Date
- Oct 2010
- Location
- Duluth
- Car Year, Make, Model: 37 Ford Tudor Slantback
- Posts
- 234
Ok. PVC it is.
-
02-13-2012 04:00 PM #53
CHR Member
- Join Date
- Jun 2008
- Location
- Leonardtown
- Car Year, Make, Model: Walking
- Posts
- 1,228
Al, here's the pvc reducing bushing I was referring to. Don't forget to smooth the sharp edges, I chucked these up in the lathe, but nothing a file wouldn't take care of with them clamped in the vise.
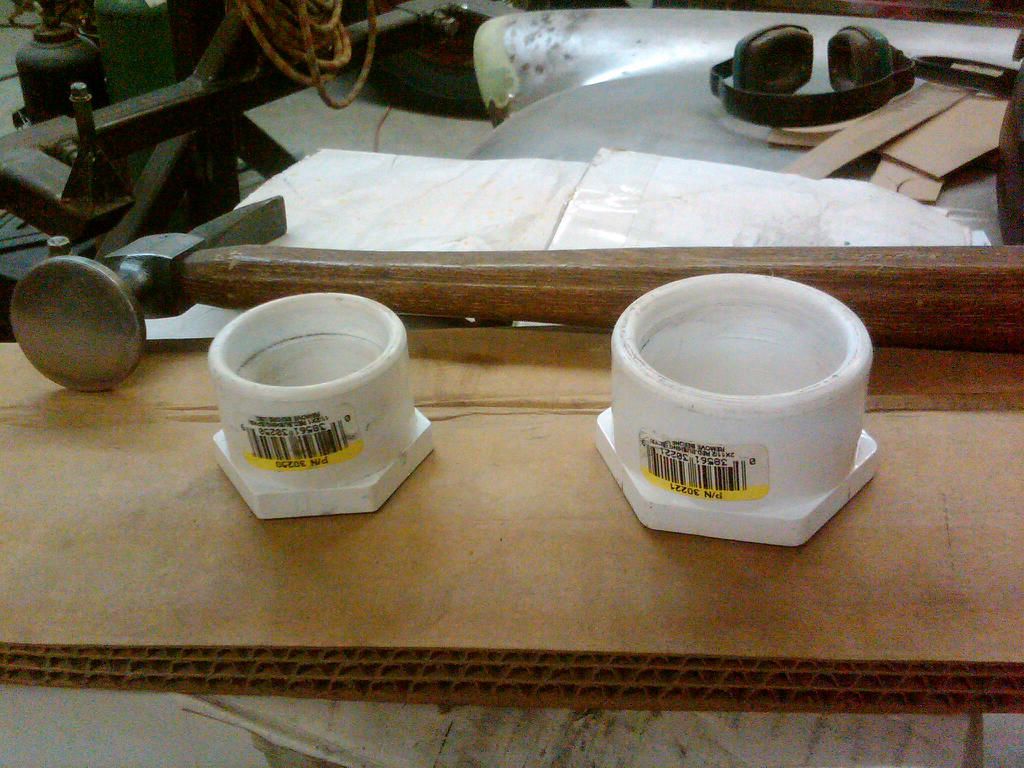
As a suggestion for the sizes, the hammer head diameter is usually just under 2". I'd get one just larger than the hammer head diameter, and one the next size up:
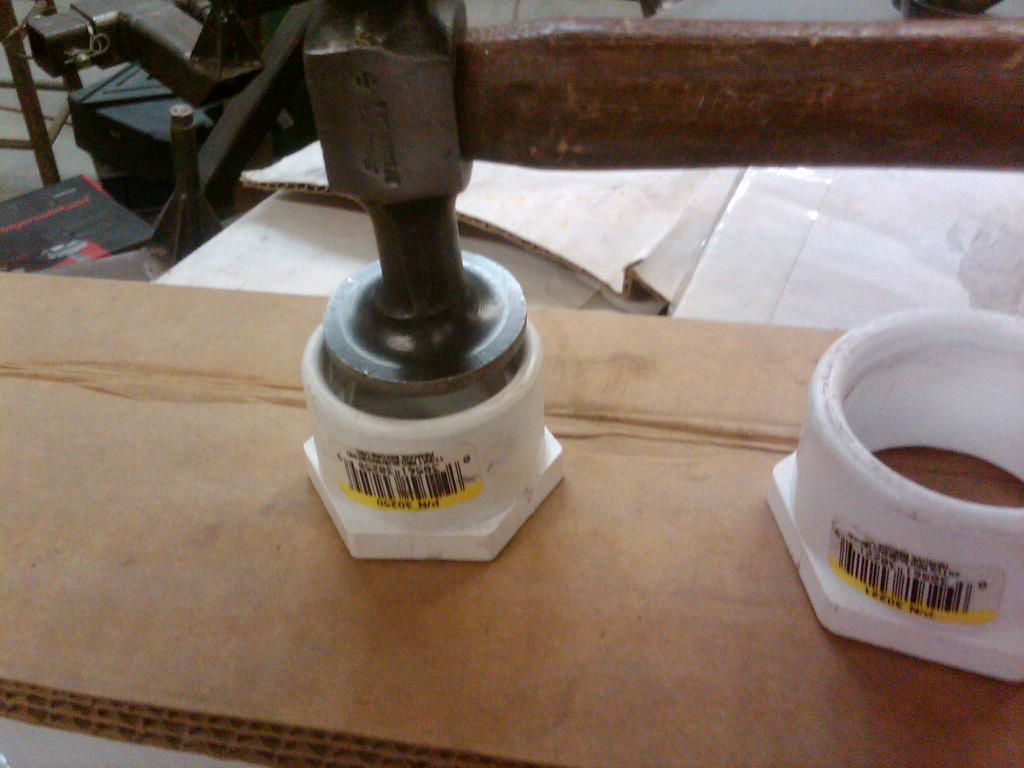
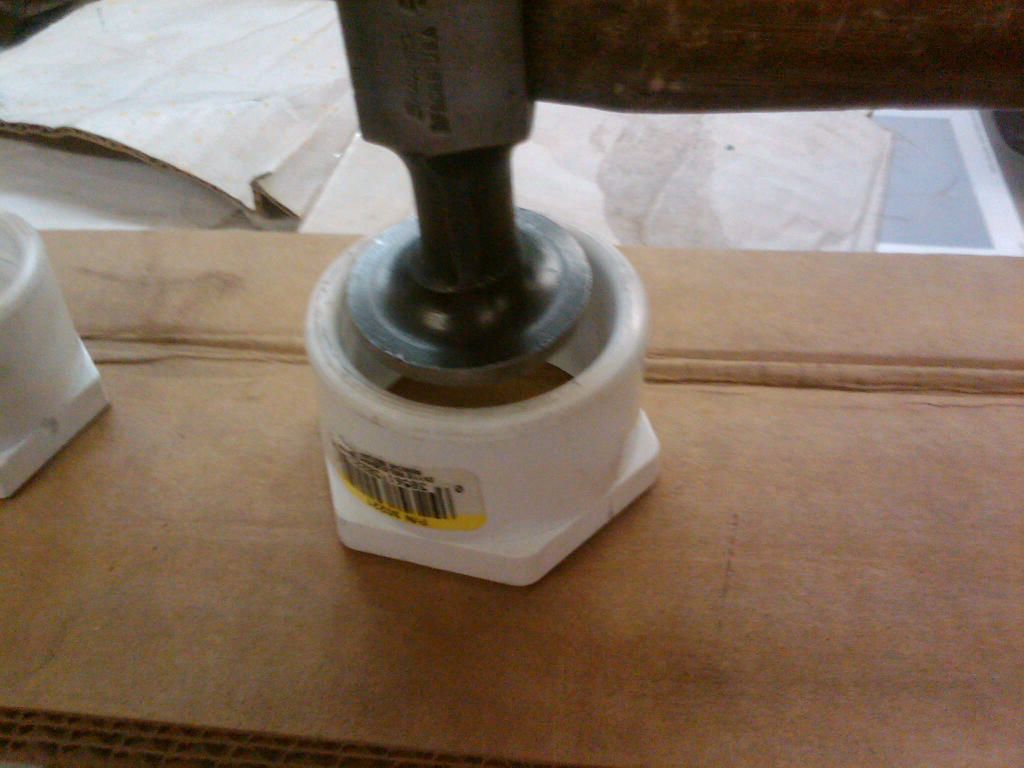
That should take care of about anything you'd want to use them for...Last edited by MP&C; 02-13-2012 at 04:49 PM.
-
02-13-2012 05:07 PM #54
CHR Member
- Join Date
- Oct 2010
- Location
- Duluth
- Car Year, Make, Model: 37 Ford Tudor Slantback
- Posts
- 234
I bought a "T" 2", 2", 1". Face of the old pick hammer is 1 3/4" I figure if I screw anything up on one end.. I have the other. I also bought a pencil tip for the bigger propane tank. The little butane guys only last 1hr, and if you fill them to full.. They won't shut off.
-
02-14-2012 03:30 PM #55
CHR Member
- Join Date
- Oct 2010
- Location
- Duluth
- Car Year, Make, Model: 37 Ford Tudor Slantback
- Posts
- 234
Spent a bunch of time on a 3x3" square. It may have gone up 1/32", but that is a maybe.. I found that if I heated a spot, and hit it from the back I could get it to come out a little. Then spray it with water.
Crossbar Dent Auto Body Car Body Automotive Dent Repair Kit No Marring Kit | eBay
Do these things work??, or do you need a painted surface to work off of..
-
02-17-2012 06:53 PM #56
CHR Member
- Join Date
- Jun 2008
- Location
- Leonardtown
- Car Year, Make, Model: Walking
- Posts
- 1,228
That kit on ebay looks like one of the "Billy Mays" products. It may work, but the stud welder/dent puller would work much better IMO.Robert
-
02-17-2012 07:29 PM #57
CHR Member
- Join Date
- Oct 2010
- Location
- Duluth
- Car Year, Make, Model: 37 Ford Tudor Slantback
- Posts
- 234
It was a cheapy one. For pulling dents out of 26 gauge tin foil. I bought a pry bar tonight for use on tire repair. It is curved, and rounded on both ends. I heat the crease, and push with the prybar then spray with the water to shrink it. Just have to go slow. Was working on the door last night. I had to take out alot of bondo that was on it to see what it really looked like. I I did the heat and push method, and it seemed to work. There are a few smaller dents that need to be off dollied to flatten it off. In some of it.. The bondo is over 3/4" thick. Right now on the parts I have been working on it is less than 1/16". I still would like to get it better..
A question though.. What do I do for sharp oil canning?? I know of heating a spot in the center of the oil can, and quenching it, but it is like I am chacing the oil can all over the place..
-
02-21-2012 05:30 AM #58
CHR Member
- Join Date
- Jun 2008
- Location
- Leonardtown
- Car Year, Make, Model: Walking
- Posts
- 1,228
Spent the weekend in NYC, sorry so long to reply.
Where the heating and pushing process you are using is pretty effective at making the panel more pliable, especially in the crease area, IMO it is also a bit more of a challenge to maintain consistent results, which I think may be part of a "wavy" effect you may be noticing. This may be more of a panel deformation due to this process than an oil can, where the "highs" of the wave can be shrunk using the donut dolly, shrinking tip, etc. If it is indeed an oil can:
Oil can repairs are one of the hardest things to describe in words only. I think the biggest reason is two different people may see the panel in two different ways, and thus approach the repair differently. To start, in describing oil cans, there are two basic kinds, the first being a loose panel oil can where the panel easily flops back and forth with little pressure at all. This loose panel oil can is the result of a shrinking process/side effect, such as after welding in a panel or using a torch or shrinking disc, as either of these is rather aggressive in shrinking the area. A profile template of the opposite panel on the car (if it does have a good side!) serves well to read where and how much on-dolly or similar stretching process is needed to planish out the panel and restore the crown.
The other is a tight panel oil can, where stretching has occurred, whether due to body damage or excessive planishing, and the resulting excess metal is forced outward and may show up as a bulge.. Any push on the panel requires a bit more force to "cycle" the oil can and normally results in the oil can (excessive metal) moving elsewhere as the excessive metal (bulge) is pushed. The condition will require shrinking, and to find where the shrinking should be applied: Locate the perimeter of the bulge or stretched area. Using the thumb of one hand, apply slight pressure at one point on the perimeter of the oil can, and use the other hand to attempt and oil can "cycle". Continue to move your thumb around the perimeter and repeat the cycle process, and if you find a spot where the slight thumb pressure will "lock" the oil can from cycling, then shrink this area. Then check the results with profile template, and continue the process until the stretched metal / oil can condition is relieved.
The other part of the equation is restraint, or knowing when to stop. So unless restraint is mastered, one may find occasion to use multiple processes to address the "went too far" syndrome... of which I am very familiar
Last edited by MP&C; 02-21-2012 at 05:36 AM.
Robert
-
02-21-2012 04:21 PM #59
CHR Member
- Join Date
- Oct 2010
- Location
- Duluth
- Car Year, Make, Model: 37 Ford Tudor Slantback
- Posts
- 234
As far as the oil canning goes. I pushed it in kind of hard. it went in, and I had to push it back out from the backside. I put just some heat over the center. Without raising it any higher than what it is. Then quenched it. It stayed where it is, but the oil can effect is gone.
I got email today from Harbor Freight that they have a stud welder on sale for $90.00. I tried already the doughnut dolly on that crease, and hit on the crease from behind. The crease just won't move. If I bought another one of these.. I would then lay the studs down the crease how far apart?? I don't want to use that slide hammer, because it seems to pull to much up. I did see something on ebay. It looks like a rivet gun with a cage on the front.It pulls the dent up in a more controled way. That is if it works. After the studs are down the center of the crease.. And I start at the least dented first.. Should I then heat down the center of the crease and try to pull it up??
-
03-04-2012 11:22 AM #60
CHR Member
- Join Date
- Oct 2010
- Location
- Duluth
- Car Year, Make, Model: 37 Ford Tudor Slantback
- Posts
- 234
Well This is what I did. I used two welding clamps to hold the inner frame from moving all that much. Then used a 36" tire iron and put the rounded tip in the center of the dent and pushed againest it. While pressure was applied I used the hammer to tap around the outside. The crease is slowly comming back up. Not finished with it, but I have time. There was also alot of deep dents in the door that was covered with bondo, and sprayed some kind of yellow primer. I ground out the bondo and used the clamp method. They kind of poped out as well. I did get a couple of oil cans, but I heated up the tip of the oil can to near red hot. Because it came out a little more I hammered with a dolly behind it to flaten it out. Then I quenched it and the oil can was gone. Thanks guys. I just have to take my time. Maybe by the end of the Summer I might have it all in primer..
 Reply With Quote

Posting Permissions
- You may not post new threads
- You may not post replies
- You may not post attachments
- You may not edit your posts

Either return this forum to what was or get the HELL OUT!
Dead!