


Thread: My '27 T Sedan project


Results 1 to 15 of 109
 LinkBack URL
 About LinkBacks
-
02-08-2008 06:41 PM #1
 CHR Member/Contributor

- Join Date
- Nov 2007
- Location
- Calgary
- Posts
- 496
My '27 T Sedan project turned '31 A
Well I thought I'd start a thread instead of posting bits and pieces all over. I'd like to hear any comments you guys may have as I go in case I have something screwed up. I'll start with a few pictures from the begginning and work my way up to today.
First off is my frame, I didn't have a jig so I had to get creative. I sat in my car for days trying to figure this out and this is what I've got so far. I'll start with the car I brought home and then go through my frame build. The second is how I jigged my frame rails and then a mock up of the frame.Last edited by sgo70; 07-19-2008 at 10:41 PM.
-
Advertising

- Google Adsense
- REGISTERED USERS DO NOT SEE THIS AD
-
02-08-2008 06:46 PM #2
CHR Member/Contributor
- Join Date
- Nov 2007
- Location
- Calgary
- Posts
- 496
A little bit more......
-
02-08-2008 06:47 PM #3
CHR Member/Contributor
- Join Date
- Nov 2007
- Location
- Calgary
- Posts
- 496
I got a little out of order but I'm sure you can figure it out. Here's the engine mounting....
-
02-08-2008 06:50 PM #4
CHR Member/Contributor
- Join Date
- Nov 2007
- Location
- Calgary
- Posts
- 496
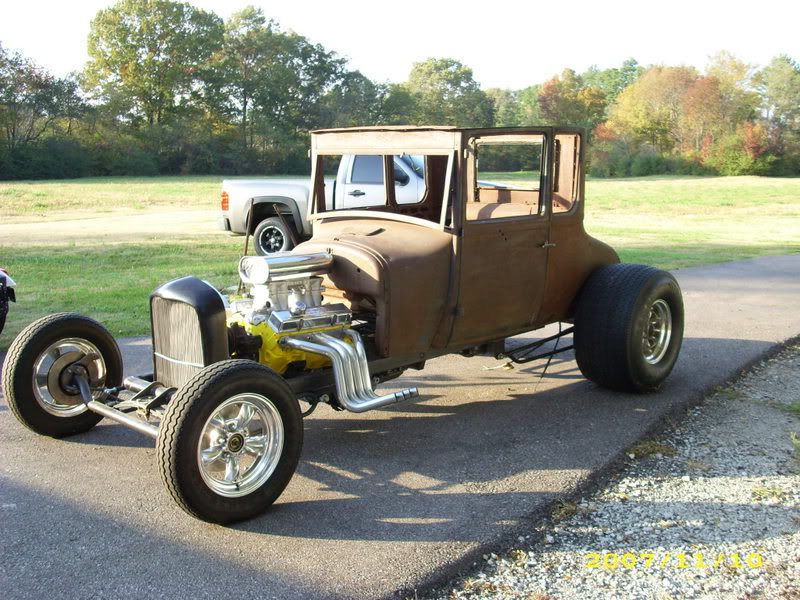
Here's some pictures of the body mounted on the frame with the suspension all complete.
-
02-08-2008 06:55 PM #5
CHR Member/Contributor
- Join Date
- Nov 2007
- Location
- Calgary
- Posts
- 496
And a little bit more. The last shows the window that I had to pie cut and re-weld and that brings me up to today. Man the body work takes time!!
-
02-08-2008 07:01 PM #6
CHR Member/Contributor
- Join Date
- Nov 2007
- Location
- Calgary
- Posts
- 496
Now my face feels sunburnt from stiching with no mask on, I gotta stop doing that. I have to come up with a steering column so I can have a floor mount shifter and e-brake but still have a signal light switch. I also need something for the roof corners so I can build a roof, andthen i"ll flip it upside down and start patching the lower body panels.
I missed some steps in there cause I have to shrink my pictures to make them fit, but I think everything shows so far. Let me know if you see any problems (besides my body work ).
).
Thanks,
Sean.
-
02-08-2008 07:17 PM #7
CHR Member/Contributor
- Join Date
- Jul 2003
- Location
- Madison
- Car Year, Make, Model: '67 Ranchero, '57 Chevy, '82 Camaro,
- Posts
- 21,160
Looks Kewl Sean.... Tom is really tall, so he won't let me chop his coupe!!!
Looks like a very solid frame! keep us updated on your progress, gonna be a nice one!Yesterday is history, tomorrow is a mystery, Live for Today!
Carroll Shelby
Learning must be difficult for those who already know it all!!!!
-
02-08-2008 07:27 PM #8
CHR Member
- Join Date
- Jul 2006
- Location
- Gulf Coast, Ms.
- Car Year, Make, Model: 37 Chevy coupe Gasser/ 51 Chevy Bel Air
- Posts
- 464
Thats going to be a nice ride! Im planning on using square tubing in a similar way that you did inside the body. Im building a 27 coupe and plan on a chop later on down the road. For right now, channeling the body will be good enough......ive still gota get that body over the frame!!
-
02-08-2008 07:28 PM #9
CHR Member/Contributor
- Join Date
- Nov 2007
- Location
- Calgary
- Posts
- 496
Thanks, I actually went with 3/16th tubing, reinforced the front and got a welding shop to mount my perch. Too much riding on that one piece.
Sean.
-
02-08-2008 07:33 PM #10
CHR Member/Contributor
- Join Date
- Nov 2007
- Location
- Calgary
- Posts
- 496
I think I had the body on and off about three times before it would fit. A little cut and grind here and there and finally it went on. A real PIA when you're by yourself and all you have is an engine hoist!!! It actually fit the frame better than I had planned, about 3/4 " all the way around, and the taper is perfect for the body. Sometimes dumb luck is on your side.
Sean.
-
02-08-2008 09:12 PM #11
CHR Member
- Join Date
- Nov 2004
- Location
- waldeck
- Car Year, Make, Model: 66 ford custom,27 t bucket
- Posts
- 683
That is excellent ,love the framework
-
03-18-2008 10:08 PM #12
CHR Member/Contributor
- Join Date
- Nov 2007
- Location
- Calgary
- Posts
- 496
Well I haven't been posting in a while, just reading everyone elses posts so I thought it's time to see what everyone thinks.
There wasn't much left of my firewall so I decided to replace that before I could mount my steering column. It doesn't look as good as the original but it's cleaner and stronger and a lot of the body is gonna need patching so I imagine it won't look much the same, oh well it's still fun. It looks a bit off in the picture but I swear it's symmetrical, I'm gonna look again tomorrow!!
I mounted my steering box on a bracket and tacked it to the frame, it had to mount just slightly back of parallel to allow the rad to be tucked down in front. I know you told me not to do that Don but I hope it doesn't affect it too much, it's probably 3 or 4 degrees off .
.
I also relocated my master cylinder back about 14" so I'll have a rod going from there through the old mount to the pedal. Mounted my shifter and had to re-fab that a bit so it wasn't under the dash.
I've also pounded out a bunch of dents and stuff, I do a bit at a time in between projects so I don't get too carried away. I also ran some 1" square tubing around the top, it really stiffened it up so there is no more flex, just a lot of grinding to do someday when I'm stuck.
If you see me heading off in the wrong direction let me know, I can use all the help you guys give me.
Sean.
-
03-18-2008 10:12 PM #13
CHR Member
- Join Date
- Aug 2006
- Location
- apollo
- Car Year, Make, Model: 96mustang,56dodgepu,39fordpu,69camaro
- Posts
- 256
Looks great man, I got to pick up the pace to keep up with you guys...lol
-
03-18-2008 10:12 PM #14
CHR Member/Contributor
- Join Date
- Nov 2007
- Location
- Calgary
- Posts
- 496
Some more.....you can see why I had to move the master cylinder back, my feet aren't that small.
Sean
-
03-18-2008 10:17 PM #15
CHR Member
- Join Date
- Aug 2006
- Location
- apollo
- Car Year, Make, Model: 96mustang,56dodgepu,39fordpu,69camaro
- Posts
- 256
How did you make your drive shaft hoops? Just heat and bend or relief cuts?
 Reply With Quote

Posting Permissions
- You may not post new threads
- You may not post replies
- You may not post attachments
- You may not edit your posts

Yep. It’s pretty sad.
Dead!