


 379Likes
Thread: Project Special K


Results 316 to 330 of 1041
 LinkBack URL
 About LinkBacks
-
06-09-2009 08:53 AM #316
 CHR Member/Contributor

- Join Date
- Nov 2007
- Location
- Calgary
- Posts
- 496
Nice job Steve,
I haven't been around in a while but you've made some good progress. That engine looks great!
The bolt you dropped in reminded me of something I did. I took the valve covers off to put my inner springs back in after break in and when I went to put the covers back on I couldn't find one of the bolts. I searched for it and it made me feel kind of sick to think I may have to tear it all down and start again. I went inside for the night and the next morning I found it still attached to a clamp. It's longer than the rest so I didn't want it going in the wrong hole, WHEW!
Keep it up,
Sean
-
Advertising

- Google Adsense
- REGISTERED USERS DO NOT SEE THIS AD
-
06-09-2009 09:28 AM #317
CHR Member
- Join Date
- Oct 2007
- Location
- Petaluma
- Car Year, Make, Model: 48 Ford F1
- Posts
- 9,795
Yep. I've done more than my share of stupid stuff on this build. The hardest lesson is what to buy, when. I've finally come to the conclusion that you just need to build it, test it, and then take it all apart for painting. I was hoping to avoid the taking it all apart part, but I now see the error of my ways!
I'm trying to balance the ever stacking house maintenance against the truck. Both need stuff done to them during good weather! I've got a few wood decks to restain, a yard to maintain, and my wife's 40th Bday to plan! But I also want to get that engine started and a lot of parts back on the truck! I'd love to clean the shop up, throwaway a billion old boxes and label all the truck stuff so I can find it!
I have thursday and friday off so hopefully I'll get the gas tank plumbed in, and the accelerator linkage and kickdown cable installed, and if I'm really good, the wiring started!
Then I'm out of here for a week to backpack the Lost coast (25 mile stretch of ocean between Mendocino and Humboldt Counties that hasn't been touched, and has no road access, other than on the ends."  "No matter where you go, there you are!" Steve.
-
06-11-2009 05:25 PM #318
CHR Member
- Join Date
- Oct 2007
- Location
- Petaluma
- Car Year, Make, Model: 48 Ford F1
- Posts
- 9,795
Today was productive but had many trips to the parts and hardware stores!
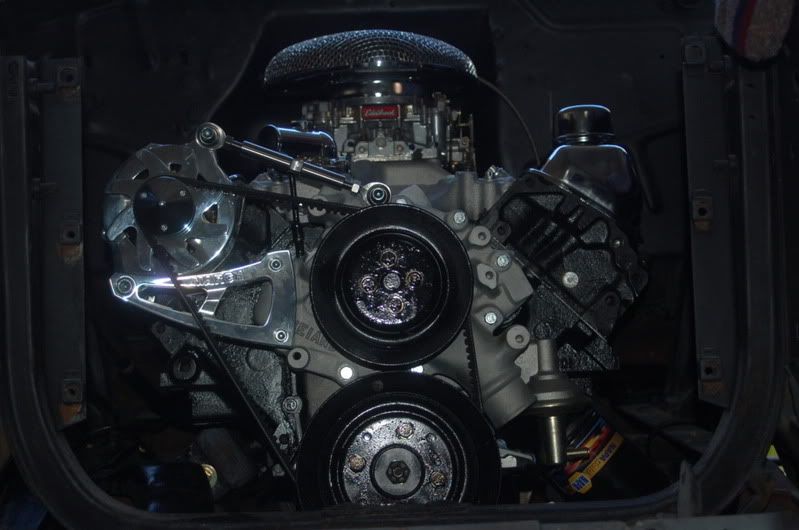
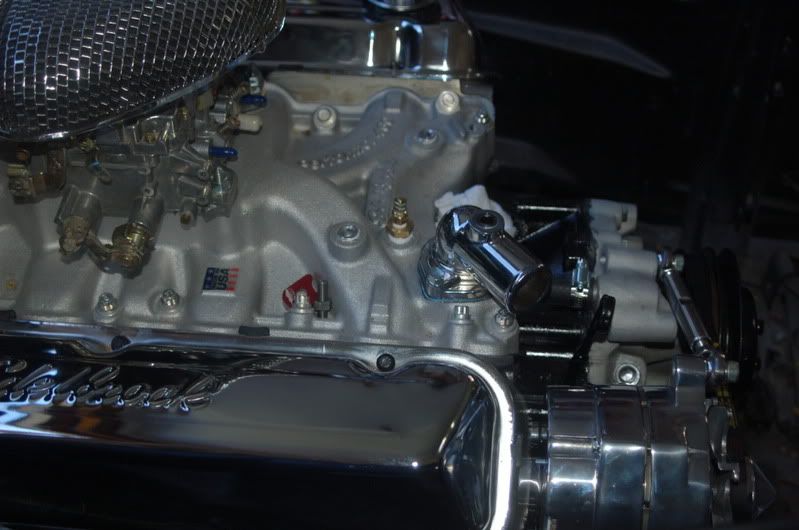
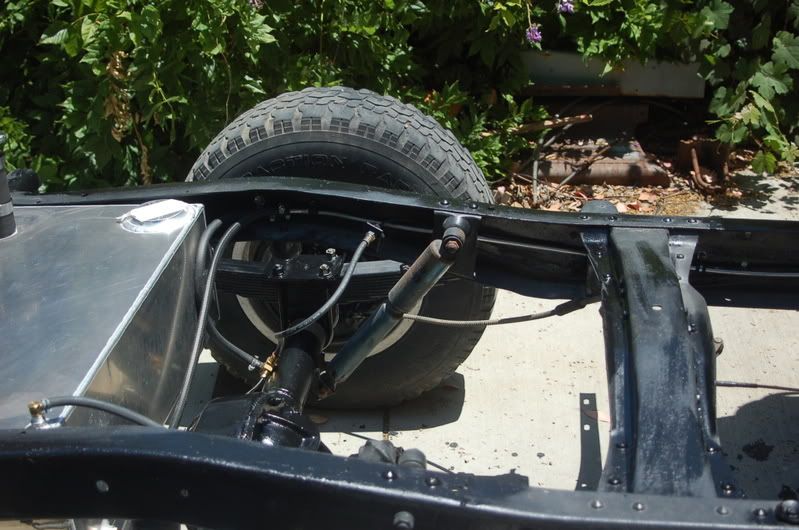
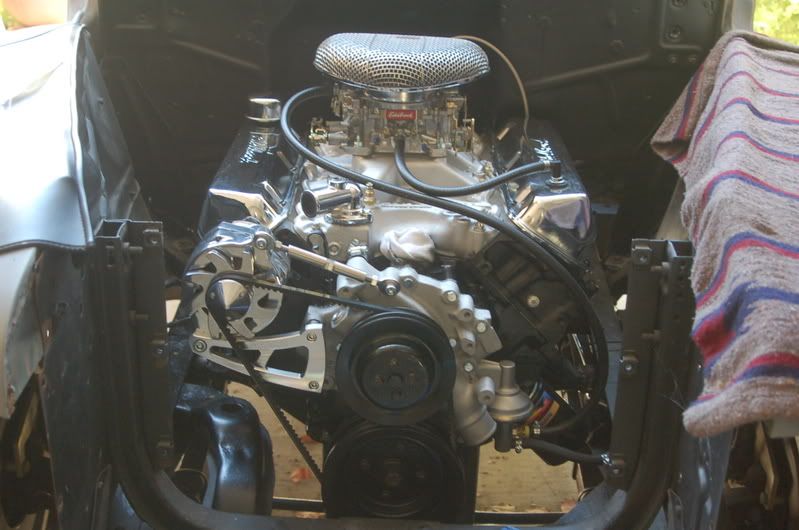
I started out but finaly getting the transmission inspection plate back on. It has been sitting around forever, took 1 minute to do. Next worked on sealing all the water and vacuum plugs on the intake. Then put in the new temp and oil transendinding units from auto meter. Put plugs back in, and mounted the alternator with the new march performance bracket. This was not as straight foward as it could have been. Their were standard and metric thread issues as well as spacers that needed to be cut to size. I think because I'm using a Weiand water pump, that the spacers they provided wouldn't work. But like everything else, and what dave say, a little cutting....
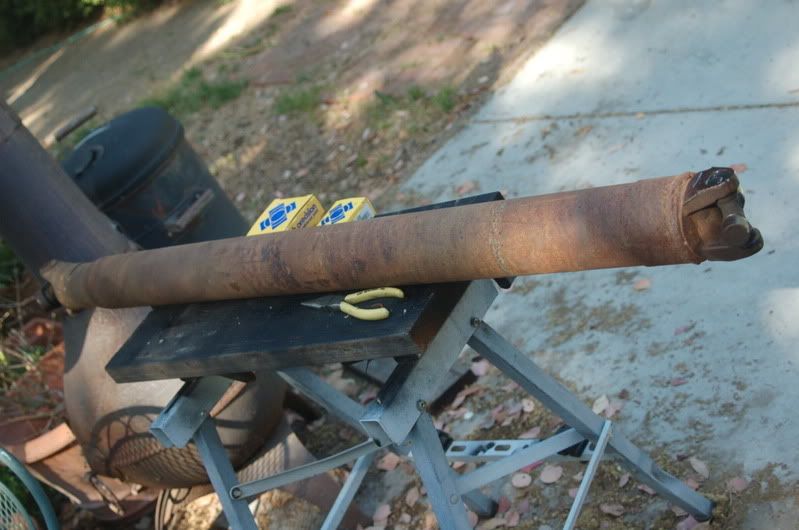
I also worked on getting the drive line in. I had to spray some penetrating oil on the old u joint to free the spring pins which were rusted it. After soaking all day they just came out. Not sure how to remove the u joint, but guessing you pull the end caps off where the spring clips hold them in place, and then the rest will slide out?
Here are some shots.
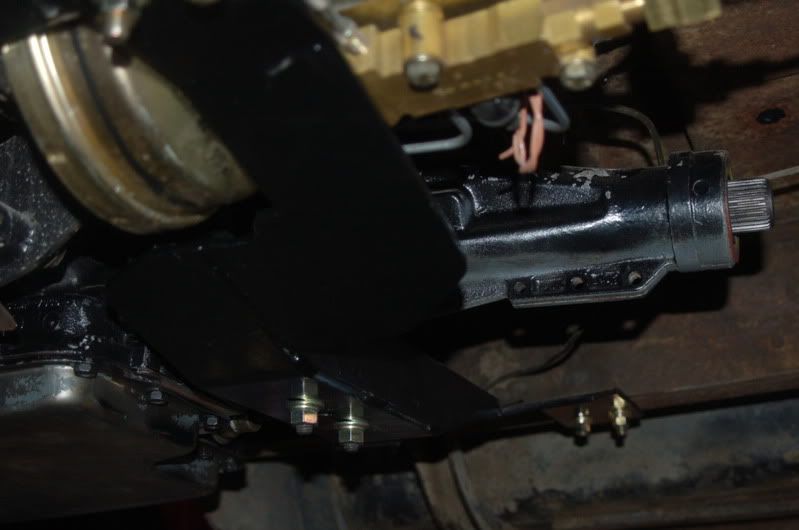
and a shot of the final install on the tranny mount.
Last edited by stovens; 06-11-2009 at 05:29 PM.
" "No matter where you go, there you are!" Steve.
-
06-11-2009 05:32 PM #319
CHR Member
- Join Date
- Oct 2007
- Location
- Petaluma
- Car Year, Make, Model: 48 Ford F1
- Posts
- 9,795
If you've followed this thread, you can see just from the last two posts, how easy it is for me to get redirected!
Felt good today, but wished I spent more time on truck and less in the car! Maybe tomorrow the gas tank and drive line will go in. I'm looking for pictures of how my transmission linkage was hooked up, so I can get that done too!
Last edited by stovens; 06-11-2009 at 05:36 PM.
" "No matter where you go, there you are!" Steve.
-
06-11-2009 06:13 PM #320
CHR Member
- Join Date
- Jan 2008
- Location
- st
- Car Year, Make, Model: 1950 Ford 2dr. Custom
- Posts
- 1,465
Steve, you are really getting close, pretty soon it will be ready to fire up. Again you're doing a good job.
Richard
-
06-12-2009 07:00 AM #321
CHR Member
- Join Date
- Jan 2008
- Location
- st
- Car Year, Make, Model: 1950 Ford 2dr. Custom
- Posts
- 1,465
I haven't changed u joints since the late 60's but I do remember using sockets the same size to press them out with a bench vice.
Richard
-
06-12-2009 04:46 PM #322
CHR Member
- Join Date
- Oct 2007
- Location
- Petaluma
- Car Year, Make, Model: 48 Ford F1
- Posts
- 9,795
Got redirected elsewhere today, so after a few hours of fighting traffic, I got home late afternoon. Wanted to at least scratch one item off the bullet list, so I pounded out the ball joint closest to the differential and poped in the new one. It was actually quite easy, I guess letting it soak in penetrating oil for 24 hours didn't hurt a thing. And a craftsman 3/4 inch socket is perfect to use as a pounding shaft that fits the diameter almost perfectly. I didn't feel too bad, the socket didn't get harmed(and I have a spare from my brother's tool set he gave me when he washed his hands of anything mechanical!)
I guess Monday will be a car day to get stuff done. Still scratch one thing off a multipage list!
" "No matter where you go, there you are!" Steve.
-
06-12-2009 07:58 PM #323
CHR Member/Contributor
- Join Date
- Jul 2003
- Location
- Madison
- Car Year, Make, Model: '67 Ranchero, '57 Chevy, '82 Camaro,
- Posts
- 21,160
Yuppers, getting one thing done is better then getting nothing done Steve.... The days I don't like are when you try to get one thing done.....and create 3 new things to do!!!!!
Anyways, engine is looking great! As for fitting brackets...they never come out of the box and bolt right on, do they????Yesterday is history, tomorrow is a mystery, Live for Today!
Carroll Shelby
Learning must be difficult for those who already know it all!!!!
-
06-12-2009 09:05 PM #324
CHR Member
- Join Date
- Jun 2004
- Location
- In the Boonies of Ontario
- Car Year, Make, Model: 40 Graham Sharknose :58 MGA/Ford V6
- Posts
- 1,307
I have used a large(6",) heavy duty C-clamp with a socket to remove U-joints when they are still in the car and you don't want to remove the driveshaft to get to a bench vise. Just make sure they are HD because I have broken a cheapie (AKA made in China) in two while doing this with a stubborn joint. Just remove the clips, then use a big enough socket to allow the cup to go inside and drive the other clip through with the C-clamp.
-
06-15-2009 08:42 PM #325
CHR Member
- Join Date
- Oct 2007
- Location
- Petaluma
- Car Year, Make, Model: 48 Ford F1
- Posts
- 9,795
with the drive line ready to go in, I tried to rough fit it with no luck. Seems the new differential is longer combined with the engine mounted farther back. With the help of a few members I found a local shop that specializes in customizing drive shafts, so they are on the job. I also was able to drill and mount the gas tank today, so little more progress done. Hopefully I'll get the plumbing done for the gas line and or the floor boards painted and permanently mounted and sealed in place this week. Then it's wiring and startup time!
Last edited by stovens; 06-16-2009 at 05:48 AM.
" "No matter where you go, there you are!" Steve.
-
06-16-2009 03:18 AM #326
CHR Member
- Join Date
- Jan 2008
- Location
- st
- Car Year, Make, Model: 1950 Ford 2dr. Custom
- Posts
- 1,465
The drive shaft is something you just about have to expect to be cut, and made to fit but a good machine shop can get them balanced pretty well. Won’t be long till the neighbors will be calling the law.
I couldn’t sleep so I woke up the wife, and started reminiscing about our first neighborhood, it was an older subdivision we were the new kids on the block. Every time I fired up the 39 Ford coupe, which I still have, the neighbor lady would call the police.
It’s nice to be the bad ass on the block, wish those day’s were still around!!
Richard
-
06-16-2009 05:43 AM #327
CHR Member
- Join Date
- Oct 2007
- Location
- Petaluma
- Car Year, Make, Model: 48 Ford F1
- Posts
- 9,795
Yeah Richard, there were a few times a couple of years ago, when a transient guy moved in with the renters next door. Everyday he would sit outside from 10 a.m. until about 2 a.m. smoking and talking nonstop. In the evening he would start bon fires about 3 feet from my fence under my second story bedroom window. I lost about 6 months of sleep during that time. I tried at first to talk with them, then the landlord, finally the police and fire department. The whole neighborhood signed a petition to the landlord which finally kicked the guy off the property. One of his buddies would just say I got my rights to be out here and talk all I want. So around that time I took to 8a.m Harley Tuneups outside his bedroom window, and one day left the rototiller run until it ran out of gas, that was the only thing that seemed to get thru his thick skull!
Mostly we all get along now days, mind those renters are gone, so it will be mid day starts and no idling in the back by their bedrooms.
But I am getting antsy to get this one fired up.
The nice thing about taking the drive shaft in to the shop, was he pointed out that my 68 9" differential could have many different sized universal joints, so he sent me home with two testers which have two different diameter bearings on each set. One is 1 1/8" and the other is 1 1/16th ". The difference between the two universal joints is also the width of the joint. Turns out mine takes a smaller narrower config to the diff. I would have never known, until the shaft was the right length, so one step saved!Last edited by stovens; 06-16-2009 at 05:47 AM.
" "No matter where you go, there you are!" Steve.
-
06-16-2009 07:23 AM #328
CHR Member
- Join Date
- Jan 2008
- Location
- st
- Car Year, Make, Model: 1950 Ford 2dr. Custom
- Posts
- 1,465
Steve, as I get older I just want piece, and quiet even though we live in the country we still have to put up with disorderly young guy's (like I was at one time) now it's with neighbors dog's running wild. I told the young neighbor finally that no one wants to live next to a bad neighbor. He said yea I know, the young guys next to me party late into the night with loud music. It's always different when someone else is disturbing the piece.
That was real helpful information about the universal joints, could have been frustrating.
RichardLast edited by ford2custom; 06-16-2009 at 07:26 AM.
-
06-21-2009 06:04 PM #329
CHR Member
- Join Date
- Oct 2007
- Location
- Petaluma
- Car Year, Make, Model: 48 Ford F1
- Posts
- 9,795
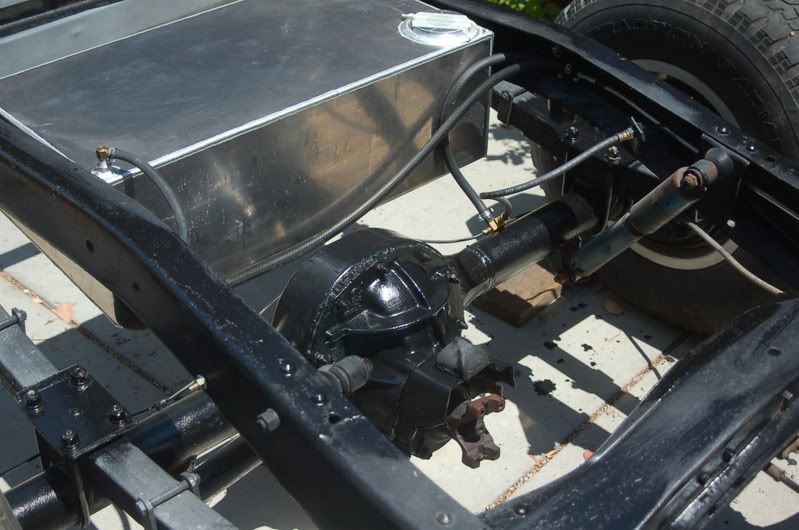
Got the gas tank plumbed in today. I went with aluminum 3/8 inch fuel line along the frame rail, and then put 3/8 inch fuel hose to the pump and up to the carb. I also connected the brake booster vacuum, to the back of the new carb, and connected the pcv valve to the front of the carb.
I decided to hold off putting in the canister fuel filter, ball shut off valve and stainless lines, until I have a better idea of where the exhaust will be. I just need gas to the carb for engine startup and breakend for now, shiny stuff can wait until later. After I connected the gas hose from the carb to the out let on the fuel pump, I found the original steel fuel line still connected to the original fuel pump in a box. I spent some time cleaning it up and will probably paint it black, and connect the braided stainless lines to that or not, later.
I tried hooking up my cable shifter, and am stimmied as to where the two bolt bracket, near the end of the cable, bolts to? It seems there are no bolt holes anywhere that would work, except two adjacent pan bolts! I thought I took a picture of it before disconnecting it originally but can't find it. The bracket is triangular shaped and is very close to the end that connects to the shifter linkage. I have no idea who makes the shifter, so nowhere to get original instructions! The reason the pan bolts don't make sense is the pan has a lip that curves downward, so a washer or two would be needed to keep the bracket mounted flat." "No matter where you go, there you are!" Steve.
-
07-04-2009 01:55 PM #330
CHR Member
- Join Date
- Oct 2007
- Location
- Petaluma
- Car Year, Make, Model: 48 Ford F1
- Posts
- 9,795
I set aside some time today and tomorrow for the truck. I love my wife, she's doing my house and yard duties letting me spend some guilt free hours on the truck. I took the fitted floor panel patches out today, and coated them with Por 15. While I was garbed up to keep that stuff off of me, I painted some scuffed frame areas and also hit the used 9" differential and axle and brake backing plates with it as well. What a difference a little paint makes! Here are also some shots of the above, plus the gas tank in with the temp rubber lines for startup and shake down. I'm a little worried about where to run my vent line for the gas tank. Right now it's slightly below the top of the tank. Once the bed is remounted I can probably mount the breather to the bottom of it and be above the tank. I also need to put in my fuel shut off valve and mount the canister fuel filter, but am not sure if it should be mounted to the rear by the tank or if there will be room in the engine compartment once the exhaust is installed with the headers in place! We'll see. Thanks everyone for the encouraging words, and I apologise for posting the little stuff!


" "No matter where you go, there you are!" Steve.
 Reply With Quote

Posting Permissions
- You may not post new threads
- You may not post replies
- You may not post attachments
- You may not edit your posts

This site is up more often lately, but very little traffic.
Dead!