


 21Likes

Results 16 to 30 of 54
 LinkBack URL
 About LinkBacks
-
08-05-2012 06:45 PM #16
 CHR Member/Contributor

- Join Date
- Dec 2006
- Location
- Woodstock
- Car Year, Make, Model: 34,stroker,32pu,2020 MustangGTpp2
- Posts
- 1,109
Handy tool and good explanation of the process, very enjoyable read. A good sheet metal man can do some great stuff, shaping raw metal is absolutely an art. Seems a shame to cover it with paint, like placing a body over a well fabricated tube frame and drive train.
Correct me if I am wrong, but I believe you have posted metal meets in the past. I follow them with great interest thanks for that.I have two brains, one is lost and the other is out looking for it
-
Advertising

- Google Adsense
- REGISTERED USERS DO NOT SEE THIS AD
-
08-05-2012 07:32 PM #17
CHR Member/Contributor
- Join Date
- Dec 2006
- Location
- Woodstock
- Car Year, Make, Model: 34,stroker,32pu,2020 MustangGTpp2
- Posts
- 1,109
Ok time for me to show one, nothing fancy a metal brake.


I have two brains, one is lost and the other is out looking for it
-
08-06-2012 04:27 AM #18
CHR Member
- Join Date
- Apr 2001
- Location
- Byron, Mi.
- Car Year, Make, Model: '88 Astro Van-BAD AST
- Posts
- 871
Nice looking bender Pepi. How Heavy will it bend? Do you have plans?
Curious people need to know...
If money is the root of all evil... Women must be the fertilizer...
Link to my BAD AST Build Thread:
http://www.clubhotrod.com/suspension...van-build.html
-
08-06-2012 04:31 AM #19
CHR Member
- Join Date
- Apr 2001
- Location
- Byron, Mi.
- Car Year, Make, Model: '88 Astro Van-BAD AST
- Posts
- 871
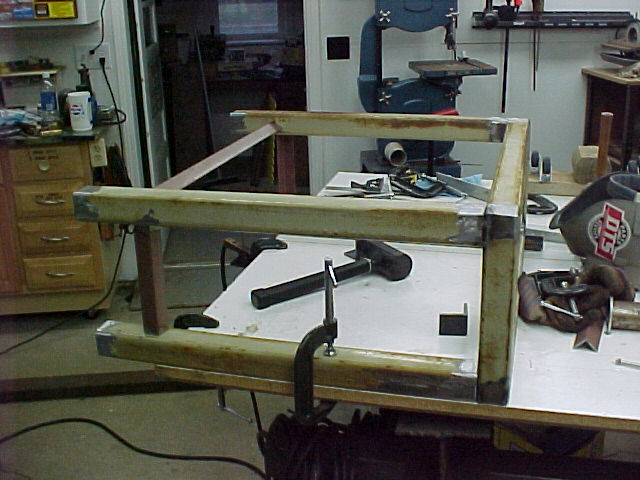
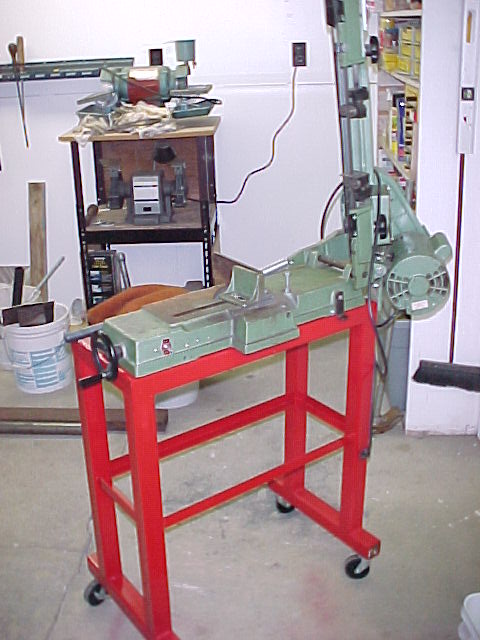
I may have posted this before.
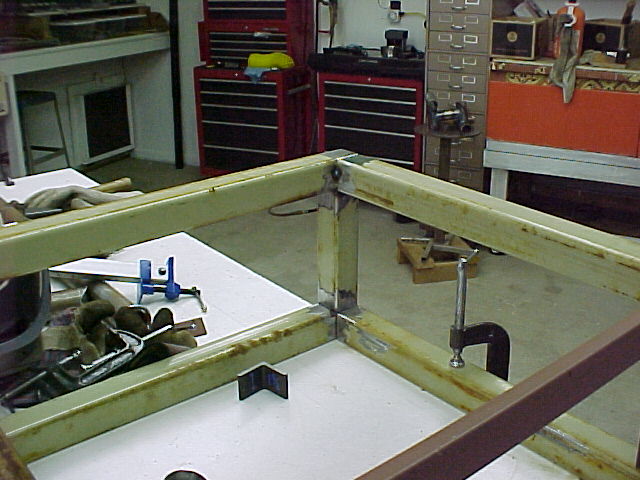
I decided to improve the working height of my H/V Bandsaw. At 24" it was a pain in the back to work with it. It had always been a problem with long stock to keep it level with the cutting surface. After this mod I will be able to use one of my roller work stands. Much better...
I had picked up 30 sticks of used 2 x 2 x 1/8th wall x 100"lg. sq. tubing so I made the new table out of a stick and a half of that. I know it's a little overkill for something like this but, at 7 bucks a stick, I can justify the 10 dollar material cost.
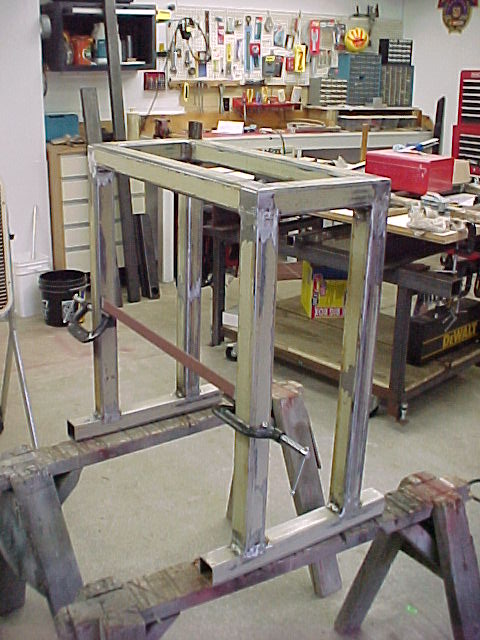
I used some brush on industrial red enamel I had left over from another project. It was very hot and humid when I painted this and it took a full day for it to tack-off and get solid enough to put on a second coat. Once it was dry though it is VERY tough paint...
This was after the first coat.
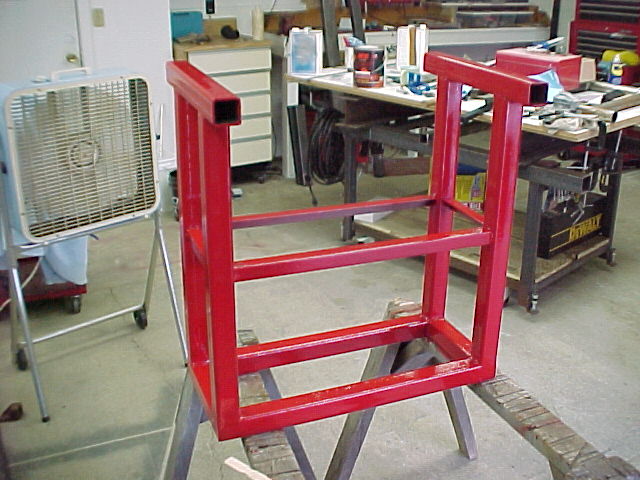
After the second coat

Added the casters and let it sit in the sun for a day to bake. The paint got real hard after this.

I didn't get any pics of the mounting tabs before I bolted the saw down but I made some angle brackets and bolted those to the top to use as mounting lugs for the original sheet metal leg attachment holes on the saw. Worked well, as I set the saw in place and then marked and drilled the thru holes for three 1/4-20 bolts. The saw is nice and stable and rolls around much easier now.
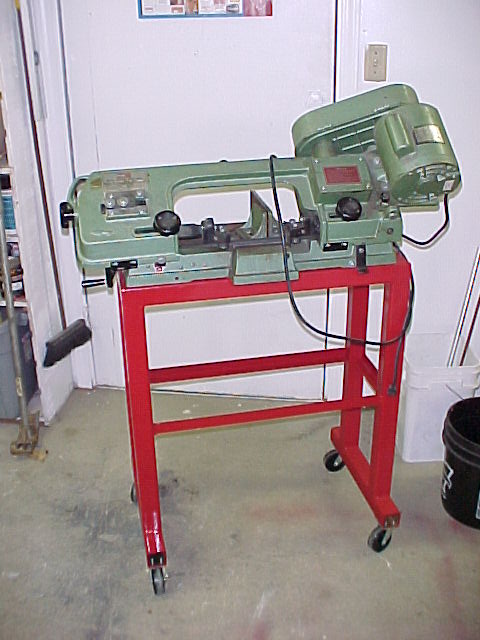
And let me tell you it is very nice not having to bend over to set up cuts!
Thanks for looking
Mark
If money is the root of all evil... Women must be the fertilizer...
Link to my BAD AST Build Thread:
http://www.clubhotrod.com/suspension...van-build.html
-
08-06-2012 04:38 AM #20
CHR Member
- Join Date
- Apr 2001
- Location
- Byron, Mi.
- Car Year, Make, Model: '88 Astro Van-BAD AST
- Posts
- 871
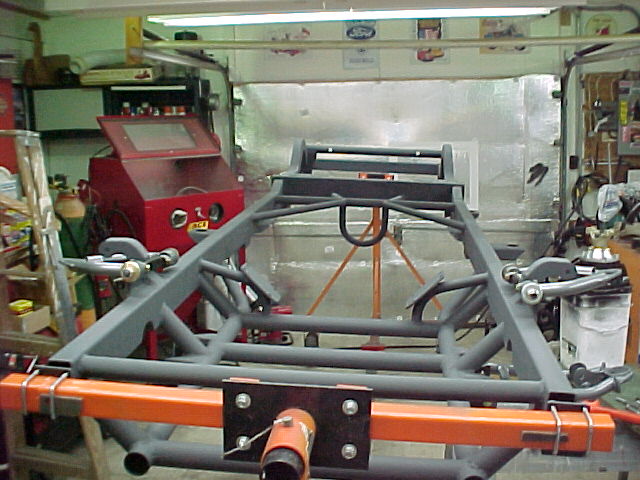
I think I posted this when I was rebuilding the '49 F1 a few years ago. This is the same rotisserie I used for Bad Ast.
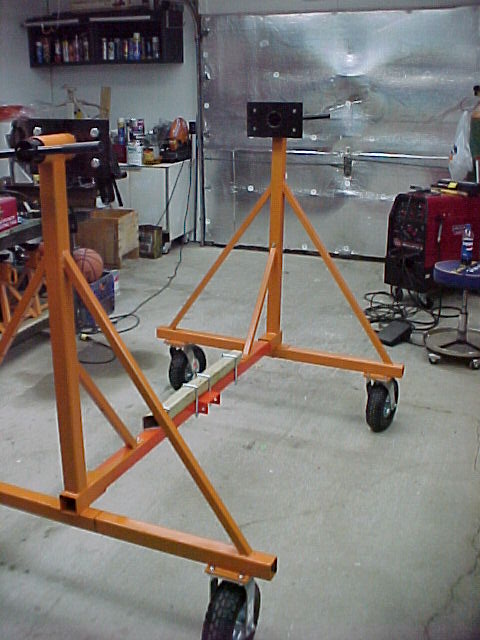
I had been thinking about a rotisserie for the '49 frame. I got serious about it when I found 1000lb engine stands on sale at NAPA for $35.00 ea. I couldn't build the stands for that kind of money so I bought two and made a couple of mods to make them into chassis stands.
I didn't get any pics before I started cutting up the stands but you can see what I ended up with. I made new, taller necks to support the rotation part of the stands. This also got the frame high enough to work on AND still rotate (I left the running board brackets on it) over the lower tie bar.
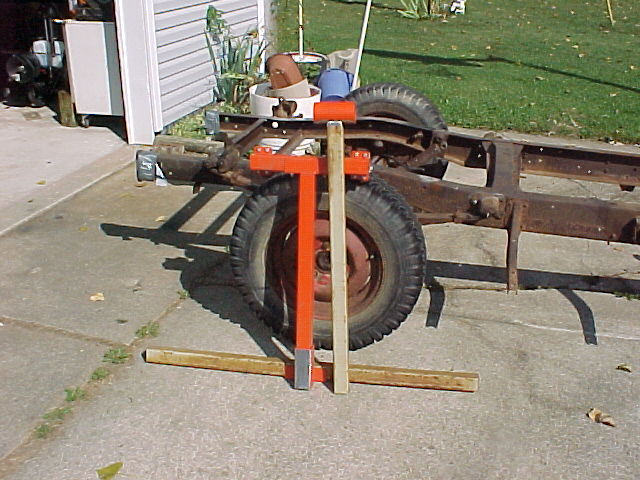
I also replaced the lower tube with a longer one to increase the track width of the wheels.

All welded up and painted safety orange. I put solid 10" casters on one end and swivels at the other. It drives fine.
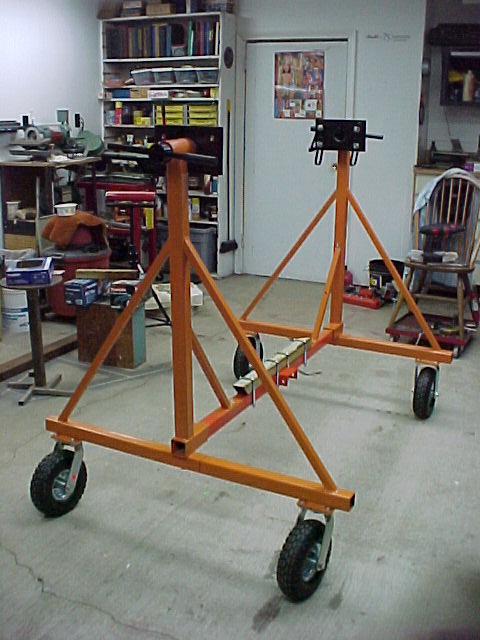
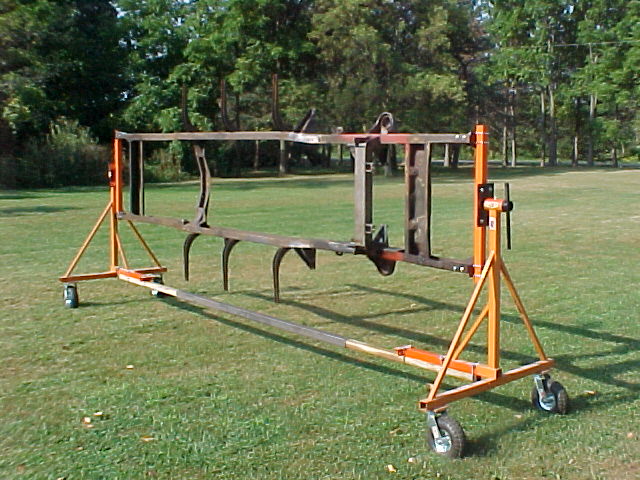
I made a couple of bars that bolt to the rotisserie head with some adapter brackets that bolt to the rails and are held on with 2" x 2" U bolts. This worked very well.
Here is a shot with the '49 frame installed.

Rotated verticle.
A couple of weekends of cleaning and grinding and it was ready for paint!
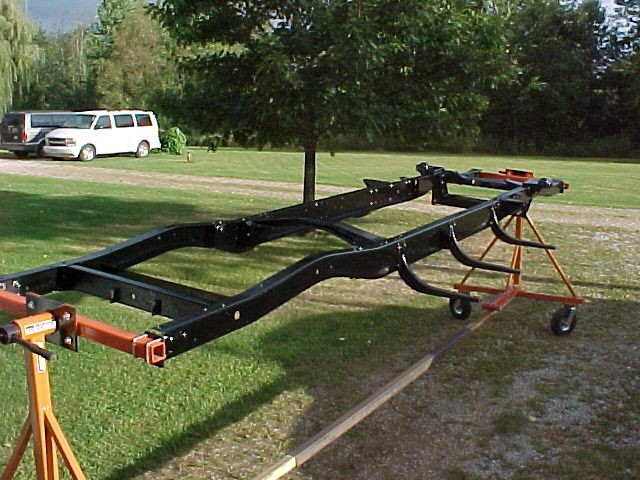
This rig made it a breeze cleaning and painting the frame. Actually enjoyable, if you know what I mean.
It also adapted nicely to the frame I built for my Bad Ast astro van
Thanks for looking
MarkIf money is the root of all evil... Women must be the fertilizer...
Link to my BAD AST Build Thread:
http://www.clubhotrod.com/suspension...van-build.html
-
08-06-2012 04:52 AM #21
CHR Member
- Join Date
- Apr 2001
- Location
- Byron, Mi.
- Car Year, Make, Model: '88 Astro Van-BAD AST
- Posts
- 871
Lots of good info and ideas guys! The tuck fork I am going to have to build!
I posted this in the Bad Ast build thread.
I hit a yard sale a few weekends ago and picked up an old Sears scroll saw for 5 bucks...
It ran! I had to rewire it, put on a new switch and do a lot of cleaning and some fine tuning but she runs like a champ and I was cutting 1/4" aluminum with it Sunday morning!

I made a foam board blank to mock up gages in the van. I used 5 dollar saw to cut this out...
http://images55.fotki.com/v268/photo...MVC010F-vi.jpg
I used the scroll saw again to cut out some more foam core to make the speedo and tach. I used these to mock up the gage positions in the cluster.
[img]http://images16.fotki.com/v377/photo...MVC011F-vi.jpg[/img]
I have gotten 5 dollars worth of use out of that saw already! I use it almost every time I am out there working.
MarkIf money is the root of all evil... Women must be the fertilizer...
Link to my BAD AST Build Thread:
http://www.clubhotrod.com/suspension...van-build.html
-
08-06-2012 10:01 AM #22
CHR Member/Contributor
- Join Date
- Sep 2007
- Location
- Gardner, KS
- Car Year, Make, Model: '33 HiBoy Coupe, '32 HiBoy Roadster
- Posts
- 11,245
Glad you posted this, Mark. I had forgotten that those little scroll saws will cut non-ferrous metals! Originally Posted by astroracer

Roger
Enjoy the little things in life, and you may look back one day and realize that they were really the BIG things.
-
08-06-2012 01:43 PM #23
CHR Member
- Join Date
- Sep 2007
- Location
- UPSTATE New York
- Posts
- 4,336
Another saw that will cut non-ferrous metal is my little 10" Sears band saw. So far I've cut up to half inch(s-l-l-o-o-o-l-y) though 1/4 seems to cut like butter - and so far haven't hurt the wood cutting blade at all. Just have to remember to clean the chips off the wheel rubber occasionally Originally Posted by rspears
Dave W
I am now gone from this forum for now - finally have pulled the plug
-
08-06-2012 05:50 PM #24
CHR Member/Contributor
- Join Date
- Dec 2006
- Location
- Woodstock
- Car Year, Make, Model: 34,stroker,32pu,2020 MustangGTpp2
- Posts
- 1,109
astroracer,
Good use for a couple of engine stands, wise idea bet that made the frame prep much less hasle. I noticed in one of your shots a bandsaw. I took one of those slowed it down turned it into a metal bandsaw, if interested let me know.
The metal brake came from a book, the author is David J. Gingery. The shot of the bend above was 20GA., it will bend up too 18GA.


I have two brains, one is lost and the other is out looking for it
-
03-09-2013 05:36 PM #25
CHR Member/Contributor
- Join Date
- Dec 2006
- Location
- Woodstock
- Car Year, Make, Model: 34,stroker,32pu,2020 MustangGTpp2
- Posts
- 1,109
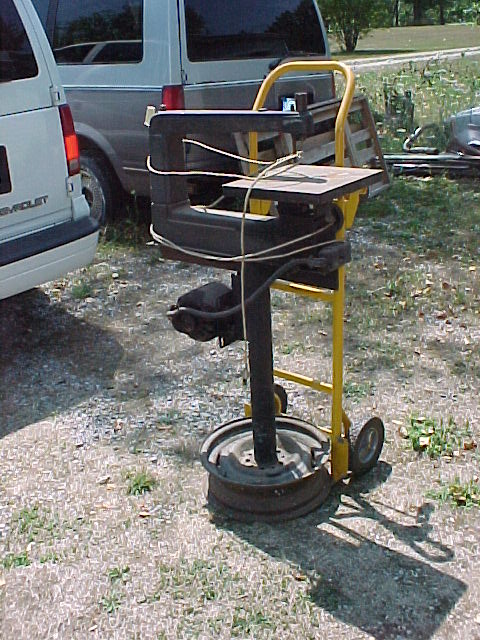
HF had a tent sale, grabbed a hand cart, made a cut and a Tig cart starts to form.
DSCN2502.jpg
Shop Forman stopped by to check square, he approved.
DSCN2529.jpg
He stayed out of my hair, finished and painted
DSCN2664.jpg
DSCN2663.jpg
Add one welder
DSCN2667.jpgI have two brains, one is lost and the other is out looking for it
-
03-10-2013 04:17 AM #26
CHR Member
- Join Date
- Mar 2010
- Location
- Montgomery
- Car Year, Make, Model: 1962 Ford Fairlane 2dr with 289
- Posts
- 9,934
Let the fun begin - - - - nice work Pepi
now, what's your next project?.
" I'm drinking from my saucer, 'cause my cup is overflowed ! "
-
03-10-2013 04:36 PM #27
CHR Member/Contributor
- Join Date
- Sep 2007
- Location
- Gardner, KS
- Car Year, Make, Model: '33 HiBoy Coupe, '32 HiBoy Roadster
- Posts
- 11,245
Pepi,
I picked up a similar 2-wheel cart, maybe at HF but not sure. Adapted mine into a cart for Oxy-Acetylene bottles to feed one of the little Cobra torches. Not near the project for the Mig, but a bit of fab for the accessory tray, chain restraints and extending the base with rings.
DSCN6129.JPG
DSCN6127.JPG
DSCN6128.JPGRoger
Enjoy the little things in life, and you may look back one day and realize that they were really the BIG things.
-
03-10-2013 05:06 PM #28
CHR Member
- Join Date
- Apr 2001
- Location
- Byron, Mi.
- Car Year, Make, Model: '88 Astro Van-BAD AST
- Posts
- 871
Nice job of re-purposing guys! Both carts look great and will work just as well as a "store bought" one.
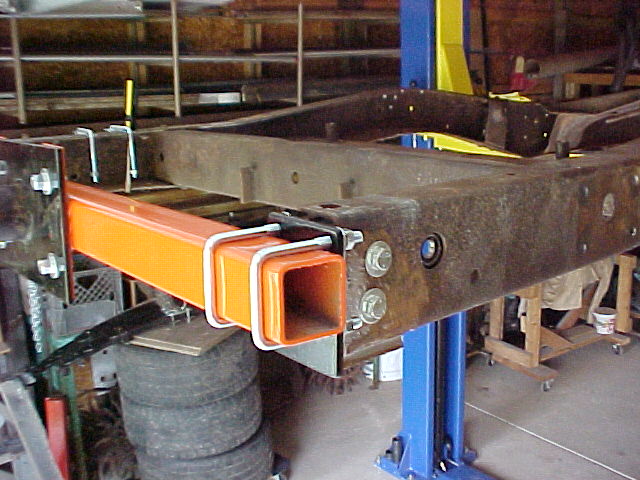
Today I made a simple sheet metal bender out of scraps I had laying around. Necessity being I had to bend a panel for the van that was just under 39 inches long and the 3-in-1 is too short.
This is the panel. You can see the dashed tangent line at the top. That's where we needed a 1" radius bend.
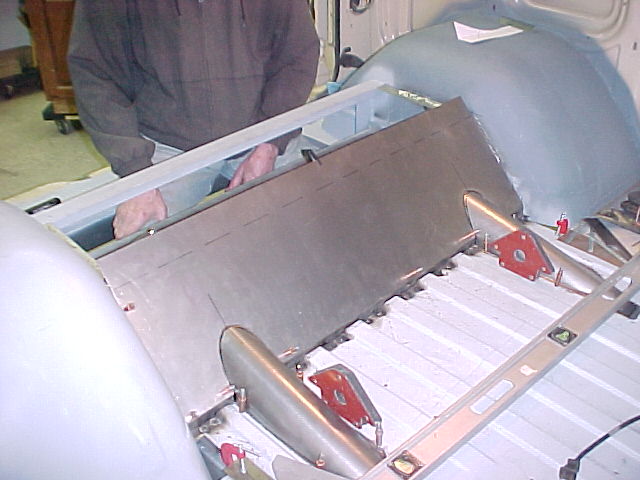
Using some 3 x 3/8ths plate, a piece of 1x2 tubing and the top tube out of an old swingset I fabbed up a simple bender that will clamp the steel in place and except a piece 48" wide.
Here you can see the 38" piece we bent for the trial. It has a short flange on one side and we just clamped it in place and hand bent it (20ga).
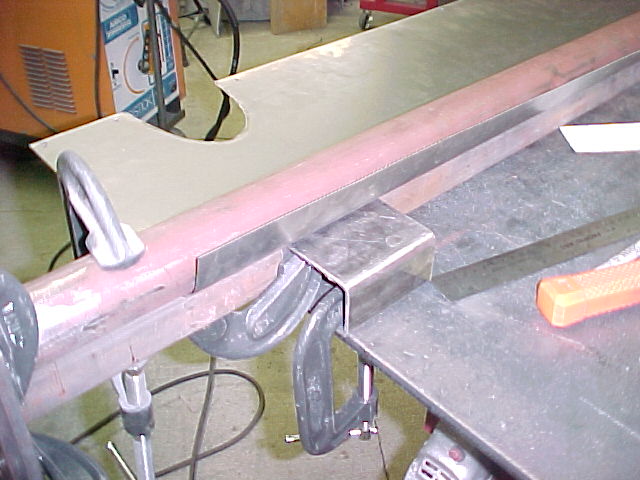
You can see the tube here with the bent flange at the top.

Here is the panel set in place. Very nice.

I will get some clearer pics later. Once the sheet was bent I cleaned up the bender and sprayed it gloss orange so I had to wait to let the paint dry.
This is the "top" piece. There are no bolts. It just gets C-Clamped together while I am doing the bend. Quick and easy...

The bottom half. This is a 1 x 2 rect tube welded to the two end plates. The upper half clamps in between to capture the sheet being bent. This guy will clamp to the fab bench or the jig tables.

Mel and I spent about an hour making this thing. Do you know how much time it will save trying to clamp steel and round tubing together to make a long bend? A LOT!!!
MarkLast edited by astroracer; 03-10-2013 at 05:09 PM.
If money is the root of all evil... Women must be the fertilizer...
Link to my BAD AST Build Thread:
http://www.clubhotrod.com/suspension...van-build.html
-
03-10-2013 08:07 PM #29
CHR Member/Contributor
- Join Date
- Dec 2006
- Location
- Woodstock
- Car Year, Make, Model: 34,stroker,32pu,2020 MustangGTpp2
- Posts
- 1,109
Anyone interested in turning a wood band saw into a metal cutter? I converted a 10in delta into one, let me know I'll post the pictures. V Astroracer what's up with the HF orange, home made tools deserve better then that.I have two brains, one is lost and the other is out looking for it
-
03-10-2013 08:54 PM #30
CHR Member/Contributor
- Join Date
- Sep 2007
- Location
- Gardner, KS
- Car Year, Make, Model: '33 HiBoy Coupe, '32 HiBoy Roadster
- Posts
- 11,245
Sure Greg, post 'em! I've got an older (better) Craftsman 12", and I seem to remember that the instructions with it said something about cutting the drive pulley down 1/2 size from OEM to slow it down? Originally Posted by pepi
Roger
Enjoy the little things in life, and you may look back one day and realize that they were really the BIG things.
 Reply With Quote

Posting Permissions
- You may not post new threads
- You may not post replies
- You may not post attachments
- You may not edit your posts

Either return this forum to what was or get the HELL OUT!
Dead!