Thread: 57 Plymouth
-
04-09-2018 08:56 PM #106
I came across that intake too Ken. It's at $363 with $25 dollars shipping right now and I don't see it going for much more unless someone is really not paying attention.......they are going new for $431 with free shipping on at least a couple of sites.
The older one you listed earlier ended at $380 (and $32 shipping) which seemed fair.
..Last edited by Mike P; 04-10-2018 at 04:32 AM.
I've NEVER seen a car come from the factory that couldn't be improved..... 
-
Advertising

- Google Adsense
- REGISTERED USERS DO NOT SEE THIS AD
-
04-12-2018 07:54 AM #107
As long as we’re talking about Hemi intake manifolds……..I’ve always kind of liked the one off and unusual stuff and there are a few on E Bay right now.
I’ve seen the 2 carb marine intakes off and on and always thought they would be neat on a 331 in a Rat Rod type project.
https://www.ebay.com/itm/331-354-392...pazX5G&vxp=mtr
I’ve also occasionally come across the 4 Stromberg Weiands. These are designed to run synchronized linkage and I understand can be a bit of a challenge to tune. As one friend put it “how can that damn engine run with 2 carbs flooding and 2 backfiring at the same time?????”
At $1500 for the intake and $300 each on new carbs plus air cleaners and linkage the cost on a new Weiand manifold and FiTech doesn’t sound too bad.
https://www.ebay.com/itm/331-354-392...ZazPEe&vxp=mtr
The factory 55 and 56 Chrysler 300 are also an interesting design. A friend of mine has one of these over at his shop and I’ve been tempted to see if he would part with it…..course then I’d have to dig up another HEMI to put it on
https://www.ebay.com/itm/MOPAR-1956-...lamKkA&vxp=mtr
.I've NEVER seen a car come from the factory that couldn't be improved..... 
-
04-12-2018 08:16 AM #108
It appears that the guy in the last ad you posted has everything you need though I'd bet it 'd be cheaper to drive to Washington than to have it all shipped.
Ken Thomas
NoT FaDe AwaY and the music didn't die
The simplest road is usually the last one sought
Wild Willie & AA/FA's The greatest show in drag racing
-
04-12-2018 01:43 PM #109
- Join Date
- Apr 2011
- Location
- Prairie City
- Car Year, Make, Model: 40 Ford Deluxe, 68 Corvette, 72&76 K30
- Posts
- 7,301
- Blog Entries
- 1
That doesn't seem like a bad price for the 56 300B intake from what I've been seeing them go for lately.Ryan
1940 Ford Deluxe Tudor 354 Hemi 46RH Electric Blue w/multi-color flames, Ford 9" Residing in multiple pieces
1968 Corvette Coupe 5.9 Cummins Drag Car 11.43@130mph No stall leaving the line with 1250 rpm's and poor 2.2 60'
1972 Chevy K30 Longhorn P-pumped 24v Compound Turbos 47RH Just another money pit
1971 Camaro RS 5.3 BTR Stage 3 cam, SuperT10
Tire Sizes
-
04-13-2018 03:30 PM #110
I think I’m finally happy with the carbs. I ended up having to order a couple pair of step rods to fine tune it. They came in today and have been installed and road tested……a couple of times
 .
.
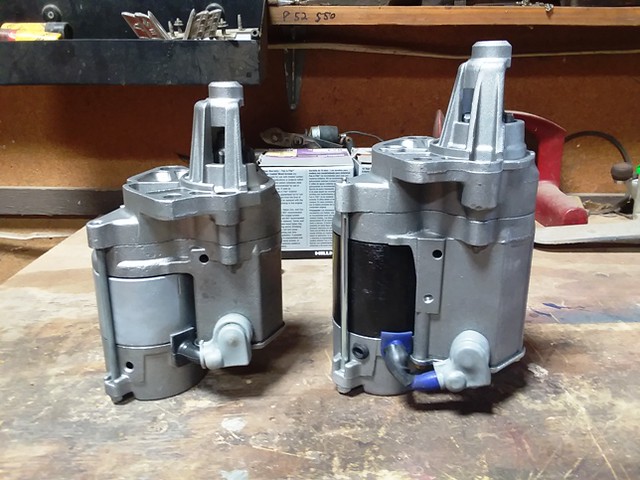
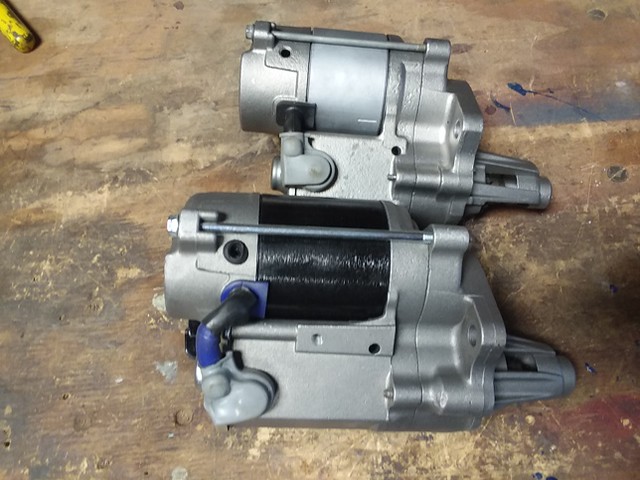
Here’s one for the Mopar guys. I decided that when I do the power steering conversion on the 57 I’d go ahead and change over to one of the smaller Chrysler high torque starters. Chrysler started using them in the late 80s early 90s. They interchange with the older gear reducted starters on both the Small Block and Big block Mopars. I have one on the Hemi in the 37 Dodge and am really pretty impressed with it.
Anyway I ordered one and when it came in I thought it looked smaller than the one on the 37, so I checked. Sure enough the snout was the same configuration but the starter was quite a bit smaller.
 MS1 by M Patterson, on Flickr
 MS2 by M Patterson, on Flickr
I figure in this case a bigger motor is better so I’m going with the larger one, it just kind of surprised me a bit about the 2 different styles.
.I've NEVER seen a car come from the factory that couldn't be improved..... 
-
04-13-2018 03:40 PM #111
Starters are so much smaller these days. The one for my 5.3 looks like a toy.
-
04-14-2018 06:33 AM #112
".......Starters are so much smaller these days. The one for my 5.3 looks like a toy. ...."
Yeah, I know. I'm running one of the down sized ones on the 283 in my Ram 50. sure was nice to have, I don't think I'd be able to get an older full sized one in or out without dropping the exhaust on that truck.
I went thru an original mid 50s Chrysler Hemi starter earlier this week, I swear it weighed about 15 pounds.
.I've NEVER seen a car come from the factory that couldn't be improved..... 
-
04-14-2018 01:05 PM #113
Mike, I had a WCFB as stock on a '59 Studebaker Lark Regal 259 V8 3-speed and I seem to remember that is was rated not quite 400 CFM, like 390 or so. It's a tossup whether the WCFB stood for Will Carter Four Barrel or White Cast Four Barrel. NTFDAY (Ken) and I had many fun nights in that car, running around Dayton, Ohio in 1960 and '61. Our favorite prey was '55 and '56 Chevies.
.PLANET EARTH, INSANE ASYLUM FOR THE UNIVERSE.
-
04-14-2018 01:18 PM #114
We always thought it stood for "Will Call For Backup".. 8-)
-
04-16-2018 04:46 PM #115
- Join Date
- Apr 2011
- Location
- Prairie City
- Car Year, Make, Model: 40 Ford Deluxe, 68 Corvette, 72&76 K30
- Posts
- 7,301
- Blog Entries
- 1
Mike, they even make gear reduction replacement starters for Class 8 engines. I try to upgrade them every chance I get.
.Ryan
1940 Ford Deluxe Tudor 354 Hemi 46RH Electric Blue w/multi-color flames, Ford 9" Residing in multiple pieces
1968 Corvette Coupe 5.9 Cummins Drag Car 11.43@130mph No stall leaving the line with 1250 rpm's and poor 2.2 60'
1972 Chevy K30 Longhorn P-pumped 24v Compound Turbos 47RH Just another money pit
1971 Camaro RS 5.3 BTR Stage 3 cam, SuperT10
Tire Sizes
-
04-21-2018 07:17 PM #116
Next on the list was mounting the PS pump. The only readily available PS pump bracket out there seems to be the Hot Hemi Heads one, but that is for the newer (small) GM pump with a remote reservoir. PAW used to sell a bracket for the older Saginaw pump that would have been exactly what I needed, but they have been out of business for years now. At least I've still got a copy of their old catalog with pictures so I had a starting point.
I had originally planned of just building the brackets on the car. I really didn't relish the thought of bending over the fender and radiator and getting everything aligned, drilled, and welded. My ol' buddy Dave (69Bee) came to my rescue however, he was kind enough to loan me an old 331 block, cart to set it on, timing cover and water pump adapters. Between that and the odds and ends I have around here I was able to mock up the short block to use to build the brackets. Sitting on a stool figuring everything out sure beats doing it on car.
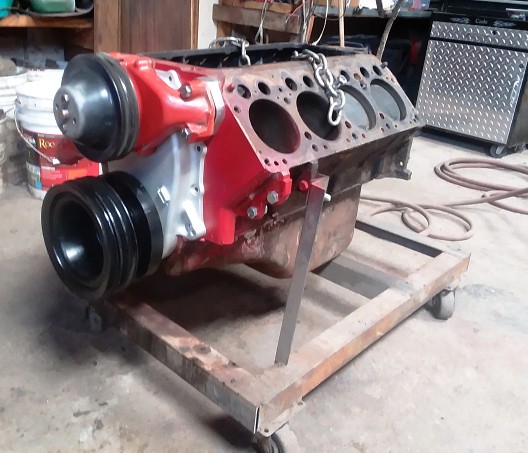 MUPS by M Patterson, on Flickr
I started out with an old pump I had laying and a pretty common old SBC PS bracket.
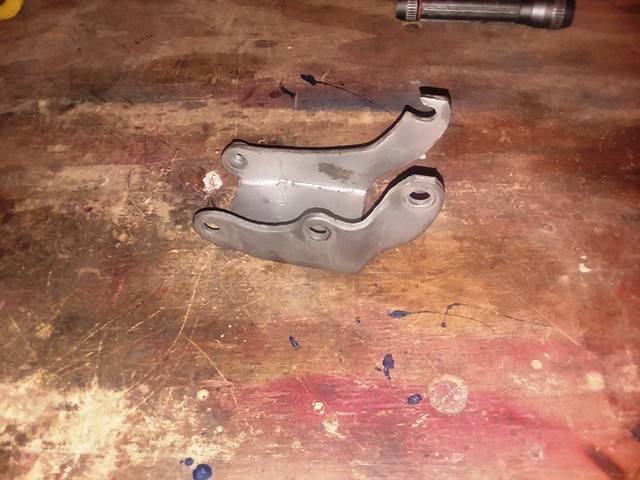 HP1 by M Patterson, on Flickr
The modifications to the bracket and a couple of smaller support brackets weren't hard to do or complicated, but getting everything aligned took a fair amount of time and tweaking.
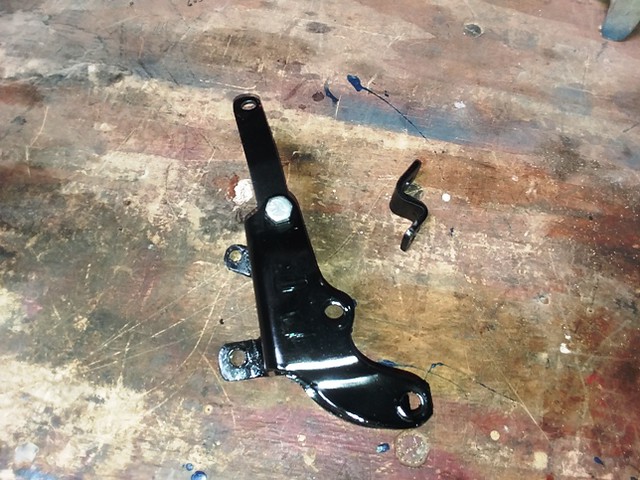 HP3 by M Patterson, on Flickr
Having the mockup block was a real blessing and definitely worth the time and effort to set up.
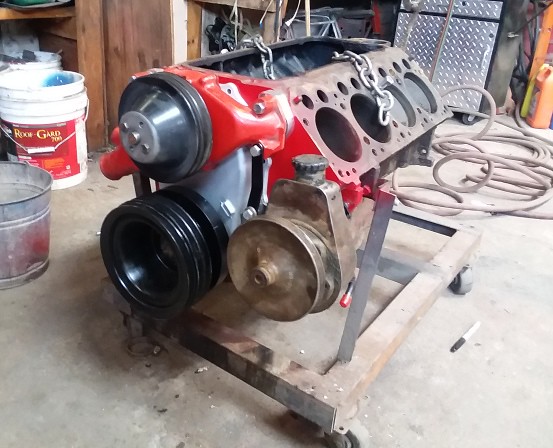 HP2 by M Patterson, on Flickr
I picked up a rebuilt pump and belt. and ended up using a different pulley than the one I started with but I finally got everything sorted out.
Bolting it all to the engine was straight forward and I'm happy with the result.......but boy I still wish I had bought one of the PAW brackets years ago when I built the engine.
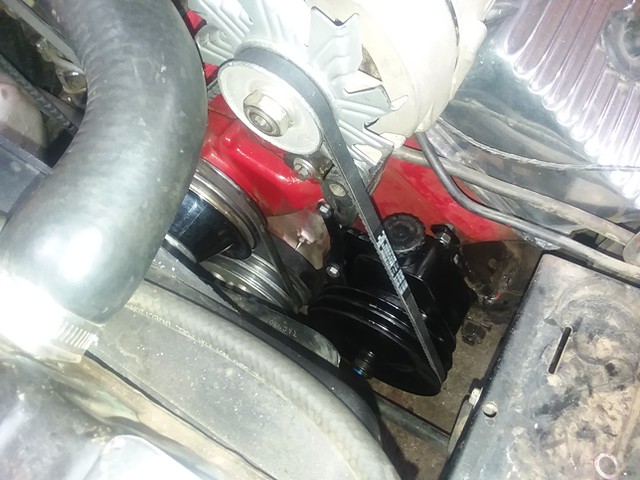 HP4 by M Patterson, on Flickr
I've run out of easy stuff so I guess next is getting the old steering gear out and fitting the 605 box.
.I've NEVER seen a car come from the factory that couldn't be improved..... 
-
04-29-2018 07:52 AM #117
Found some more easy stuff
Actually I'm going to get the alignment checked on the 57 before I start on the steering box change. The shop I use can't get me in till Wednesday so with luck I'll be able to get a start on that next week.
With the car in the shop where it's handy to work on I've been taking care of some of the little issues that have turned in the 12 years since I built the car.
The dash mounted rear view mirror has always been kind of useless as it was too low to see over the top of the back seat. I finally got around to building a 1" extension for that. I went rooting thru my odds and ends drawer to see what would work for the extension. I had a couple of old SBC T handle valve cover bolts sitting around that happened to be 1/4-20 which is the same thread used to screw the mirror head to the stem.
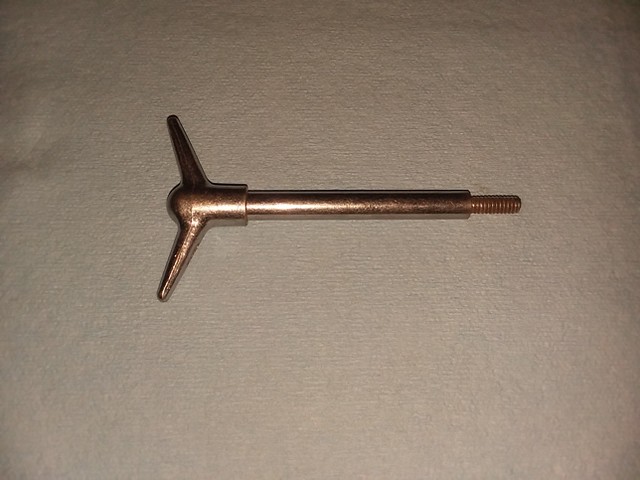 ME1 by M Patterson, on Flickr
It was pretty simple to cut the extension out of that, then drill and tread the end to make the extension.
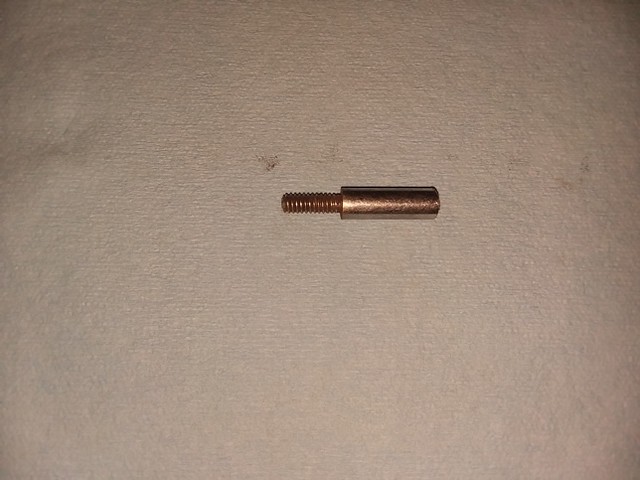 ME2 by M Patterson, on Flickr
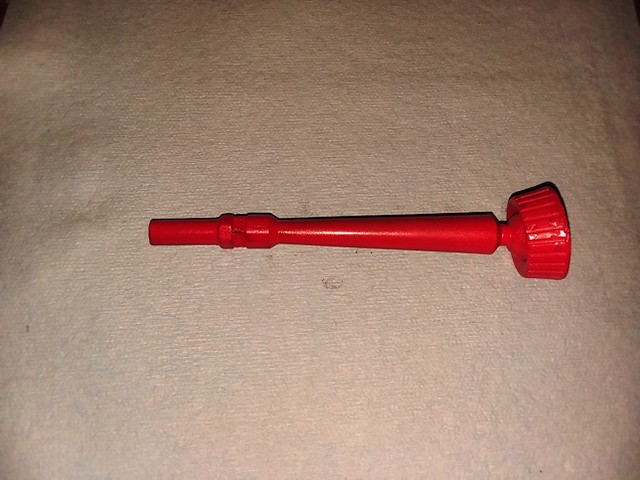 ME3 by M Patterson, on Flickr
After getting the mirror back in the car and actually having it useful was one of those “I should have done this years ago things” LOL
When I drive back to Illinois I do a lot of the driving at night. I’d already made the cross country trip in the 57 once with no issues, and about 5 years ago took it back to the Midwest to visit family again. It’s definitely a “WHOO S#**” moment when the headlights go out at 80 MPH on a dark interstate at 3AM. About 5 minutes later the headlights came back on then went out again about 20 minutes later and came back on in about another 5 minutes. I finally narrowed the problem down to the circuit breaker in the headlight switch cycling on and off.
In their infinite wisdom Chrysler didn’t use a fuse box/fuses when they built the cars! Power for the accessories and lights go thru 2 internal circuit breakers inside the headlight switch. that is why there are all the terminals on the back of the headlight switch. When I built the 57 Plymouth I did a custom wiring harness and added a fuse box (including a circuit breaker for the lights).
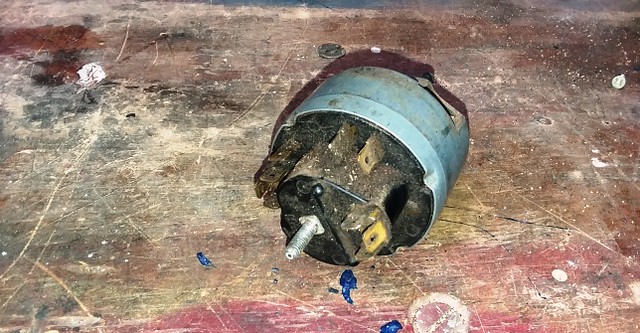 LS1 by M Patterson, on Flickr
I was carrying a spare switch with me and installed that to get me thru the rest of my trip, but after the experience with the original switch I had a feeling it might be a time bomb too. I had no idea why the circuit breaker was cycling; whether it was bad contacts in the switch creating resistance or the breaker just getting weak. So yesterday I decided to pull the switch and see if there was some way to bypass the circuit breakers.
I had to un-crimp the housing to get that off.
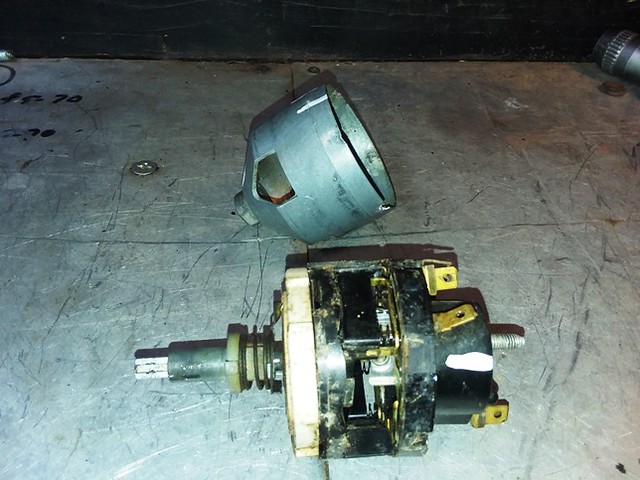 LS2 by M Patterson, on Flickr
Then split the switch to get to the contacts and circuit breakers.
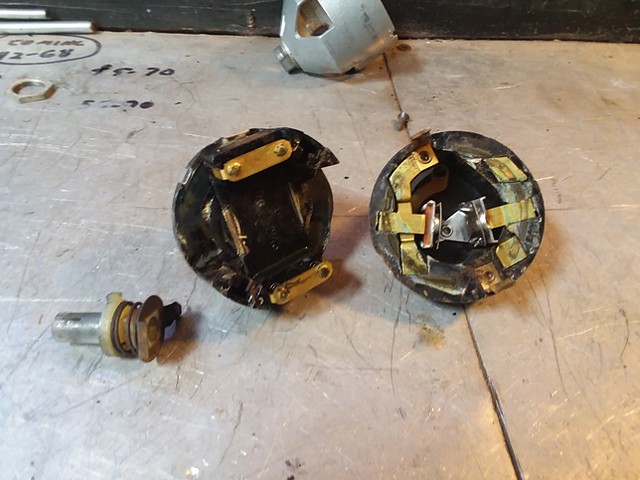 LS3 by M Patterson, on Flickr
All the contacts were dirty and I did find where there had been a bit of arcing on the headlight contacts. The way the switch is built makes it pretty difficult to get to the circuit breakers which sit down in a well in the housing. There are actually 2 circuit breakers one dedicated to the headlights and the other for the rest of the lights and accessories.
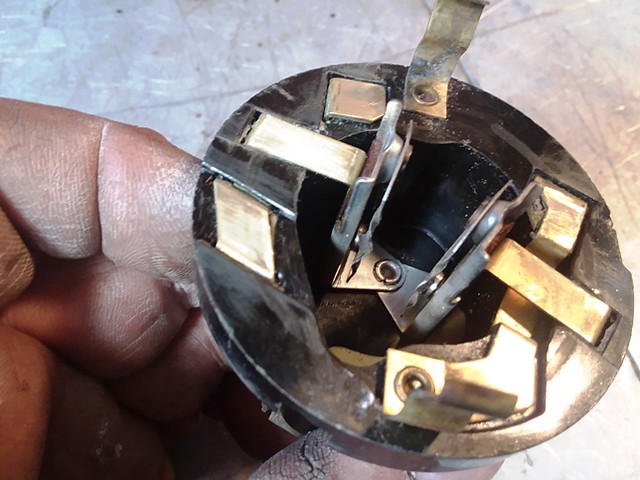 LS4 by M Patterson, on Flickr
The brass contact the switch slides over is isolated from the power side with a piece of Bakelite so the power has to go thru the contact set at the bottom of the switch.
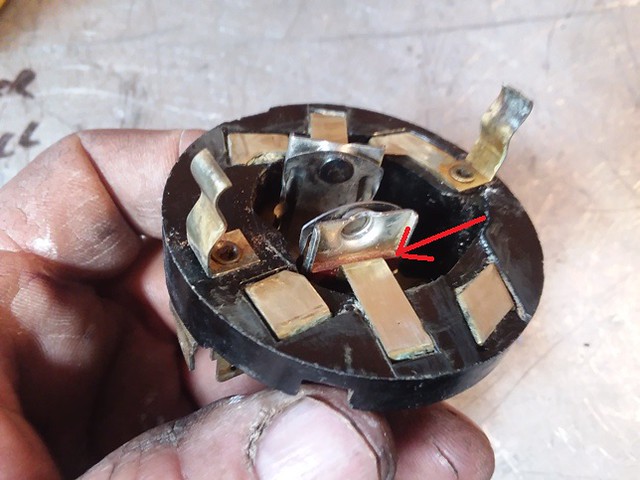 LS5 by M Patterson, on Flickr
I finally decided the best way to bypass the circuit breaker was to just fill the gap between the contact and power side of the switch with solder.
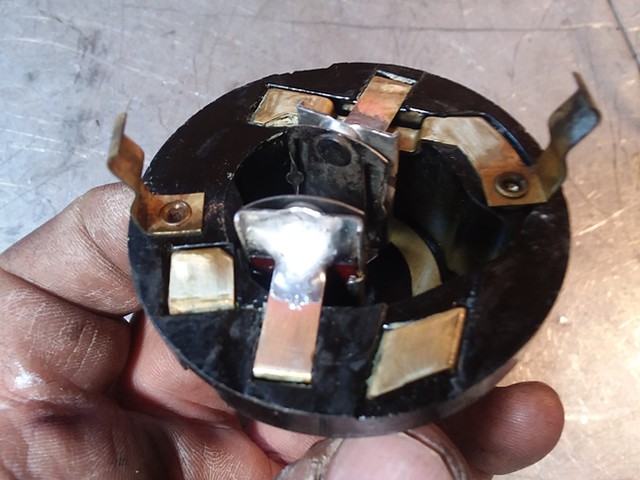 LS6 by M Patterson, on Flickr
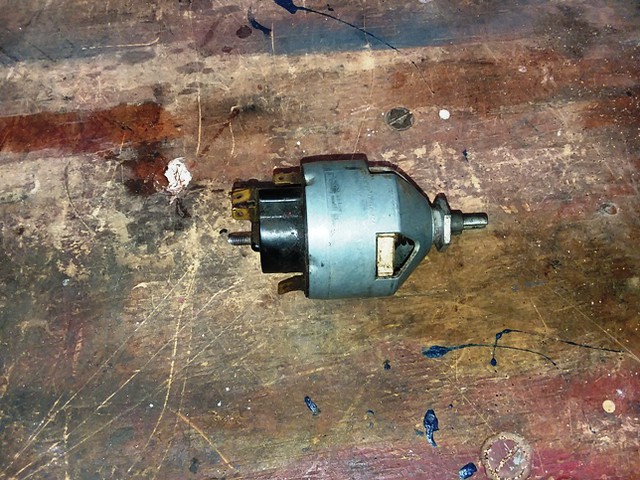
Anyway the switch is reassembled and back in the car and I’m a lot more comfortable about driving it at night.
 LS7 by M Patterson, on Flickr
.I've NEVER seen a car come from the factory that couldn't be improved..... 
-
04-29-2018 08:13 AM #118
Have you ever considered putting the headlights on relays? It's not that difficult and takes the heavy current load off the headlight switch.Ken Thomas
NoT FaDe AwaY and the music didn't die
The simplest road is usually the last one sought
Wild Willie & AA/FA's The greatest show in drag racing
-
04-29-2018 08:26 AM #119
I think we all have " A drawer of many things " they can be a life saver or a disappointment. I can relate to the lights shutting off, 1976 Chevy pickup dimmer switch. They quit when I clicked em to high beam, it didn't take very long to switch back to low beam. Your light switch looks a bit over engineered from the factory.Seth
God cannot give us a happiness and peace apart from Himself, because it is not there. There is no such thing. C.S.Lewis
-
04-29-2018 11:36 AM #120
".....Have you ever considered putting the headlights on relays? It's not that difficult and takes the heavy current load off the headlight switch....."
Actually Ken yes I did. When I put in my spare switch I added a relay and also included a "hidden" toggle switch so I could manually turn the headlights on (bypassing the factory switch). The spare switch probably would have done fine, but I feel a lot more comfortable with the modified one.
“……Your light switch looks a bit over engineered from the factory. ……”
Over engineered……that’s one way of describing Chrysler's electrical systems Seth. Usually my reaction to some of the stuff they did has been “you got to be kidding me”
.I've NEVER seen a car come from the factory that couldn't be improved..... 


 348Likes

 LinkBack URL
 About LinkBacks
 Reply With Quote

time for a new forum to visit. when they sold sr.com it went down hill fast. no more forum just a cheap site selling junkie cars. the canadians killed hr.com. mods are real pricks. as with any site...
Where is everybody?