


 348Likes
Thread: 57 Plymouth


Results 76 to 90 of 187
 LinkBack URL
 About LinkBacks
Hybrid View
-
11-28-2017 06:39 AM #1
 CHR Member

- Join Date
- Aug 2003
- Location
- Springfield
- Car Year, Make, Model: '66 Mustang, 76 Corvette
- Posts
- 5,444
Mike, you're making me reconsider putting dual quads on my Vette. The linkage in the second picture is very close to what was on the sbc in the 36 coupe I had in the late 60's. It was a set up from an early Vette with WCFB's.Ken Thomas
NoT FaDe AwaY and the music didn't die
The simplest road is usually the last one sought
Wild Willie & AA/FA's The greatest show in drag racing
-
11-28-2017 07:34 AM #2
CHR Member
- Join Date
- Feb 2006
- Location
- Bartlett
- Posts
- 6,831
Wasn't the stop/collar on the rod for the front carb originally in between the arms of the u piece?? That way it not only opened the carb but would force it closed also
-
11-28-2017 02:29 PM #3
CHR Member
- Join Date
- Apr 2011
- Location
- Prairie City
- Car Year, Make, Model: 40 Ford Deluxe, 68 Corvette, 72&76 K30
- Posts
- 7,301
- Blog Entries
- 1
So on your progressive linkages Mike, the throttle cable or rod attaches to the rear carb and the rear carb opens first then the front opens once the rod stop hits the bracket on the arm?Ryan
1940 Ford Deluxe Tudor 354 Hemi 46RH Electric Blue w/multi-color flames, Ford 9" Residing in multiple pieces
1968 Corvette Coupe 5.9 Cummins Drag Car 11.43@130mph No stall leaving the line with 1250 rpm's and poor 2.2 60'
1972 Chevy K30 Longhorn P-pumped 24v Compound Turbos 47RH Just another money pit
1971 Camaro RS 5.3 BTR Stage 3 cam, SuperT10
Tire Sizes
-
11-28-2017 03:41 PM #4
CHR Member
- Join Date
- Mar 2003
- Location
- SW Arizona
- Car Year, Make, Model: 68 Ply Valiant, 83 El Camino
- Posts
- 3,872
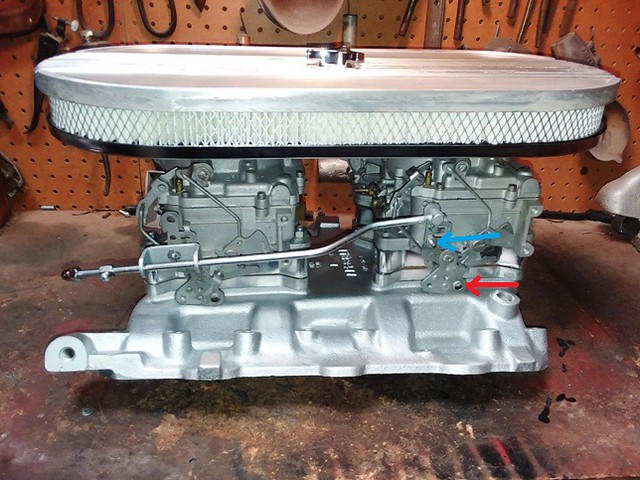
Youre exactly right Ryan. On the progressive linkages the pickup point for the linkage on the secondary carb(s) is closer to the butterfly shaft than it is on the primary carburetor . This causes the secondary carb to open fast than the primary carb. Most manuals on tri-power and dual quads recommend adjusting the linkage to that both carbs reach WOT at the same time.
As long as the carbs were easy to get to while they were on the bench, I set both pairs up so that either carb could be used as either a primary or secondary carb. That was basically just putting the stud for the secondary bracket on both carbs (blue arrow). You can see how much difference there is between where the linkage picks up on the primary carb (top hole) and where the stud is on the secondary carb.
While setting up the carbs the way the manual says is great for racing, most of my driving is Interstate miles. Ive found in real life on a street car the secondary carbs usually come in too quickly for my taste. I usually set it up so that the secondarys start opening at 80 MPH on a flat stretch of road. The rear carb never really reaches WOT but its close enough you never notice it
In the case of the 57 Plymouth the throttle rod actually pushes instead of pulls. That being the case the rod connects to the lower part of the throttle arm (where the red arrow is).
The stud I put in on the carbs for the secondary bracket will still serve a purpose on the carb that is used as the primary ..it will now become where the cruise control linkage connects
 Cad AFB P 2 by M Patterson, on Flickr
Jerry, all the ones I've seen (including the factory 409 cars) have had the stop at the front. What you are saying makes sense and I've wondered if that wasn't the original intent by who ever came up with the design. I actually tried setting it up that way on the Dual Quad 440 I built years ago. I was using the Offenhauser linkage that is designed the same as this only the bracket on the front carb was cast aluminum. The problem I found in doing it that way was that the length between the holes in the bracket was too short. When it was properly adjusted to activate the front carb, when the throttle is released the stop would contact the front of the bracket too soon and hold the rear carb open.
.I've NEVER seen a car come from the factory that couldn't be improved..... 
-
12-07-2017 04:10 PM #5
CHR Member
- Join Date
- Mar 2003
- Location
- SW Arizona
- Car Year, Make, Model: 68 Ply Valiant, 83 El Camino
- Posts
- 3,872
Still collecting parts and trying to figure out the power steering conversion for the Plymouth.
I'm currently looking at Borgeson pitman arms (the 2 listed for the 605 box)
https://www.borgeson.com/xcart/home.php?cat=56
Just wondering if anyone has had any experience with them.......good or bad.
.I've NEVER seen a car come from the factory that couldn't be improved.....
-
01-22-2018 04:21 AM #6
CHR Member
- Join Date
- Mar 2003
- Location
- SW Arizona
- Car Year, Make, Model: 68 Ply Valiant, 83 El Camino
- Posts
- 3,872
I figured I'd update where I'm at with the power steering swap. I really don't plan on tearing the 57 apart for the dual quads and PS till sometime this spring and have been mostly collecting parts. With the dual quads ready to go on I've been concentrating on figuring out the PS swap and gathering the pieces I figure I'll need.
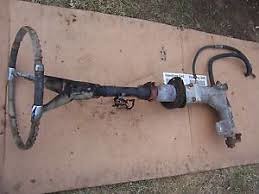
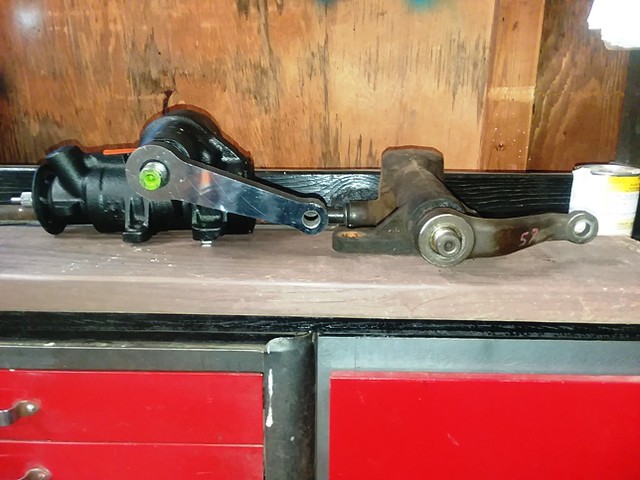
Just a brief recap. This is the original manual steering gear I want to replace.
 sg by M Patterson, on Flickr
The original style PS gear is a lot bulkier and has virtually no road feel. Even if I could fit one in the car with the HEMI it would be my last choice.
 PS G by M Patterson, on Flickr
The 354 Hemi with the 56 Manifolds just barely fits around the steering gear. The top of the steering box almost touches the bottom of the exhaust manifold.
 SB by M Patterson, on Flickr
I had originally looked at using a Saginaw 700 style steering box, the most common one that was used on most GM cars and light Trucks from the 60s-80s and Mopars in the 70s. I'm pretty sure there's room for the 700, but eventually decided to try the smaller and lighter Saginaw 605 Box. The 605 is an almost direct replacement for the 700. The mounting holes are the same as is the 3/4" 30 spline input shaft. When bolted up the pitman shaft is located in the same place.
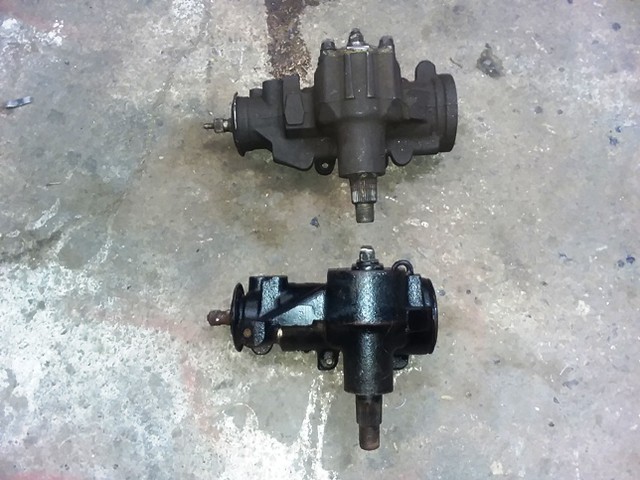 S5 by M Patterson, on Flickr
The only thing that really keep the 605 from being a direct replacement is diameter that the pitman shaft which is smaller on the 605 than it is on the 700s. The 605 pitman arm is the same diameter and splines as the Saginaw manual steering boxes which means that any manual steering pitman arms from least 1958 through the 1980 GM cars will fit the box, giving me a lot of choices to pick from. Additionally Borgeson makes a few "universal" pitman arms for the 605 Box.
I went ahead and picked up a rebuilt 605 steering gear and I have a junk one to use in mockup. The rebuilt box has the same amount of rotation stop to stop and the original 57 and is 3 1/2 turns as opposed the the 57s 4 1/2 turns stop to stop.
Mounted on the frame rail the 605 will sit considerable lower than the original gear, placing it where it will be well below the exhaust manifold and into an area where there appears to be plenty of room for it.
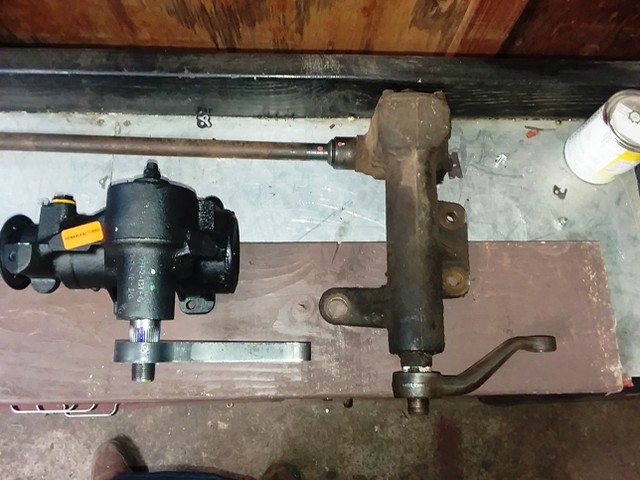 S1 by M Patterson, on Flickr
The one thing I hadn't considered when I started looking at the Saginaw boxes was that it would move the pitman shaft inboard about 2" from where it is with the stock box.
 S3 by M Patterson, on Flickr
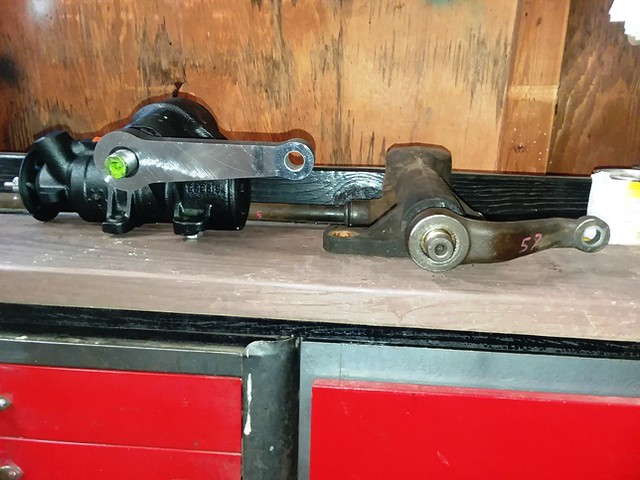
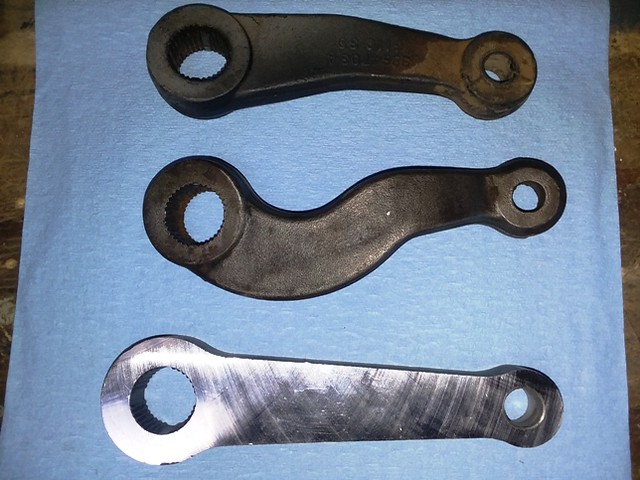
I'm not sure exactly how I'll end up compensating for the 2 inches, but I think I have a couple options. One is a pitman arm that is bent where it properly locates the outer end for the pitman arm to connect to the drag link.
I currently have a couple of stock Chevrolet manual steering pitman arms (58 and 65 Chevy) and I sprung for a Borgeson universal pitman arm ( one of the bendable steel ones).
Neither of the stock arm locate the pitman arm where it needs to be but as I mentioned there are a lot of other stock arms out there that may.
 S4 by M Patterson, on Flickr
The Borgeson universal pitman arm is not cut with the master splines that the stock arms have. It might be as simple as just locating the arm on the shaft in the position that located the pitman arm outer end in the same location as the stock box and pitman arm.
 S6 by M Patterson, on Flickr
Another option might be to adjust the tie rods by shortening the ones passengers side and lengthening the drivers side, moving the while drag ling over. The potential issue I may run into with either solution or combination of the 2 is I'm not sure how it will affect the geometry of the draglink and tie rods as the as they move thru their travel. Another solution I've been kicking around is seeing if I can find a drag link off something else that would fit and move the joint at the pitman arm inboard.......or even as a final option have a custom drag ling built.
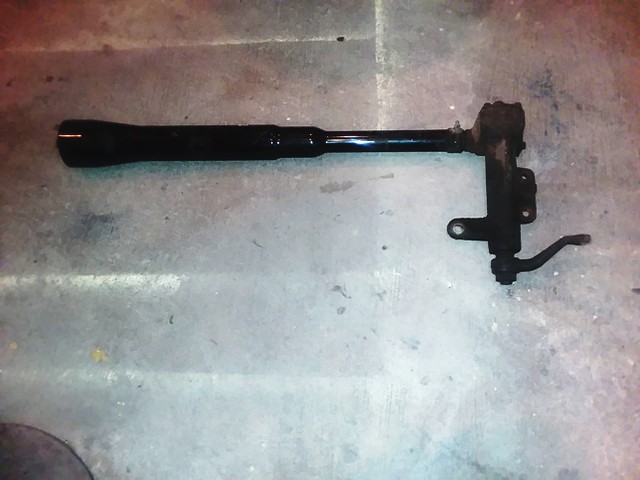
Once I get the steering box/draglink/tie rods sorted out, I'll still need to shorten the steering column and add an intermediate shaft. Shortening the column won't be a big deal. Rather than buy a couple steering universal joints and piece of bar stock to make a custom shaft I think I can use a trick/upgrade I learned about when I was building my G body El Caminos. It happens an 88-96 Jeep Cherokee is a direct bolt in for the 78-87 GM G body vehicles. Here is a comparison picture of the stock G Body shaft and Jeep shaft.
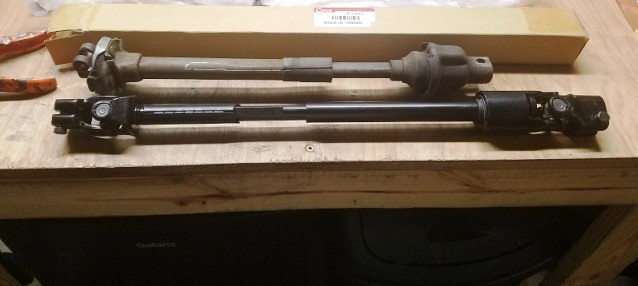 84 94 s shaft by M Patterson, on Flickr
The Jeep shafts eliminate the trunion joint at the top and rag joint at the bottom with U Joints (the correct splines at the bottom joint for the Saginaw steering boxes and a double D end at the top). The U joints can run at a bit steeper angle than the aftermarket steering U joints and the shaft will collapse and telescope depending on the length needed.
So far the biggest expenditures have been the rebuilt steering box and jeep steering shaft. If this doesn't work out the money won't go to waste, the parts will either sit on the shelf as spares for my 83 El Camino or the wifes 84 El Camino will get a steering upgrade.
So that's where I am right now.
.Last edited by Mike P; 01-23-2018 at 02:18 AM.
I've NEVER seen a car come from the factory that couldn't be improved.....
-
01-22-2018 06:19 AM #7
CHR Member
- Join Date
- Jun 2003
- Location
- Cahokia
- Car Year, Make, Model: 48 Chevy 1ton Bus
- Posts
- 2,503
Great read Mike, sounds like your having fun fun fun, lol.
Made me remember the early 60's as a kid. My parents own a red 57 Plymouth(nothing like yours other then the colors) & I remember the story dad would tell as about breaking passenger front spring on the car & him telling us all to sit behind him so we could drive back home from Iowa to Illinois....joeDonate Blood,Plasma,Platelets & sign your DONORS CARD & SAVE a LIFE
Two possibilities exist:
Either we are alone in the Universe or we are not.
Both are equally terrifying.
Arthur C. Clarke
-
01-22-2018 09:19 AM #8
CHR Member
- Join Date
- Mar 2003
- Location
- SW Arizona
- Car Year, Make, Model: 68 Ply Valiant, 83 El Camino
- Posts
- 3,872
Yeah Joe, my folks had a 57 Belvedere 4dr sedan in the 60s (one of the reasons I wanted to build a 57. Theirs was painted yellow and black (dad used to say it looked like a damned bumble bee LOL).
The 57s actually had torsion bars instead of front springs (first year). I'm originally from snow (salt) country too.......I was raised just a bit south of the Quad Cities. It was not unusual to see broken torsion bars on 5+ year old Mopars. It didn't take much rust on the bars to weaken them enough to snap on a hard bump.
I got lucky when I built this 57 and found a set of NOSR 57-58 Dodge Super D500 (Hemi)/57-8 Chrysler Windsor bars to replace the original 6 Cyl bars.
.I've NEVER seen a car come from the factory that couldn't be improved.....
-
03-31-2018 07:48 AM #9
CHR Member
- Join Date
- Aug 2003
- Location
- Springfield
- Car Year, Make, Model: '66 Mustang, 76 Corvette
- Posts
- 5,444
This doesn't necessarily apply to this thread but I didn't want to start a new one.
I found this on ebay today and thought you might be interested.
https://www.ebay.com/itm/Weiand-WC2Q...53.m1438.l2649.
This guy has a lot of old stuff at decent prices.Ken Thomas
NoT FaDe AwaY and the music didn't die
The simplest road is usually the last one sought
Wild Willie & AA/FA's The greatest show in drag racing
-
03-31-2018 06:10 PM #10
CHR Member
- Join Date
- Mar 2003
- Location
- SW Arizona
- Car Year, Make, Model: 68 Ply Valiant, 83 El Camino
- Posts
- 3,872
Not a problem Ken......I bookmarked the auction just to see what it ends up going for. Funny you should bring up dual quads.
A couple of days ago I decided to get some more done on the 57, and as I'm not quite ready to pull it apart to start on the Power Steering. that pretty much left doing the dual quad conversion.
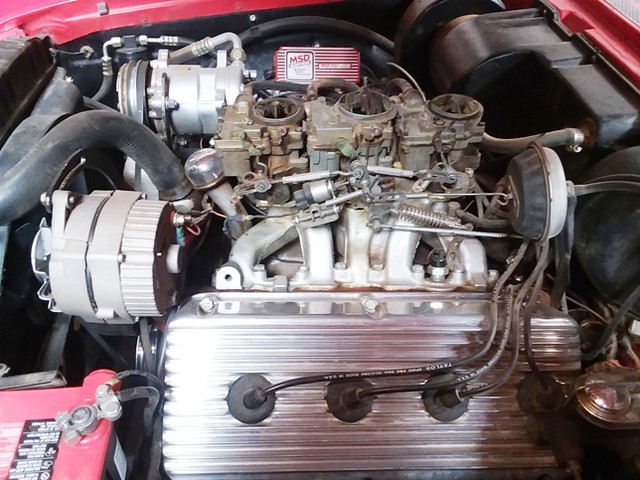
With the Tri Power off and on the bench I realized this is the first time in over 30 years that I don't have at least one Tri Power car.
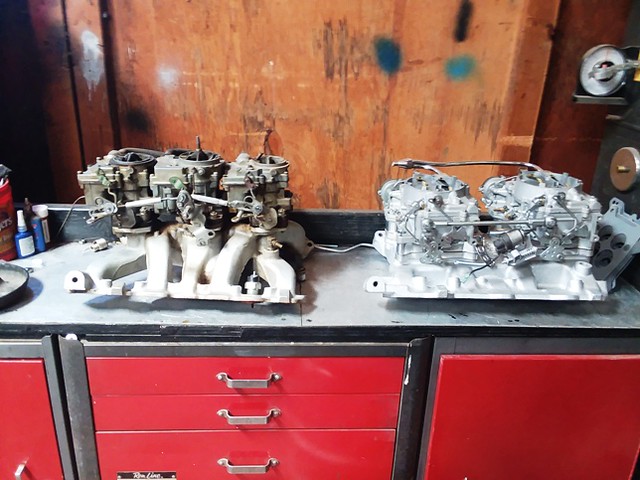 TPDQ by M Patterson, on Flickr
As long as I had the intake off I went ahead and pulled the valve covers and re adjusted the lifters.........this old man isn't made to stretch out over a fender like he used to......and the adjustable push rods are a PIA. The cast iron intake wasn't too bad but aluminum would have been nicer
A few trips to town to pick up odds and ends and it's about ready to go. I'm down to building fuel lines for it.......seems like the pretty fuel line I had for it won't clear the AC compressor. I ran out of time to do it today but I may be able to get out to the shop early and get started on it tomorrow before company gets here.
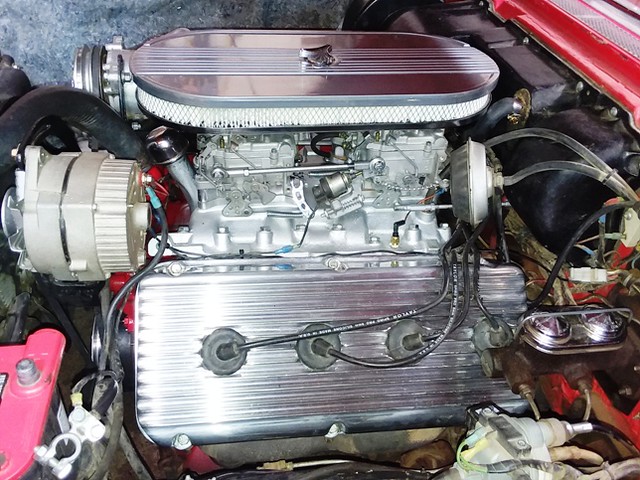 20180331_165142 by M Patterson, on Flickr
and Happy Easter to everyone.
.I've NEVER seen a car come from the factory that couldn't be improved.....
-
03-31-2018 07:18 PM #11
CHR Member
- Join Date
- Apr 2001
- Location
- Salado
- Car Year, Make, Model: 32, 40 Fords,
- Posts
- 10,898
It doesn't really mean much in the big picture and probably no reflection on the manifold that Ken highlighted, but I took a look at that guy's other listings and saw the Buick aluminum drums. He does the classic, and to me ultra annoying, thing in the description. He lists them as "about 12" diameter". This is a guy who doesn't know crap from shoe polish about brake drums. Almost as bad as the frequently seen "looks like plenty of meat". Arghhhhhhh! You only get about .060 of wear/turning on a drum before it's too thin for safe use (especially on a composite like these). Use a drum mic, not a tape measure or "calibrated" eyeball. Back to our regularly scheduled programming................Your Uncle Bob, Senior Geezer Curmudgeon
It's much easier to promise someone a "free" ride on the wagon than to urge them to pull it.
Luck occurs when preparation and opportunity converge.
-
04-01-2018 03:16 AM #12
CHR Member
- Join Date
- Sep 2007
- Location
- New Bedford
- Car Year, Make, Model: 34 Ford 3W Coupe Replica
- Posts
- 14,754
Thanks for the pics Mike. Like a piece of jewelry right there...
Cruise Control Also?
-
04-01-2018 05:21 AM #13
CHR Member
- Join Date
- Mar 2003
- Location
- SW Arizona
- Car Year, Make, Model: 68 Ply Valiant, 83 El Camino
- Posts
- 3,872
.Cruise Control Also?....
Oh Yeah The plan for the car was always as cross country trips (the first being to Tulsa when they dug up the buried 57 Plymouth) so cruise control was always on the list when I built it. 12 years ago when I put it together however the only aftermarket Cruise Control units on the market either required a VSS circuit from the computer or hanging magnets on the drive shaft
both of which were non-starters for me. I ended up using one of the old GM cruise units from the 70 early 80s. The one with the button built into the end of the turn signal lever that uses the transducer mounted on the inner fender and the speedometer cable attaches to with a second cable going to the speedometer. Its a bit over complicated and does NOT have a resume, tap up/tap down feature, but it works well.
The plan for the car was always as cross country trips (the first being to Tulsa when they dug up the buried 57 Plymouth) so cruise control was always on the list when I built it. 12 years ago when I put it together however the only aftermarket Cruise Control units on the market either required a VSS circuit from the computer or hanging magnets on the drive shaft
both of which were non-starters for me. I ended up using one of the old GM cruise units from the 70 early 80s. The one with the button built into the end of the turn signal lever that uses the transducer mounted on the inner fender and the speedometer cable attaches to with a second cable going to the speedometer. Its a bit over complicated and does NOT have a resume, tap up/tap down feature, but it works well.
It also turned into one of the little time eaters when I put the dual quads on. I ended up having to modify the bracket to drop the vacuum pod down a couple of inches and go from a mechanical linkage to the chain on the dual quads.
 TP1 by M Patterson, on Flickr
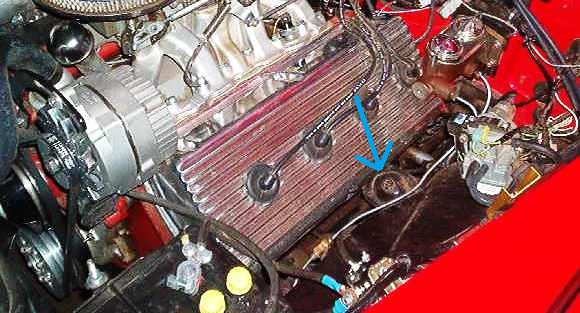
I know what you mean about the guys listings Bob. I looked at the intake he had listed. It has a bunch of pictures in the listing, but NONE of the bottom side of the intake. I know from firsthand experience that these ole Hemis are generally a bit cold blooded . these style of intake manifolds tend to make matters a bit worse especially if they dont incorporate the big heat crossover chamber like show below.
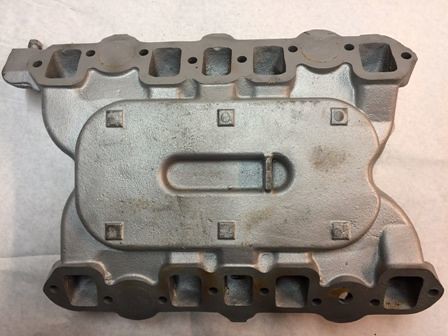 heat crossover by M Patterson, on Flickr
If I were really interested in this intake I ask to see pictures of the bottom of the intake to look at the condition of the mounting surfaces and verify if it incorporates the heat chamber.
.I've NEVER seen a car come from the factory that couldn't be improved.....
-
04-01-2018 07:00 PM #14
CHR Member
- Join Date
- Mar 2003
- Location
- SW Arizona
- Car Year, Make, Model: 68 Ply Valiant, 83 El Camino
- Posts
- 3,872
I managed to spend a little time out in the shop this morning and got the fuel lines bent up before the company got here.
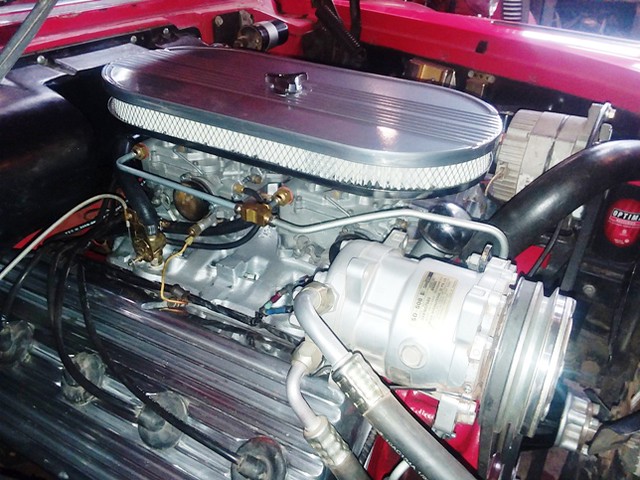 FL by M Patterson, on Flickr
Everybody was on their way home by mid afternoon so I figured what the heck I'd go ahead and get it running and start adjusting the carbs. It fired right off and ran for a couple of minutes when started hearing an exhaust leak . Sure enough it was coming from the exhaust crossover. The bolts were tight so off came the intake again. Finding the culprit was pretty easy.......a mismatch between the crossover ports in the heads and the intake, and using the gaskets for the small crossover ports.
This is a picture of the ports on the Tri Power (the center port is the crossover). This matches the port in the heads I'm using.
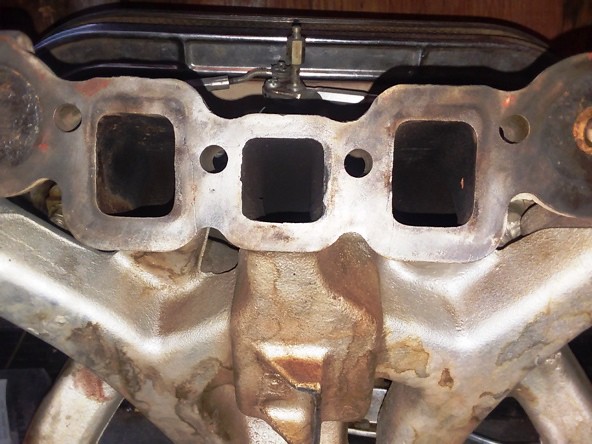 CR2 by M Patterson, on Flickr
And this is the port on the dual quad intake.
 CR1 by M Patterson, on Flickr
Needless to say the gasket didn't have much of a chance of sealing it.
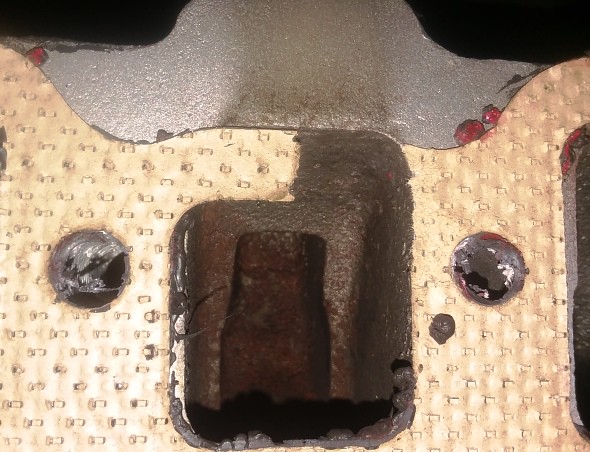 CR3 by M Patterson, on Flickr
If the mismatch had been in the other direction (big ports on the heads and small on the intake I probably would have caught it but I only checked them when I put them on the heads and didn't think to check them on the intake.
The heads are flat on the intake side so a set of gaskets to match the intake should seal fine. I get them ordered tomorrow and with any luck they should be here in a day or two and I can try again.
.I've NEVER seen a car come from the factory that couldn't be improved.....
-
04-02-2018 11:38 AM #15
CHR Member/Contributor
- Join Date
- Jul 2003
- Location
- Madison
- Car Year, Make, Model: '67 Ranchero, '57 Chevy, '82 Camaro,
- Posts
- 21,160
Pure eye candy for us old farts! Great work as always Mike!Yesterday is history, tomorrow is a mystery, Live for Today!
Carroll Shelby
Learning must be difficult for those who already know it all!!!!
 Reply With Quote

Posting Permissions
- You may not post new threads
- You may not post replies
- You may not post attachments
- You may not edit your posts

i've enjoyed the years here . made a lot of friends. most who have left. i see no reason to continue with this so hope to see you somewhere else. i dont think this site will ever be back. it's lived...
Dead!