


Thread: Fiberglass center console


Results 1 to 14 of 14
 LinkBack URL
 About LinkBacks
-
10-23-2011 08:47 PM #1
 CHR Member

- Join Date
- Jan 2003
- Location
- Centreville
- Car Year, Make, Model: 35 ford 5 window coupe
- Posts
- 691
Fiberglass center console
I have been working on this for several months now when I had time that couldn't easily be spent doing something more productive on the car. I have finally gotten to a point where I can say I am about done.
I started by taking the console out of my '98 Blazer as I liked the overall shape and curves of it, but it was too wide and from the seats forward the Blazer console is not symetrical so I had to go from scratch there. Looking back it would have been easier and cheaper to use a manual Blazer console (actually found a good deal after I had started but since I had started I only bought the lid and a couple other pieces instead of the whole console), cut it down the middle, tweak a couple things and call it done, but the $200 prices I was seeing scared me away from that (again likely not much difference in the end). So here are a few pictures.
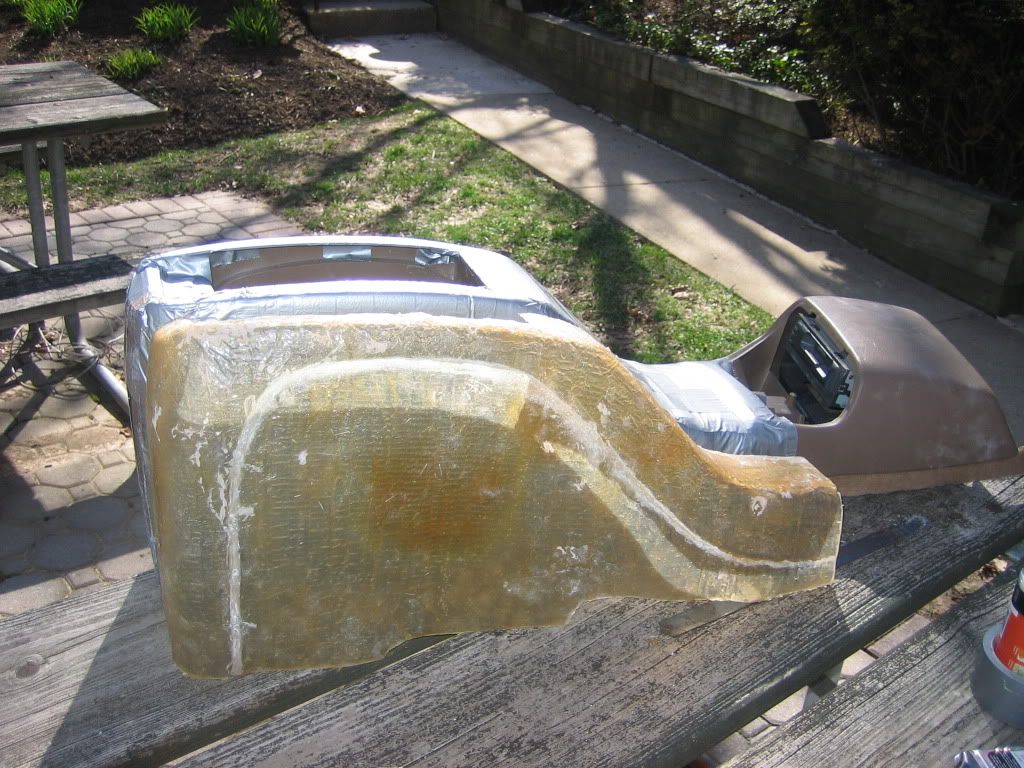
All that is left is to mount it, attach the shift and e brake boots, figure out the hinge and lid and later on probably wrap it in ultra leather. My original plan was to paint it gloss black so I spent extra time smoothing it all out, but I'm afraid it might look a little too mini truck and not hold up as well over time as wrapping it will. I also plan to add a piece on the end with a vertical face plate (basically how the Blazer console it in the first pic) to mount the heater controls and maybe a charger plug (no AC), but it is getting too cold and I decided to make it a seperate piece to hopefully ease the wrapping process. This was my first real experience with fiberglass (and filler really) and I'm pretty happy with it. So how did I do?
Last edited by 35fordcoupe; 10-23-2011 at 08:52 PM.
'35 Ford coupe- LT1/T56, '32 Ford pickup, 70 GTO convertible, 06 GTO
Robert
-
Advertising

- Google Adsense
- REGISTERED USERS DO NOT SEE THIS AD
-
10-23-2011 11:01 PM #2
CHR Member
- Join Date
- Feb 2007
- Location
- Santa Monica
- Car Year, Make, Model: 37 Ford tudor humpback
- Posts
- 1,988
Nice work, Robert!! Looks great! how about a few more pics...;-)"It is not much good thinking of a thing unless you think it out." - H.G. Wells
-
10-24-2011 12:59 AM #3
CHR Member
- Join Date
- Feb 2008
- Location
- Inglewood
- Car Year, Make, Model: 60 F100 truck
- Posts
- 6,339
It looks the part..It fits..No one has one like it..you did good..and yep,,more pix please..Messy stuff when you arent used to it..isnt it??
Micah 6:8
If we aren't supposed to have midnight snacks,,,WHY is there a light in the refrigerator???
Robin.
-
10-24-2011 06:24 AM #4
CHR Member
- Join Date
- Jan 2003
- Location
- Centreville
- Car Year, Make, Model: 35 ford 5 window coupe
- Posts
- 691
Thanks guys . I have some more pictures, but it's mostly all the same. I'll see if there something else tonight though. The first night was pretty rough because I spent more time than I thought applying my very high tech protective barrier over the console and it got dark quick. I probably should have put a couple more drops of hardener in and I found myself outside in the cold with a shop light right over it trying to dry it so I could bring it inside. You can see in the first pic where the light did its job on the one darker spot. I got resin all over my hands (later bought latex gloves) and then my roommate came home in the '87 Jeep Commanche he had been building at a friends shop. After filling the tank with gas for the first time he had gas pouring out so along with my issues I was helping him with that. Although I must say a truck with an 8.5" lift is pretty nice to work under
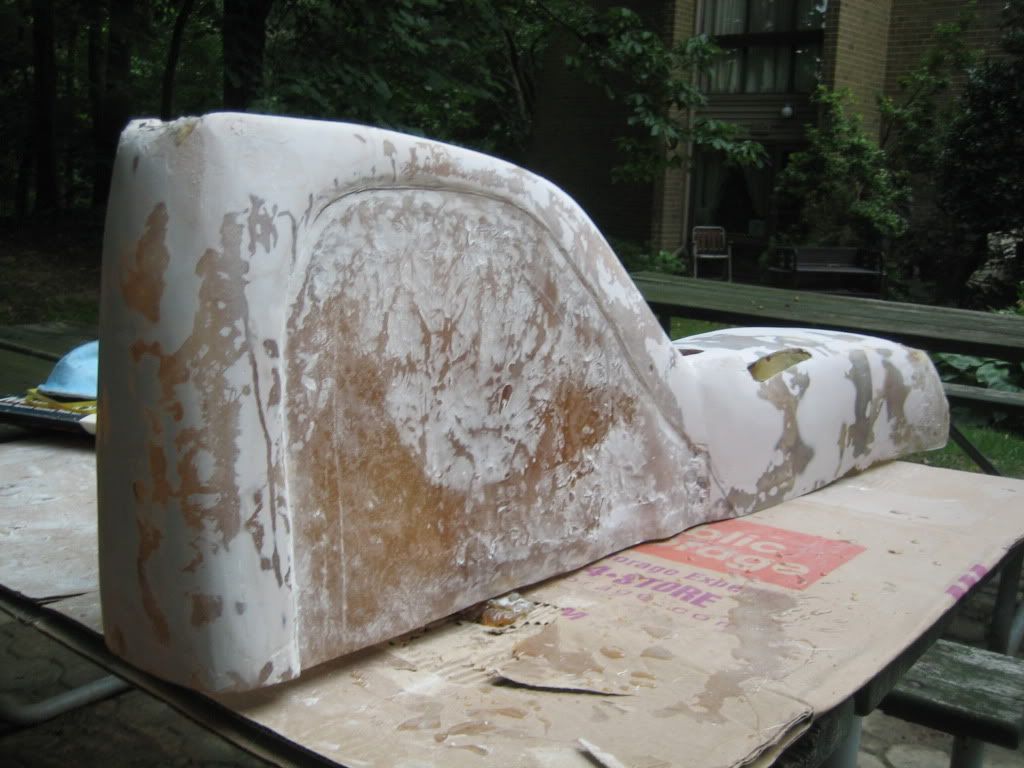
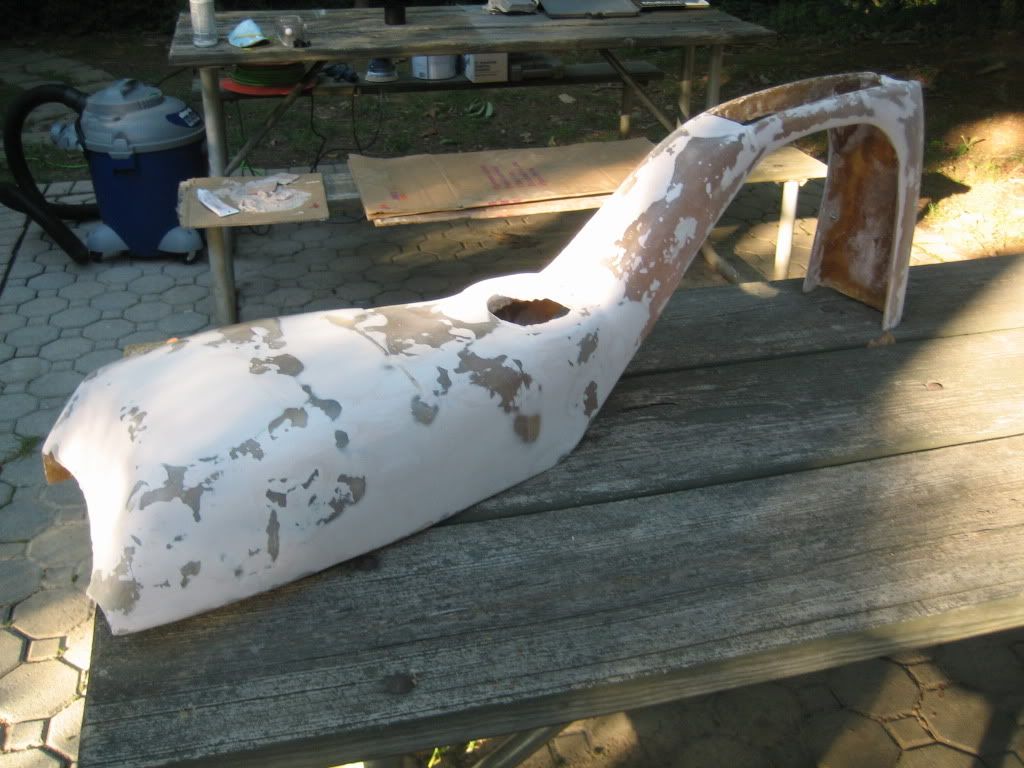
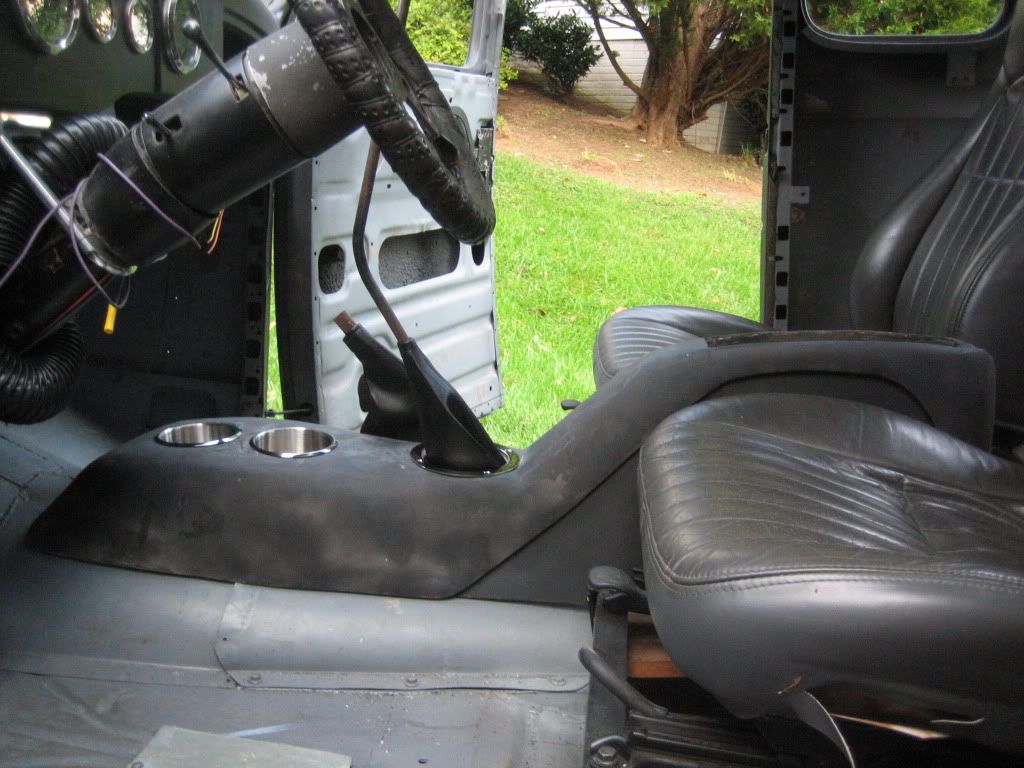
I was trying hard to get that line the Blazer console has on the side and did a decent job, but not good enough so that is why I cut the sides out. I 'glassed in 6 bolts on either side and mounted the wood sides from the inside. That way it was easier to get that nice clean line. Unfortunately the seats in the last picture are all the way back and in driving position you can only see the very top of the console") . I knew that pretty early on, but still thought the side needed something. The T56 trans in the car puts the shifter real far back. I looked at a kit to move the shifter forward to an inspeciton plate, but it costs too much and requires too much disassembly. That's where our hand bent lever came in (it will be cut off above the top bend, but for now it's rat rod style
. I knew that pretty early on, but still thought the side needed something. The T56 trans in the car puts the shifter real far back. I looked at a kit to move the shifter forward to an inspeciton plate, but it costs too much and requires too much disassembly. That's where our hand bent lever came in (it will be cut off above the top bend, but for now it's rat rod style  ). We needed a drastic curve forward to get the lever out of the driver's lap then a decent bend back so when in 1,3,5 we didn't have to lean forward. The drastic bend in the lever meant that the cup holders had to be further forward than I wanted, but there's always compromises.
Since there isn't much room b/w the seats, the shifter is right at the edge of the seats and I had to get around the e brake, I had to flare the console out quickly so the part after the seats was pieced together in three pieces making it a nightmare to get it smooth in the end.
Okay I'm done rambling for now..'35 Ford coupe- LT1/T56, '32 Ford pickup, 70 GTO convertible, 06 GTO
Robert
-
10-24-2011 06:36 AM #5
CHR Member
- Join Date
- Feb 2007
- Location
- Santa Monica
- Car Year, Make, Model: 37 Ford tudor humpback
- Posts
- 1,988
LOL! Thanks for the ramble....I needed to hear your process because I'll be wrestling with similar issues when I get to that point on my '37. I'll also take a look at the manual Blazer console you mentioned for additional ideas. Is your finish going to be paint or covered with vinyl/fabric or something?"It is not much good thinking of a thing unless you think it out." - H.G. Wells
-
10-24-2011 07:04 AM #6
CHR Member/Contributor
- Join Date
- Jul 2003
- Location
- Madison
- Car Year, Make, Model: '67 Ranchero, '57 Chevy, '82 Camaro,
- Posts
- 21,160
Looks great! Some really nice shape to it, fits the rest of the car perfect! I'd say a most excellent job for your first ordeal with 'glass!!!!!--If you want more practice, I have this roadster in the shop that needs a bit of attention, heck, I wouldn't even charge you (much) for supplying the training material!!!!!!!!
and if you go for that deal, we need to talk about some real estate I have for sale!!!!
Yesterday is history, tomorrow is a mystery, Live for Today!
Carroll Shelby
Learning must be difficult for those who already know it all!!!!
-
10-24-2011 07:59 AM #7
CHR Member/Contributor
- Join Date
- Mar 2005
- Location
- Tigard
- Car Year, Make, Model: 63 Nova SS
- Posts
- 2,591
Look great! I'm going to attempt a similar build for a '63 Nova and you've provided a bit of encouragement along with good ideas and a nice looking end product. Thanks for sharing!
Glenn"Where the people fear the government you have tyranny. Where the government fears the people you have liberty." John Basil Barnhil
-
10-24-2011 08:19 AM #8
CHR Member
- Join Date
- Jan 2003
- Location
- Centreville
- Car Year, Make, Model: 35 ford 5 window coupe
- Posts
- 691
Randy - If I were you I would think about finding something to modify because I used almost 2 gallons of resin at $35 each. I had one from a few years ago though that was hardly used. I obviously used a good bit of Bondo most ended up on the floor I think as it should. I'm not sure how most people do it, but I went through a dozen sponge brushes (after I ruined a $6 brush..hardener DUH!) and 20 gloves. The wood I found in an intersection so I grabbed it up  . Then I spent $40 on a Blazer console lid with hinge (then cut it up to narrow it
  ), a mount that supports the hinge and the plastic "bucket" that goes inside that I can't really use. After I started I found a craigslist deal...the guy wanted $40 for the whole console, but it was over an hour away so I just took the parts listed to save shipping...bad timing...I would have driven for the whole console had I not started.
At the very least I would take the time to make a wooden buck exactly how you want it and use the fleece method. forming sections on the Blazer console and piecing it all together was, I thought the easiest way to get a good fit as I went, but there was a lot of time lost in attaching parts and waiting for it to dry before moving on then sanding down the bumps where I joined parts. I had planned on painting it, but I think it will look better covered and hold up better. It will probably match the seats when they are recovered in black.
Thanks Dave haha I can't imagine building (err "fixing" imperfections from the mold) a fiberglass car. I did my best to pretect myself with eye, nose and mouth protection, but honestly was lazy some and that dust just gets everwhere. Plus I had to quit when it was 90+ degrees out. I said it took a few months...welll technically I started the last week of March. It was very much off and on, but still a snails pace. You can do a lot with fiberglass, but I think I'd rather burn metal and I'm a rookie with that too!
'35 Ford coupe- LT1/T56, '32 Ford pickup, 70 GTO convertible, 06 GTO
Robert
-
10-24-2011 08:26 AM #9
CHR Member
- Join Date
- Jan 2003
- Location
- Centreville
- Car Year, Make, Model: 35 ford 5 window coupe
- Posts
- 691
Thanks Glenn. Rspears thread here for his '33 was my initial inpiration so I'm happy to pass that along when I can (not often! :LOL)'35 Ford coupe- LT1/T56, '32 Ford pickup, 70 GTO convertible, 06 GTO
Robert
-
10-24-2011 11:37 AM #10
CHR Member
- Join Date
- Dec 2003
- Location
- Pahrump
- Car Year, Make, Model: 1947 International Pick Up
- Posts
- 3,188
Very nice work.
Kurt
-
10-24-2011 04:51 PM #11
CHR Member
- Join Date
- Dec 2009
- Location
- Vacaville
- Car Year, Make, Model: '62 Velo Rossa
- Posts
- 286
Awesome job! I love the custom touches.
Where did you get the stainless cup holders? I'd like to replace my plastic ones.Wes
You don't have to be crazy to do this...
... but it helps!
-
10-24-2011 05:50 PM #12
CHR Member
- Join Date
- Jan 2003
- Location
- Centreville
- Car Year, Make, Model: 35 ford 5 window coupe
- Posts
- 691
Thanks. You have done some nice things with the body on your hot rod ()
There's a bunch of stainless cup holders on amazon all different sizes some nicer than others. My Google search led me there. Most are advertised for poker tables or boats. I had the luxury of choosing anything since I had yet to drill the holes. I ended up with one about 2.5" wide at the bottom and 3.5" at the top (think large Taco Bell cup). I paid a little under 20 bucks shipped. Unfortunately it seems if it doesn't fit in the bottom of the cup holder it will tip over because the overall depth I think is only roughly 2.5". It's hard to find one deeper than that. I would recommend one all one width. These will fit a medium take out cup or can mostly. I think I'll put one larger cup holder in each side panel under the quarter window behind the seat for a bigger mug or bottle.
By the way I'm noticing the cup holders look like they don't sit the same in the console so I might sand the top more so that they both sit the same and level. They don't look straight in line with each other front to back, but they are.'35 Ford coupe- LT1/T56, '32 Ford pickup, 70 GTO convertible, 06 GTO
Robert
-
11-08-2011 05:29 PM #13
CHR Member
- Join Date
- Feb 2008
- Location
- PLATTSMOUTH
- Car Year, Make, Model: all kinds
- Posts
- 166
I think you did a great job...Nice shape also !Tracy Weaver
www.recoveryroominteriors.com
-
11-26-2011 08:12 AM #14
CHR Member
- Join Date
- Jan 2003
- Location
- Centreville
- Car Year, Make, Model: 35 ford 5 window coupe
- Posts
- 691
I have seen the work that comes out of your shop so that means a lot..Thanks! Originally Posted by RECOVERY ROOM

I haven't done anything with it recently, but I still need to tweak the area around the shift boot ring so it fits a bit futher back without the shifter hitting it. I'm also concerned with how the lid looks after sectioning it, but I'm trying to ignore it until we find a shop for the interior and I'll probably have them wrap some leather on it to match the whole thing.Last edited by 35fordcoupe; 11-26-2011 at 08:14 AM.
'35 Ford coupe- LT1/T56, '32 Ford pickup, 70 GTO convertible, 06 GTO
Robert
 Reply With Quote

Posting Permissions
- You may not post new threads
- You may not post replies
- You may not post attachments
- You may not edit your posts

i've enjoyed the years here . made a lot of friends. most who have left. i see no reason to continue with this so hope to see you somewhere else. i dont think this site will ever be back. it's lived...
Dead!