


 98Likes
Thread: 87 Ram 50 Engine Swap


Results 1 to 15 of 95
 LinkBack URL
 About LinkBacks
-
03-16-2015 05:21 AM #1
 CHR Member

- Join Date
- Mar 2003
- Location
- SW Arizona
- Car Year, Make, Model: 68 Ply Valiant, 83 El Camino
- Posts
- 3,872
87 Ram 50 Engine Swap
I’ve been working on this for the last couple of months and figured I post a build thread.
This started out as my daughters’ first vehicle. To make a long story short, the engine went out and I ended up with it when we got her another vehicle. It’s been sitting in the back shed for the last 10 years or so.
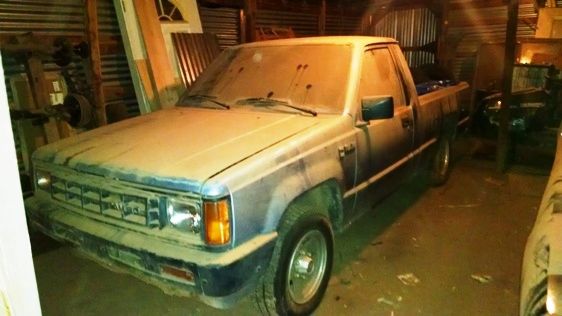
The truck was really straight and rust free, so I figured it would be a good candidate to put back on the road. The grandkids thought it was a good idea too…..especially Cade! With the seat all the way up and the steering wheel all the way down, he can reach the pedals and see over the steering wheel.

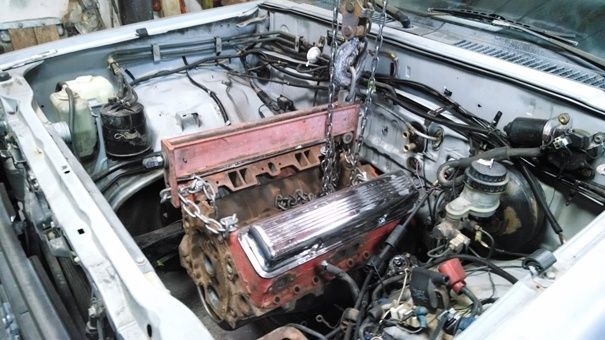
I’d originally planned about putting a SB Mopar in it but after looking at some similar swaps it became evident that the factory AC would have to be eliminated so the radiator could be moved in front of the core support where the condenser sits. A SBC with the short water pump is at least 3 inches shorter and I figured with a bit of work it would probably fit better and let me retain the AC.
I’ll admit that having the fresh 283 that my grandson and I built last year sitting around also was a factor. Although I like my Tri Powers, It really doesn’t look right to me in something this new, so off it came along with the Mallory dual point and on went an old Offenhauser Dual Port, and a stock distributor converted to electronic with a Pertronix kit.

The dual port is kind of an odd ball intake that was designed in the early 70’s (Gas crisis time). The primaries feed thru the lower ports and the secondaries thru the upper ports.
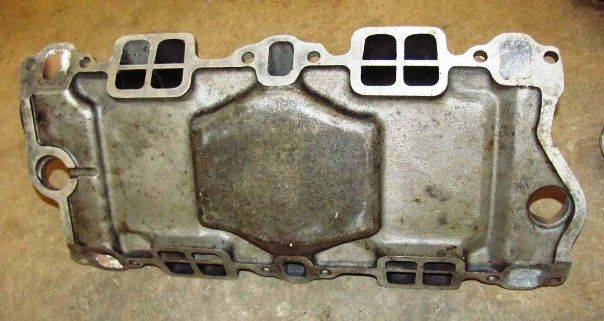
There is/was a lot of mixed reaction to these intakes, people either seemed to love or hate them. The results I’ve looked at seem to indicate they worked pretty well with smaller displacement engines but were too restrictive when the cubic inches went up. It’s just odd ball enough for me to be curious so I figured I’d give it a try.
.I've NEVER seen a car come from the factory that couldn't be improved..... 
-
Advertising

- Google Adsense
- REGISTERED USERS DO NOT SEE THIS AD
-
03-16-2015 05:23 AM #2
CHR Member
- Join Date
- Mar 2003
- Location
- SW Arizona
- Car Year, Make, Model: 68 Ply Valiant, 83 El Camino
- Posts
- 3,872
So out came the 4 banger and 5 speed.
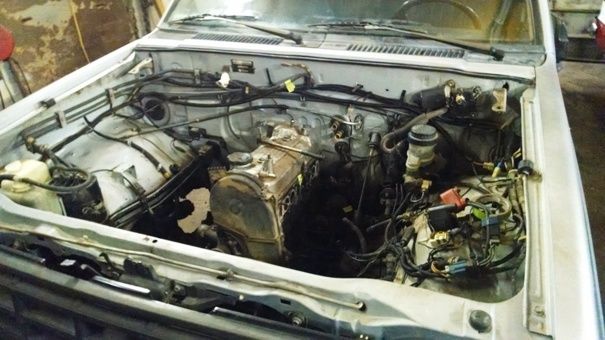
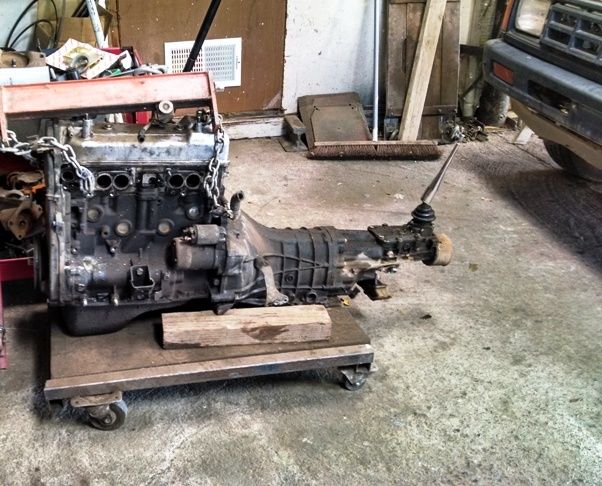
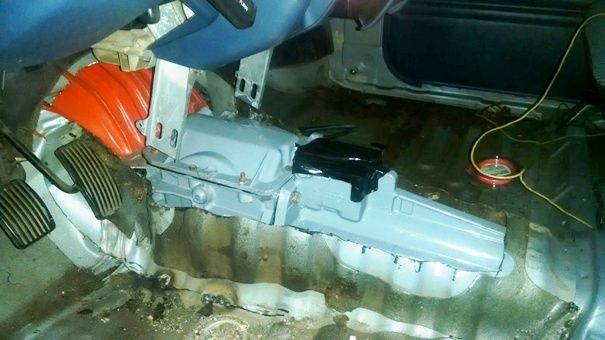
The rear end has 3.91 gears so putting an overdrive transmission back into it was pretty much required. I considered a TH 200 4R, but decided on a T5 out of an S10. The truck used a cable operated clutch so instead of re-inventing the wheel for clutch linkage, I dug up a V8 Monza bellhousing which as far as I know is the only one Chevrolet made for a cable clutch.
The engine fits the engine compartment pretty well, but the original 5 speed and bell housing and the transmission tunnel it fit are considerably smaller than the new T5. Im still tweaking the tunnel and firewall before I build the mounts.
.I've NEVER seen a car come from the factory that couldn't be improved.....
-
03-16-2015 05:28 AM #3
CHR Member
- Join Date
- Mar 2003
- Location
- SW Arizona
- Car Year, Make, Model: 68 Ply Valiant, 83 El Camino
- Posts
- 3,872
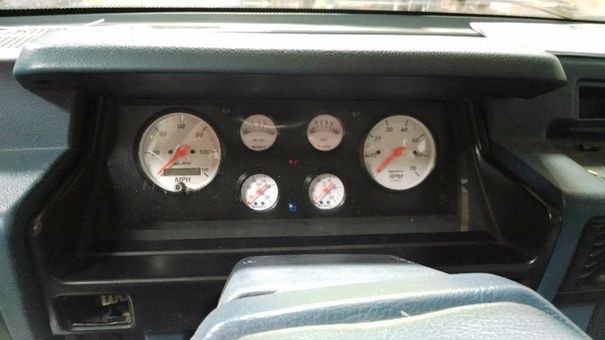
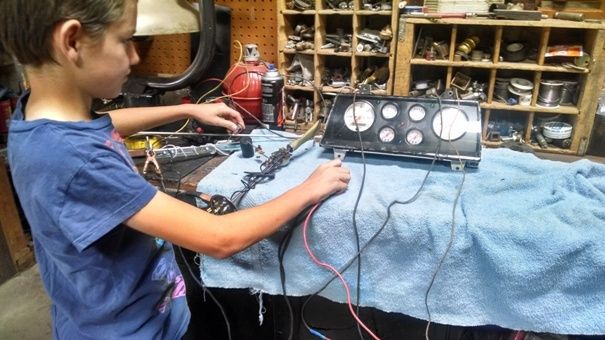
I got sidetracked a bit from the engine and transmission fitment with the gauge cluster which led being side tracked by the fuel system. The original gauge cluster was actually pretty nice and I originally had no intention of doing anything with it. It would be nice to have an oil pressure and volt gauge along with a tach, but I figures I could add those on later.
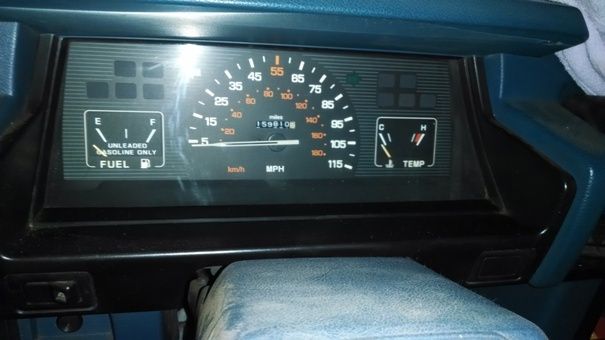
The T5 I had picked up was set up for an electronic speedometer and the original plan was to replace the tail housing with an early style one designed for a mechanical cable. After not being able to come up with a cable style speedometer tail housing, it hit me that I could kill 2 birds with one stone by buying an electronic speedometer and building a custom gauge cluster. Besides keeping all the gauges I wanted in the cluster, it got me out of having to make a custom speedometer cable. After years of calibrating speedometers with a couple of road tests then changing out drive and driven gears in the transmission, the idea of setting the speedometer by just pressing a button is kind of appealing too.
When I had the truck up in the air I decided to go ahead and drop the fuel tank so I could trace the sending unit wire for the new gauge cluster. I would also give me a chance to check the sending unit.
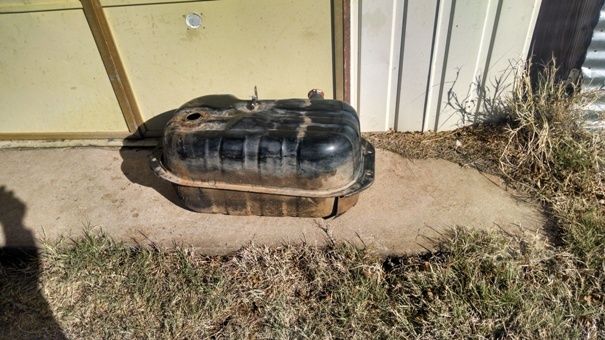
With the tank out, I found out 3 things.
1. I really wish I had drained the tank 10 years ago when I put the truck in storage. The gas had turned to varnish.
2. The original sending unit was junk and no longer available.
3. In spite of how large it looks, it only holds 13 gallons.
I’ve got the tank cleaned out now, but what a PIA. I’ve had good luck soaking tanks with Acetone in the past and that’s what I used this time….but wow has the price gone up on that since I bought it the last time.
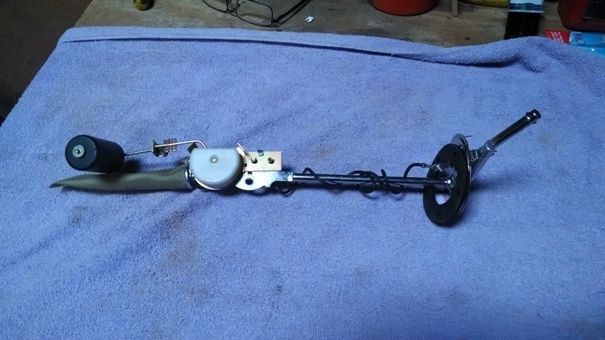
The sending unit was not a big deal as I had a couple of new universal ones on the shelf. Fortunately the tank uses a sending unit that is separate from the fuel pickup and the universal fit with just a couple of little mods.
The 13 Gallon capacity bothered me a bit as I will likely take the truck on long trips. I’ve seen a few truck builds where people have used first/second generation Mustang tanks mounted under the bed behind the axel. I happened to have 58 Chevrolet tank in the back I had set aside years ago. It’s a little dirty on the outside, but absolutely perfect (and clean) on the inside, it also holds 20 gallons. It will be close but it looks like it should fit under the bed (I’ll probably have the fill neck come out behind the license plate).
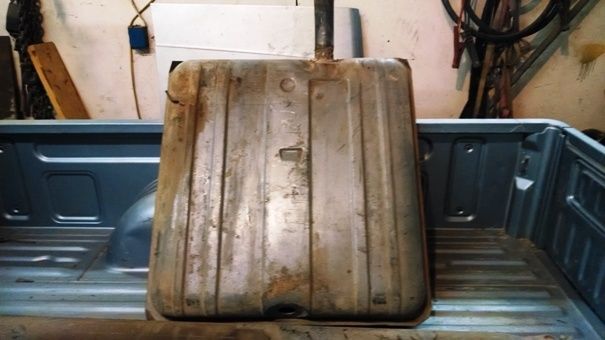
I had to buy a new sending unit for the 58 tank which was reasonably priced, but the sender itself was not compatible with aftermarket gauge. Fortunately it was actually pretty simple to change the sender out to the new pickup.
Between the 2 tanks I’ll have 33 gallons of fuel. I’ll be using electric switch valves and with a DPDT switch I’ll be able to switch the tanks over and have the gauge read from which ever tank I’m currently using.
I showed Cade how the switch would be wired yesterday and we bench tested the switch, senders and gauge.
.I've NEVER seen a car come from the factory that couldn't be improved.....
-
03-16-2015 05:34 AM #4
CHR Member
- Join Date
- Aug 2003
- Location
- Springfield
- Car Year, Make, Model: '66 Mustang, 76 Corvette
- Posts
- 5,445
That should be a cool build and I'm assuming it will become Cade's. Are you going to retain the generator? I'm curious to know how the Offy works out, I still have the 360º I had on the 400, found a Ford version for the 289 in the Mustang and also have a dual quad version that might go on the Vette.Ken Thomas
NoT FaDe AwaY and the music didn't die
The simplest road is usually the last one sought
Wild Willie & AA/FA's The greatest show in drag racing
-
03-16-2015 06:21 AM #5
CHR Member/Contributor
- Join Date
- Sep 2007
- Location
- Gardner, KS
- Car Year, Make, Model: '33 HiBoy Coupe, '32 HiBoy Roadster
- Posts
- 11,245
Another very cool build thread, Mike. I admire that you're not only getting Cade and the girls interested in the details, and hands on experience, but also instilling in them how to attack a problem and solve it with solid thinking, planning and execution. You're a grandpa to be admired for sure.Roger
Enjoy the little things in life, and you may look back one day and realize that they were really the BIG things.
-
03-16-2015 06:29 AM #6
CHR Member
- Join Date
- Mar 2003
- Location
- SW Arizona
- Car Year, Make, Model: 68 Ply Valiant, 83 El Camino
- Posts
- 3,872
"....That should be a cool build and I'm assuming it will become Cade's......"
Maybe someday. I'm planning on driving for quite a while (but quite possibly it will be what Cade learns to drive a stick with). My daughter (Cade's mom) is actually my step-daughter, she inherited the truck from her real dad. One of the reasons I think I kept it around all this time is because of her history with it. When I'm ready to let it go it will go back to her. She is probably the one most excited to see it back on the road. I'm giving her a lot of input on the changes I'm making on this build.....personally I think I would have gone with the TH200 R4, but she really wanted it to remain a 5 speed. I suspect Cade might eventually end up with it but I think he's in for a long wait.
The generator will be replaced with an alternator.....I just haven't gotten around to that yet. The re-pop Corvette manifolds look like they’ll clear with no problems.
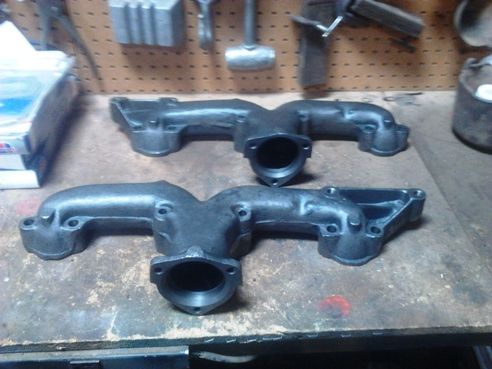
You might notice there are bosses on both sides which will actually work out pretty nice it think. The D50s alternator was on the right side and AC compressor on the left. I’ll move the alternator to the right and use the left side as the mounting point to the compressor which will save having to reroute the alternator wiring and AC plumbing.
I’m curious about the intake too. On the stand I can already tell that it has cleaned up the idle quite a bit over the single plane Tri Power setup.
.I've NEVER seen a car come from the factory that couldn't be improved.....
-
03-16-2015 06:38 AM #7
CHR Member
- Join Date
- Aug 2003
- Location
- Springfield
- Car Year, Make, Model: '66 Mustang, 76 Corvette
- Posts
- 5,445
Just one more question. Are you changing the refrigerant over to R134?Ken Thomas
NoT FaDe AwaY and the music didn't die
The simplest road is usually the last one sought
Wild Willie & AA/FA's The greatest show in drag racing
-
03-16-2015 06:52 AM #8
CHR Member
- Join Date
- Mar 2003
- Location
- SW Arizona
- Car Year, Make, Model: 68 Ply Valiant, 83 El Camino
- Posts
- 3,872
".....Just one more question. Are you changing the refrigerant over to R134?...."
Probably. For the last several years I'd been using "Freeze 12" which was a drop in replacement for the R12. Unfortunately that has gotten almost impossible to find and expensive when you do find it. I re-did my wifes El Camino to R134 last year due to cost and availability and unless I can find a good deal on R12 or Freeze 12 I'll end up using the R134 in this one too. On a side note, even after sitting for the last 10 years, the AC system was still holding pressure on the little truck.
.I've NEVER seen a car come from the factory that couldn't be improved.....
-
03-16-2015 07:10 AM #9
CHR Member
- Join Date
- Aug 2003
- Location
- Springfield
- Car Year, Make, Model: '66 Mustang, 76 Corvette
- Posts
- 5,445
I just checked at Amazon and they have a 30lb jug of Freeze 12 by Johnsen's for $172.95 and free shipping which figures out to $5.76 a pound.Ken Thomas
NoT FaDe AwaY and the music didn't die
The simplest road is usually the last one sought
Wild Willie & AA/FA's The greatest show in drag racing
-
03-17-2015 06:16 AM #10
CHR Member
- Join Date
- Apr 2001
- Location
- Salado
- Car Year, Make, Model: 32, 40 Fords,
- Posts
- 10,898
Before jumping to R134 be aware that the Nanny Nazis are at it again: Obama’s EPA To Ban R134A- Most Common Refrigerant Used TodayYour Uncle Bob, Senior Geezer Curmudgeon
It's much easier to promise someone a "free" ride on the wagon than to urge them to pull it.
Luck occurs when preparation and opportunity converge.
-
03-19-2015 04:39 AM #11
CHR Member
- Join Date
- Mar 2003
- Location
- SW Arizona
- Car Year, Make, Model: 68 Ply Valiant, 83 El Camino
- Posts
- 3,872
“…..Before jumping to R134 be aware that the Nanny Nazis are at it again….”
I missed this when you posted it Bob. I had heard/read about this a while back. It just made me wonder what the less efficient, more toxic and expensive replacement is going to be. I’m sure it will also have to have its own specific lubricant, hoses, and seals. Of course they will have to also mandate new refrigerant compliant fittings and gauges, new recovery equipment and so on and so on…..we’ve been here before as I recall.
.I've NEVER seen a car come from the factory that couldn't be improved.....
-
03-20-2015 04:32 PM #12
CHR Member
- Join Date
- Apr 2011
- Location
- Prairie City
- Car Year, Make, Model: 40 Ford Deluxe, 68 Corvette, 72&76 K30
- Posts
- 7,301
- Blog Entries
- 1
Great project again! My mom had an 87 D50 Ram 4x4 that we used to ride around in all the time until she got hit by a semi. That wasn't cool, the semi won for sure. Any how, there is a guy on Competitiondiesel.com that put a pretty sweet 12v 5.9 cummins in one of these, kept it a 4x4 and races it and mud races it. It's pretty sweet. Anyhow, back to your build... Do you plan to make the trans tunnel removable to allow easier trans removal later? Nice work on it too.
I'm guessing dupont's patent ran out on the r-134a just like it did with R-12 and then was outlawed. But they already had the magical r134-a ready to take it's place.
Ryan
1940 Ford Deluxe Tudor 354 Hemi 46RH Electric Blue w/multi-color flames, Ford 9" Residing in multiple pieces
1968 Corvette Coupe 5.9 Cummins Drag Car 11.43@130mph No stall leaving the line with 1250 rpm's and poor 2.2 60'
1972 Chevy K30 Longhorn P-pumped 24v Compound Turbos 47RH Just another money pit
1971 Camaro RS 5.3 BTR Stage 3 cam, SuperT10
Tire Sizes
-
03-21-2015 08:56 AM #13
CHR Member
- Join Date
- Mar 2007
- Location
- festus
- Car Year, Make, Model: 48 Plymouth, 48,54 Heap
- Posts
- 3,407
Very cool, Mike! That little truck should move pretty good with a 283. It's really clean looking.1 Corinthians 1:27
-
03-22-2015 05:02 AM #14
CHR Member
- Join Date
- Mar 2003
- Location
- SW Arizona
- Car Year, Make, Model: 68 Ply Valiant, 83 El Camino
- Posts
- 3,872
"..... there is a guy on Competitiondiesel.com that put a pretty sweet 12v 5.9 cummins in one of these......"
And I thought I was having challenges making room for the 283!!!!!
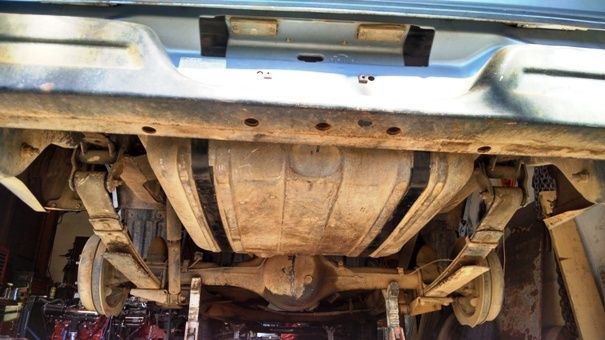
I pulled the mockup up motor and transmission out to do some more transmission tunnel massaging. While it was up in the air on stands I decided to go ahead and get the auxiliary gas tank installed.
This is the hole where the spare tire used to live and the home for the “new” tank. The truck will eventually have a bed cover and the spare will be kept in the bed.
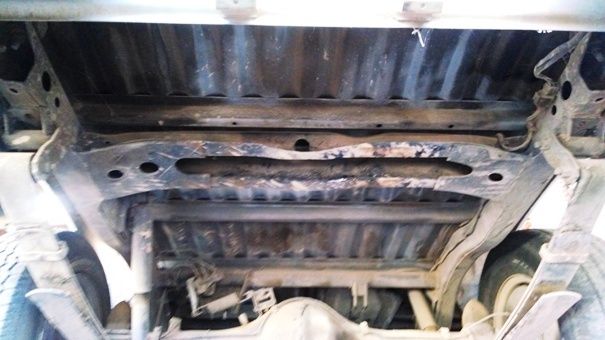
It was a pretty simple matter to add 2 braces to the Ram 50 frame that run the length of the tank at the top like the factory 58 Chevy used. These braces are also what the straps connect to (when I set the tank aside 30 years ago fortunately I also kept the straps). In addition to attaching the braces to the existing crossmember on the frame I welded in an additional crossmember to the frame to provide an additional attaching point for the braces. Unfortunately the picture I took of the braces didn’t turn out and by the time I realized it I already had the tank bolted in.
I remember and miss the old days when we could get good non-ethanol gas and I lived in a bit cooler environment at a lower altitude. I could run a fuel line from the tank to the fuel pump and call it good. After a few times trying to get home with a vapor locking hot rod or hard starts at a gas station due to heat soak, I’ve been adding a fuel return line to just about everything I build.
A lot of the tanks I’ve used didn’t have provisions for the fuel return and I’ve either managed to find a sending unit that had the provision or welded a fitting to the tank. Of course the 58 Chevy tank didn’t have a fuel return line. After looking at this tank, I thought I’d try using a bulkhead fitting rather than weld a fitting to the tank. The only problem was the local hardware store I buy my brass fitting from didn’t have any bulkhead fittings. I had looked on line and found a couple, they were about $15 and would take a week or so to get here.
Being a bit impatient and cheap (something my wife has informed me are not necessarily qualities) when I saw the swamp cooler float assemblies on the shelf the gears started turning and for $5 I figured I could experiment a bit.
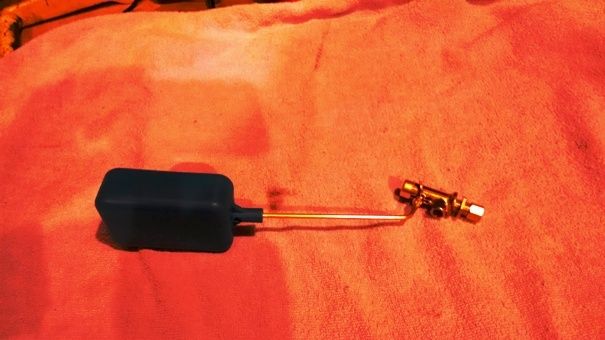
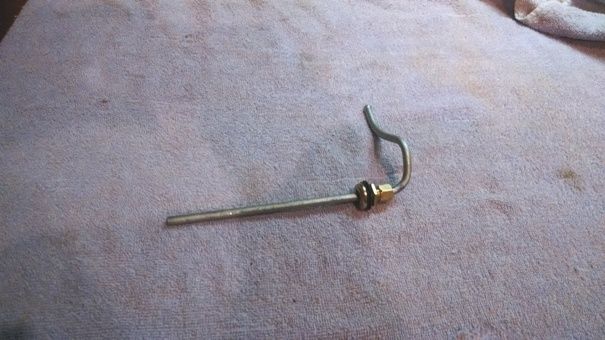
I cut the bulkhead and compression fitting section from the valve. One of the things I’d noticed over the years is that most factory return lines actually extend into the fuel when they return to the tank…….the only reason I can think of is possibly to cut down on aerating the fuel…….I figure the engineers do it for a reason so I extended this one also. All it took was just running a 1/4” drill bit all the way thru the fitting. I doesn’t affect the compression fitting sealing area and only takes a few seconds to do. I even found a couple of fuel resistant gaskets that were the right size in the leftovers from a carb kit. I drilled a hole in the tank and fished the fitting in thru the sending unit hole.
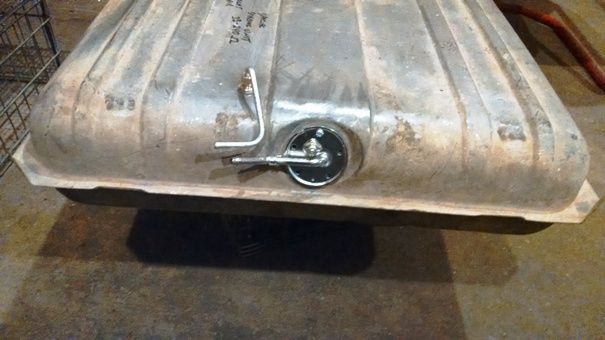
With all that done it was simply put the tank in place and strap it in. Except for the fresh paint on the straps and new anti-squeak strips it kind of looks like it’s been there all its life. It tucks up nicely into the frame and unless you actually crawl underneath you can’t see it’s there (just as it should be).
All that’s left now is to cut the hole for the filler neck and add the fold down license plate holder.
.Last edited by Mike P; 03-22-2015 at 05:54 AM.
I've NEVER seen a car come from the factory that couldn't be improved.....
-
03-22-2015 05:18 AM #15
CHR Member/Contributor
- Join Date
- Sep 2007
- Location
- Gardner, KS
- Car Year, Make, Model: '33 HiBoy Coupe, '32 HiBoy Roadster
- Posts
- 11,245
Very cool, nice fit, and great innovation on the fitting, too. It looks factory!Roger
Enjoy the little things in life, and you may look back one day and realize that they were really the BIG things.


 Reply With Quote


Posting Permissions
- You may not post new threads
- You may not post replies
- You may not post attachments
- You may not edit your posts

This site is up more often lately, but very little traffic.
Dead!