


 98Likes
Thread: 87 Ram 50 Engine Swap


Results 16 to 30 of 95
 LinkBack URL
 About LinkBacks
-
03-22-2015 06:17 AM #16
 CHR Member

- Join Date
- Sep 2007
- Location
- New Bedford
- Car Year, Make, Model: 34 Ford 3W Coupe Replica
- Posts
- 14,754
That came out great.
Swamp Coolers.. I really don't miss cleaning out mine.. or the stain it would leave when it flooded over!
-
Advertising

- Google Adsense
- REGISTERED USERS DO NOT SEE THIS AD
-
03-23-2015 02:14 AM #17
CHR Member
- Join Date
- Mar 2003
- Location
- SW Arizona
- Car Year, Make, Model: 68 Ply Valiant, 83 El Camino
- Posts
- 3,872
“…….. That little truck should move pretty good with a 283. It's really clean looking……..”
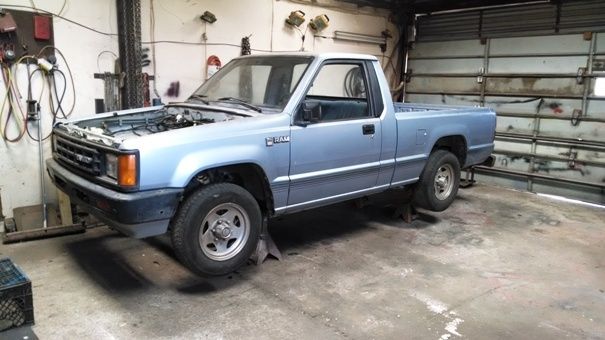
Yeah. I don’t think the little 283 will have any problem pulling the truck around. I want to run this across the scales when I get it done just to see what it ends up weighing.
I realized I hadn’t posted a decent picture of what the truck looks like yet. It is really solid and straight. I could use a paint job but even as it sits it’s still pretty presentable. My thinking right now is that the paint job may wait a year or two until the grandsons are a bit older and see how they do/like paint and body.
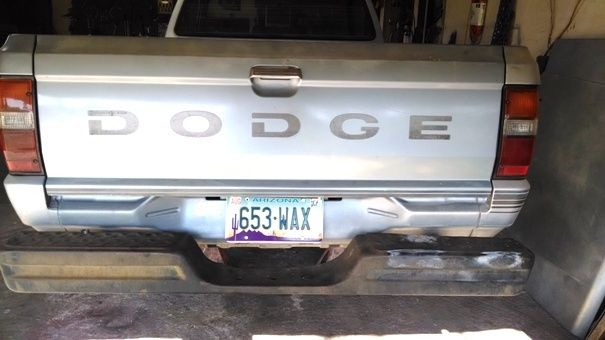
I finished up the rear tank yesterday. I got the hole cut for the filler neck and could figure out the length for the filler neck. Fortunately a friend of mine had a piece of fuel hose in his “why the hell did I keep this pile” to connect the filler neck pieces together.
Then it was just installing the license plate bracket to finish it up. I glad I went ahead and did this now as it gets one more big part off the floor and out of the way.
.I've NEVER seen a car come from the factory that couldn't be improved..... 
-
03-23-2015 06:46 AM #18
CHR Member
- Join Date
- Feb 2007
- Location
- Santa Monica
- Car Year, Make, Model: 37 Ford tudor humpback
- Posts
- 1,988
Mike, I'd be curious to see your "behind the bumper" filler neck mods. I did a similar style mod to my '66 F100 using the '68 Mustang style tank. It's a slow-feed when filling up but at only 16 gallons, it doesn't take that long.
I noticed in pics online that the '59-60 Chevy tank is the same size as your '58 but has the filler neck more centered. Sure, most times we use what we have laying around, but for someone else considering this modification, it might be helpful.
That'll be a fun little truck!!! Nice work!


"It is not much good thinking of a thing unless you think it out." - H.G. Wells
-
03-23-2015 07:57 PM #19
CHR Member
- Join Date
- Mar 2003
- Location
- SW Arizona
- Car Year, Make, Model: 68 Ply Valiant, 83 El Camino
- Posts
- 3,872
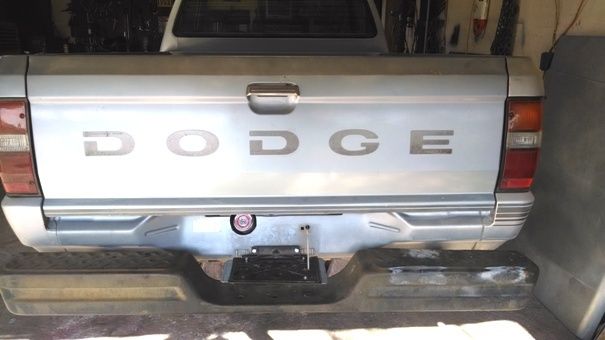
You’re install looks nice and clean Randy. I can’t really get a camera up in there to take a picture of my fill pipe. Basically I just took about a 3 ½” section out of the fill neck and connected the ends back together with hose and clamps. It’s a pretty straight shot onto the tank so it should fill OK. I agree it would have been nicer from an ascetics standpoint if the fill pipe was centered…….I was really wondering if the plate would cover it completely.
I went ahead and installed the now clean original tank…..figured I might as well get that out of the way too as long as the truck is up in the air. I mentioned earlier that the original sending unit was dead and not the right resistance for the new gauge so I’m using an aftermarket sender. I’ve used these a few times in the past and can tell you from personal experience they can be a real PIA to get adjusted properly. After a few tries setting the float and then trying to see where it was with a flashlight thru the pickup assembly hole I figured there had to be a better way to set this up.
After thinking about it a little bit I came up with this idea. I cut the box the sender was shipped in down to the same height as the tank, cut a hole in the top to set the sender in. I marked where the full level was (the line at the top box), and from there it was really simple to adjust and tweak the sender. It should be right on, but I’ll find out when I fill it the first time.
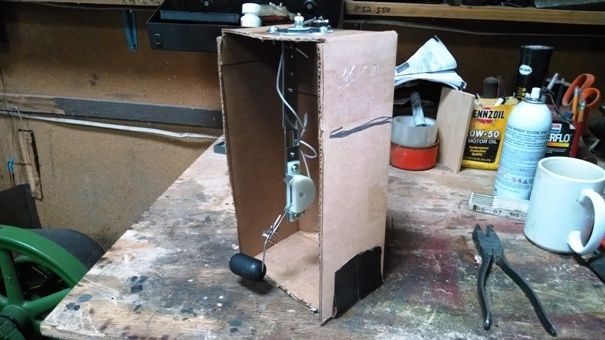
Seeing how far down the full line is I can now understand why the tank is only rated at 13 Gallons.I've NEVER seen a car come from the factory that couldn't be improved.....
-
04-05-2015 05:01 AM #20
CHR Member
- Join Date
- Mar 2003
- Location
- SW Arizona
- Car Year, Make, Model: 68 Ply Valiant, 83 El Camino
- Posts
- 3,872
I spent most of the week going thru the rearend in the El Camino so I didn’t get a chance to spend any time on the D50 till yesterday.
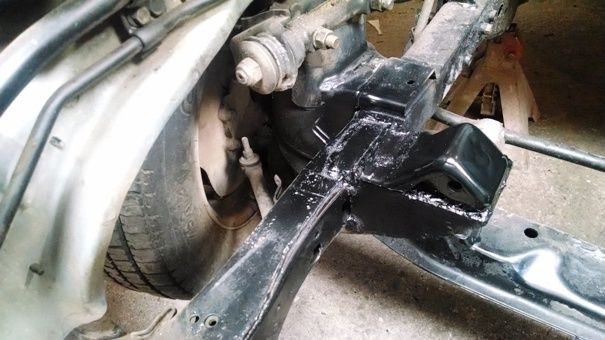
I tweaked the transmission tunnel a bit more and set the mockup engine and transmission back in and started on the mounts. I decided to get the transmission mount built first and then move on to the motor mounts.
The trans mount location is about 6” further back and lower than the original mount so some crossmember surgery was needed.
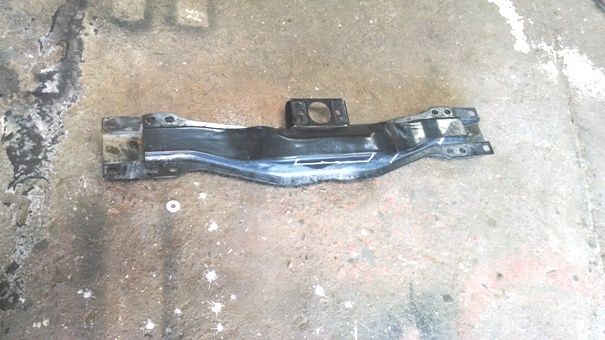
I cut the original mounting bracket off the front to the crossmember, notched the top and then extended the rear a bit to allow me to get a washer, nut and room for a wrench to tighten everything.
While I was under the truck I also started figuring out how I was going have to run the exhaust. Because of the original gas tank location both exhaust pipes will need to be run down the passenger side of the truck where the original exhaust was. The crossmember was originally designed to allow plenty of clearance for the single 2” pipe to pass over the top but would definitely need some extra room for two 2 1/2” inch pipes although I’m debating on using 2 ¼” (which should be plenty for the 283). So while I had the crossmember out I went ahead and clearanced it a bit more.
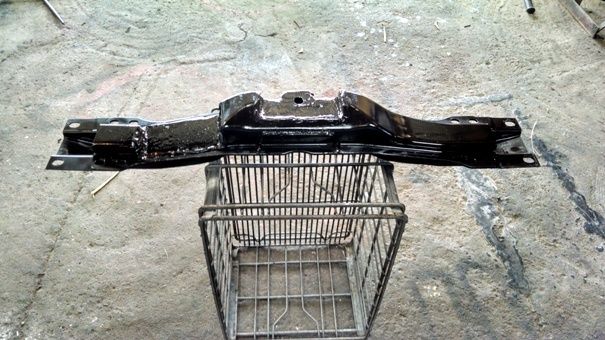
And also on the plus side it gave me a chance to play with the new welder and helmet.
.I've NEVER seen a car come from the factory that couldn't be improved.....
-
04-06-2015 06:32 AM #21
CHR Member
- Join Date
- Apr 2011
- Location
- Prairie City
- Car Year, Make, Model: 40 Ford Deluxe, 68 Corvette, 72&76 K30
- Posts
- 7,301
- Blog Entries
- 1
Nice work!Ryan
1940 Ford Deluxe Tudor 354 Hemi 46RH Electric Blue w/multi-color flames, Ford 9" Residing in multiple pieces
1968 Corvette Coupe 5.9 Cummins Drag Car 11.43@130mph No stall leaving the line with 1250 rpm's and poor 2.2 60'
1972 Chevy K30 Longhorn P-pumped 24v Compound Turbos 47RH Just another money pit
1971 Camaro RS 5.3 BTR Stage 3 cam, SuperT10
Tire Sizes
-
04-06-2015 05:48 PM #22
CHR Member
- Join Date
- Apr 2015
- Location
- Bristow
- Car Year, Make, Model: 22 dodge RPU
- Posts
- 5
cool project - Ive got a 95 dak that will be getting a big block Mopar - my winter project - jaxx
-
06-12-2015 10:31 AM #23
CHR Member
- Join Date
- Mar 2003
- Location
- SW Arizona
- Car Year, Make, Model: 68 Ply Valiant, 83 El Camino
- Posts
- 3,872
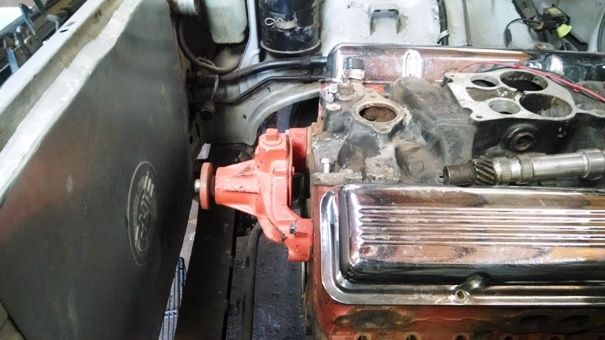
I havent been on much in the last couple of months. Once the weather got nice I spent some time doing house stuff; installing and painting new trim boards on the roof, trimming the trees (resulting in about a ½ cord of wood being cut and split for the kids to burn this winter), servicing the swamp coolers, putting new carpet in the family room (that side tracked painting the Franklin stove, redoing the concrete platform it sits on and refinishing the antique liquor cabinet). Now that thats done I get back to the easy things like stuffing an engine into a truck it was never intended to be in
I got started by building the brackets for the alternator and AC compressor. This is just going to be a drivers so I didnt do anything fancy, just built them with stuff I had on hand.

It took a while to figure out the sweet spot to set the engine at. I originally had it about an 1 ½" lower fortunately before I started building motor mounts I realized that there was going to be an interference problem between the rear spark plug and steering box even with a short header plug. The engine couldnt go back any further because of the firewall, and going forward would lose clearance on the radiator, that only left going up.
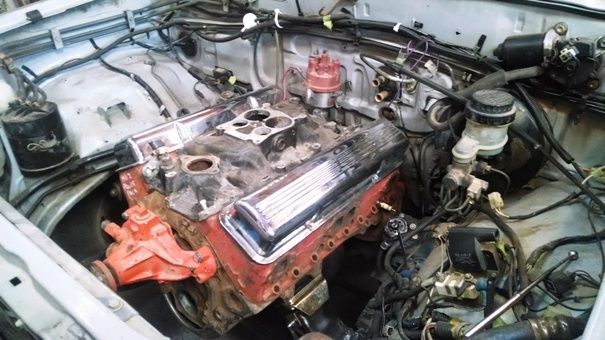
I had originally intended on using a Delco distributor but even though I can get it in and out and adjust it there is less than 1/32 clearance between it and the firewall, so it looks like Ill be going with the Mallory Dual point (with Pertronix conversion) after all. With that done I got the motor mounts tacked in. Ill get some pictures of them when I take the mockup engine out and get them finished.

Its going to be close, but Ill be able to get the radiator and fan in and leave the AC condenser in its original location as I had hoped.
With any luck I should be able to get some work done on the transmission tunnel over the weekend and start figuring out clutch cable routing.
.I've NEVER seen a car come from the factory that couldn't be improved.....
-
06-12-2015 05:29 PM #24
CHR Member
- Join Date
- Apr 2011
- Location
- Prairie City
- Car Year, Make, Model: 40 Ford Deluxe, 68 Corvette, 72&76 K30
- Posts
- 7,301
- Blog Entries
- 1
Nice work! How's the weather been down your way any how?Ryan
1940 Ford Deluxe Tudor 354 Hemi 46RH Electric Blue w/multi-color flames, Ford 9" Residing in multiple pieces
1968 Corvette Coupe 5.9 Cummins Drag Car 11.43@130mph No stall leaving the line with 1250 rpm's and poor 2.2 60'
1972 Chevy K30 Longhorn P-pumped 24v Compound Turbos 47RH Just another money pit
1971 Camaro RS 5.3 BTR Stage 3 cam, SuperT10
Tire Sizes
-
06-12-2015 06:29 PM #25
CHR Member
- Join Date
- Mar 2003
- Location
- SW Arizona
- Car Year, Make, Model: 68 Ply Valiant, 83 El Camino
- Posts
- 3,872
Thanks Ryan. It seems like it's been a bit cooler than usual for this time of year, but it's finally starting to get hot. The monsoon season will probably start in a month or so, then it will be 6-7 hours a week sitting on the lawn mower (yuck).
.I've NEVER seen a car come from the factory that couldn't be improved.....
-
06-15-2015 04:52 PM #26
CHR Member
- Join Date
- Apr 2011
- Location
- Prairie City
- Car Year, Make, Model: 40 Ford Deluxe, 68 Corvette, 72&76 K30
- Posts
- 7,301
- Blog Entries
- 1
We have had an unusual monsoon season here lately. From 12am -7am a lone today we had 3" of rain.Ryan
1940 Ford Deluxe Tudor 354 Hemi 46RH Electric Blue w/multi-color flames, Ford 9" Residing in multiple pieces
1968 Corvette Coupe 5.9 Cummins Drag Car 11.43@130mph No stall leaving the line with 1250 rpm's and poor 2.2 60'
1972 Chevy K30 Longhorn P-pumped 24v Compound Turbos 47RH Just another money pit
1971 Camaro RS 5.3 BTR Stage 3 cam, SuperT10
Tire Sizes
-
06-28-2015 09:11 AM #27
CHR Member
- Join Date
- Mar 2003
- Location
- SW Arizona
- Car Year, Make, Model: 68 Ply Valiant, 83 El Camino
- Posts
- 3,872
With the motor and tranny mounts sorted out I pretty much spent the week working on getting the transmission tunnel modified around the bellhousing and transmission. It took a pretty fair amount of time to make sure I not only had room for the transmission and bellhousing but could get to the bolts to remove them for an eventual clutch change.
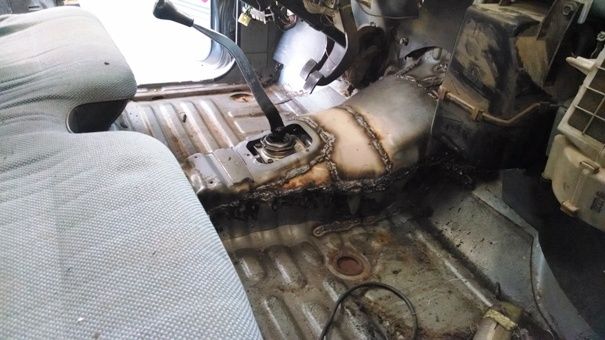
Although I’d hoped to avoid it I ended up biting the bullet and pulling the dash. Besides not wanting to set the insulation on fire and melting various plastic components when I welded the trans tunnel, I also figured I’d go ahead and put a new heater core in it now rather than wishing I had 6 months after I get this back on the road (and the dash needs to come out to get to the heater box).
Heater cores are still available for these, so that’s not a big deal. So far I haven’t been able to find the odd ball water control valve that is attached (with a short section of hose under the plastic cover) to the upper pipe. Should this valve leak the dash would also have to be removed. Unfortunately the cable that operates the valve also controls some internal doors in the heater box. I’m thinking it should be fairly simple to eliminate the factory valve, add a second cable to the bellcrank the original cable operates and run a more tradition control valve in the heater hoses under the hood.

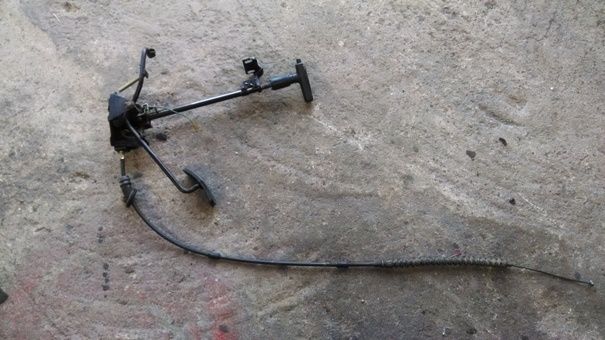
I also had to pull the gas pedal and emergency brake assembly to I didn’t have to work around that. While I was setting it in the back of the truck out of the way, it hit me that this would be kind of neat for a hot rod……..then it hit me I still hadn’t sorted out a gas pedal and emergency brake for the 37 Dodge. A quick trip out to the shed to look at the 37 and it’s almost a perfect fit. Drill 4 holes and call those 2 items done. As I know where a couple of these trucks are sitting out in the wrecking yard it looks like a trip out there is in my future once it cools down.
I’ve still got to get in there with a grinder to knock the welds down and then get some under coating on it but the tunnel is pretty much done.
Overall not a bad week.
.I've NEVER seen a car come from the factory that couldn't be improved.....
-
06-29-2015 12:43 PM #28
CHR Member
- Join Date
- Apr 2011
- Location
- Prairie City
- Car Year, Make, Model: 40 Ford Deluxe, 68 Corvette, 72&76 K30
- Posts
- 7,301
- Blog Entries
- 1
Great work on the truck!Ryan
1940 Ford Deluxe Tudor 354 Hemi 46RH Electric Blue w/multi-color flames, Ford 9" Residing in multiple pieces
1968 Corvette Coupe 5.9 Cummins Drag Car 11.43@130mph No stall leaving the line with 1250 rpm's and poor 2.2 60'
1972 Chevy K30 Longhorn P-pumped 24v Compound Turbos 47RH Just another money pit
1971 Camaro RS 5.3 BTR Stage 3 cam, SuperT10
Tire Sizes
-
07-05-2015 11:28 AM #29
CHR Member
- Join Date
- Mar 2003
- Location
- SW Arizona
- Car Year, Make, Model: 68 Ply Valiant, 83 El Camino
- Posts
- 3,872
I've been kicking around different ideas on the clutch on the truck. The original plan was to use a cable clutch. I’ve already got the V8 Monza cable clutch bellhousing and fork and the truck was originally used cable clutch. Now that the engine and trans are mocked up the using the cable presents some problems I hadn’t anticipated……not necessarily show stoppers but it’s going to be a bit more complicated than I originally thought. Anyway I figured it might not be a bad time to look at alternatives.
I came across this kit sold by speedway
Speedway Hydraulic Clutch Pedal Kit, Swing Mount - Speedway Motors, America's Oldest Speed Shop
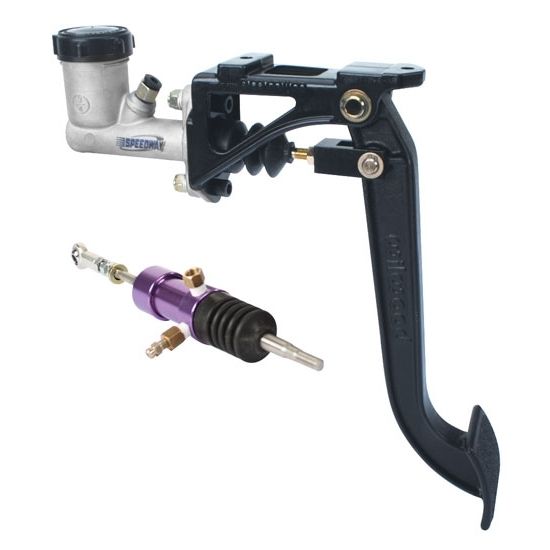
I was wondering if anybody here has used this kit before and how they mounted the slave cylinder? Also you had any reliability problems with it.
.I've NEVER seen a car come from the factory that couldn't be improved.....
-
07-17-2015 06:05 PM #30
CHR Member
- Join Date
- Mar 2003
- Location
- SW Arizona
- Car Year, Make, Model: 68 Ply Valiant, 83 El Camino
- Posts
- 3,872
I made a bit of progress this week. I got the welds on the transmission tunnel ground down and shot a bit of undercoating on it. I also got the motor mount perches welded in (not real pretty but functional and solid).
While I have the dash out I went ahead and replaced the brake booster and master cylinder (makes it a bunch easier to get to the booster bolts). The oil pan on the 283 had the drain plug in the front…..right where it would end up draining straight on to the cross member so I changed that out for one that drains from the side and pulled the canister oil filter off and changed over to a spin on filter.
I ended up going with an adapter to get the spacing right on the T5 rather than extending the input shaft splines.
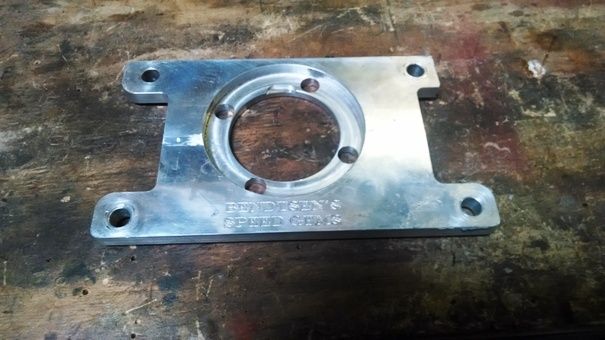
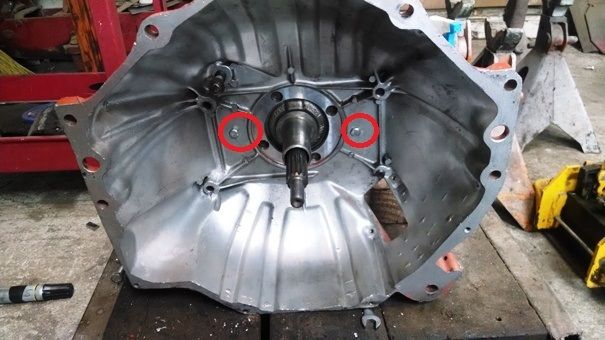
I had the transmission bolted and unbolted from the mockup engine a couple of times and came to the conclusion that the spacer (that sandwiches between the transmission and bell housing) was a real PIA to keep in place when I stabbed the transmission, and that was with the engine and trans on the floor…..it would be a major pain if/when I have to pull the tranny to put a clutch in it in the vehicle. After looking at it a bit I decided to go ahead and drill a couple of 1/4” holes thru the bellhousing and tap the spacer for 1/4-20 bolts.
With all that done I got the engine and transmission bolted together for the final time (hopefully) and got it stuffed into the truck.

It's good to finally start pulling parts out the bed and putting stuff together.
.Last edited by Mike P; 07-17-2015 at 06:08 PM.
I've NEVER seen a car come from the factory that couldn't be improved.....
 Reply With Quote


Posting Permissions
- You may not post new threads
- You may not post replies
- You may not post attachments
- You may not edit your posts

i've enjoyed the years here . made a lot of friends. most who have left. i see no reason to continue with this so hope to see you somewhere else. i dont think this site will ever be back. it's lived...
Dead!