


 98Likes
Thread: 87 Ram 50 Engine Swap


Results 31 to 45 of 95
 LinkBack URL
 About LinkBacks
-
07-19-2015 05:46 AM #31
 CHR Member

- Join Date
- Mar 2003
- Location
- SW Arizona
- Car Year, Make, Model: 68 Ply Valiant, 83 El Camino
- Posts
- 3,872
I got some quality grandpa time in yesterday. Both my grandsons (Cade and Austin) were over. Cade asked if there was anything out in the shop to work on. I had set aside an alternator with a bad regulator for the D50 for just such an occasion. We had gone thru a generator when we first built the 283 so doing an alternator now just seemed like a natural progression.
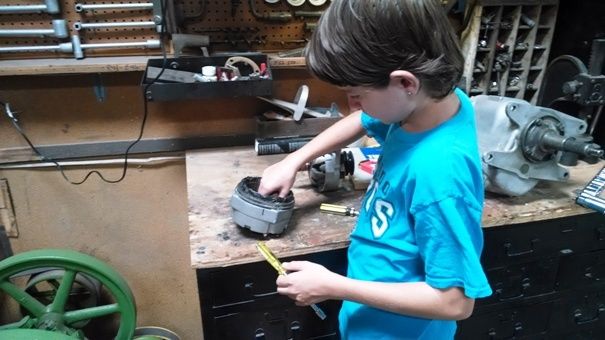
About the time we got the alternator back together Austin wandered out to the shop and wanted to help too. I had given him his starter tool box with a few “real tools” (a hand full of spare wrenches, a crescent wrench etc) a couple of months ago. How can you say no to this?
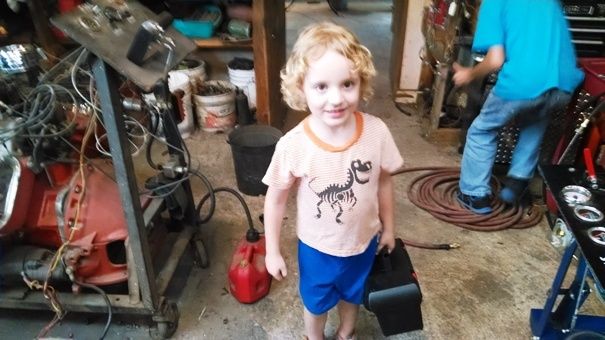
The second part of the project was to put the alternator on the old HEMI (which is set up for a GM alternator) and test it out. I have a test harness built just to test out alternators. Cade was great showing little brother what had to be done to change out the alternator.
You should have seen the grins on both boys faces when the old HEMI fired off. We did an output test on the alternator and then it was time to put the original alternator back on the engine. It just doesn’t get any better than seeing my 2 Grandsons wrenching together, especially on an old carbureted HEMI.
And yes the last picture is my new screen saver.
.I've NEVER seen a car come from the factory that couldn't be improved..... 
-
Advertising

- Google Adsense
- REGISTERED USERS DO NOT SEE THIS AD
-
07-19-2015 06:01 AM #32
CHR Member/Contributor
- Join Date
- Sep 2007
- Location
- Gardner, KS
- Car Year, Make, Model: '33 HiBoy Coupe, '32 HiBoy Roadster
- Posts
- 11,245
Very cool, Mike! And it almost looks like "Christine" watching their progress....Roger
Enjoy the little things in life, and you may look back one day and realize that they were really the BIG things.
-
07-19-2015 02:58 PM #33
CHR Member
- Join Date
- Jun 2004
- Location
- Las Vegas
- Car Year, Make, Model: Sans hot rod, sold the truck.
- Posts
- 1,207
That's about as good as it can get.


.Rrumbler, Aka: Hey you, "Old School", Hairy, and other unsavory monickers.
Twistin' and bangin' on stuff for about sixty or so years; beat up and busted, but not entirely dead - yet.
-
07-20-2015 02:55 PM #34
CHR Member
- Join Date
- Mar 2003
- Location
- SW Arizona
- Car Year, Make, Model: 68 Ply Valiant, 83 El Camino
- Posts
- 3,872
This was my “ well I’ll be damned” moment of the day.
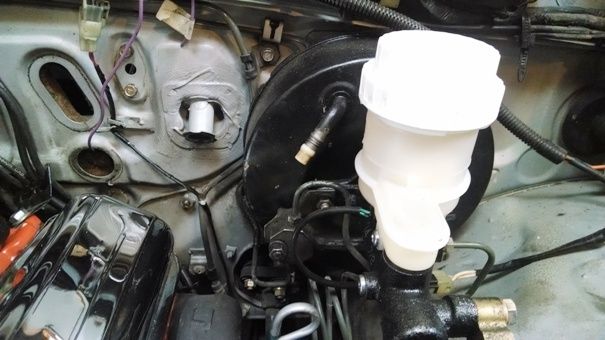
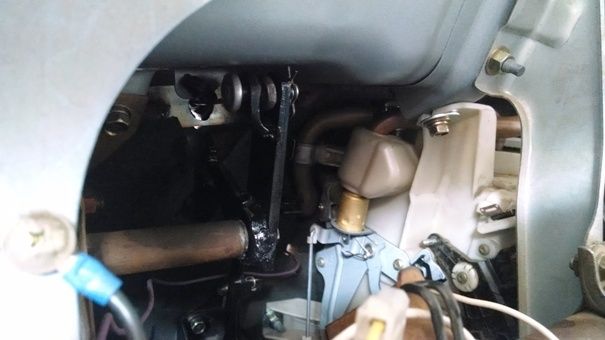
I decided to get some of the easy odds and ends stuff done today, and among other things I decided to hook up the brake booster. When I was putting the new booster on a couple of days ago I noted there was no check valve in the booster, just a vacuum pipe coming out of it. I just figured the valve was probably screwed in to intake on the original engine. So out to the scrap pile I went and dug out the original intake. No check valve there or in the hose.
I figured if nothing else I'd just install an in line valve (like Volvo uses) but I was curious to find out what the factory did for a check valve so I checked the shop manual. It showed the valve….screwed into the end of the vacuum pipe. Sure enough I checked the old booster (fortunately I hadn’t had to turn it in as a core) and sure enough……
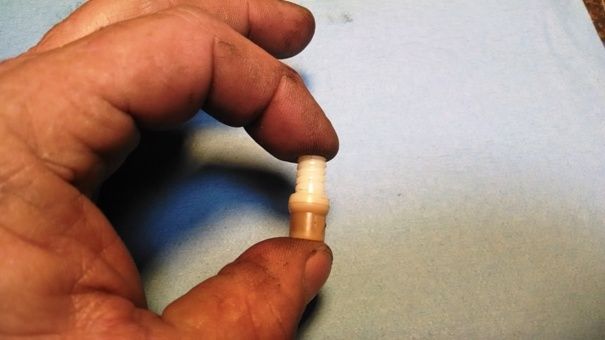
Yeah I do have too much time on my hands.
.Last edited by Mike P; 02-14-2017 at 02:24 AM.
I've NEVER seen a car come from the factory that couldn't be improved.....
-
08-01-2015 03:54 PM #35
CHR Member
- Join Date
- Mar 2003
- Location
- SW Arizona
- Car Year, Make, Model: 68 Ply Valiant, 83 El Camino
- Posts
- 3,872
I didnt get any big stuff done in the last couple of weeks. I did get new heater core and control valve in and the heater box bolted back on the firewall but spent most of the time ordering parts to try to get the 10 pound of crap in a 5 pound bag and waiting on the big brown truck to bring them.
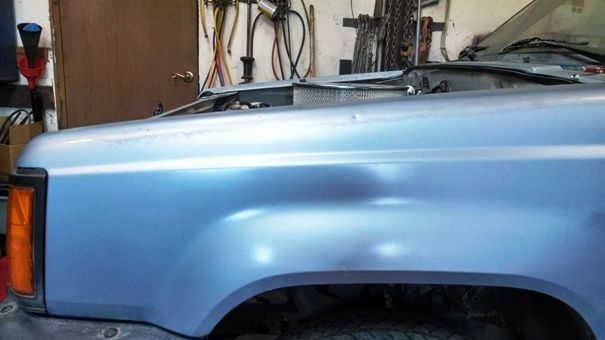
This is one of the tightest swaps that I can remember doing .
With the engine in I could got measurements for a radiator. I originally ordered a 26 X 16 with two 1 rows. After it came in and I did the first test fit it looks like I can go the next size up and use a 26 X 19 so Im waiting on that.
Theres no way a mechanical fan will fit, so it looks like Ill be going with a 14 electric pusher, Hopefully, that along with the adjustable thermostat and relay will be in next week.
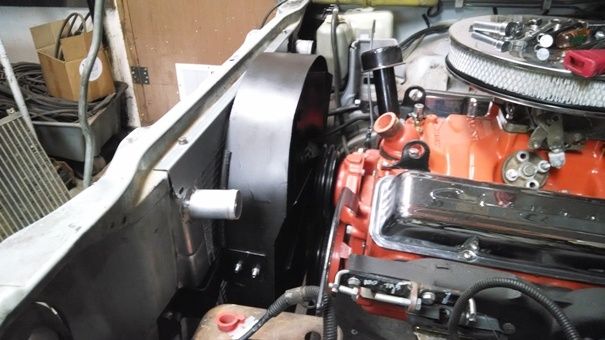
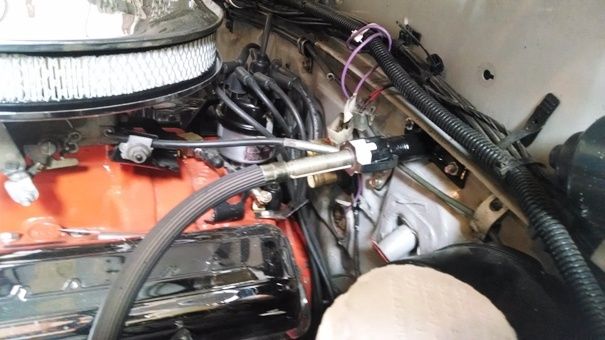
I was hoping to get started on the cable clutch, but to do that I really need to get the head pipes built from the manifolds to make sure I have enough room not to melt the clutch cable housing. The exhaust will run down the passenger side, and it gets tight around the starter. I looked around for something a bit smaller than the original starter .some of the aftermarket gear reduction starters looked promising, especially the ones that were clockable, but I ended up settling on a mid 90s GM unit (I used a 96 Camaro with 5.7 for the application) It should give the clearance I need, and I really like the idea of using something that would likely be on a parts store shelf rather than one I have to get mail order.
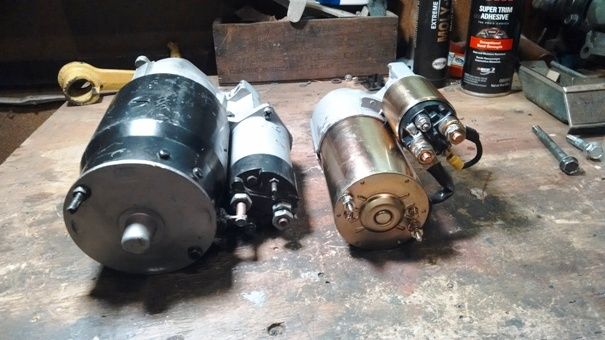
I got the starter bolted in yesterday and Ive got to admit it really spins over the little 283. I which these had been around back in the days when I was doing V8 Vegas.
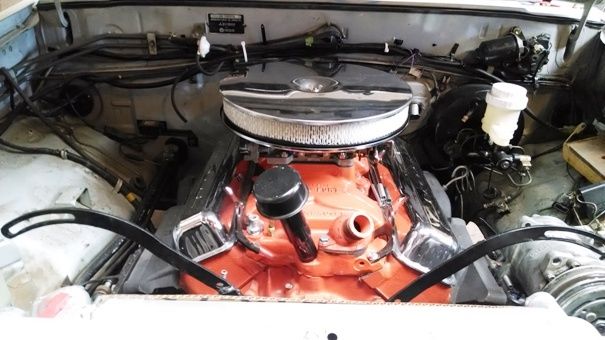
Even the air cleaner turned into a bit of a issue on this.
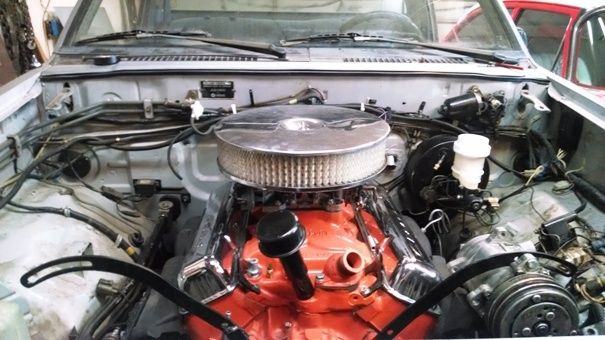
Part of it was Im using an early small throat AFB, which required an adapter under the air cleaner. I came across an outfit that sales a 14 drop base for the early 4 7/32 throat AFBs so I ordered one of those .$35 for the air cleaner base or $300 for a new AFB wasnt a hard decision. I still had to go from a 3 to a 2 tall air filter, but at least the hood closes now.
Next week looks like more time under the truck getting exhaust built and maybe making the clutch work.....in between the 2 days of mowing the yard and arena and then getting over the allergies that get to me afterward. I sure will be glad when those 2 grandsons of mine get big enough to reach the pedals on the mower and Cade's getting real close
.Last edited by Mike P; 08-01-2015 at 04:08 PM.
I've NEVER seen a car come from the factory that couldn't be improved.....
-
08-12-2015 04:41 PM #36
CHR Member
- Join Date
- Mar 2003
- Location
- SW Arizona
- Car Year, Make, Model: 68 Ply Valiant, 83 El Camino
- Posts
- 3,872
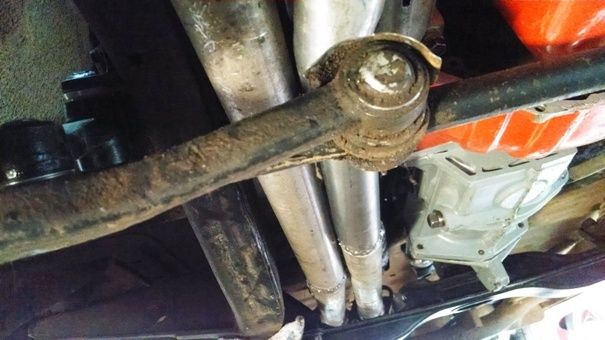
While I was waiting on the larger radiator and electric fans to come in I got the exhaust threaded along the engine and transmission. I brought the drivers side around under the oil pan and ran both pipes down the passenger side (the clutch cable and gas tank made that necessary). Right now the pipes terminate just past the transmission, I still have to hang mufflers and tail pipes, but that part should be relatively easy.
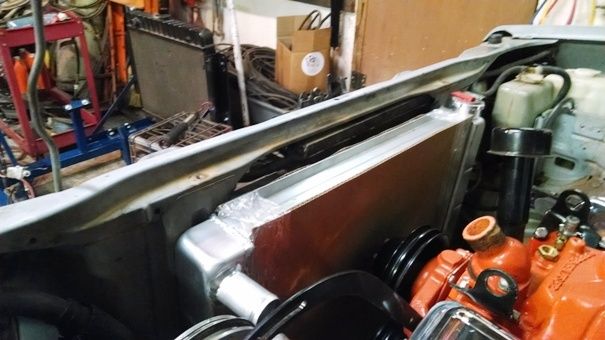
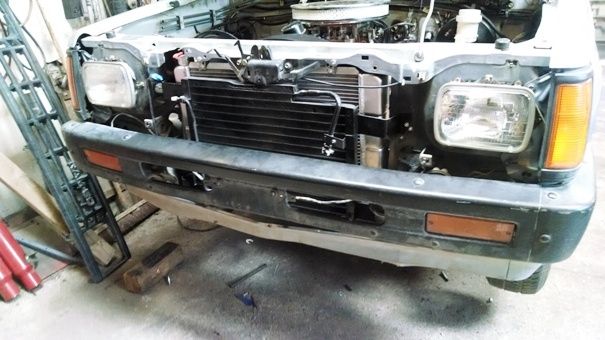
The bigger radiator, fans, relay, and thermostat came in and then the real fun began. The dimensions were just a bit bigger than the ad said just enough that it wouldnt fit without some major surgery. To get the electric fan to fit would also take some modifications and after looking the fan over I had some real concerns it would move enough air. I did some more measuring and thinking and then bit the bullet and completely re-thought the whole radiator installation. I figured out that rather than moving the radiator in front of the core support as most of the swaps Ive seen done on these trucks (resulting in losing any room to the AC condenser), I might be able to put the radiator in the core support which is about 3 wide. Out came the cut-off wheel and I enlarged the opening. I really didnt want to but to get the radiator in I had to remove the entire bottom section.
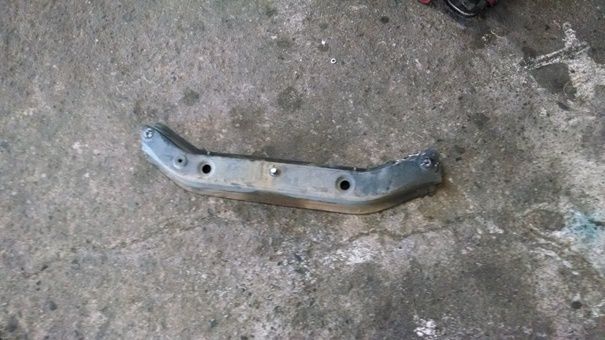
After the hole was big enough I tied the bottom of the core support back together with a piece of angle iron (this picture was when I was tacking it in).
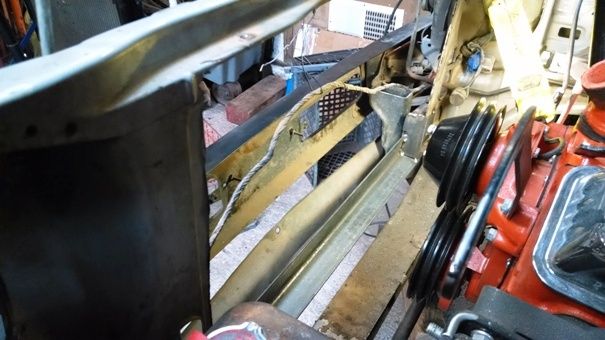
From that point it was pretty simple to make some brackets and mount the radiator.
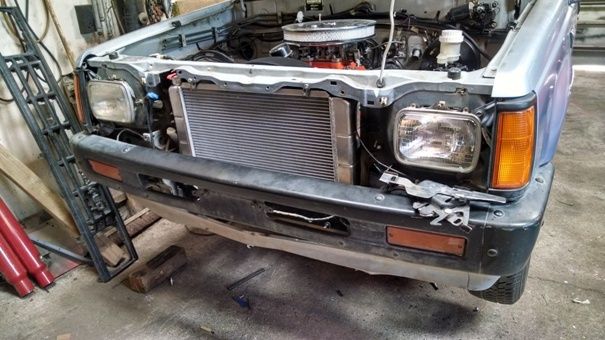
With the radiator forward, I tried to get a fixed fan and clutch in, but came up about an inch short. I ended up going with my second choice which is an OEM ford flex fan. I like them a bit better than the aftermarket units because they have a bit more pitch on the blades and theyre a bit stiffer (more rpm to flatten them out) which means they move more air.

Next on the list was building a fan shroud. I have a bunch of different factory shrouds out in the shed but none were close enough to modify and use. I had an old aftermarket shroud Id had on another car years ago sitting around, so that was the most logical thing to cut down and use. The chrome was shot, but I planned on sandblasting it off and painting it anyway.
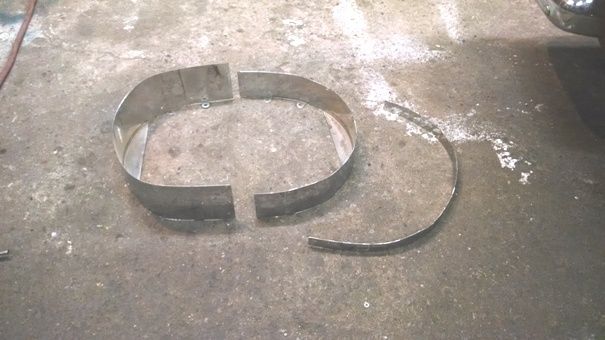
Rather than use the tabs and thru pins they are normally held on with, I built brackets and made it so the top half of the shroud can be removed for access to the fan and waterpump.
The next thing was redoing the brackets on the AC condenser to move it forward (it used to sit where the radiator now resides). Ive still got to run new hoses and install a receiver/dryer, but that will wait till later. For now Im calling it good.
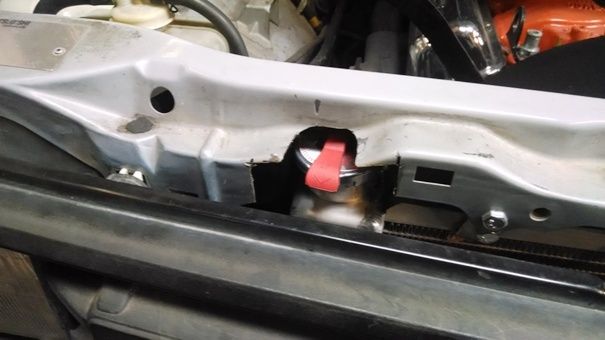
With all that done, it still left a couple of issues. Where the radiator sits, the fill neck is level with/slightly below the thermostat. The other problem is the radiator cap is very difficult to remove (and I dont really want to cut all the way thru the core support top brace). The fill problem is going to be cured by putting an in-line fill neck in the upper radiator hose (its on order and should be here Friday), which will be higher than the radiator and thermostat.
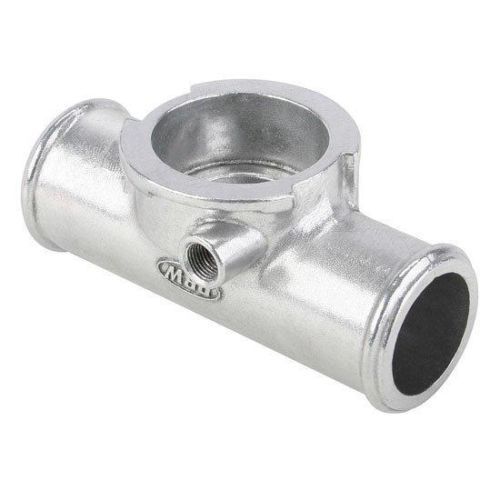
Im going to run a 20-22 pound cap on the fill neck in the hose and plug the overflow pipe. As I still have to run a radiator cap on the radiator, I installed a 16 pound lever cap on there and that will also connect to the radiator overflow bottle. The lever will let me relieve pressure on the system, and the overflow nipple on the radiator is right next to the overflow bottle eliminating a long overflow hose.
That just leaves 2 major (and a bunch little) projects left. Hooking up the cable clutch and sorting out a drive shaft to connect the T5 to the Mitsubishi rear end.
.I've NEVER seen a car come from the factory that couldn't be improved.....
-
08-12-2015 07:51 PM #37
CHR Member
- Join Date
- Apr 2011
- Location
- Prairie City
- Car Year, Make, Model: 40 Ford Deluxe, 68 Corvette, 72&76 K30
- Posts
- 7,301
- Blog Entries
- 1
Great work Mike! This will be such a sleeper truck for sure! I'm sure it will be super fun to drive too!Ryan
1940 Ford Deluxe Tudor 354 Hemi 46RH Electric Blue w/multi-color flames, Ford 9" Residing in multiple pieces
1968 Corvette Coupe 5.9 Cummins Drag Car 11.43@130mph No stall leaving the line with 1250 rpm's and poor 2.2 60'
1972 Chevy K30 Longhorn P-pumped 24v Compound Turbos 47RH Just another money pit
1971 Camaro RS 5.3 BTR Stage 3 cam, SuperT10
Tire Sizes
-
08-21-2015 04:42 PM #38
CHR Member
- Join Date
- Mar 2003
- Location
- SW Arizona
- Car Year, Make, Model: 68 Ply Valiant, 83 El Camino
- Posts
- 3,872
I went to work on the clutch this week. The truck was originally a cable operated and I figured when I started that it would probably be easiest to try and use a cable setup (of course I made that decision prior to studying everything under the dash
Anyway, I’m using a V8 Chevy Monza bellhousing. As far as I know that is the only SBC bellhousing for a cable clutch that Chevy ever made. Surprisingly they are still around and reasonably priced (not much of a call for them I guess ). The major difference between them and most standard Chevy bellhousings (besides having the boss for the cable) is the clutch fork pulls instead of pushing.
I had a couple of new V8 Mustang II clutch cables on the shelf from back when I was building and driving those cars. The bellhousing end of the cable happens to fit the Monza bellhousing and clutch fork and it has enough length to snake around the engine, plus it’s a lot heavier duty than the stock clutch cable (the upper one in the picture).
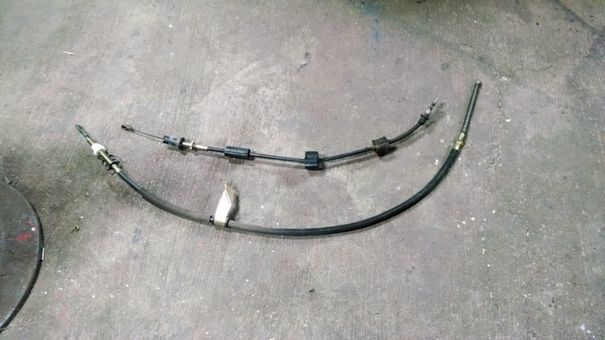
Of all the left over Mustang II clutch parts I have I didn't have any of the firewall brackets that the cable connects to (I had sold my last one a couple of years ago). I scrounged around a bit and came up with enough bits and pieces to fabricate one that is actually more solid than the ones Ford used.
That just left building a bracket/lever for the pedal end, which was pretty straight forward.
It feels like a cable clutch but has good free-play and releases nicely without too much leg effort so I can live with it. The cable should have ample clearance between it and the exhaust pipe but I’ll probably wrap the pipe and may even build a heat shield just in case (melted clutch cables suck).
On a side note, as I mentioned I have another new clutch cable for a spare, but out of curiosity I looked them up last night to see what the current availability is and how much they are going for these days. Seems they are out there and they run between $40-$75 depending on who you buy from. When I checked Rock Auto, they had one left on “wholesaler closeout” for $17.90 …….so now I guess I’ll have 2 spares (you can never have too many spares LOL).
.Last edited by Mike P; 08-21-2015 at 04:59 PM.
I've NEVER seen a car come from the factory that couldn't be improved.....
-
08-22-2015 02:51 AM #39
CHR Member
- Join Date
- Mar 2007
- Location
- festus
- Car Year, Make, Model: 48 Plymouth, 48,54 Heap
- Posts
- 3,407
Nice! The drive train looks like a great fit and I'm betting will really wake that little truck up.1 Corinthians 1:27
-
08-22-2015 03:44 AM #40
CHR Member/Contributor
- Join Date
- Sep 2007
- Location
- Gardner, KS
- Car Year, Make, Model: '33 HiBoy Coupe, '32 HiBoy Roadster
- Posts
- 11,245
I like the in-line filler neck for the top radiator hose, and hadn't seen them cast - using the right name for a search helps! Thinking that I may do a little re-routing of my hoses on the '33 to solve the dreadfully slow fill process with the radiator tilted back.... Also like your approach of a 20+ pound cap in-line, and the lower pressure at the fill neck.Last edited by rspears; 08-22-2015 at 03:55 AM.
Roger
Enjoy the little things in life, and you may look back one day and realize that they were really the BIG things.
-
08-22-2015 05:06 AM #41
CHR Member
- Join Date
- Mar 2003
- Location
- SW Arizona
- Car Year, Make, Model: 68 Ply Valiant, 83 El Camino
- Posts
- 3,872
“……Nice! The drive train looks like a great fit and I'm betting will really wake that little truck up…….”
Thanks falcon, so far I’m happy with how the install is turning out. I’ve got to admit though this has been one of the more aggravating one’s I’ve done over the years……I get something about where I want it and then inevitably have to look for way to get just one more inch or two additional clearance to get it to actually fit.
I think I mentioned the family history on the truck (it was my step daughters first vehicle and she had inherited from her real dad). It will eventually go back to Missy……. after I run the wheels off it for a while….. and then probably end up with Cade after that, which I think is appropriate as the 283 was his first engine build. As I suspect/hope it will stay in the family for many years, I’m really concentrating reliability/serviceability and not so much on the “pretty stuff” . Hell it will never see a car show (at least while I have it)……I’m too old to put up with the comments about a Chevy engine in a “Dodge” truck.
Roger I picked the filler up off E Bay, but it was actually sourced from Speedway (their E bay store). It is cast aluminum and a matt finish (there is no logo on it as the ad picture I posted shows). If a guy wanted to, it looks like a bit of time could be spent polishing it out to a nice finish. The speedway part number is 575-2202.
Yesterday I happened to look thru the folder with the owner’s manual that was in the glove compartment for the first time. Among other things, it had the original window sticker, sales contract, insurance binder, and pre delivery check list in it. The out the door price kind of surprised me ….$9339.60…..I didn’t realize they sold for that much, especially for a zero option truck. I couldn’t help but compare that to the 37 Dodge which went out the door for $950.
.Last edited by Mike P; 08-22-2015 at 05:24 AM.
I've NEVER seen a car come from the factory that couldn't be improved.....
-
08-28-2015 04:03 AM #42
CHR Member
- Join Date
- Mar 2003
- Location
- SW Arizona
- Car Year, Make, Model: 68 Ply Valiant, 83 El Camino
- Posts
- 3,872
I’ve been collecting up the parts to send up to the drive shaft shop. There used to be a local shop I used, but like so many of the small businesses I’ve used since I moved out here 20 years ago, the owner retired and there was no one who wanted/was capable of taking over the business.
Although I really didn’t want to, I did contemplate building my own drive shaft. I’ve built 3 or 4 in the past and actually had good luck doing it, but I’m really not set up for it but I figured out how do it in a pinch if I have to.
I did some asking around and there is a place up in Tucson I’m going to be giving a try, I’ve heard a few good things about his work. I talked to the owner on the phone and liked what I heard, so we’ll see. I’m really curious to see his set up for balancing. It’s been a looong time since I’ve had a drive shaft balanced. What I’m used to being is just the shaft without joints or yokes being spun up. He apparently sets it up with the U-joints and yokes to do the balancing so I’m wondering what his fixtures and readout setup looks like.
While I was figuring out what to do about the drive shaft, I started getting the parts ready. Fortunately, the shaft doesn’t have to be built from scratch. The original shaft (lower one in the picture) is too long now and needs to be shortened past where the shaft tapers down for the small joint.
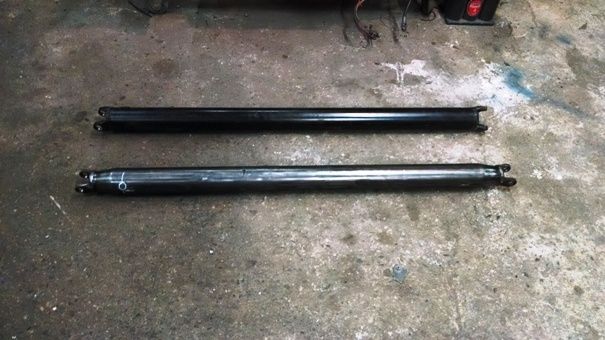
The upper shaft in the picture is the same OD as the Ram 50 and was the donor for the weld in yoke. You might notice how it’s all cleaned up and painted. I can’t recall what project I prepped it for, but I do remember I was in a bit of a hurry when I did it and didn’t pay enough attention when I cleaned, painted, installed the U Joints and installed it in the car. I paid a lot more attention when I was tracking down the vibration the car had when I got it on the road. It only took a second when I was back under the car to realize that the when the factory built the shaft somehow they got the yokes 45 degrees out of phase with each other.
Anyway. I cut the weld off the shaft and got one of the yokes off which is correct to use with the T5 slip yoke. So here’s the pile of parts going up to Tucson next week.
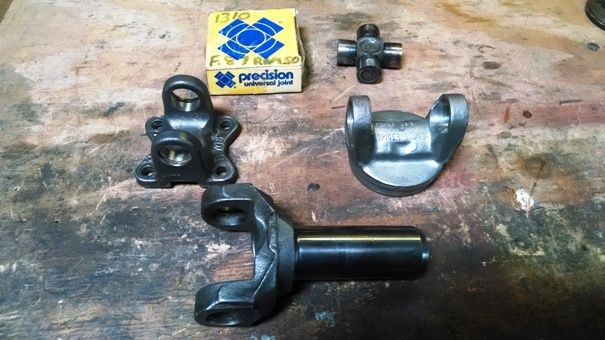
.Last edited by Mike P; 08-28-2015 at 04:05 AM.
I've NEVER seen a car come from the factory that couldn't be improved.....
-
08-28-2015 05:31 AM #43
CHR Member/Contributor
- Join Date
- Sep 2007
- Location
- Gardner, KS
- Car Year, Make, Model: '33 HiBoy Coupe, '32 HiBoy Roadster
- Posts
- 11,245
Your approach and use of parts on hand is always impressive to me, Mike. I took the easy way on mine, dropping by the local Inland Empire truck center with my transmission yoke in hand, along with the facts on the 9" Ford yoke and the needed length. A few days later I had a brand new drive shaft, but my wallet was lighter by a couple of Benjamin's.Roger
Enjoy the little things in life, and you may look back one day and realize that they were really the BIG things.
-
08-28-2015 06:36 AM #44
CHR Member
- Join Date
- Mar 2003
- Location
- SW Arizona
- Car Year, Make, Model: 68 Ply Valiant, 83 El Camino
- Posts
- 3,872
Thank you Roger, but in my case my approach is often simply being cheap and never meeting free or bargain priced parts I didnt like. That combined with never throwing anything away ought to make it real interesting for my kids when it comes time for the estate sale after Im gone. I suspect they might even hear my Grandson Cade say you cant get rid of that more than a time or two.
I've NEVER seen a car come from the factory that couldn't be improved.....
-
08-28-2015 06:47 AM #45
CHR Member/Contributor
- Join Date
- Sep 2007
- Location
- Gardner, KS
- Car Year, Make, Model: '33 HiBoy Coupe, '32 HiBoy Roadster
- Posts
- 11,245
Heck, by then Cade can just move in and take over! Originally Posted by Mike P

Roger
Enjoy the little things in life, and you may look back one day and realize that they were really the BIG things.


 Reply With Quote


Posting Permissions
- You may not post new threads
- You may not post replies
- You may not post attachments
- You may not edit your posts

i've enjoyed the years here . made a lot of friends. most who have left. i see no reason to continue with this so hope to see you somewhere else. i dont think this site will ever be back. it's lived...
Dead!