


 1584Likes
Thread: Project Sebring GT Spyder


Results 76 to 90 of 838
 LinkBack URL
 About LinkBacks
-
04-23-2016 09:34 AM #76
 CHR Member

- Join Date
- Feb 2007
- Location
- Vidalia
- Car Year, Make, Model: 1946 Ford Coupe, 1962 Austin Healey 3000
- Posts
- 1,508
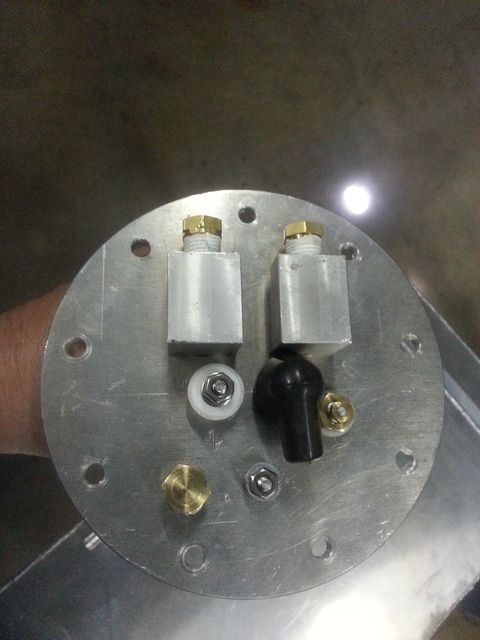
I built a pump module setup along the lines of a factory unit. It holds the Aeromotive 340 pump, return line and the fuel sender. It's hard to see in the picture, but the return line does double duty as the pump mount also. I made it from 1/2" tubing for extra strength. There is a reinforcing ring welded to the inside of the tank that the module bolts thread into. The gasket in the picture is Neoprene, but that was only used for leak testing since Neoprene isn't compatible with gas. I'll replace it with something else during final assembly. Most likely Viton.
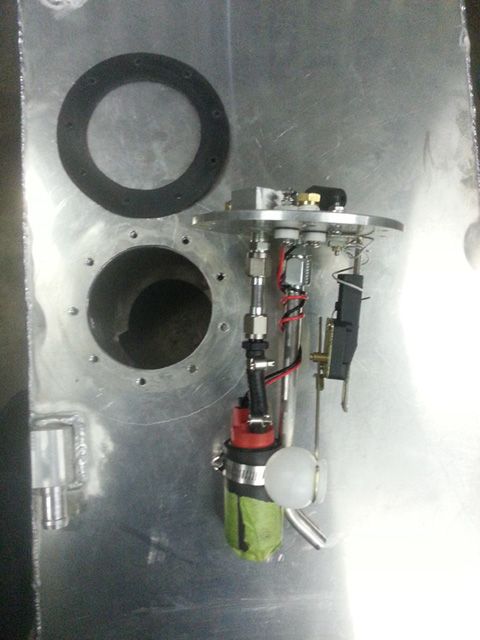
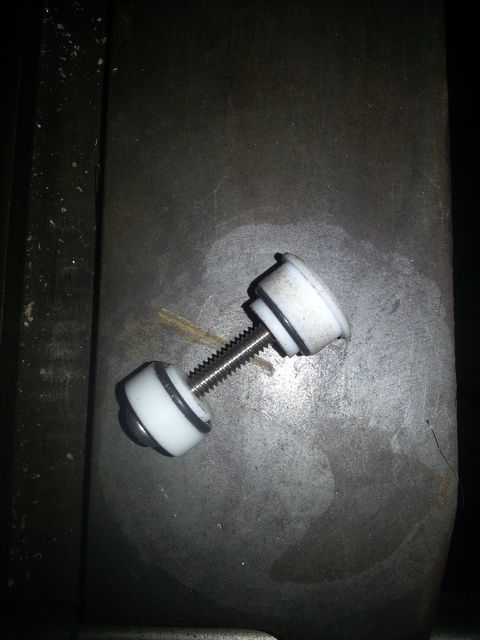
The small white parts are electrical bulkheads for the fuel pump. These are made from Teflon (PTFE) which is unaffected by gas or alcohol. They're sealed with Viton O-rings. I made them to the same general shape as the B+ connection on a GM alternator. That allows them to use the same insulating boots.
The tank is built from 5052 aluminum. This is an alloy recommended for aircraft and marine fuel tanks. The aircraft part didn't mean a lot because aviation gas doesn't contain ethanol, but a marine tank will almost certainly see contact with water. I was concerned about corrosion due to fact that ethanol can hold a good bit of water. I try not to use ethanol, but that's just not always possible.
I actually had enough 304 stainless on hand to build the tank, but it was going to be pretty heavy. Since all that weight is behind the axle, I decided to switch to aluminum. However, I am definitely not an accomplished aluminum welder and this tank is the single largest project I've ever done in that material. I pressure tested it with 3 pounds of air and soapy water. I found 3 pinhole leaks that were fairly easy to repair. Considering that it should never see any pressure normally, I think that's good enough. I did add some doubling strips where it lays against the chassis and where the mounting straps lay.
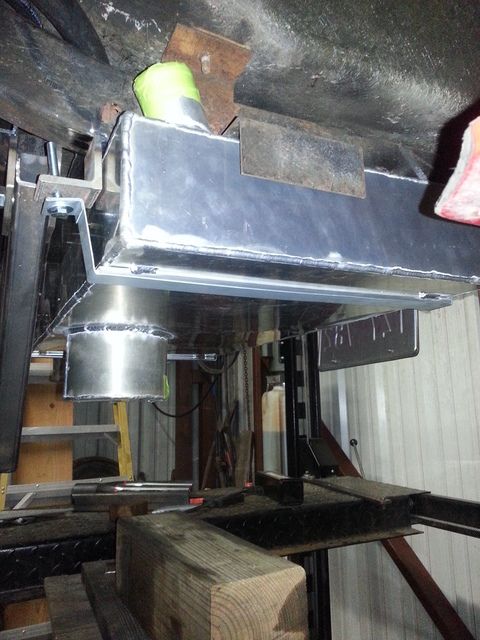
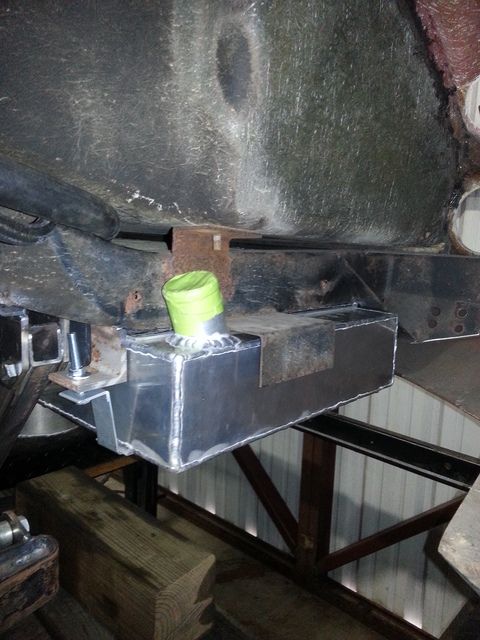
I noticed after getting it hung that I need to add some reinforcing where the mounting brackets are on the frame. It would be easy to for the steel frame bracket to punch a hole in the tank in an accident.
-
Advertising

- Google Adsense
- REGISTERED USERS DO NOT SEE THIS AD
-
04-23-2016 09:41 AM #77
CHR Member
- Join Date
- Feb 2007
- Location
- Vidalia
- Car Year, Make, Model: 1946 Ford Coupe, 1962 Austin Healey 3000
- Posts
- 1,508
A little disaster
They say that disaster can strike in an instant and when you least expect it. I can testify to that.
Just about the time I was finishing up the gas tank and before I had it mounted, I was getting ready to attend a car show in another state. I had my 46 coupe under the carport (it normally lives in my shop) to load it for the trip and was trying to get my lawn mowed before a thunder storm came through. Suddenly the poop hit the fan as they say. As I sat on my mower, I saw a strong wind hit the trees in my neighbor's yard and I turned in time to see the shingles being ripped from my house in huge chunks. The swinging doors on my shop broke the chains that hold them open and were banging back and forth. I also saw the roof being ripped off my neighbors equipment shed and the power poles behind it torn down. I had just witnessed a small tornado and it quite literally went right over my head. I never actually saw it, but my neighbor who lost the shed told me later that he did. I don't think the funnel ever made it to the ground or maybe my house acted as a shield, but my guardian angel was most definitely looking out for me. I hate to think what kind of shape I could be in. As it was, I didn't get a scratch until I tried to close the doors on my shop and got slapped pretty hard by one.
It wasn't raining and there was almost no wind before all this happened. Just some rain clouds off in the distance like we get all the time. I wasn't the only one as several homes in town suffered roof damage and many power lines were pulled down. The "official" report said straight line winds, but I have to believe my neighbor. I also find it hard to believe that straight winds would have removed shingles from both sides of my house.
It vacuumed over a third of the shingles from my roof and pulled a large swath of siding off. The shingles that were flying around acted like super coarse sandpaper and damaged the paint on my truck, 46 coupe and my motorcycle. Most of the damage was just surface scratches, but one place on the coupe was ground all the way to bare metal. The wind pushed my 750 lb Goldwing about 3 feet backwards into my 46, but didn't cause any damage. The doors on my shop were warped and had to be tied shut. Our power was out for almost 2 days. Luckily I was able to get a roofer out pretty quick and get tarps on the roof so there was only minor water damage. My shop was full of mess that was blown in. Shingles, siding and leaves.
Of course, all this shut down work on the car for several weeks. The various insurance companies have paid and some of the repairs have been completed. The roof is back on, but the siding is still waiting. The shop doors took about 2 days for me to straighten well enough to close. My truck has been repainted and I actually sold the Goldwing with the scratches. The new owner said he would take care of them. The bruises on my arm where door got me have faded.
The 46 will eventually get a complete repaint, but insurance only paid for spot repairs. The paint is 20 years old and shows some age, so I'll pay the extra for a make over. That will have to wait for the Healey to be finished, since I have some other work to do on it too.
From where I sit now, I'm thankful that the damage was just to things that could be repaired. As far as I know, no one in town was injured. Compared to the utter devastation I've seen with other storms, it could have been much, much worse.
Now let's get back to building a car.Last edited by Hotrod46; 04-23-2016 at 09:44 AM.
-
04-23-2016 11:13 AM #78
CHR Member
- Join Date
- Aug 2003
- Location
- Springfield
- Car Year, Make, Model: '66 Mustang, 76 Corvette
- Posts
- 5,444
Glad to hear that you're ok with a minimal amount of damage. Since I'm in tornado alley I know exactly what you're talking about and at times it can sure be scary.
What state are we talking about? It seems these days tornadoes have no boundaries and can pop up at any time no matter where you're located. Sure wasn't that way when I was a kid.Ken Thomas
NoT FaDe AwaY and the music didn't die
The simplest road is usually the last one sought
Wild Willie & AA/FA's The greatest show in drag racing
-
04-23-2016 11:24 AM #79
CHR Member
- Join Date
- Apr 2012
- Location
- american canyon
- Car Year, Make, Model: 36 Ford Sedan, 23 T Bucket
- Posts
- 1,899
WOW! I guess straight line winds are tricky. Glad to hear you are OK, everything else is replaceable..
-
04-23-2016 11:46 AM #80
CHR Member/Contributor
- Join Date
- Sep 2007
- Location
- Gardner, KS
- Car Year, Make, Model: '33 HiBoy Coupe, '32 HiBoy Roadster
- Posts
- 11,245
I can attest that straight line winds can indeed cause that kind of damage - they hit one side of the roof, pushing the singles ahead of the wind, then as the wind goes over the peak of the roof it "rolls", forming an extreme low pressure area on the opposite side and literally lifts shingles into the wind. Saw a brick wall in Corpus Christi that had two layers of bricks, face to face with a brick cap on top and the wall was standing after the hurricane winds, but on the downwind side about 1/2 the height was pulled away by the vacuum formed by the 200mph winds hitting the face. Imaging the damage those bricks caused getting sucked off the wall, then flying at 200mph velocity impact!!
Glad that you're OK, and that your damages were not worse. "Stuff" can be replaced, but lives gone are gone.Roger
Enjoy the little things in life, and you may look back one day and realize that they were really the BIG things.
-
04-23-2016 12:48 PM #81
CHR Member
- Join Date
- Apr 2004
- Location
- Little Elm
- Car Year, Make, Model: 34 Ford Low Boy w/ZZ430 Clone
- Posts
- 3,890
I've been within shouting distance of two tornadoes, and the lack of wind and rain happened both times. It's fairly common, I believe, and damn scary. Originally Posted by Hotrod46

Glad you got away with no injuries or really serious damage.
BTW, that's where they get the saying, 'calm before the storm.'Jack
Gone to Texas
-
04-23-2016 04:53 PM #82
CHR Member
- Join Date
- Feb 2007
- Location
- Vidalia
- Car Year, Make, Model: 1946 Ford Coupe, 1962 Austin Healey 3000
- Posts
- 1,508
Thanks everyone for the concern.
You know, when something like this happens it's easy to feel sorry for yourself, but when you consider all the poor people in places like Joplin, MO and Moore, OK, that lost everything including their lives in some cases, you realize that what happened to me was nothing. Nobody was hurt (except through my own stupidity) and at least I still had something that could be fairly easily repaired. The impact on my life was nothing more than an inconvenience and I've tried to treat it as such. I have nothing to complain about and many things to be thankful for. Some of those people's lives will never be the same.Last edited by Hotrod46; 04-23-2016 at 04:56 PM.
-
04-23-2016 08:32 PM #83
CHR Member
- Join Date
- Oct 2007
- Location
- Petaluma
- Car Year, Make, Model: 48 Ford F1
- Posts
- 9,795
Glad your o.k."  "No matter where you go, there you are!" Steve.
-
04-24-2016 09:15 AM #84
CHR Member
- Join Date
- Feb 2007
- Location
- Vidalia
- Car Year, Make, Model: 1946 Ford Coupe, 1962 Austin Healey 3000
- Posts
- 1,508
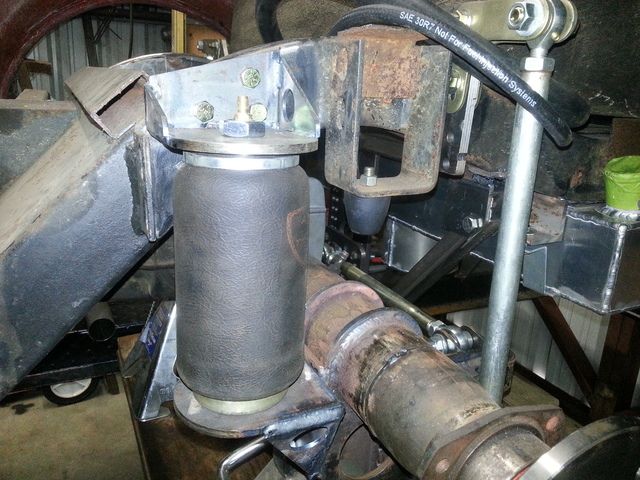
After the little break from suspension, I decided to get back on it. I'm adding air bags (air springs if you want to get technical) to the rear. I had them on my t bucket and they really seemed to be a benefit to the ride quality. I'm going with basically the same GM-based auto leveling setup I had on the T. It proved itself on my other car and never really gave me any trouble, except when I left it on all winter and burned out a switch, but that was my fault.
Actually, the auto-leveling sensor was the only GM part that I used. The rest of the system used automotive aftermarket and industrial parts. It's pretty simple in that it doesn't use an air tank. The air is pumped directly into the bags by a small motorcycle size compressor. The air valves are small industrial control parts mounted directly to the top of the bags.
My T used only air bags, but this time I'm going with a hybrid setup. I'll use weaker or possibly variable rate springs on the coil overs and use a minimum amount of air to just to compensate for varying loads. This is the way most auto leveling factory systems do it. Some of the pro-touring stuff I've read talks about having to wait for the bags to "take a set" when transitioning in a curve. This is with an all air setup. I think the air/coilover setup may help this. I never noticed anything like this in my T, but it wasn't exactly a sports car, either.
I do have the option of going with air only and may experiment with that. That would only take an afternoon to try, so it's worth playing with. The air/coilover system also has the advantage of still having some suspension if an air bag fails, although the ones on my T were in service for 8 years with no problems. If I get serious about autox or track days, I can always run just the coilovers, too.
The lower mounts are adjustable so that I can get the bag mounting length correct. The preferred length is 7", but that may have to be changed once I get the car on the road.
That's all I've gotten done so far. I'll do the exhaust next and then mount the pedals and master cylinders. Sway bars and plumbing will probably be after that.
-
10-07-2016 06:56 PM #85
CHR Member
- Join Date
- Feb 2007
- Location
- Vidalia
- Car Year, Make, Model: 1946 Ford Coupe, 1962 Austin Healey 3000
- Posts
- 1,508
Well, as usual it's going on five months since I updated this log. Life has a nasty habit of getting in the way of my hobbies. Most of it was good, but some was not. Im still here and plugging away at it, though. The best thing was that I bought a new motorcycle and the worst was being laid up for over a month with a bad back. I actually went through a series of motorcycles and rode a lot this summer, before winding up with an Indian Roadmaster. Great bike with big block like torque. Downside is that my back kept me from riding the Indian very much. Between motorcycle distractions and my back, progress on the Spyder build slowed to a virtual crawl. Im getting better every day and Im back out in the shop able to do pretty much what I want.
As I said in my last post, I decided to do the exhaust next. I thought it would be take a few days to do, never thinking it would be close to 5 months.
-
10-07-2016 07:16 PM #86
CHR Member
- Join Date
- Feb 2007
- Location
- Vidalia
- Car Year, Make, Model: 1946 Ford Coupe, 1962 Austin Healey 3000
- Posts
- 1,508
The LS engine in the car is rated at 345 HP as installed in the Corvette. A better exhaust and a computer tune should add some to that. For that HP level, 2 ½ tubing was about minimum. I originally had planned for it to be stainless, but I estimated it would take $600-$900 in materials. I was unsure of my ability to fit the tubing and wasnt sure how it would turn out. I didnt want to spend that much up front and then screw up some very expensive parts, so I decided to go with aluminized steel. It was much cheaper, but I wish now I would have bit the bullet and did the stainless. Im going to check into getting what I have ceramic metallic coated (like Jethot) and will most likely have what the stainless would have cost (or more) in the job when its done.
I started with a Summit Racing brand bend and tubing kit. I added some Magnaflow mufflers. I have to say that Summit was great to deal with. I sent two different sets of mufflers back before settling on the ones I used. I also used some exhaust hangers ordered form my local parts house and a set of 1 into 2 exhaust tips that I picked up at a Super Chevy swap meet a few years back. They were stuck under a workbench and I figured this was a good time to drag them out. They look like Pacesetter Monza tips, but I think theyre actually knockoff copies.
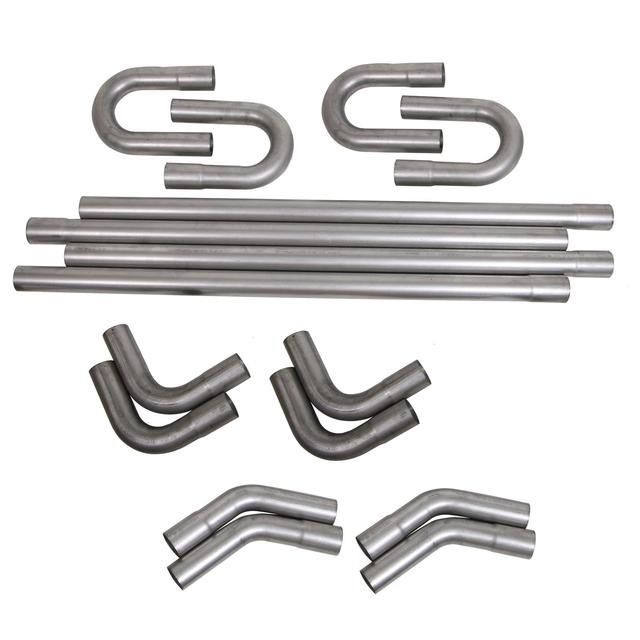
This is the Summit Kit. Sorry, this pic is from their website. I forgot to take one before I started.
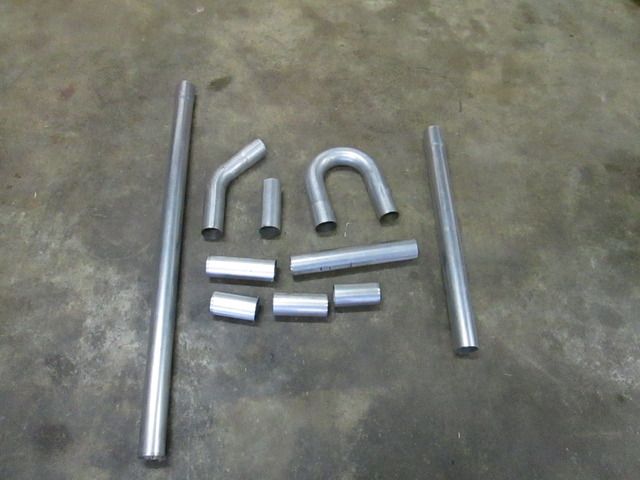
This is what I had left except for a few short off cuts.

These are the exhaust hangers I used. I picked them out of a book at my local parts house. Nothing fancy, but they look durable.Last edited by Hotrod46; 10-08-2016 at 06:11 AM.
-
10-07-2016 07:43 PM #87
CHR Member
- Join Date
- Feb 2007
- Location
- Vidalia
- Car Year, Make, Model: 1946 Ford Coupe, 1962 Austin Healey 3000
- Posts
- 1,508
If you’ve been keeping up with this, you will remember that I found these headers laying on a shelf in Street and Performance’s header shop. No one knew exactly what they fit. The header guy wasn’t there that day and all my guide knew was that they were custom and had been returned for some reason. Maybe a change in plans? They looked like they would fit my car and after being assured I could return them, I bought them.
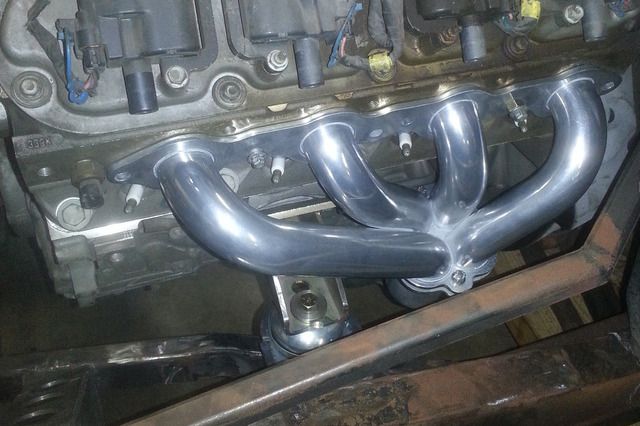
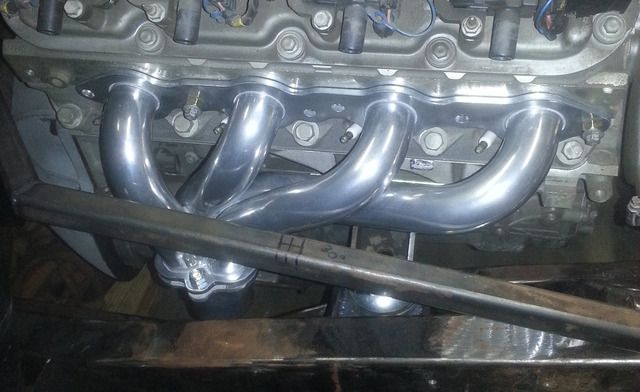
After I started the exhaust job, I noticed that the passenger side collector reducer was a little tight on the frame rail. I was able to get the pipe to fit, but it was pretty close. There was also another problem. The O2 sensors hit the motor mounts. I had to weld new bungs on the opposite side of the collector.
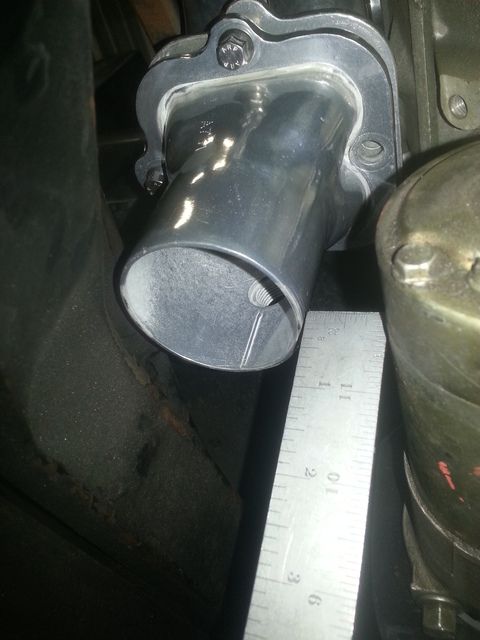
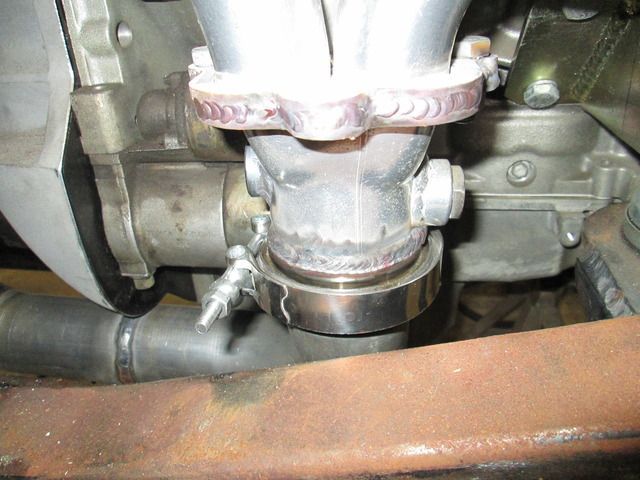
While I was welding them on. I went ahead and welded the bottom collector halves to the headers. The S and P headers have large square flange on a two part collector and use a large turbocharger type gasket for sealing. This may work just fine, but collector leaks have always plagued me and I try to do everything I can to avoid them. Famed GM engineer Charles Kettering once said “Parts left out cost nothing and cause no service problems”. I decided to use V-bands on the bottom of the headers and eliminate the gasket. No potential leaks in a difficult place to service that way.
I'll post some more tomorrow.Last edited by Hotrod46; 10-07-2016 at 07:46 PM.
-
10-08-2016 06:18 AM #88
CHR Member
- Join Date
- Feb 2007
- Location
- Vidalia
- Car Year, Make, Model: 1946 Ford Coupe, 1962 Austin Healey 3000
- Posts
- 1,508
I used these V-band flanges and clamps. I first saw this type of connection on big rig turbochargers about 30 years ago and have been curious how they would do on a hot rod, but didnt have a good project for them. Since its so tight under this car, I knew that eventually I would have to pull the exhaust for some kind of service and wanted to do the exhaust in sections. These seemed to be a good solution to that. I went all out and broke the piping down into several sections, so I used a bunch of them.
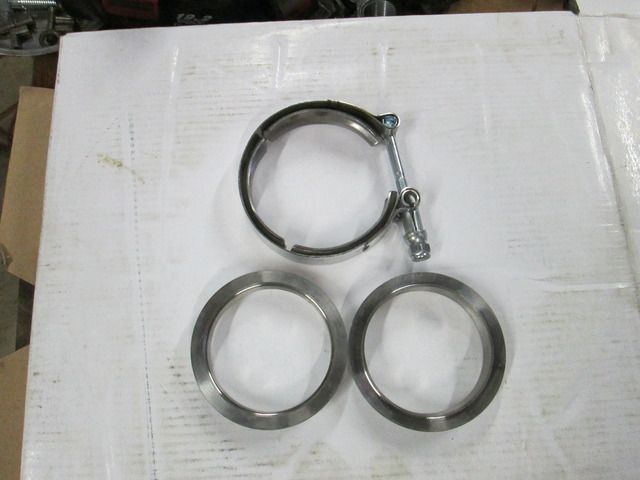

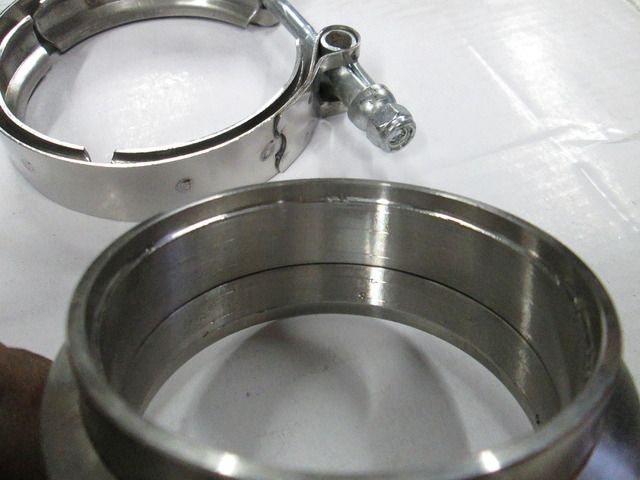
I bought these no name pieces off of EBAY to save a few bucks and they werent without some problems. The counter-bored section that fits over the tubing is too big in my opinion. This may allow a lot of leeway in fitting, but it takes a lot more weld to fill up the gap. This adds heat and can warp the pipe. I had this happen on a couple sections and had to resort to heat shrinking the tubing to get the flanges to line back up. The flanges have to butt up squarely or they won't seal. I will probably add a small smear of high temp silicone during final assembly just to be sure.
If I had used MIG instead of TIG, I could probably have welded most of the sections in place and avoided some of the warpage. The flange gaps would have been easier to fill, too. Instead, I tacked a few sections together on the car and then TIG welded them on the bench. My ancient MIG machine is a pain to fool with and I avoid it unless I have big job worth dragging it out. This may have been one of those times I should have. At least the TIG made butt welding the tubing easier (for me anyway). I really do need to invest in some more modern welding gear!
-
10-08-2016 05:40 PM #89
CHR Member
- Join Date
- Feb 2007
- Location
- Vidalia
- Car Year, Make, Model: 1946 Ford Coupe, 1962 Austin Healey 3000
- Posts
- 1,508
The build actually went better than I expected. I made a lot of use of my vertical bandsaw_ and belt sander. The bandsaw made cutting the bends square much easier and the belt sander worked well for refining the cuts. If I did my part on the fitting, the parts butted together with almost no gap. A lot of welds were "fusion welds with almost no extra filler.
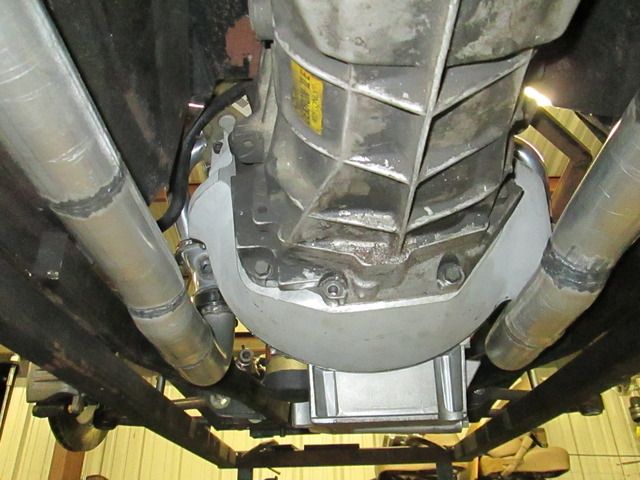
I fitted an H-pipe crossover. I wanted to do an x-pipe, but there wasnt enough room. The mufflers pretty much had to go where they are for ground clearance and that was the only space big enough for an X. After I got started, I saw some mufflers that may have fit vertically under the rear fenders. They would allowed for an X-pipe, but would have heated the trunk area up. The space behind the trans mount was perfect for the H-pipe.
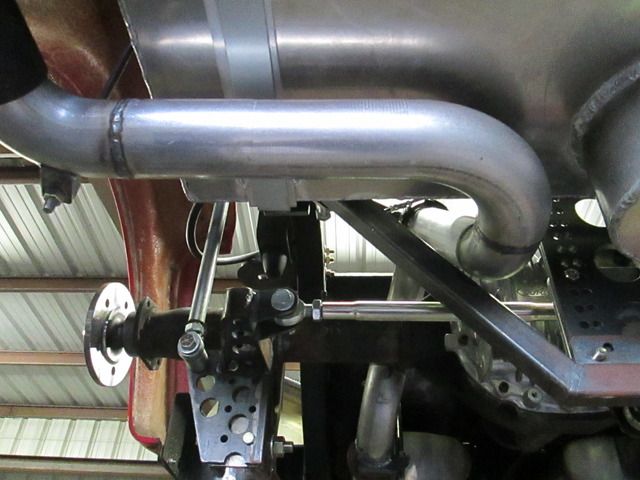
I made these mounts for the mufflers. I threaded the rod on the hangers. This gives me a little adjustment and also makes removing the section easier.
-
10-08-2016 06:01 PM #90
CHR Member
- Join Date
- Feb 2007
- Location
- Vidalia
- Car Year, Make, Model: 1946 Ford Coupe, 1962 Austin Healey 3000
- Posts
- 1,508
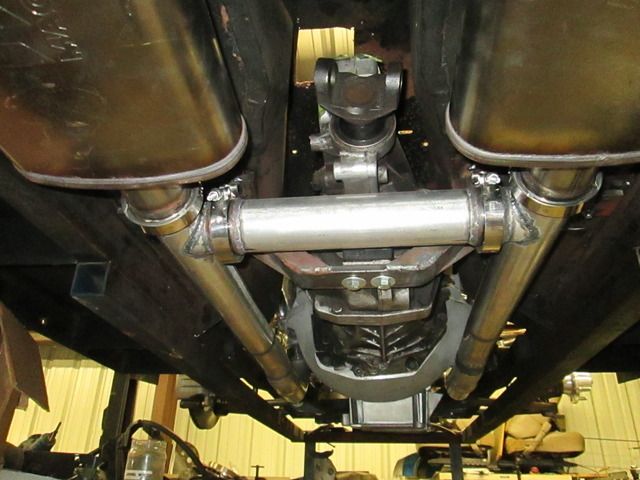
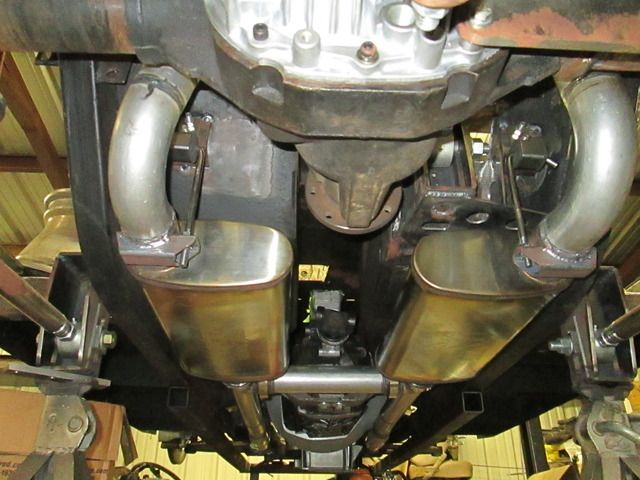
The front section from the mufflers forward was piece of cake compared to rear section. Since the Watts link is asymmetrical, it required different pipe routes on each side of the car. The reason for the driver side going so close to the center section of the rearend is due to the Watts being higher on that side. By keeping the exhaust close to the center, less room for link clearance was needed, since the link doesnt move as much near the center.
I spent a lot of time jacking up and tilting the rearend left and right checking for interference. Part of a cooling fin on the rearend cover was sacrificed early on and even more will be trimmed when it comes out of the car. It all looks very close at this point, but it does clear with room to spare.
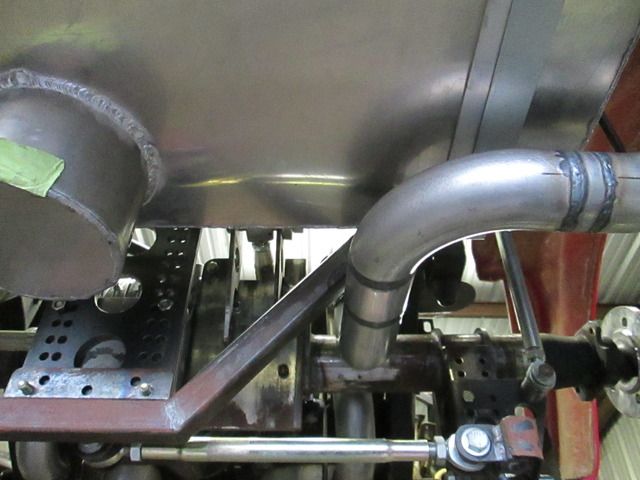
It's hard to see in the pics, but I added a v-band joint over the top of the rearend. This made the rear sections easier to install.
I was trying to keep the frame that braces the plate for the Watts and it does have some clearance, but in the end its going to have to be replaced. No problem though, I already have some ideas for a new brace that will do double duty. More on that later.
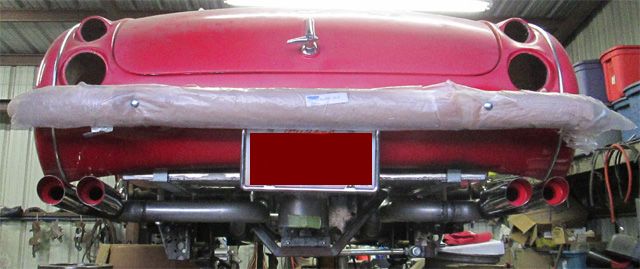
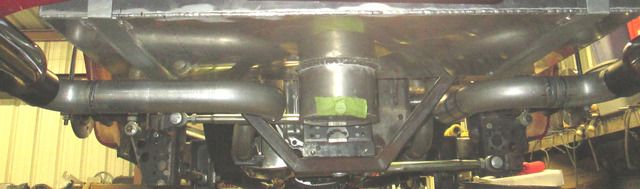
And here is the money shot. I had wanted to group the tips close together near the center of the car on either side of the license plate. This looked pretty good visually, but put the exhaust hangers dangerously close to the gas tank. I didn't want to take a chance on punching a hole in the tank in an accident, so the tips got moved under the fenders where I had plenty of room for hangers. This required a couple of tight radius bends that were not in the Summit kit. Summit had what I needed, though.
I'm not sure I completely like the Monza tips. I keep thinking a simple turn down might be better. At this point they're just tacked on. They will have to come off if I get the pipes coated.
Stay tuned. I have more updates coming in the next few days.


 Reply With Quote


Posting Permissions
- You may not post new threads
- You may not post replies
- You may not post attachments
- You may not edit your posts

Even though I know he won't see this, I still want to wish a Happy Birthday to my best friend, Richard Moore aka techinspector1
Happy Birthday techinspector1