Welcome to Club Hot Rod!  The premier site for everything to do with Hot Rod, Customs, Low Riders, Rat Rods, and more. 

  •  » Members from all over the US and the world!
  •  » Help from all over the world for your questions
  •  » Build logs for you and all members
  •  » Blogs
  •  » Image Gallery
  •  » Many thousands of members and hundreds of thousands of posts! 

YES! I want to register an account for free right now!  p.s.: For registered members this ad will NOT show

 
Like Tree564Likes

Thread: 55/58 Chevy truck build


Reply To Thread
Page 1 of 29 1 2 3 4 5 6 7 8 9 11 ... LastLast
Results 1 to 15 of 434
  1. #1
    BAM55's Avatar
    BAM55 is offline CHR Member Visit my Photo Gallery
    Join Date
    Mar 2014
    Location
    Inglewood
    Car Year, Make, Model: 55 Chevy 210 and 58 Chevy Truck
    Posts
    267

    55/58 Chevy truck build


    Here you go guys
    Here is what I started with.
    1958 Chevy Big Window I only bought it for the cab. I bought it from a guy that kept it
    in a trailer park.

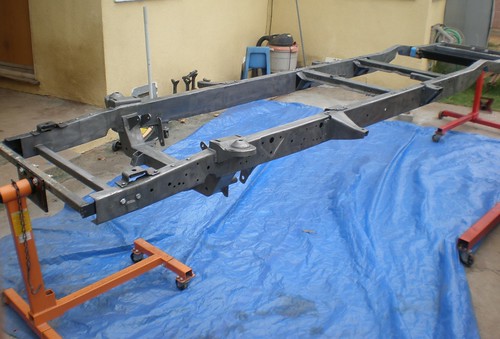
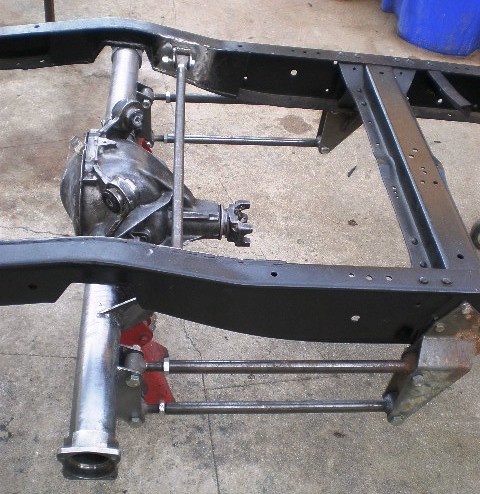
    So I’ll start with the frame I install a Mustang II, 4 link and c-notched the rear of the frame.


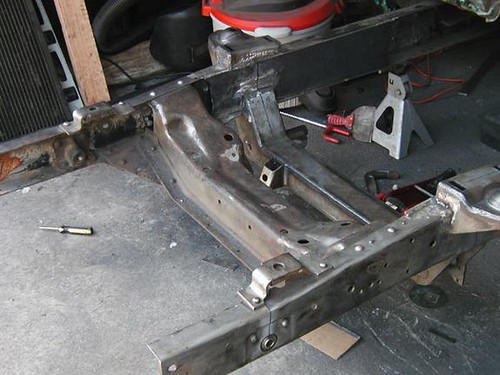
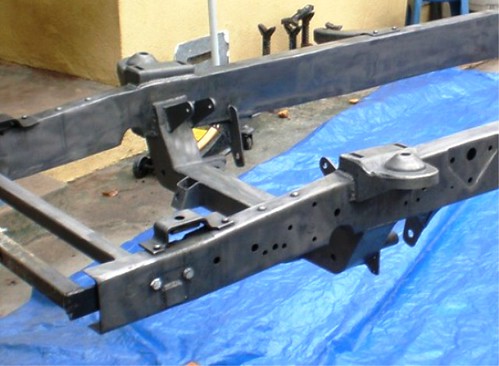
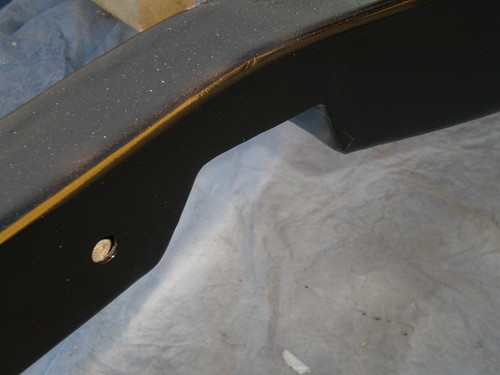
    I made a frame rotisserie out of two engine stands to get the frame ready for paint.


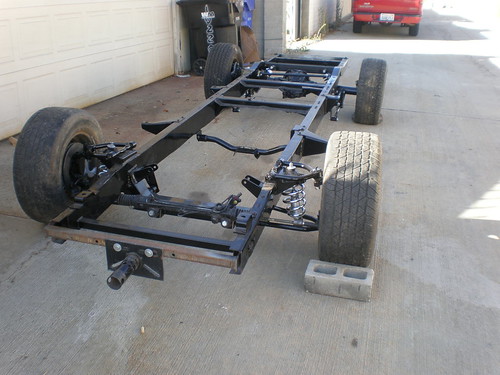
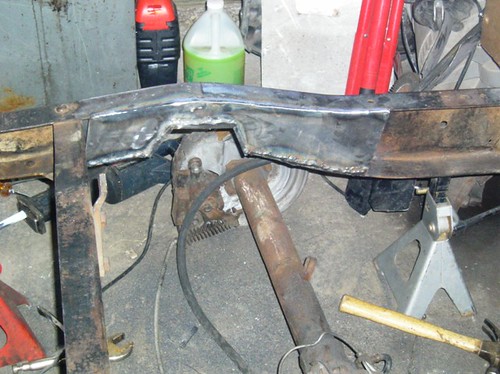
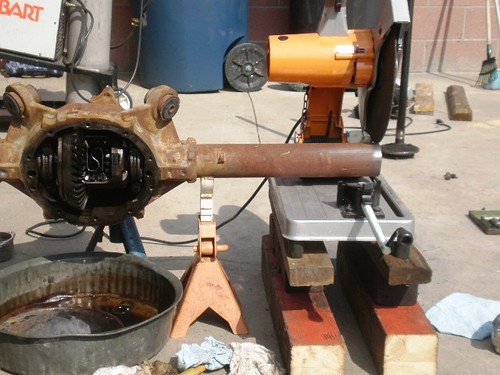
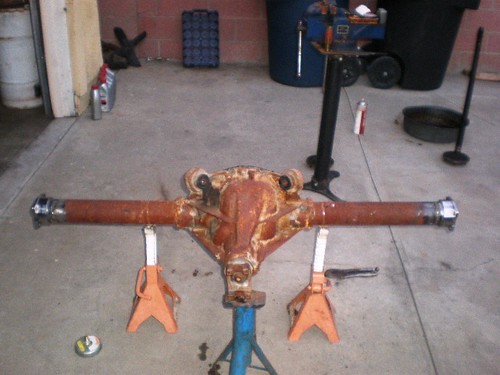
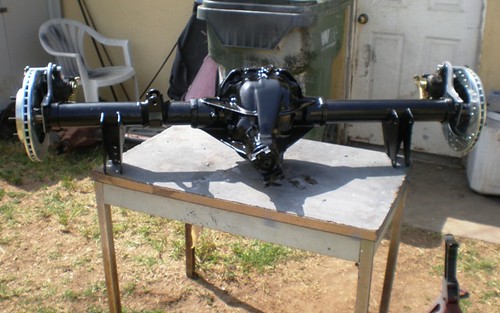
    8.5 Chevy Rearend Narrowed to 58 inches (mounting point to mounting point) with moser housing ends and axles.
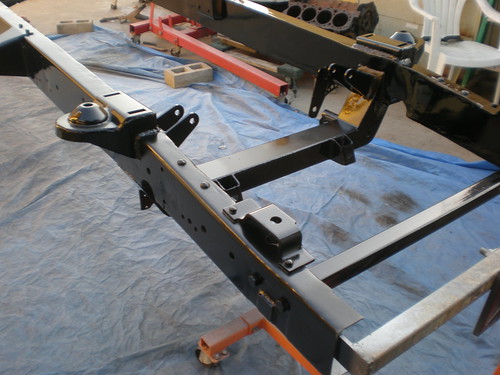


    4 Link install.


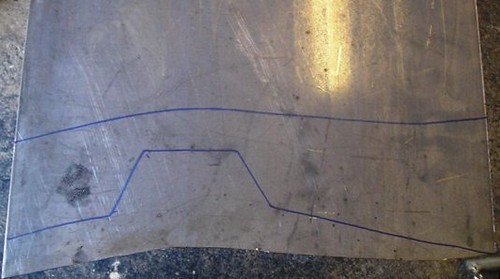
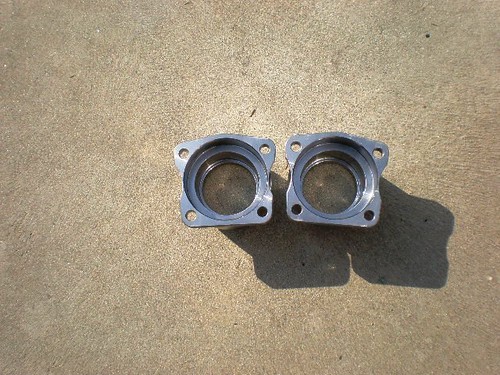
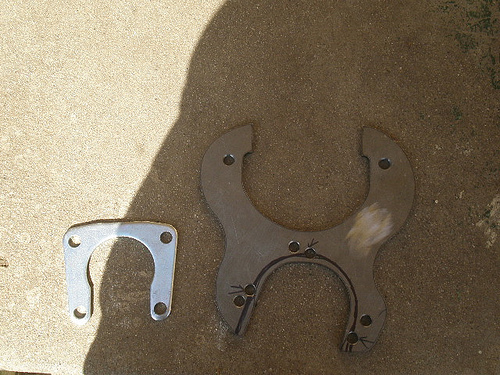
    I had to modify the caliper bracket and the axles retainer to install my disc brakes. Here is what I came up with.


    The rearend completed . I cut those micky mouse ears off the rearend to make it clear the bed floor and it also looks better.
    Last edited by BAM55; 03-06-2014 at 09:16 PM.
    TooMany2count and stovens like this.

  2. #2
    BAM55's Avatar
    BAM55 is offline CHR Member Visit my Photo Gallery
    Join Date
    Mar 2014
    Location
    Inglewood
    Car Year, Make, Model: 55 Chevy 210 and 58 Chevy Truck
    Posts
    267

    There was extensive rust damage on this cab but I wanted a big window cab and I had to have it.lol I should have waited because I ended up building a cab.lol I had to replace both cab corners, the steps and rockers, floors, and the roof.
    Cab corners replaced


    Steps replaced


    Floor replaced


    Roof replaced.


    Door Repair


    58 Fender repair


    TooMany2count likes this.

  3. #3
    BAM55's Avatar
    BAM55 is offline CHR Member Visit my Photo Gallery
    Join Date
    Mar 2014
    Location
    Inglewood
    Car Year, Make, Model: 55 Chevy 210 and 58 Chevy Truck
    Posts
    267

    After all this work I knew what I really wanted was a 55-56 truck. I have a 55 210 and I always wanted twins.lol


    I decided to change the front clip to a 55. How it came about was a friend challenged me to fix some terrible 55 fenders and they came out nice so I said why not.
    55 Fenders


    The truck will be running a 2003 5.3 and 40L60E transmission
    The motor mounts I fab up.


    TooMany2count likes this.

  4. #4
    BAM55's Avatar
    BAM55 is offline CHR Member Visit my Photo Gallery
    Join Date
    Mar 2014
    Location
    Inglewood
    Car Year, Make, Model: 55 Chevy 210 and 58 Chevy Truck
    Posts
    267

    Now for the custom mods I added which are.
    55 Chevy car dash


    Shaved parking lights


    Shaved drip rails


  5. #5
    BAM55's Avatar
    BAM55 is offline CHR Member Visit my Photo Gallery
    Join Date
    Mar 2014
    Location
    Inglewood
    Car Year, Make, Model: 55 Chevy 210 and 58 Chevy Truck
    Posts
    267

    Smooth the vent cover

    Shaved gas filler

    Shaved firewall


    3rd brake light


    Rounded door corners


    Rounded front and rear bed corners


    Mini tubs


    Shaved door hands and bearclaws latches installed in reverse because I want the solenoid in the cab corner instead of at the bottom of the door.


  6. #6
    BAM55's Avatar
    BAM55 is offline CHR Member Visit my Photo Gallery
    Join Date
    Mar 2014
    Location
    Inglewood
    Car Year, Make, Model: 55 Chevy 210 and 58 Chevy Truck
    Posts
    267

    47-55 1st Series Chevy Truck Battery access door.

    Pancaked the hood.


    I finished smoothing the steps


    A couple of mock up pics.


    Last edited by BAM55; 03-06-2014 at 09:29 PM.

  7. #7
    BAM55's Avatar
    BAM55 is offline CHR Member Visit my Photo Gallery
    Join Date
    Mar 2014
    Location
    Inglewood
    Car Year, Make, Model: 55 Chevy 210 and 58 Chevy Truck
    Posts
    267

    These are 1998 Dodge Intrepid seat. I paid 120 for them at pull your part. Can you believe they charged me 10 bucks more because one was electric (driver side electric, passenger manual)?lol Then he looked at me like I was going to put them back over 10 bucks.lol I can tell you one thing there is only junk at the yards near my house now. You can tell all the hotrodders have been through there.lol

    I like them because my cab is a big window and I really don't like seeing seats sticking up through the rear window so I knew I needed something with a low back and these fit the bill.

    I then had to modify the mount to from this to this.


    Here are a couple of shot of the seats installed.


  8. #8
    BAM55's Avatar
    BAM55 is offline CHR Member Visit my Photo Gallery
    Join Date
    Mar 2014
    Location
    Inglewood
    Car Year, Make, Model: 55 Chevy 210 and 58 Chevy Truck
    Posts
    267

    Since I pancaked the hood the kit does not fit right. I had to shorten all the bracing in the front.


    Anyway guys here is the boring stuff I've been working on but you said you wanted pics. I had to add some round tubing to the front the door to get it right. I think it will look decent once I grind down the welds and make it flow on the edge. Man the door fitment on these things leaves much to be desired.


    Last edited by BAM55; 03-06-2014 at 09:32 PM.

  9. #9
    BAM55's Avatar
    BAM55 is offline CHR Member Visit my Photo Gallery
    Join Date
    Mar 2014
    Location
    Inglewood
    Car Year, Make, Model: 55 Chevy 210 and 58 Chevy Truck
    Posts
    267

    After buying a flaming river column and installing the column in my truck I thought it was too long. I just did not like how far it was sticking out the firewall. I thought I could live with it but I couldn't take it anymore, so I decided to cut it up. It was much easier than I thought.
    First I marked where I wanted the column to stop while it was in the truck. The tape line is where it will be cut.

    I looked down the DD end when I took it out the truck and notice that the DD goes all the way down the column oh now this is easy. The bottom bushing seems to be held in by two dimples so I drilled them out. I can get the bushing out later.

    I used a cut off wheel to shorten the tube. When I mark the spot with the tape I used a square to mark the cut line all around the radius of the tube and then taped it so that my cut was square.

    I removed the bushing using a vise and two hammers.


    I then used a hand file to smooth the edges of the cut and install the bushing and cut the DD at the correct length and I’m done. This is easy and I thought someone may need to do the same thing so I posted it.


    I think I like it better now.


    I was completely shocked at how easy this was it took all of 30 min and most of that was measuring. I've done other columns and its no where near this easy that's why I was dreading do it. What a waste of stress.lol

    I fabricated a piece for the interior cab corner were trash can collect. I don't know why GM left this open like this, I guess it was a nice storage area back in the day.


  10. #10
    BAM55's Avatar
    BAM55 is offline CHR Member Visit my Photo Gallery
    Join Date
    Mar 2014
    Location
    Inglewood
    Car Year, Make, Model: 55 Chevy 210 and 58 Chevy Truck
    Posts
    267

    I thought since I rounded the doors in the front and shaved the drip rails I mightiest well go all the way and round the rear of the doors.lol


    I welded the seam is in this area. I then used Duraglass over the welds to smooth everything out.


    A little primer and I like it much better than that unfinished look that came from the factory.

    Its getting there I guess I'll keep chipping away at it inch by inch.

    This was my first time using this product, a buddy of mine told me to try it. I decided to try it on my dash to fill some minor imperfections. I could have used high build primer, but I wanted a reason to try this stuff. It sprayed great really smooth. I had to use a 2.2 tip that's how thick it is, but most of it will end up on the floor but man it's a great product. I liked it so much I did the roof also.


    I had to redo my c-notch because once I got it to ride height I notice some interference. So I decided to just redo the whole thing. I made this c-notches it gave me a reason to use the tig welder.


    Last edited by BAM55; 03-06-2014 at 09:39 PM.

  11. #11
    BAM55's Avatar
    BAM55 is offline CHR Member Visit my Photo Gallery
    Join Date
    Mar 2014
    Location
    Inglewood
    Car Year, Make, Model: 55 Chevy 210 and 58 Chevy Truck
    Posts
    267

    You can never have enough good fenders. I had a mess up fender laying around and a new repoped fender that someone gave me. The repop fender fitment was horrible so I decided to use it as a patch panel. I have a passenger fender that I already primed but when I checked the fitment I like the mess up fender a little better. So I decided to fix the fender and use which ever one I like the best when I put the truck back together. Or I just used it as an excuse to weld something together.lol


    This is what is left of a new fender that I used for patch panels because the fitment was so bad. I used the rear for another fender for a buddy. It still has some use so I will not throw it out. It still has a good brace, eyebrow, and front and top panel. Somebody may need a piece of it so I will keep it. I know too many hotrodders to throw it out. I don't know about the other new fenders, but the fitment for this one was garbage.


    Here is the fender after metal finishing.

    I'm still blocking the fenders. They are coming out nice the are pretty straight. He is a pic of them in primer (just because I have not shared in a while) I will be blocking them more but for now I'm moving on to the hood.lol


    I made it out of 1 inch wide and 1/4 thick flat stock. Making it flow with the radius of the side of the hood took some thought but it came out decent.
    Oh yeah I also spot welded the hood to the brace in several spots.


    I got the sectioned hood in primer. It was a lot of hammer and dolly work but here it is.


    Last edited by BAM55; 03-06-2014 at 09:46 PM.

  12. #12
    BAM55's Avatar
    BAM55 is offline CHR Member Visit my Photo Gallery
    Join Date
    Mar 2014
    Location
    Inglewood
    Car Year, Make, Model: 55 Chevy 210 and 58 Chevy Truck
    Posts
    267

    Well I decided to start getting the rear fenders ready for primer. I wanted to use these for the truck because they were giving to me by a buddy who bought new ones and he has passed away (He knew they were rough but did not want to throw them away). So I wanted something of his on the truck, so I went to through the trouble of saving them. My question is do you know what evils lives under your primer.


    This is what I had to cut away. Yikes

    Remember those repop fenders that I told you I like keeping just incase? Well they provided the majority of the patch panel. A little tweaking and they worked fine. That little rust spot that was left I just formed my hand.

    And here it is, almost ready for primer a little more welding and hammer and dolly work to do and very little filler will be needed now.lol


  13. #13
    BAM55's Avatar
    BAM55 is offline CHR Member Visit my Photo Gallery
    Join Date
    Mar 2014
    Location
    Inglewood
    Car Year, Make, Model: 55 Chevy 210 and 58 Chevy Truck
    Posts
    267

    Over the years this truck was really used. Man this fender has dents and digs all alone the top area. I used a big red marker to color in the top which I will block sand to see the highs and lows.

    Weapons of choice

    I also made this slapper and find it does a great job.

    On the back side you must choose a dolly that is very close to the contour of the sheet metal.


    After sanding here is what I had

    After the first use of my slapper and dolly I sanded again and here what I have. As you can see the low area is getting smaller. Sanding between hammer and dolly work shows me were I need to concentrate.

    Worked some more and sanded and had this.

    Here what I accomplished the first day, still a lot of work to do but a fender that most would have trashed or covered with way too much filler will be used with very little filler when done. After I remove all the major of the dents I will red marker again and try to fix all the imperfections. All the red markets that are left need to be worked but as you can see there is a world of difference.

    It just takes patience and work.

    I also wanted to share why I enjoy tig welding sheetmetal. I used a 3/32 2% ceriated tungsten and 1/16 filler rod and tried to keep the smallest HAZ I could. Tig sheetmetal is great you can see how low the bead profile is and some of the metal finishing I started. Man you can hammer and dolly that HAZ to your hearts desire.


  14. #14
    BAM55's Avatar
    BAM55 is offline CHR Member Visit my Photo Gallery
    Join Date
    Mar 2014
    Location
    Inglewood
    Car Year, Make, Model: 55 Chevy 210 and 58 Chevy Truck
    Posts
    267

    These are the wheels I ordered for the truck


    I guess I can live with a 5 inch lip on the rear wheel, I did want more but they would not give it to me.lol


    I just wanted to share my experience with Raptor Liner with you guys. Its my first time using this product and I must say I really like it. Its very easy to use and sprays great and was exactly what I was looking for. It dries fairly fast and looks good. I used it on the floor and the bottom of the toe board. It seams very durable so for people looking for something like this you can't beat it. I bought the 4 bottle kit, it comes with the hardener and the gun. I got mine on ebay.

    I will also be spraying it on the interior floor.


    Well, not really much to report other than I mocked up the hydroboost unit and plumbed the brake lines.


    The morning dew makes the painted frame a not look good in the pic. But the paint is smooth and nice. I used Kustom Shop's epoxy primer and satin black. It sprayed really nice. So for anyone looking for some Satin black and epoxy primer for their frame this may be the ticket. It really was not expensive and you will have enough left to do your suspension parts also.
    Last edited by BAM55; 03-06-2014 at 09:55 PM.

  15. #15
    BAM55's Avatar
    BAM55 is offline CHR Member Visit my Photo Gallery
    Join Date
    Mar 2014
    Location
    Inglewood
    Car Year, Make, Model: 55 Chevy 210 and 58 Chevy Truck
    Posts
    267

    Slowly I turn, step by step, inch by inch.lol Well thats how I doing it.

    I know its over kill but I base coat cleared the gas tank just because. No other reason.


    Here is the tank installed between the frame rails.


    Corvette filter/regulator installed


    Modified the tank a little for the in-tank fuel pump and lines.

    Well since I have not posted pics in a while I thought I should no matter how small the mod is. I knew I had to raise my bed floor 2 inches due to my c-notches. I was looking in metal yard for some scrape tubing and I could not find anything I liked, I decided to make my own 2 inch spacers. I try to keep things simple it makes life easier, but of course I will have to move the angle strips on the bed up 2 inches so that bed sits in the same spot as factory.

    I will use the bolt to hold the washers in place and then weld it together.


    Here is one of the spacers completed. I will need six of them for the three cross sills.

    Eventually they will be welded to the frame as a mount for the cross sills.

    Here are some misc pics of the 4 link reinstalled with the fuel and brake lines.


    I decided to go ahead and weld the bed floor spacers to the frame.


    Just checking cross sill bolt alignment.


    Finished and repainted.


    Before I mount the bed I have to move the angle strips up two inches and bed should fit like factory but the floor will be two inches higher.
    Last edited by BAM55; 03-06-2014 at 10:01 PM.

Reply To Thread
Page 1 of 29 1 2 3 4 5 6 7 8 9 11 ... LastLast

Posting Permissions

  • You may not post new threads
  • You may not post replies
  • You may not post attachments
  • You may not edit your posts
Links monetized by VigLink