


 9Likes
Thread: 41 New Yorker Coupe


Results 31 to 45 of 153
 LinkBack URL
 About LinkBacks
-
05-20-2011 02:27 PM #31
 CHR Member

- Join Date
- Nov 2010
- Location
- Markham, ON
- Car Year, Make, Model: 41 Chrysler New Yorker
- Posts
- 444
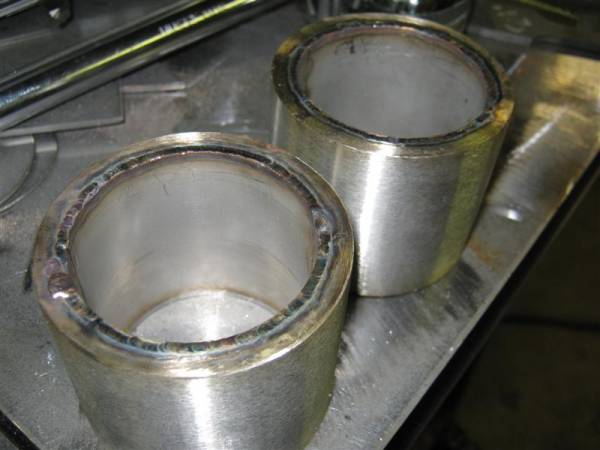
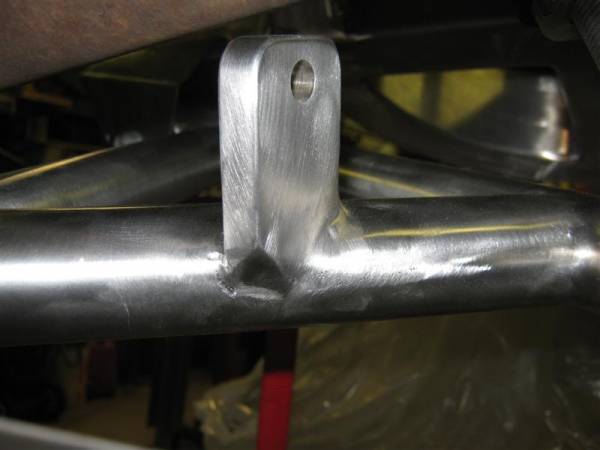
The next order of business was to lose the stock rear lower control arms as I planned to use Alden coilovers.
Of coarse some stainless was needed to start.
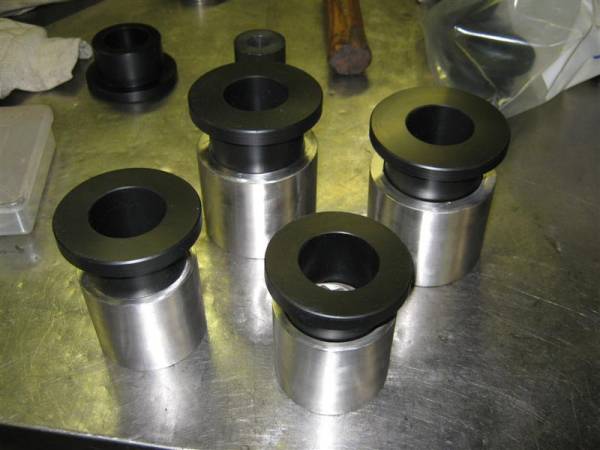
I started with some schedule 80 stainless pipe and welded in a sleeve to get the size closer to the bushings I found on line for the Cobra IRS.

-
Advertising

- Google Adsense
- REGISTERED USERS DO NOT SEE THIS AD
-
05-20-2011 03:47 PM #32
CHR Member/Contributor
- Join Date
- Jul 2003
- Location
- Madison
- Car Year, Make, Model: '67 Ranchero, '57 Chevy, '82 Camaro,
- Posts
- 21,160
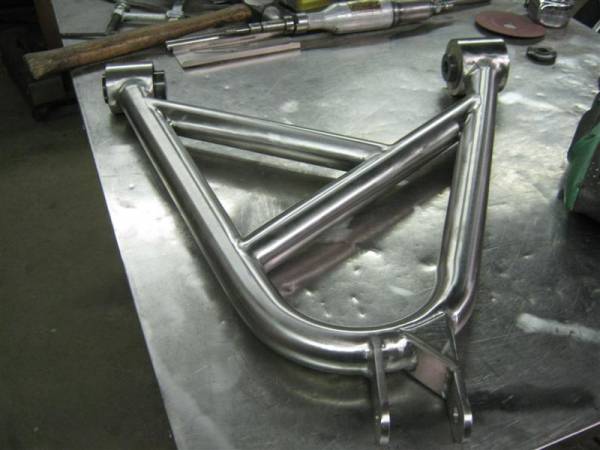
Great looking arms! one heck of an improvement over the stock stuff!!!Yesterday is history, tomorrow is a mystery, Live for Today!
Carroll Shelby
Learning must be difficult for those who already know it all!!!!
-
05-23-2011 05:38 AM #33
CHR Member
- Join Date
- Nov 2010
- Location
- Markham, ON
- Car Year, Make, Model: 41 Chrysler New Yorker
- Posts
- 444
Thanks Dave.
They look a lot better than lumpy cast parts.
-
05-23-2011 05:46 AM #34
CHR Member
- Join Date
- Nov 2010
- Location
- Markham, ON
- Car Year, Make, Model: 41 Chrysler New Yorker
- Posts
- 444
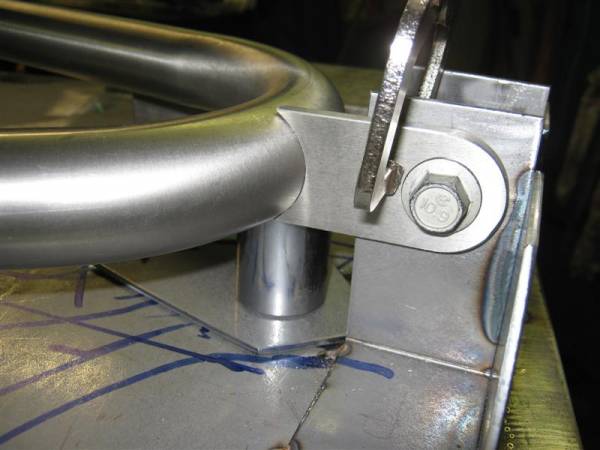
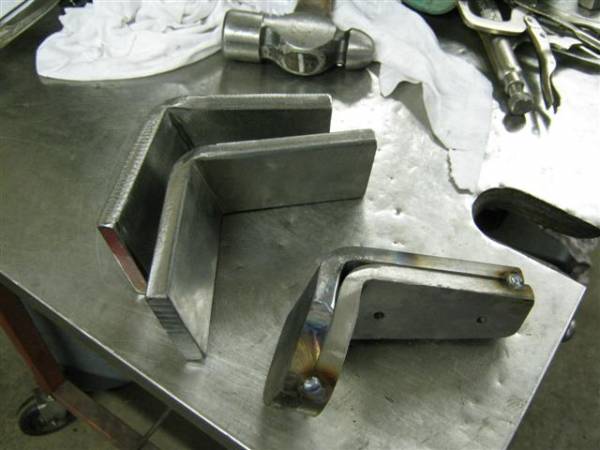
I added coilover and sway bar mounts to finish the arms off.

-
05-23-2011 05:58 AM #35
CHR Member
- Join Date
- Nov 2010
- Location
- Markham, ON
- Car Year, Make, Model: 41 Chrysler New Yorker
- Posts
- 444
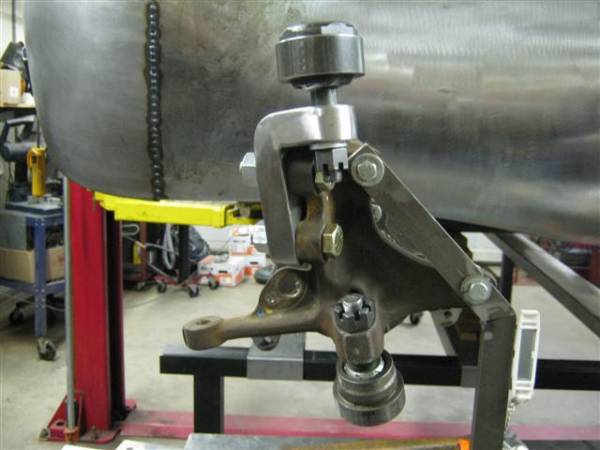
The next step was to start the front control arms but I had a little snaffoo here.
I told the guy I ordered the IRS from to throw a set of spindles and calipers onto the skid.
It never occurred to me that the Cobra would use MacPherson struts.
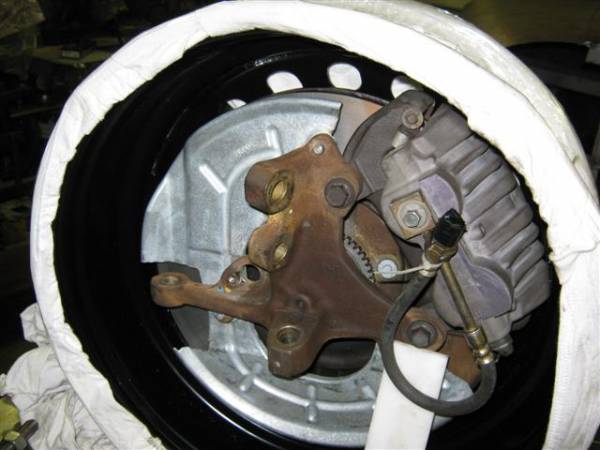
Since I always go down with the ship, I decided to use the arms I got and make up some brackets using the strut holes on the spindles to bolt to.
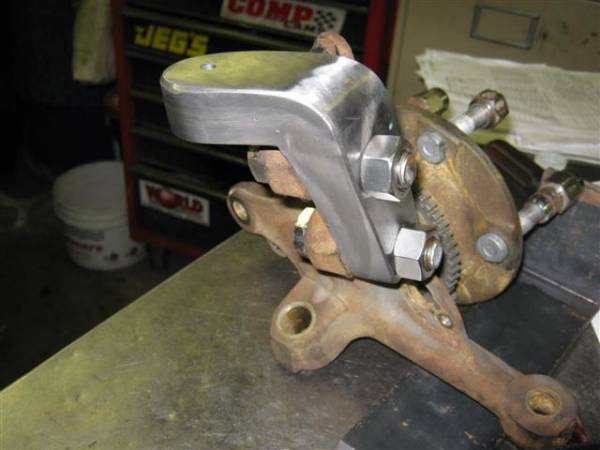
I got a tapered reamer and was all set.......
-
05-23-2011 07:10 PM #36
CHR Member
- Join Date
- Nov 2007
- Location
- Bonita Springs
- Car Year, Make, Model: 23 Ford T, 2004 ZO6 Vette, 99 Mustang
- Posts
- 542
That Cobra IFS throws this project over the top! Amazing fabrication skills. Just WOW!
Don Jr.Don Jr.
"Once again I have thoroughly disgusted myself"
-
05-23-2011 08:49 PM #37
CHR Member
- Join Date
- May 2011
- Location
- Calgary
- Posts
- 175
WOW.........that front end turned out nice......well done.....Lots of work ahead of ya....but it will look sharp
Ill be dropping in on this post to see the progress.Never take life too serious.....You wont make it out alive 
-
05-23-2011 09:40 PM #38
CHR Member
- Join Date
- Feb 2007
- Location
- Santa Monica
- Car Year, Make, Model: 37 Ford tudor humpback
- Posts
- 1,988
Hey Don, Throw in a few extra WOW's for me, too!! I can only dream of those kinds of skills!! Originally Posted by Mr Blue

"It is not much good thinking of a thing unless you think it out." - H.G. Wells
-
05-25-2011 02:59 AM #39
CHR Member
- Join Date
- Nov 2010
- Location
- Markham, ON
- Car Year, Make, Model: 41 Chrysler New Yorker
- Posts
- 444
Thanks Guys.
The next step was to get my total front end geometry correct.
I got a program online and started the task of getting the roll center as low as possible and everthing lined up using the spindles I had.
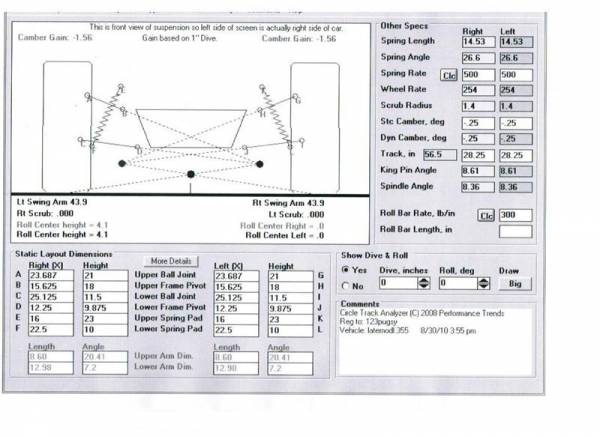
Its a pretty good program as I could go thru dive and roll and see the results.
This enabled me to check all the pivot points for the upper and lower control arms, length of arms, etc.
-
05-25-2011 06:33 AM #40
CHR Member/Contributor
- Join Date
- Jul 2003
- Location
- Madison
- Car Year, Make, Model: '67 Ranchero, '57 Chevy, '82 Camaro,
- Posts
- 21,160
Looks good in the pics and the geometry! Where did you find the software, btw?Yesterday is history, tomorrow is a mystery, Live for Today!
Carroll Shelby
Learning must be difficult for those who already know it all!!!!
-
05-25-2011 07:12 AM #41
CHR Member
- Join Date
- Nov 2010
- Location
- Markham, ON
- Car Year, Make, Model: 41 Chrysler New Yorker
- Posts
- 444
The program is by Performance Trends.
Reasonable price and they offer free 10 day trials on alot of their stuff.
Roll Center Calculator Suspension Software Program
-
05-25-2011 08:33 AM #42
CHR Member/Contributor
- Join Date
- Jul 2003
- Location
- Madison
- Car Year, Make, Model: '67 Ranchero, '57 Chevy, '82 Camaro,
- Posts
- 21,160
Thanks Pugsy!Yesterday is history, tomorrow is a mystery, Live for Today!
Carroll Shelby
Learning must be difficult for those who already know it all!!!!
-
05-25-2011 09:16 AM #43
CHR Member
- Join Date
- Feb 2007
- Location
- SLC
- Car Year, Make, Model: 52 Chevy 2-door Sedan w/ a 350/350 combo
- Posts
- 341
Great software. Thanks!
Pride Runs Deep
-
05-25-2011 10:00 AM #44
CHR Member
- Join Date
- May 2011
- Location
- Calgary
- Posts
- 175
thanks for the website for the software
DanNever take life too serious.....You wont make it out alive
-
05-25-2011 10:54 AM #45
CHR Member
- Join Date
- Oct 2007
- Location
- Petaluma
- Car Year, Make, Model: 48 Ford F1
- Posts
- 9,795
Pugsy - How did I miss this build? Very cool mods to the original front. Your sheet metal skills are fantastic! The frame and the geometry for the front suspension is seriously some of the most detailed stuff I've seen here. Thank you for posting your build, I look forward to seeing it thru!"  "No matter where you go, there you are!" Steve.
 Reply With Quote

Posting Permissions
- You may not post new threads
- You may not post replies
- You may not post attachments
- You may not edit your posts

Even though I know he won't see this, I still want to wish a Happy Birthday to my best friend, Richard Moore aka techinspector1
Happy Birthday techinspector1