


 71Likes

Results 106 to 120 of 165
 LinkBack URL
 About LinkBacks
-
05-22-2013 09:26 PM #106
 CHR Member

- Join Date
- Feb 2007
- Location
- Santa Monica
- Car Year, Make, Model: 37 Ford tudor humpback
- Posts
- 1,988
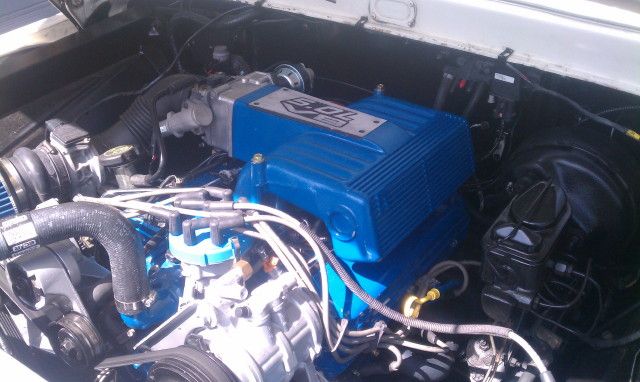
Holy crap, fellas, I'm loving this engine swap!!! I finally figured out how to use my digital timing light and the truck runs smooth & awesome!!!! The 50 series Flowmasters are a little louder than I expected but when I finish running the pipes out the back, it should quiet down a bit.
I know I promised more pics and must confess I missed a couple of good photo ops....yesterday I hoisted the old 352/cruiseomatic into the bed and hauled it to the car wash. Kinda surreal seeing the "transplant patient" hauling around its old "organs"..... would have been a fun pic.
I installed a tach today and cleaned up a little more of the wiring stuff. It's all coming together nicely. I've still resisted putting the fuel pressure testing gauge back on the shrader valve..... I also returned the Chinese distributor for a refund!!! Won't make that mistake again.....maybe....
This won't look much different than other pics but here's a shot of the engine from yesterday after I drove it around the neighborhood.....at least it's a pic!

"It is not much good thinking of a thing unless you think it out." - H.G. Wells
-
Advertising

- Google Adsense
- REGISTERED USERS DO NOT SEE THIS AD
-
05-23-2013 04:46 AM #107
CHR Member/Contributor
- Join Date
- Sep 2007
- Location
- Gardner, KS
- Car Year, Make, Model: '33 HiBoy Coupe, '32 HiBoy Roadster
- Posts
- 11,245
Looks great in there! Gotta agree on the digital timing light. That "dial back" feature where you can set the desired advance and then simply shoot the zero alignment is trick! Makes things sooooo much easier once you figure out the setup. Don't know how we did without them for so many years!Roger
Enjoy the little things in life, and you may look back one day and realize that they were really the BIG things.
-
05-23-2013 07:26 PM #108
CHR Member
- Join Date
- Feb 2007
- Location
- Santa Monica
- Car Year, Make, Model: 37 Ford tudor humpback
- Posts
- 1,988
Hey, any of you guys know of a good leak-proof remedy for connecting the trans lines to the radiator? My radiator has barbed hose fittings but the steel lines are just plain. I'm using 5/16 oil resistant hose with small hose clamps. Can't seem to get them tight enough to stop some seepage and I hate seepage! Would have been nice to flare the lines with proper fittings but they are just a tad too short for that.
Thoughts?"It is not much good thinking of a thing unless you think it out." - H.G. Wells
-
05-23-2013 07:33 PM #109
CHR Member
- Join Date
- Jan 2006
- Location
- Constantine
- Car Year, Make, Model: 57 chevy 2 dr wagon
- Posts
- 9,476
put a slight flare on the tubing then the clamp on that ..should stop leakingCharlie
Lovin' what I do and doing what I love
Some guys can fix broken NO ONE can fix STUPID
W8AMR
http://fishertrains94.webs.com/
Christian in training
-
05-23-2013 10:16 PM #110
CHR Member
- Join Date
- Sep 2005
- Location
- Hamilton
- Car Year, Make, Model: 69 nomad, 73 charger, 74 vega
- Posts
- 3,900
#1 Two hose clamps
#2. Use a tubing cutter to score a series of rings, about 1/8" apart.
#3. I had a hydraulic flare tool which had an adapter that would put a raised ring in the tubing, I think it was for an A/C application, but it made for an absolute leakproof connection for rubber tubing..
Education is expensive. Keep that in mind, and you'll never be terribly upset when a project goes awry.
EG
-
05-24-2013 06:16 AM #111
CHR Member
- Join Date
- Sep 2007
- Location
- New Bedford
- Car Year, Make, Model: 34 Ford 3W Coupe Replica
- Posts
- 14,754
Thanks for the pics R2.. I was getting "nervous"... ROFL..
I use compression fittings on the steel line with Barb fittings for the hose end. But putting a small flare works very well also!
-
06-03-2013 10:20 PM #112
CHR Member
- Join Date
- Feb 2007
- Location
- Santa Monica
- Car Year, Make, Model: 37 Ford tudor humpback
- Posts
- 1,988
Hey Fellas, I'm continuing to tweak things on my truck and trying finish up the exhaust, etc but I need some help figuring out the charcoal canister situation. I installed the canister from the Mustang because everything was set up for it when I planned on using the OEM wiring harness however the aftermarket harness doesn't have the connector for the purge valve solenoid. In order to use the charcoal canister as vent for my fuel tank and also for it's intended purpose to recycle extraneous gas fumes thru the engine I thought maybe I could use a vacuum controlled purge valve like in the pre-EFI engines. I ordered a valve for a 1982 Mustang 5.0. It looks like this:

As you can see, it has 3 bibs and I'm not sure how or where to hook them up to make them work with the EFI system. Here's a vacuum diagram for the 82 Mustang, which was carburated:

It appears that the left (black) bib goes to the canister, the top/middle(orange) bib goes to a VDV (vacuum delay valve) then to a VCV (vacuum check valve) then to the carb. The third (black) bib appears to go to the PCV valve?
So, can any of you interpret how this might be configured to work with my EFI setup? Would I need those additional VDV & VCV valves before connecting to the intake? Would that third bib actually tie into the hose on the PVC valve? Is there some easier way to get the benefit of the charcoal canister? Help!
"It is not much good thinking of a thing unless you think it out." - H.G. Wells
-
06-04-2013 05:49 AM #113
CHR Member/Contributor
- Join Date
- Sep 2007
- Location
- Gardner, KS
- Car Year, Make, Model: '33 HiBoy Coupe, '32 HiBoy Roadster
- Posts
- 11,245
Arrrrrgh! I had a bunch of stuff typed and lost it!!
Just thinking out loud here, which is dangerous but that little valve looks like a two-way that opens with vacuum. What if you ran your tank vent into the canister, then your canister outlet to the bottom black and tee the top black into your PCV line, and the orange to manifold vacuum. Tank vents to canister, engine starts and sucks the canister fumes into the engine? Problem is, it keeps sucking as long as the engine runs.
Soooo, if we could find a three way valve or two, ports 1&2 connected, 3 blocked, and then with vacuum 1 blocked, 2&3 connected? Now you put one in the line from the tank to the canister, tank to 1, canister to 2, 3 to atmosphere, orange to vacuum. Now when the engine starts, we suck the canister out using atmospheric air, but UH-OH, the tank's blocked and will implode (engine will die).
Soooo, we take a the second three way valve, put it upstream of the first one in that tank vent, put the line to the canister (the line running to the first valve) to port 1, tank to 2, and atmosphere to 3. Now the vent runs through the first valve, port 2 to 1 when off, into the second valve; and through the second valve port 1 to 2, collecting fumes in the canister. When the engine starts the first valve switches the tank to an atmospheric vent, which is OK because it's under negative pressure now, and opens the canister inlet to atmosphere, which is OK because it's also being sucked down by engine vacuum. The only missing piece might be an orifice in that line going to the PCV to limit flow and keep your engine vacuum where it needs to be because I've just created a big vacuum leak!!
This is either right or terribly wrong, but I predict you'll have to read it more than once to decide.....
Last edited by rspears; 06-04-2013 at 05:52 AM.
Roger
Enjoy the little things in life, and you may look back one day and realize that they were really the BIG things.
-
06-04-2013 06:37 AM #114
CHR Member
- Join Date
- Feb 2007
- Location
- Santa Monica
- Car Year, Make, Model: 37 Ford tudor humpback
- Posts
- 1,988
Holy crap! Would have been way easier if they had just wired the purge valve solenoid connector into the new harness!!!
Roger, I'll have to study what you said and let it soak in....... from what I've read, the VDV (vacuum delay valve) on the '82 diagram is a one way valve. It runs to the VCkV (vacuum check valve) then to SAFV (don't know what that is) before going to carb. Maybe all 3 of these "valves" need to be in place before going to the intake on my setup??
Currently, I have the line from the fuel tank to the canister attached. The other hose that usually goes to the purge control valve is just open for venting purposes. Is that a problem?
I'm missed all this part of my training......what training????
"It is not much good thinking of a thing unless you think it out." - H.G. Wells
-
06-04-2013 06:59 AM #115
CHR Member/Contributor
- Join Date
- Sep 2007
- Location
- Gardner, KS
- Car Year, Make, Model: '33 HiBoy Coupe, '32 HiBoy Roadster
- Posts
- 11,245
Randy, Originally Posted by randyr

No, I think with what you have now the canister will block any fumes from the tank vent, but it's capturing the vented fuel, absorbing the volatiles, and not burning anything. You're handling the aroma, but not fulfilling the intent of the canister according to the design - that means per the EPA. I wouldn't worry with it unless you're feeling particularly "green" about it.
The valve lineup I described sounds difficult, but it's really just some vacuum hoses and should work pretty slick assuming one can source a pair of three way VCV's, which I think are readily available. Maybe if I sketch it out, scan the sketch and post the diagram.....Last edited by rspears; 06-04-2013 at 07:46 AM.
Roger
Enjoy the little things in life, and you may look back one day and realize that they were really the BIG things.
-
06-04-2013 07:14 AM #116
CHR Member
- Join Date
- Feb 2007
- Location
- Santa Monica
- Car Year, Make, Model: 37 Ford tudor humpback
- Posts
- 1,988
Thanks, Roger! It's not about feeling overly "green" and I have plenty of opinions about the EPA, none of which are flattering to them Originally Posted by rspears
 but if hooking this thing up properly lets me milk a tiny bit more from a gallon of gas rather than evaporating into the air, then it's doing its job.
  So far, I've only smelled fuel from the canister once and that was after I just shut off the engine & lifted the hood.
I'm a little confused on the 3way vs 1way VCV's you're talking about. Please don't spend a lot of time sketching/scanning a diagram though! You've got a car to paint!!!
"It is not much good thinking of a thing unless you think it out." - H.G. Wells
-
06-04-2013 07:33 AM #117
CHR Member
- Join Date
- Sep 2007
- Location
- New Bedford
- Car Year, Make, Model: 34 Ford 3W Coupe Replica
- Posts
- 14,754
I think that first valve is only "in operation" during high vacuum situations. I think it opens the diaphragm at idle or upon deceleration. The orange side goes to the PCV Valve for the vacuum signal. The other two would go to the carbon can and the intake.
Or I could be all wet!
-
06-04-2013 07:51 AM #118
CHR Member/Contributor
- Join Date
- Sep 2007
- Location
- Gardner, KS
- Car Year, Make, Model: '33 HiBoy Coupe, '32 HiBoy Roadster
- Posts
- 11,245
Randy,
I started making the sketch "pretty", but it got messed up so I went quick & dirty and added it to the previous post. I think it'll work, but like I said I'm pretty sure you'd need an orifice in the line from the canister to the PCV to keep it from being a vacuum leak unless that canister provides more flow resistance than I think it does.... Now others can tell me why it won't work, or what else it needs... One thing I don't know is how much the charcoal canister is supposed to be vented? Do they get "purged" into the engine for extended periods, or just for some fixed time so as not to run so much air through the canister? I'm clueless.Last edited by rspears; 06-04-2013 at 11:10 AM.
Roger
Enjoy the little things in life, and you may look back one day and realize that they were really the BIG things.
-
06-10-2013 11:44 AM #119
CHR Member
- Join Date
- Feb 2007
- Location
- Santa Monica
- Car Year, Make, Model: 37 Ford tudor humpback
- Posts
- 1,988
I still haven't done anything with the purge control valve but I did finally finish my exhaust system. It's amazing how extending the pipes out the back can quiet things down so much in the cab. I'm using 50series Flowmasters, which are supposed to be a little more mellow but without tail pipes, they still set off a few car alarms.....
I bought a few mandrel bends from Summit Racing and cut to fit. Here are a few pics:
left side over the axle, around the tank & out the back...

Right side....

Finished up with some 3" tips...

"It is not much good thinking of a thing unless you think it out." - H.G. Wells
-
06-10-2013 01:58 PM #120
CHR Member
- Join Date
- Sep 2007
- Location
- New Bedford
- Car Year, Make, Model: 34 Ford 3W Coupe Replica
- Posts
- 14,754
Good to hear your making progress. Pipes came out nice and the tips "make it" a finished job.
Still like the 5.0? Does your carbon can have a vent on it?
 Reply With Quote

Posting Permissions
- You may not post new threads
- You may not post replies
- You may not post attachments
- You may not edit your posts

Yep. It’s pretty sad.
Dead!