-
10-14-2007 07:06 PM #16
C9X, Thanks for the pictures! Now that I have the chopped top that I always wanted I realize I am not going to be looking "up" much with the top in place. I was very interested in your method for mocking up a top with tape. I would like the back of the top to slope forward slightly like a '34 but there must be a limit to how far back one can lean back and also the back bow has to clear the seat when folded down. Thanks again for the neat stuff about tops.
Don Shillady
Retired Scientist/teen rodder
-
Advertising

- Google Adsense
- REGISTERED USERS DO NOT SEE THIS AD
-
10-14-2007 07:52 PM #17
 Originally Posted by Don Shillady
Not a prob.
Yes, no and maybe on the folded top clearance.
Pretty sure I posted the 32 top on an A body here.
If not, I can do it again.
Basics are, the 32 top fits the A with only one modest modification that does require welding.
About a 40 minute job if you're all set up and measure twice before cutting....
Still got the pics if need be.
With 32 w/s posts on A stanchions a 32 top is almost a given.C9
-
10-14-2007 08:47 PM #18
Not a problem.
Thanks . . . and I always like to learn something new....C9
-
10-14-2007 09:00 PM #19
No offense taken Denny, I only do it to help. But I also think that you're completely clueless that that kind of comment it what's driven several people off this site. Spare the excuses, I've already heard them.Your Uncle Bob, Senior Geezer Curmudgeon
It's much easier to promise someone a "free" ride on the wagon than to urge them to pull it.
Luck occurs when preparation and opportunity converge.
-
10-15-2007 10:05 AM #20

DennyW, maybe smart guys are sensitive sometimes. I thought this might be a problem but just thought Bob's picture slightly lighter. In my career I usually grooved in on some fundamental detail but often did not stay up with the latest technology. This is because after many stages of graphics evolution with maybe each stage of a year or so whatever hotshot graphics I used before would go out of date. I originally spent a lot of time on CalComp flat bed graphics plotters but then PC software came out so fast I did not keep up. So DennyW, Bob and C9X are certainly ahead of me on the PC graphics. Did you all use "Photoshop"? I only have PAINT so far and Denny certainly is a pro with the color shading and as I said I still have the neat maroon '29 Denny shaded in from a white picture, neat stuff, even removing one of the passengers. I have already learned and used the trick DennyW showed on how to merge several pictures into one and to keep Denny happy I am attaching one with five (5) pictures merged using the method he showed, they are pictures of the top four (highest occupied energy) electronic orbitals of formaldehyde. This may/may not be the cover of our new book since the cover art selection is sort of a committee process and anytime you get three people on a committee there are usually seven opinions! Just for the record, I am using an early Canon Power Shot A20 camera with only 2.1 Megapixels (which we won from a Coke can!) and I usually just resize the picture by 50%x50% to make it into the Forum limit but I don't know if all the pixels are resized or maybe there are only 1/4 the number of pixels. I am unfamiliar with this camera (which is my son's since he won it) and use the "auto flash" which doesn't always work. I wish I were using my old 35mm with all manual settings! Anyway in the garage with only a fluorescent overhead the pictures come out dark so I need to either get Photoshop and/or learn how to use some sort of manual settings on the camera. I was just so excited to get the windshield on that I wanted to take a picture as my first advancement on the car in over a year but it came out too dark. So here is the question: tell me what software to get to lighten up dark pictures.
Now, for C9X, I talked with a guy named "Dale" at Brookville who occasionaly installs windshields on their steel '29 roadsters. He says there should be a lip on the inside of the '29 stanchions but in fact I have official Brookville stainless stanchions (2" chopped) and they have no such lip, perhaps because they are not replicas but just "hot rod" parts? Anyway Dale suggested and it seems reasonable to add a tab to the bottom of the inside of each stanchion with two small bolts or machine screws as a fix to keep the windshield from swinging in. I can get some scrap stainless but cannot imagine how to polish it so I will probably use flat steel and paint the tabs body color.
I will try to answer any question on the theory of electronic structure if anyone asks (hah!) but you guys are the experts in PC graphics and building cars, I am the amateur here and need advice from several sources, so let us just stay calm and swap useful info. Whatever I know about cars is mostly useless stuff on early Fords, VWs and MGs so I am really groping when it comes to the SBC drive line and I am sorry to say that I will need more advice and hope not to become a pest any more than necessary.
Don Shillady
Retired Scientist/teen rodder
-
10-15-2007 04:45 PM #21
DennyW, That's great, now you can even see a small part of my temporary steering column just behind the dipstick as well as my new tilt column hanging on the left curing like a ham. When I got the tilt column painted a second time after scratching it up with the mockup I decided to make sure the paint thoroughly cured in the hot garage over the summer while I mess around with the old column for the mockup. I wasted $60 on the first Camaro column but with paint the tilt column is now over $400 so I will try to cut my losses using the Camaro column for the setup. So maybe you can e-mail your version of this picture to me and tell us the name of the programs you have used? (quantummechanicsllc@msn.com).
Don Shillady
Retired Scientist/teen rodder
-
10-29-2007 10:35 PM #22
Hi, I am asking this question in two threads to try to get an answer. Since the last nice pictures I have drilled holes in the stanchions for windwing clamps and find that is just one more case of messing around to get it to work. I have windwings cut from laminated safety glass and find the rubber pads I got from Brattons are too thick. I am considering using the rubberized cloth that came with the clamps on one side with the thinner of the two rubber pads on the other sides. Can you make any comments about mounting the windwings?
Don Shillady
Retired Scientist/teen rodder
-
10-30-2007 09:07 AM #23
"I talked with a guy named "Dale" at Brookville who occasionaly installs windshields on their steel '29 roadsters. He says there should be a lip on the inside of the '29 stanchions "
That's a stock 29 roadster in the pic I posted with the stops.
Don't remeber a lip, but Brookville could have cast one in since your posts/stanchions are one piece.
Comments about windwings . . don't use glass - meaning safety glass etc.
Make them from polycarbonate (common trade name = Lexan, which is a brand of polycarbonate).
Available from Home Depot etc.
Trouble with glass is, they're usually so heavy they tend to slip out and down in cold weather.
You could make some from slightly thinner Lexan and your gaskets would probably fit.
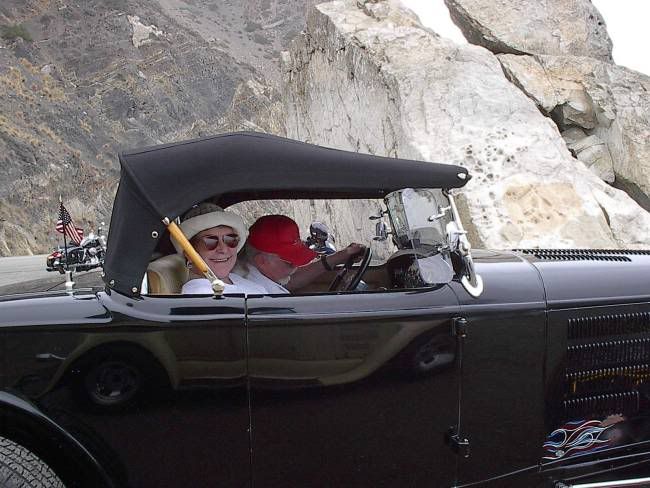
Take note of the WW's in the pic.
Lexan and they're about 10 years old.
No special care needed and they're as clear as ever.
I wash them when I wash the car and that's it.
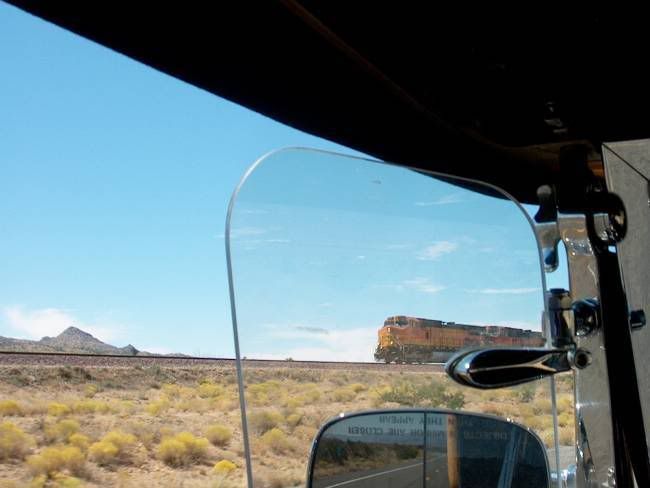
And a view through a WW about a year ago.
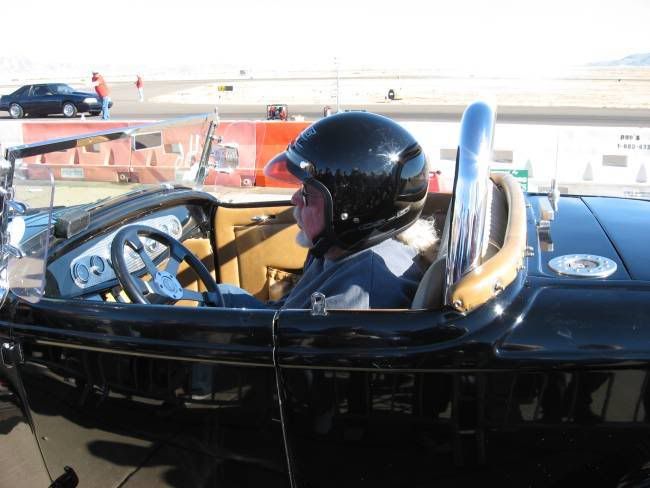
Note as well the WW's on the 32 are a little shorter fore & aft-wise than a stock 32 WW.
Stock length hampers ingress as well as shuts off a little too much air in summer.
I was removing them in summer, but the shorter ones stay on year-round.
They do a good job in the cold, especially when used in conjuncton with Lexan 1/4 windows that cover the area between top and door gap.
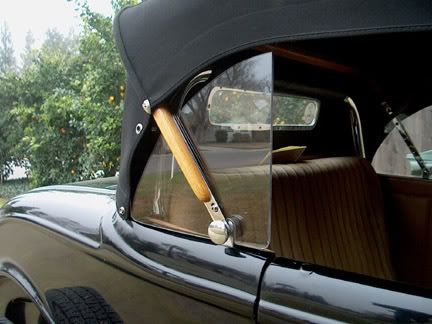
Do your clamps look similar to these?
There are different thicknesses of neoprene rubber available.
Local industrial rubber store, McMaster-Carr etc.C9
-
10-30-2007 09:08 AM #24
Guess that last pic wasn't needed . . . too much stuff going on this morning, forgot where I was....C9
-
10-30-2007 05:54 PM #25
C9X,
That is a wealth of help. Yes my clamps are essentially the same as what you show although perhaps slightly smaller. I should have thought of Lexan since the same shop that cut the class for me does Lexan as well and it is of course much lighter. Thanks too for the picture of the Lexan rear quarter windows. Are they secured by the top bolt? That solves a major concept for me for cold weather driving and will allow me to purchase the less expensive LeBaron Bonney top you have recommended as well as retain visibility to the rear. I plan to drill two holes in the top of each door (fiberglass) and add a rubber grommet in the holes. Then I can fabricate Lexan windows with posts for the holes. The only tricky part will be to put a strip of velcro along the top and sew a strip in a flap hanging down from the top edge of the top. All considered, it would seem unlikely that a watertight setup can be achieved easily, but a wind break might allow the annual trip to the Skyline Drive on the Blue Ridge in the cooler Fall weather and earlier outings in the Spring along with the heater under the dash. The stuff that I do myself suffers from my lack of skill but I think I can get it together. I note in your pictures that your brackets hang down from the "ball socket so that if the nut comes off the WW will fall. I think I can mount the clamps so that the weight of the WW sits on the "ball socket" so if the nut comes off the WW will stay there, but that does depend on visibility to the top of the WW and whether the clamp obscures vision. Maybe you do have it set up so the WW has it's weight on the "ball", I can't quite see from the picture but anyway that is easy to do. You have one very neat machine there and I really appreciate seeing your pictures!
On the other matter about stopping the windshield from coming too far in, I agree that I do not recall such a lip on the '31 Fordor I had either so maybe the comment from the guy at Brookville is just his imagination? On my fiberglass dash the upper lip is narrow and it is in the '32 style shape rather than the true Model A shape so I have not figured out yet how to add the stops but for now it mught have to be a piece of 1" angle iron (my favorite material) with rounded corners and a metal screw into the fiberglass painted body color as a last resort. If I could figure out where to get some chrome or stainless angle iron that would be much better. I will look around for some stainless in the nearby Hanover Air Park. There must be some sort of aircraft stainless stuff that could be formed into a stop on each side of the dash. It is coming back to me now that on the '31 Fordor there was a swing-out bracket with a tightening knob attached to the windshield post on the inside? However the roadster stanchions are too thin for that sort of arrangement.
Thanks!
Don Shillady
Retired Scientist/teen rodderLast edited by Don Shillady; 10-30-2007 at 06:11 PM.
-
10-30-2007 08:30 PM #26
Just a quick note on the Brookville stanchions, I just received a pair of their stainless, 2" chopped, stanchions, they're in Brookville blister pack, so I know they are Brookville's. They don't have what I would call a "lip" that would stop the glass. There is an insert piece welded on the inner side, that has a groove stamped in it that might "catch" the side rubbers, but that would be the extent of it. Hardly what I would consider a "lip" worthy of stopping an installed windshield. Certainly not like the actual lip on the inner edge of the stanchions on my '36.Your Uncle Bob, Senior Geezer Curmudgeon
It's much easier to promise someone a "free" ride on the wagon than to urge them to pull it.
Luck occurs when preparation and opportunity converge.
-
10-30-2007 10:43 PM #27
Bob, We are talking about the same parts from the Brookville blister pack. I have "glued" the 5/8" wide rubber in the "crack" with "GOOP" contact glue and it seems firm but who knows how many "swishes" of the windshield the rubber can take before dislodging.
Don Shillady
Retired Scientist/teen rodder
-
10-31-2007 08:16 AM #28
Don, your stanchion/post is hollow is it not?
Make up a threaded weld bung with a step and JB Weld it in place from the inside.
~~~~~~~~~~~~~~~
The WW pivot nuts don't fall off because they're nylocks and also because when they get loose - from swinging the WW's in or out - they'll drive you nuts and you'll torque em back to where they should be.
~~~~~~~~~~~~~~~~
The Lexan rear quarter windows are secured to the oak bow and stainless top iron piece the oak bow is on.
Slightly longer stainless sheet metal screws into the wood and an 8-32 allen with nylock through the oval hole at the bottom.
Since the quarter windows are supported only in the middle you need a fairly sturdy thickness of Lexan.
I tried 1/8", but they fluttered/buzzed at highway speeds much like the control surface in an airplane will when max speed is exceeded.
3/16" stopped that.
The quarter windows do well in keeping the wind that comes off the windwings from curving in and hitting short passengers right in the ear.
~~~~~~~~~~~~~~~~~~~~~~~
One thought I have about side windows is a sheet of 3/16" lexan on a hinge that mounts to the top's horizontal bar above the door.
An over-center spring setup to allow the window to stay up or down would help.
Granted, it would leak air to an extent, but the main thing is rain would stay out of the cockpit for the most part.
16 degree's F is my personal best in the roadster, but below freezing at highway speeds can get a touch chilly.
~~~~~~~~~~~~
A couple of pic's during the quarter window mock-up phase.
They will impinge on the ingress-egress bit, but not bad.
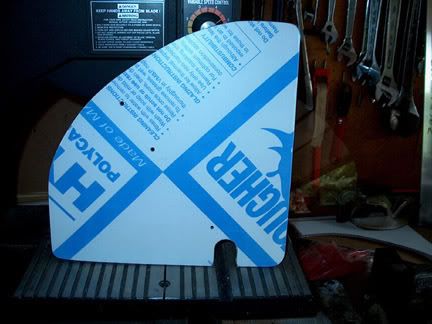
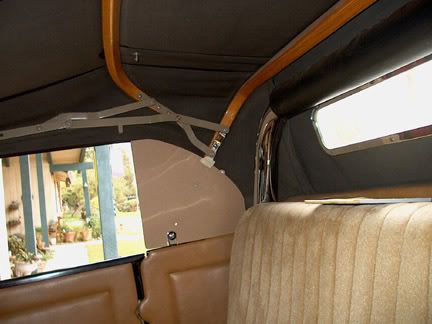
Note the notch for the main top bolt, not used for the quarter window install.C9
-
10-31-2007 08:25 AM #29
When you cut Lexan, use a table saw with a piece of plywood on the table so the sharp table edges don't cut through the protective paper.
A sharp 60-80 tooth carbide blade helps as well.
Cut the basic shape close to the line with the table saw and use a bench style disc sander to reach the finished shape/size.
Use a piece of plywood on the sander as well.
Don't let the Lexan flap up and down on the table saw, hold it firmly in place with your hand
If it does pop up and slam back down you'll probably end up with a chip in the outer edge.
Sand a light chamfer on the edges of the Lexan and wet sand the edges until they look like a typical glass edge.
240 - 360 grit wet/dry works ok here.
Note as well that Lexan has an ultraviolet resistant coating on one side.
That goes toward the sun.
Be sure and make a left and a right side....C9
-
10-31-2007 07:18 PM #30
C9X, Thanks for the excellent details on the rear quarter window. Yes the stainless stanchions are evidently pressed from heavy gauge stainless with the panel with the groove for the rubber welded across the U-channel of the pressed shape. The holes were drilled through the stainless behind the panel that has the groove for the rubber. C9X, thanks for your excellent help, I can only approach your excellent workmanship in a rough way, but your practical ideas are excellent. I see what you mean about the stop. I could thread a hole in the channel welded across the stanchion near the bottom and use a small bolt with a spacer protruding at the base of the stanchion. Probably a 1/4" stainless bolt with the head cut off and rounded should be enough to prevent the windshield from coming back too far and a short rounded stainless bolt sans head might not look too bad, I'll think that over.
Don Shillady
Retired Scientist/teen rodderLast edited by Don Shillady; 10-31-2007 at 07:37 PM.
Welcome to Club Hot Rod! The premier site for
everything to do with Hot Rod, Customs, Low Riders, Rat Rods, and more.
- » Members from all over the US and the world!
- » Help from all over the world for your questions
- » Build logs for you and all members
- » Blogs
- » Image Gallery
- » Many thousands of members and hundreds of thousands of posts!
YES! I want to register an account for free right now! p.s.: For registered members this ad will NOT show


 LinkBack URL
 About LinkBacks
 Reply With Quote

I bought the 76 in August , but haven't been able to work on it. When I get a chance I'll post some pictures.
Corvette Resurrection?