


 228Likes
Thread: the shop tips thread


Results 61 to 75 of 131
 LinkBack URL
 About LinkBacks
-
07-16-2015 01:39 PM #61
 CHR Member

- Join Date
- Sep 2005
- Location
- Hamilton
- Car Year, Make, Model: 69 nomad, 73 charger, 74 vega
- Posts
- 3,900
Last night I welded in a patch panel. I had used black paint on everything, and couldn't see anything. Everything was black! All I could see was the puddle.
I'm thinking that if the patch panel was grey primer, against all black, it would have been much easier..
Education is expensive. Keep that in mind, and you'll never be terribly upset when a project goes awry.
EG
-
Advertising

- Google Adsense
- REGISTERED USERS DO NOT SEE THIS AD
-
07-23-2015 04:47 PM #62
CHR Member
- Join Date
- Mar 2003
- Location
- SW Arizona
- Car Year, Make, Model: 68 Ply Valiant, 83 El Camino
- Posts
- 3,872
Rather than fight with a mirror and flashlight to try to see a casting number/part number or other small detail, reach down with the camera on your cell phone and take a picture of it.
Wonder how much clearance you have between the air cleaner (or other parts) with the hood closed, put a light on the engine compartment, set the cell phone camera where it can gets a view of the parts (and won't get crushed) and turn it on to record a video. Close the hood and then retrieve the phone and review the video.
.I've NEVER seen a car come from the factory that couldn't be improved..... 
-
07-29-2015 04:39 PM #63
CHR Member
- Join Date
- Mar 2003
- Location
- SW Arizona
- Car Year, Make, Model: 68 Ply Valiant, 83 El Camino
- Posts
- 3,872
If you’re in a situation where you are going to be trial fitting a radiator numerous times (and possibly building/modifying brackets to hold it in), a piece of thick cardboard over the core (held on with tape) will help prevent any unexpected damn-it moments. The box it’s shipped in is a good source for the cardboard. I learned this the hard way many years ago, fortunately it was back in the brass copper days so it was a relatively easy repair. I’ll admit I don’t do this very time, but I probably should.
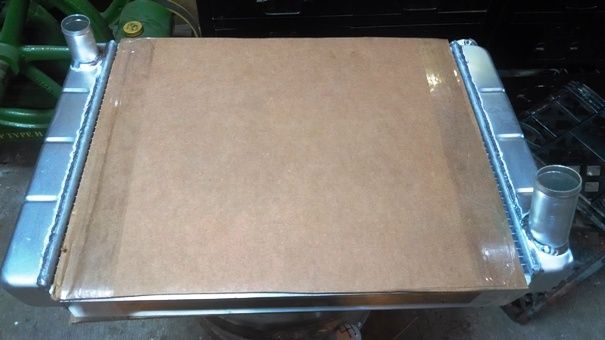
I went a step further on my current project, as I didn’t want to remove the AC condenser and knew I would be putting the mockup motor in and out numerous times in a short engine compartment. I cut a cover to put over the radiator opening to protect the condenser. From a couple of the nicks I put in the cover it was probably a pretty good idea that I did.
.I've NEVER seen a car come from the factory that couldn't be improved.....
-
08-04-2015 07:09 PM #64
CHR Member
- Join Date
- Sep 2005
- Location
- Hamilton
- Car Year, Make, Model: 69 nomad, 73 charger, 74 vega
- Posts
- 3,900
Someone around here turned suggested stainless steel cut off wheels. I'm not sure it made the shop tips thread, so there you have it. Stainless steel cut off wheels will out perform standard discs so well, that I actually save money (and time) by paying the higher price..
Education is expensive. Keep that in mind, and you'll never be terribly upset when a project goes awry.
EG
-
08-04-2015 07:16 PM #65
CHR Member
- Join Date
- Sep 2005
- Location
- Hamilton
- Car Year, Make, Model: 69 nomad, 73 charger, 74 vega
- Posts
- 3,900
Right now I'm doing rust repair at the bottom of the car, and I don't have a lift. That means sitting cross legged on the ground, with the car on jackstands. To keep the sparks off, I use cardboard. I'll sit on the edge, and draw it up over my knees, and tuck it up under my arms. Then the sparks just roll off and hit the ground. Note: don't rest your elbows on the cardboard, cause sparks will get your elbows..
Education is expensive. Keep that in mind, and you'll never be terribly upset when a project goes awry.
EG
-
08-23-2015 11:09 AM #66
CHR Member
- Join Date
- Apr 2012
- Location
- american canyon
- Car Year, Make, Model: 36 Ford Sedan, 23 T Bucket
- Posts
- 1,899
Found it to be a good practice to do a compression test before and after adjusting valves, lower compression after is a sure bet you have adjusted a valve too tight.
Not claiming this one (saw it on the web) but it works; using a variation to the oil in tubing method to find TDC, using a combo fuel pressure/vacuume gauge connecting the gauge to your compression tester's plug adapter. Find compression stroke on #1, rotate by hand back and forth between vacuum and pressure readings to find center on the gauge.
-
08-23-2015 11:37 AM #67
CHR Member
- Join Date
- Feb 2006
- Location
- Bartlett
- Posts
- 6,831
You can feel the differance in pressure/vacume with ur pinkie in the plug hole more sensitive than most guages-----
After an engine build and the initial valve setting and verifying after warm up/heat cycle/retorque--------I use the valve adjustment ( well not "valve adjustment". but rather "valve gap checking" to determine if anything has changed and then maybe a compression/ leakdown to determine what/where to look farther--------sure beats picking up pieces
-
08-27-2015 07:39 AM #68
CHR Member
- Join Date
- Apr 2001
- Location
- Salado
- Car Year, Make, Model: 32, 40 Fords,
- Posts
- 10,898
On another forum (a couple others here hang there as well) we've been having a discussion on fluorescent fixture ballast replacement. The problem has become that the old magnetic style has just about disappeared. Late last year one of my ballasts (8' fixture) died. I go to the big box hardware as well as local hardware stores and all they have are "electronic" ballasts. I call the tech lines of, I think it was GE, and check to see if those are a suitable replacement. In a word.....no! Seems you can't mix electronic and magnetic ballasts on the same circuit.........which means I'd have to replace all 9 fixtures/ballasts. A little online searching and I was able to buy some NOS magnetic ballasts on ebay so bought a few for "just in case". Looked at LED replacement lamps, but the prices were astronomical. Well, as often happens with emerging technologies, the prices have come down for the LEDs, and probably will some more over time. At the same time, folks have been doing what I did, and the availability of older magnetic ballasts is shrinking quickly.
So, if you get into a similar pickle, consider the LED replacements. They give off good light, run cooler, don't have the characteristic hum of a fluorescent, and use less energy. They do require a small wiring change to bypass the ballast, but only takes minutes. Here's a pretty cost effective supplier for now; http://www.amazon.com/WYZM-4-Pack-Do...46QX5E8WC5EBM8 As with many things the more you buy the lower the unit cost. It wouldn't surprise me if in, say 6 months, they'll be even lower. I may have outsmarted myself buying an extra supply of those magnetic ballasts!Your Uncle Bob, Senior Geezer Curmudgeon
It's much easier to promise someone a "free" ride on the wagon than to urge them to pull it.
Luck occurs when preparation and opportunity converge.
-
08-28-2015 01:11 PM #69
CHR Member
- Join Date
- Sep 2005
- Location
- Hamilton
- Car Year, Make, Model: 69 nomad, 73 charger, 74 vega
- Posts
- 3,900

It's here.
Education is expensive. Keep that in mind, and you'll never be terribly upset when a project goes awry.
EG
-
09-16-2015 07:52 AM #70
CHR Member
- Join Date
- Sep 2005
- Location
- Hamilton
- Car Year, Make, Model: 69 nomad, 73 charger, 74 vega
- Posts
- 3,900
I put that last entry on the wrong thread...
Anyway, one thing I keep re-learning is that, when doing patch panels, think ahead. Be sure to leave yourself enough room to complete the weld. Especially on an inner panel.
Something I've been experimenting with, is giving a patch panel extra crown, so that after shrinkage it will sit true to the mating contour. It works, but gauging how much extra crown the panel needs is tricky. It seems better to have a bit too much, as extra can be tapped down, but too little and you're in a bit of a pickle if you can't access the back side of the patch..
Education is expensive. Keep that in mind, and you'll never be terribly upset when a project goes awry.
EG
-
02-10-2016 06:25 AM #71
CHR Member
- Join Date
- Sep 2005
- Location
- Hamilton
- Car Year, Make, Model: 69 nomad, 73 charger, 74 vega
- Posts
- 3,900
I like poster board for templating patch panels. It cuts easy with scissors, holds a bend, and it's cheap.
Recently I found myself out of poster board, and discovered aluminum foil works just as well. Be sure to put it back before the wife starts dinner!.
Education is expensive. Keep that in mind, and you'll never be terribly upset when a project goes awry.
EG
-
02-10-2016 04:35 PM #72
CHR Member
- Join Date
- Apr 2012
- Location
- american canyon
- Car Year, Make, Model: 36 Ford Sedan, 23 T Bucket
- Posts
- 1,899
You had me to the end, LOL! Originally Posted by firebird77clone

-
02-11-2017 02:59 PM #73
CHR Member
- Join Date
- Sep 2005
- Location
- Hamilton
- Car Year, Make, Model: 69 nomad, 73 charger, 74 vega
- Posts
- 3,900
Today I found a neat trick for diagnosing a fuel pump. I removed the inlet line, and attached a length of tubing with a funnel jammed in the end. I secured the funnel and filled it to the top with fuel.
I loosened the inlet line to the carb and cranked the motor. I was able not only to confirm the pump was pumping fuel, but the tubing and funnel acted as a stethoscope, I could actually hear it sucking fuel.
Way easier than pulling the pump to verify function by manually operating it..
Education is expensive. Keep that in mind, and you'll never be terribly upset when a project goes awry.
EG
-
03-13-2017 08:20 AM #74
CHR Member
- Join Date
- Sep 2005
- Location
- Hamilton
- Car Year, Make, Model: 69 nomad, 73 charger, 74 vega
- Posts
- 3,900
It may be time to get a roll of aluminum foil for the shop, rather than stealing from the kitchen.
I found that it is wonderful for masking paint..
Education is expensive. Keep that in mind, and you'll never be terribly upset when a project goes awry.
EG
-
03-13-2017 09:12 AM #75
CHR Member
- Join Date
- Feb 2006
- Location
- Bartlett
- Posts
- 6,831
I use a lot of freezer paper when working /making fiberglass panels-also use the sponge/foam egg crate type packing material in a lot of shipping boxes for padding spacers around transmissions with the freezer(waxed) paper to made floor boards over anything underneath and then can pull out the foam----------this will leave like 2 inches space
 Reply With Quote


Posting Permissions
- You may not post new threads
- You may not post replies
- You may not post attachments
- You may not edit your posts

This site is up more often lately, but very little traffic.
Dead!