


Thread: do your own interior


Results 1 to 15 of 33
 LinkBack URL
 About LinkBacks
Hybrid View
-
10-27-2008 10:27 AM #1
 CHR Member

- Join Date
- Dec 2004
- Location
- Coralville
- Car Year, Make, Model: 41 willys coupe
- Posts
- 282
do your own interior
I am not a professional upholsterer by any stretch of the imagination. But I did stay in a Holiday Inn Express one night 30 years ago.
that being said I have been doing my own interior panel for years. I make the moulding forms out of sheetmetal, plywood or fiberglass then cover them.
I do not own a sewing machine but the only thing I have to farm out is the seats.
On Shirley's mustang we decided to change the entire interior so all of the current panels became obsolete. The following pictures show how simple it is to make the panel behind the seats.
#1 shows what the new sheet metal bulhead looks like. We decided to make a panel that would cover the top of the deck from cage uprights and down the new section part between the seats.
#2 shows how I used a piece of 1/4" plywood and cut it to fit the top. then I sawed kerfs 1/8" deep every 1/2" for the radius. I then screwed it to the bulkehead to make sure it fit .
#3 I simply used some fiberglass body putty to fill in the kerfs so they would hold the shape.
#4 I then pulled the panel off and used fiberglass cloth to reinforce the back so when I sanded the front smooth it would not loose it's shape.
#5 shows the 1/4" closed cell foam used to make the inital padding.
-
10-27-2008 10:41 AM #2
CHR Member
- Join Date
- Dec 2004
- Location
- Coralville
- Car Year, Make, Model: 41 willys coupe
- Posts
- 282
#6 Use 3M #74 spary adhesive. DO NOT use 77 or 80 because they will lose adhesion when the sun beats down on them.
you can use #74 or purchase professional adhesive by the qurat and spray it through your paint gun. I tried that and it is a lot easier and less messy to buy the 74 in spray cans.
#7 shows the foam glued on. I can show you how to cut it to fit around the edges and where to stop the foam to get the best look for your upholstery.
#8 show the padded panel in place.
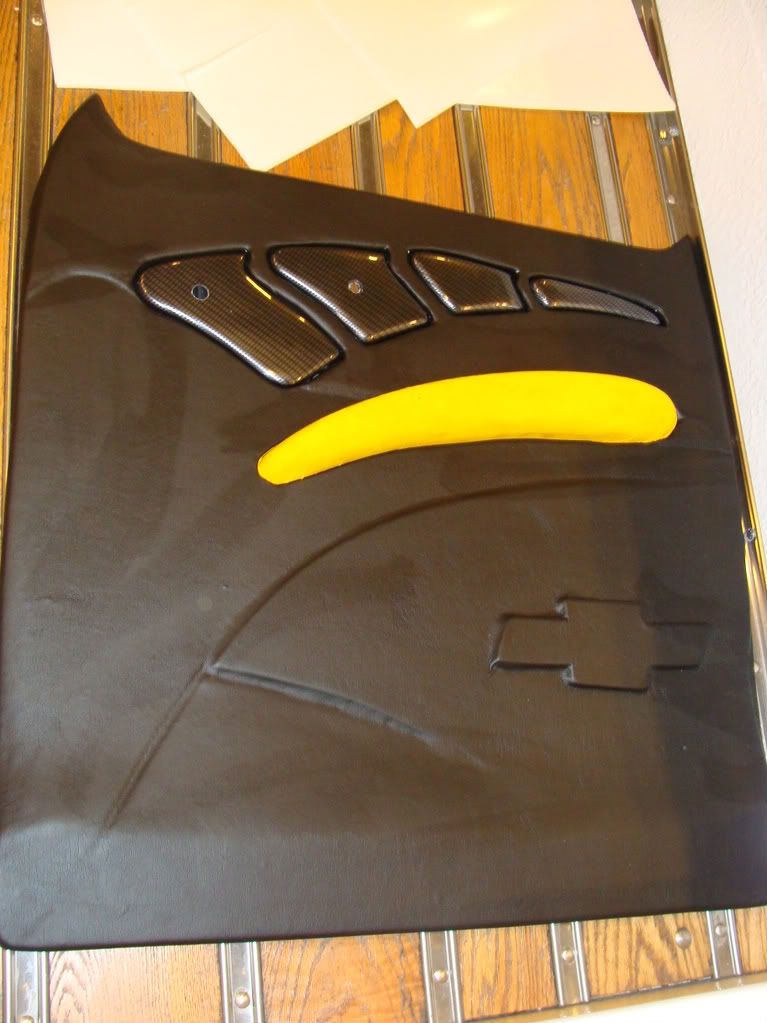
Now is the time to add any graphics that you might want. Flames, lines or patterns. That is done with additonal foam cut into shapes. I will be glad to go into that detail if anyone is interested.
The next step is covering it with vinyl. I like to use Pleather because it looks better and is thinner so it is easier to pull into shape.
-
10-27-2008 11:07 AM #3
CHR Member
- Join Date
- Apr 2007
- Location
- West Point, Virginia, United States
- Car Year, Make, Model: 1971 monte carlo
- Posts
- 2,772
Wow! very neat and professional looking job. you are very talented.BARB
LET THE FUN BEGIN
-
10-27-2008 11:23 AM #4
CHR Member
- Join Date
- Dec 2004
- Location
- Coralville
- Car Year, Make, Model: 41 willys coupe
- Posts
- 282
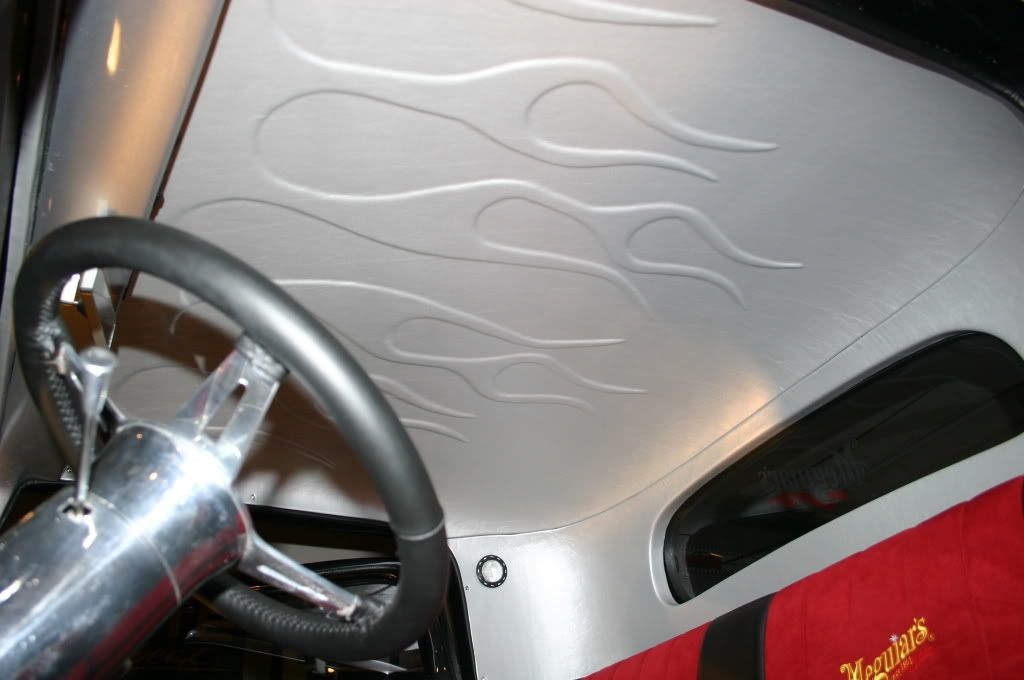
Thanks Barb for the kind words, But it is really simple to do. Here are a few shots of some graphics I used in the Willys.
-
10-27-2008 12:44 PM #5
CHR Member
- Join Date
- Apr 2007
- Location
- West Point, Virginia, United States
- Car Year, Make, Model: 1971 monte carlo
- Posts
- 2,772
way cool graphics.BARB
LET THE FUN BEGIN
-
10-27-2008 01:28 PM #6
CHR Member
- Join Date
- Jun 2006
- Location
- Seabeck
- Car Year, Make, Model: 56 F100 302-C4 Jag IRS
- Posts
- 153
Very nice work and yes I'd like to know the details. I'm planning on the interior of my F100 to be my winter project.Flames, lines or patterns. That is done with additonal foam cut into shapes. I will be glad to go into that detail if anyone is interested.
Thanks,Mike
'56 Ford F100
-
10-27-2008 05:21 PM #7
CHR Member
- Join Date
- Dec 2003
- Location
- Pahrump
- Car Year, Make, Model: 1947 International Pick Up
- Posts
- 3,188
Wow!!! That is realy sharp, good work.
We Need more people to show this kind of stuff.
Hey if you do your window felts or rubber around
your doors or rear deck lid. please show some photo's
of that. Maybe some one can reccomend a good book
for that. I need to learn that for my 65 ranchero.
Thanks for the pictures. Kurt
-
10-28-2008 12:55 AM #8
CHR Member
- Join Date
- Oct 2007
- Location
- Petaluma
- Car Year, Make, Model: 48 Ford F1
- Posts
- 9,795
Holiday inn? I think you've got a budding talent you've been hiding from us! Nice work!"  "No matter where you go, there you are!" Steve.
-
10-28-2008 03:16 AM #9
CHR Member
- Join Date
- Sep 2006
- Location
- New Lenox
- Car Year, Make, Model: 67 Mstg cpe , 37 Ford Coupe
- Posts
- 2,787
41 when you heat the pleather will the foam soften also when you are forming it . Did you apply pleather with the flames by hand or use some type of roller . Very good tech thread also I believe this is the biggest hurdle of the car hobby .
-
10-28-2008 06:05 AM #10
CHR Member
- Join Date
- Dec 2004
- Location
- Coralville
- Car Year, Make, Model: 41 willys coupe
- Posts
- 282
Bobby, Originally Posted by bluestang67
The heating process is very slight using a common hairdryer, just enough make the material slightly warm and a little more "stretchable". there are some techinigues to applying or laying the fabric on larger panels that help with the conturing. One of which is to have two people "drape" the material on to the form while slightly stretching it. This will use use up some of the excess material that might bunch up in the corners or recesses. I use a common kitchen dough roller. It is a double ended one with a 2" roller about a inch in diamter on one end and a 4'" x 1 1/2" diameter on the other. take it to the belt sander and round the sharp edges first, but don't take it back into house so your wife can see it.
-
10-28-2008 06:07 AM #11
CHR Member
- Join Date
- Mar 2007
- Location
- festus
- Car Year, Make, Model: 48 Plymouth, 48,54 Heap
- Posts
- 3,407
What type of foam are you using?
-
10-28-2008 06:18 AM #12
CHR Member
- Join Date
- Dec 2004
- Location
- Coralville
- Car Year, Make, Model: 41 willys coupe
- Posts
- 282
Originally Posted by falconvan
ONLY use CLOSED CELL foam. It is especially made for this use. Open cell is way to soft. I get my foam from ebay. It is used on pool tables and poker tables. Look up "poker table foam". Or you can buy it from your local upholsterer but it will be more expensive there.
#1 pic is 1/8"
#2 pic is 1/4"
-
10-28-2008 08:30 AM #13
CHR Member
- Join Date
- Apr 2005
- Location
- new bloomfield
- Posts
- 356
if you take your time anyone can do it. The examples you show are great. Done the last few of mine as well using the foam but also have used PVC and CPC plastic sheeting. Easy to use with a little heat it will take any shape you want and stay when colled. There is a plastic company across the street and I can get a 4x8 sheet for about $35
For the headliner of the '32 I used tracing paper and traced the flames off the hood
-
10-28-2008 08:39 AM #14
CHR Member
- Join Date
- Apr 2005
- Location
- new bloomfield
- Posts
- 356
a few shots from the truck I just finished. Started with what vintage air send for under the dash and added on from there and moved the controls. added the center console door panels and everything else.
You can oder plastic from a place like rod doors and also used a headliner from rod doors and covered. In the long run the headliner is formed and is cheaper to do this from RD


-
10-28-2008 08:45 AM #15
CHR Member
- Join Date
- Dec 2004
- Location
- Coralville
- Car Year, Make, Model: 41 willys coupe
- Posts
- 282
[QUOTE=iceburgh]a few shots from the truck I just finished. Started with what vintage air send for under the dash and added on from there and moved the controls. added the center console door panels and everything else.
You can oder plastic from a place like rod doors and also used a headliner from rod doors and covered. In the long run the headliner is formed and is cheaper to do this from RD
Very nice work. It is really much easier to do than one would think. I like the idea of the plastic. I have used the Rod Doors pvc molded panels in the past but they are so expensive for what you get when it is posible to duplicate it with your own materials.
Again VERY NICE WORK
 Reply With Quote

Posting Permissions
- You may not post new threads
- You may not post replies
- You may not post attachments
- You may not edit your posts

This site is up more often lately, but very little traffic.
Dead!