


 188Likes

Results 3,796 to 3,810 of 6479
 LinkBack URL
 About LinkBacks
-
10-23-2008 06:43 PM #3796
 CHR Member/Contributor

- Join Date
- Jul 2003
- Location
- Madison
- Car Year, Make, Model: '67 Ranchero, '57 Chevy, '82 Camaro,
- Posts
- 21,160
Getting some of the little stuff made right on Tom's coupe. Still working on those nasty old fenders, today I had to add a piece to the left rear so it would match the right rear... Still some trimming and shaping to make them the same, but you get the idea.
When Tom came over he brought this really kewl dash. It had the usual dings in it. Had to do a bit of the old ding and ping and some trimming to make it fit. The dash sure was a great find!!! Way nicer then most of the one's I've seen. Now that it fits I'll do a bit of sandblasting and some smoothing on it, then primer.Yesterday is history, tomorrow is a mystery, Live for Today!
Carroll Shelby
Learning must be difficult for those who already know it all!!!!
-
Advertising

- Google Adsense
- REGISTERED USERS DO NOT SEE THIS AD
-
10-25-2008 05:48 PM #3797
CHR Member
- Join Date
- Aug 2003
- Location
- CC
- Car Year, Make, Model: 70 Camaro Z-28 Now/40 Chevy Back Then
- Posts
- 4,306
Lookin' good Dave.
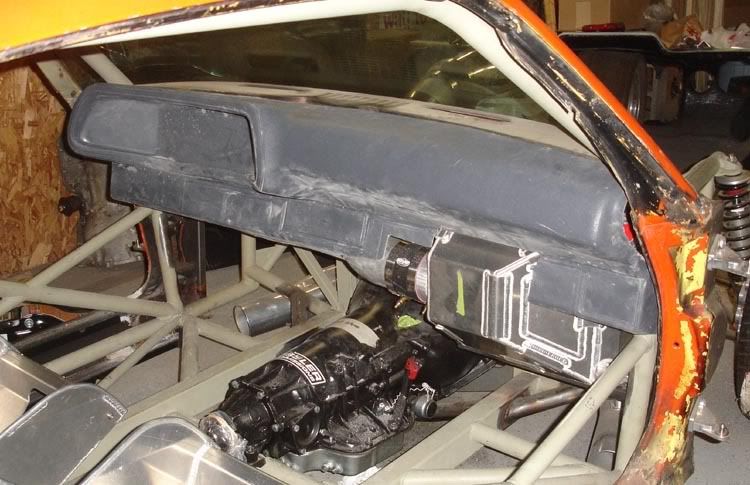
I did a little work on a dash myself today. First work I've done on the "Z" in awhile.
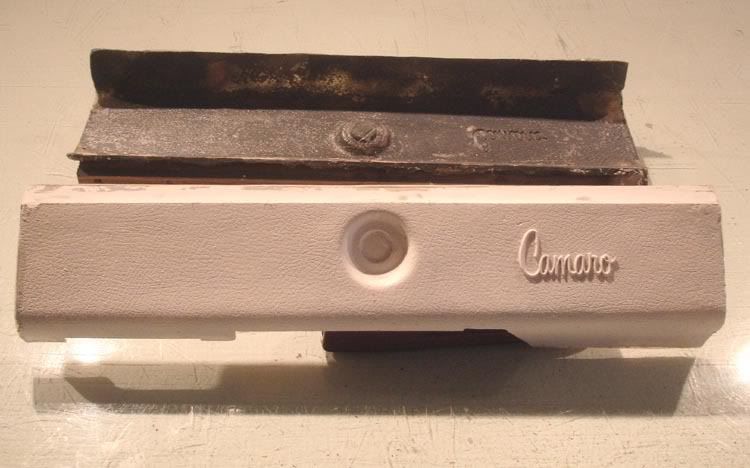
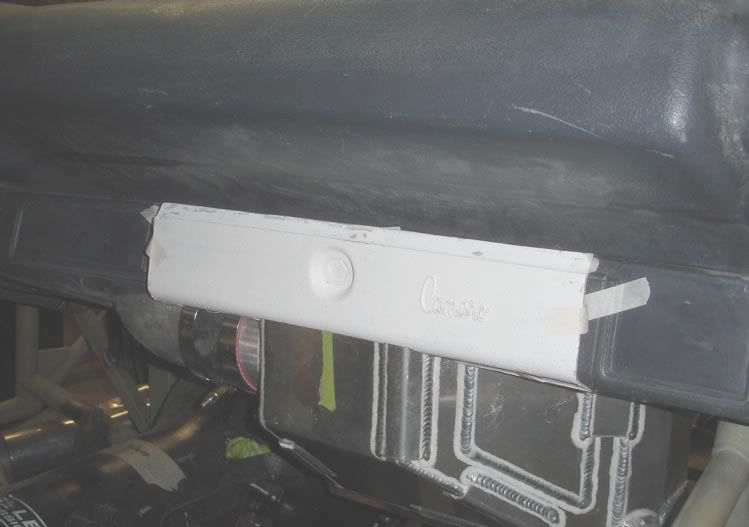
Got the glove box door pulled out of the mold, cleaned up a little & trimmed to fit over the intercooler. I've been lookin' at different ways to finish off the intercooler protruding through the dash and decided to make it look like the glove box door is partially open, with the intercooler stuffed inside. Got the skin done, now I've got to make the inner door panel so it can be glassed to the dash

"PLAN" your life like you will live to 120.
"LIVE" your life like you could die tomorrow.
John 3:16
>>>>>>
-
10-25-2008 05:57 PM #3798
CHR Member
- Join Date
- Oct 2007
- Location
- Harrison AR
- Car Year, Make, Model: 36 Chevrolet Low Cab
- Posts
- 1,023
Wow Pro. Thats cool!. I'm fixin to get my fill of fiberglass....have to widen my rear fenders. Also thinking about making my own one piece hood. Glad to see you got back to your project. I was starting to worry.
Dave GDo not lift a rock only to drop it on your own foot 
-
10-25-2008 06:13 PM #3799
CHR Member/Contributor
- Join Date
- Jul 2003
- Location
- Madison
- Car Year, Make, Model: '67 Ranchero, '57 Chevy, '82 Camaro,
- Posts
- 21,160
That's going to be very nice, Pro! Anxious to see the system all plumbed, should look awesome what with all the tubes, hoses, clamps, and shiny stuffs!!!!!
Worked a bit on Tom's coupe today, the rear fenders are finally starting to resemble rear fenders!!!!! Also did a bit more on reinforcing the top sill and tieing things together up there. Hey Tom, did you want square or round tubes for your cross bows??? I think we discussed it, but you forgot to have me write it down in my notes!!!!!
Then went out in the "little garage" and cut out part of the rear floor on the Bronco II so it's easier to get some measurements and do some figuring and calculation for the new frame and cage.Last edited by Dave Severson; 10-25-2008 at 06:15 PM.
Yesterday is history, tomorrow is a mystery, Live for Today!
Carroll Shelby
Learning must be difficult for those who already know it all!!!!
-
10-25-2008 06:16 PM #3800
CHR Member
- Join Date
- Aug 2003
- Location
- CC
- Car Year, Make, Model: 70 Camaro Z-28 Now/40 Chevy Back Then
- Posts
- 4,306
Thanks Dave & Dave...
I had to go out to the shop & tape it in place, just to see what it'll look liike. . It will look somethin' like this, but not exactly like this.
"PLAN" your life like you will live to 120.
"LIVE" your life like you could die tomorrow.
John 3:16
>>>>>>
-
10-25-2008 06:22 PM #3801
CHR Member/Contributor
- Join Date
- Jul 2003
- Location
- Madison
- Car Year, Make, Model: '67 Ranchero, '57 Chevy, '82 Camaro,
- Posts
- 21,160
That'll be kewl, Pro....and with chebbie power, the tape should hold it in place just fine!!!!!~!
Where are you at on the weight now, Pro??? I've forgotten, is your frame and cage moly or DOM?????Yesterday is history, tomorrow is a mystery, Live for Today!
Carroll Shelby
Learning must be difficult for those who already know it all!!!!
-
10-25-2008 06:25 PM #3802
CHR Member
- Join Date
- Aug 2003
- Location
- CC
- Car Year, Make, Model: 70 Camaro Z-28 Now/40 Chevy Back Then
- Posts
- 4,306
It's a MS chassis. I think it's gonna' end up on the heavy side by the time I get everything hung on it. I'm at about 1750 or so now. Hoping to stay under 3g. But if it gets a little heavy I'm not worried cuz' it is Chevy powered
"PLAN" your life like you will live to 120.
"LIVE" your life like you could die tomorrow.
John 3:16
>>>>>>
-
10-25-2008 06:31 PM #3803
CHR Member/Contributor
- Join Date
- Jul 2003
- Location
- Madison
- Car Year, Make, Model: '67 Ranchero, '57 Chevy, '82 Camaro,
- Posts
- 21,160
Yeah, well ya know I've got to be messin' with ya!
Think I'm gonna plunk down the $$$$$ and go moly for the Bronco II. I think if I stick with a good diet I can keep it around 2400 or so using either a Windsor or a modular for power, heck might even join the 21st centruy and run EFI and a supercharger!!!! Gonna be a long winter, and too much time to sit around and think!!!!!
Yesterday is history, tomorrow is a mystery, Live for Today!
Carroll Shelby
Learning must be difficult for those who already know it all!!!!
-
10-25-2008 07:39 PM #3804
CHR Member
- Join Date
- Apr 2007
- Location
- Austin
- Car Year, Make, Model: 1966 Mustang Fastback
- Posts
- 396
[QUOTE=Dave Severson]
Worked a bit on Tom's coupe today, the rear fenders are finally starting to resemble rear fenders!!!!! Also did a bit more on reinforcing the top sill and tieing things together up there. Hey Tom, did you want square or round tubes for your cross bows??? I think we discussed it, but you forgot to have me write it down in my notes!!!!!
Square tubes.
As long as your E-mail isn't working I going to give you some measurements on here. Paul a guy I met at "Back to the 50s" several years ago has a 27 T Tudor with a Buick V6, 4" dropped axle, 4 bar, and a stock T frame, and full fendered.... I liked everything about his car. I asked him how he got his "Rake" and how the tires fit so good in the front fenders.
He has 195/70R14 in the front and 255/70R15 in the back, from the highest point on the bottom edge of front fender to the ground is 25 1/2 inch, this was measured at the top of the curve in the wheel well. The lowest point of the front of the fender to the ground is 17 3/4 inches. From the bottom of the radiator bottom cover to the ground is 9 3/4 inches.
I attched a couple of pictures of his car which doesn't show much but he's sending me more pictures in the mail, hopefully they make it here some time this week so I can show them to you when I stop my this coming Sunday afternoon.
-
10-25-2008 07:41 PM #3805
CHR Member/Contributor
- Join Date
- Jul 2003
- Location
- Madison
- Car Year, Make, Model: '67 Ranchero, '57 Chevy, '82 Camaro,
- Posts
- 21,160
Thanks Tom!!!! As for the top bows, I forgot what you said, did you want to use round tubing???????Yesterday is history, tomorrow is a mystery, Live for Today!
Carroll Shelby
Learning must be difficult for those who already know it all!!!!
-
10-25-2008 07:47 PM #3806
CHR Member
- Join Date
- Apr 2007
- Location
- Austin
- Car Year, Make, Model: 1966 Mustang Fastback
- Posts
- 396
Square tubing. Originally Posted by Dave Severson
Drove my stock T out to my son's place again today, another 20 miles, sure is fun to drive, I get lots of waves and stares.
-
10-25-2008 07:51 PM #3807
CHR Member/Contributor
- Join Date
- Jul 2003
- Location
- Madison
- Car Year, Make, Model: '67 Ranchero, '57 Chevy, '82 Camaro,
- Posts
- 21,160
Betcha you get looks wherever you drive it---gonna be a blast to have them both done and runnin'!!!!!! Originally Posted by Tom F
Yesterday is history, tomorrow is a mystery, Live for Today!
Carroll Shelby
Learning must be difficult for those who already know it all!!!!
-
10-26-2008 05:45 AM #3808
CHR Member
- Join Date
- Oct 2007
- Location
- Harrison AR
- Car Year, Make, Model: 36 Chevrolet Low Cab
- Posts
- 1,023
Whats max speed on the stock T Tom? I use to have a neighbor that had a farm stocked full of original T's. For the most part I think they were all original. Ummm....think his name was Paul Cotton. You guys may know him...I dont know. He has since passed and I believe his cars are gone. I've got fond memories of him pulling out of the driveway into traffic with his T's.....clogging up traffic and getting an occasional honk in anger....all the while Mr. Cotton would just grin and give a toot back...guess that was ooogah!. I really liked those cars.
Yesterday I got the drivers side pillar/front cab corner more or less finished. Filled the void where the drip edge was. Got rid of the lead for the most part and welded the pillar lower to the cowl. Man that metal is real hard to weld with lead in it. Took some serious cleaning. If I knew it was going to be that hard I would re-leaded it instead.
Today. Going to finish the passenger side and get the rest of the floor in it so I can get the steering/brakes/dash finished. I'm sure this is a no brainer but.....I've smothed my dash up and going to tilt the bottom back quite a bit. I concidered just welding the dash in permenant. I'm in a tailspin trying to decide. Any thoughts?
Dave GDo not lift a rock only to drop it on your own foot
-
10-26-2008 05:55 AM #3809
CHR Member
- Join Date
- Sep 2006
- Location
- New Lenox
- Car Year, Make, Model: 67 Mstg cpe , 37 Ford Coupe
- Posts
- 2,787
[QUOTE=Dave Severson]That'll be kewl, Pro....and with chebbie power, the tape should hold it in place just fine!!!!!~!
You guys can always put a smile on my face and it feels good . I'll never be at the level i was before daughters mishap but you lift my spirits with this comradery .
-
10-26-2008 06:01 AM #3810
CHR Member/Contributor
- Join Date
- Jul 2003
- Location
- Madison
- Car Year, Make, Model: '67 Ranchero, '57 Chevy, '82 Camaro,
- Posts
- 21,160
If you'll still have room to install the gauges, heater and other things that go in and around the dash, I'd say weld it.... worst it can do is make the whole structure a bit less prone to flex. Originally Posted by Stovebolter
Yesterday is history, tomorrow is a mystery, Live for Today!
Carroll Shelby
Learning must be difficult for those who already know it all!!!!
 Reply With Quote

Posting Permissions
- You may not post new threads
- You may not post replies
- You may not post attachments
- You may not edit your posts

A belated Happy 78th Birthday Roger Spears
Belated Happy Birthday