


Thread: E-stopp parking brake actuator


Results 1 to 3 of 3
 LinkBack URL
 About LinkBacks
Hybrid View
-
02-15-2015 01:37 PM #1
 CHR Member

- Join Date
- Feb 2013
- Location
- Loveland
- Posts
- 427
E-stopp parking brake actuator
Since few people view or comment on my build log, I'm posting this as general info that might be applicable to any project, particularly one using Wilwood disc brakes that have the drum type parking brake built into the rear rotors.
One of the things that I've never dealt with is the poor performance of my Lokar parking brake lever, that will not put out enough force to actuate my Wilwood parking brakes. I trashed the Lokar brake lever and the cables - about $250 in parts and 2-3 days of work. In place of the brake lever, I put two billet aluminum cup holders into the console. Even a hot rod needs a place to put some cans of pop.
I bought an E-stopp electric parking brake actuator that puts out 600 pounds of pulling force and a new Lokar cable set, to replace the old setup. I also bought an E-stop cable combiner bracket, but found that it would not work for my installation. To use the E-stopp bracket, you must have cables that are prefabricated to the exact length needed. I also had an interference problem with a frame cross member that made the bracket unuseable.
http://www.summitracing.com/parts/esc-esk001
http://www.summitracing.com/parts/LOK-EC-81FU
http://www.summitracing.com/parts/esc-esb002
As received, the actuator has a 5-1/2 inch long cable housing (including the threaded end) and a cable that's about 11 inches long, fully extended. Apparently, that's a lot shorter cable than older units had. The longer cable made the actuator impossible to install in a lot of cars.
I made my own cable combiner bracket that was compatible with the Lokar brass cable stop that combines both cables. The Lokar stop requires the cables to be placed ¾ apart and ¾ above the frame. I made my bracket from some 3/16 x 1-1/2 and 3/16 x 3/4" 304 stainless steel bar stock that I had on hand.
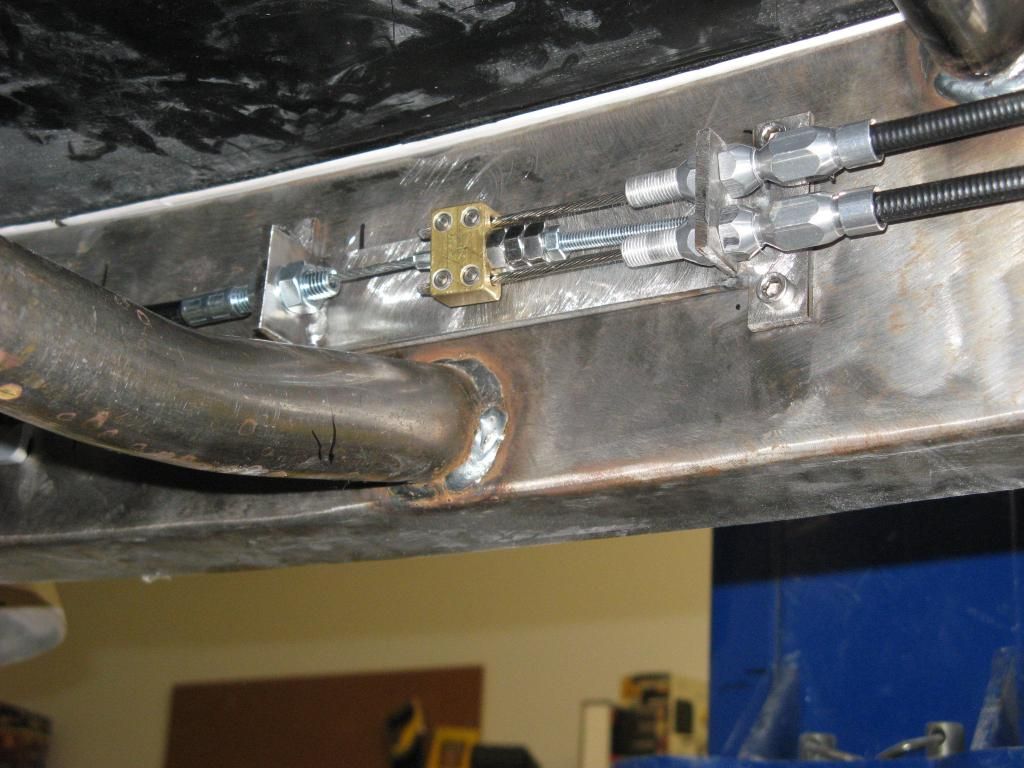
I found out the hard way that the Lokar cable stop is hard on the cables. If you just cut the cables to length and clamp them down with the two set screws, the ends will be badly frayed, if the cables are ever removed. To fix that problem , I used my TIG welder to ball the ends of the cables this time, so they wouldnt fray. I had to turn the amperage down to 20, to get some control over the weld. A also practiced on some scrap pieces, to I wouldnt ruin an expensive stainless steel cable.
My only complaint about the E-stopp actuator is the lack of instructions. I assumed that the actuator cable was fully released when I got the unit, since thats where it needs to be to hook up the cables from the parking brakes. When I first hooked the actuator to the cars battery, it immediately released about an inch of cable and fouled things up. I was able to make some adjustments and not have to relocate anything, but it was a setback. If thats the way these units are always sent out, then they should include instructions that tell the installer to make the electrical hookup early-on and be sure that the cable is fully released, before mounting the cable combiner bracket. They should also tell you that its OK to retract the cable, to check the maximum cable travel, or at least tell you how much cable travel is available.
Here's the whole unit, installed. It's about 27 inches from the end of the actuator to the end of the cable combiner bracket. I have a lot more frame rail available, but my oval shaped muffler is positioned only a couple of inches behind my cable combiner bracket. If I had moved the whole thing back further, I'd have to remove a tail pipe and muffler, to make any cable adjustments. If I had no other choice, I might have done that.
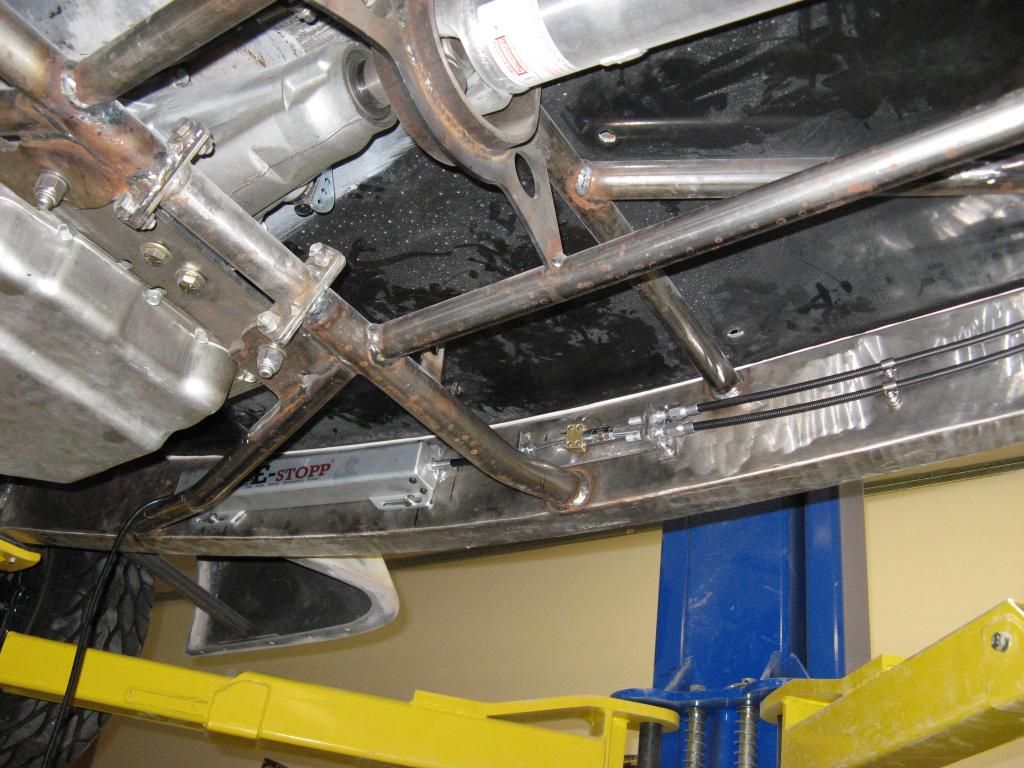
I'm seeing more metric parts all the time. The E-stop actuator has metric threads. The cable ends at the parking brake end of the Lokar cable housings are also metric and require a pair of 16mm wrenches to install.
-
02-15-2015 03:15 PM #2
CHR Member
- Join Date
- Sep 2005
- Location
- Hamilton
- Car Year, Make, Model: 69 nomad, 73 charger, 74 vega
- Posts
- 3,900
Nice work on those tubular braces. Which is your build log, maybe I've been missing something good!.
Education is expensive. Keep that in mind, and you'll never be terribly upset when a project goes awry.
EG
-
02-15-2015 03:20 PM #3
CHR Member
- Join Date
- Feb 2013
- Location
- Loveland
- Posts
- 427
I didn't build the frame, but I did modify the transmission cross member, so the trans could be removed without removing the front half of the body and the engine, first. Oze supplied the frame (that had many other problems). I also made the motor mounts and fixed the front suspension so it could be adjusted to have the proper caster and the same wheelbase on both sides of the frame. Originally Posted by firebird77clone

'37 Oze build


 Reply With Quote

Posting Permissions
- You may not post new threads
- You may not post replies
- You may not post attachments
- You may not edit your posts

Even though I know he won't see this, I still want to wish a Happy Birthday to my best friend, Richard Moore aka techinspector1
Happy Birthday techinspector1