


Results 91 to 105 of 107
 LinkBack URL
 About LinkBacks
-
09-07-2009 05:04 PM #91
 CHR Member/Contributor

- Join Date
- Jul 2003
- Location
- Madison
- Car Year, Make, Model: '67 Ranchero, '57 Chevy, '82 Camaro,
- Posts
- 21,160
Sounds like it's getting real close to cruizin'!!!!! Been following your build, should be a super-fine family cruizer, anxious to see it get going and get some test drive reports!!!! Have fun and keep us updated on the progress.Yesterday is history, tomorrow is a mystery, Live for Today!
Carroll Shelby
Learning must be difficult for those who already know it all!!!!
-
Advertising

- Google Adsense
- REGISTERED USERS DO NOT SEE THIS AD
-
09-07-2009 09:48 PM #92
CHR Member
- Join Date
- Nov 2005
- Location
- Phoenix
- Car Year, Make, Model: 1937 Caddy LaSalle, 66 Lone Star Cobra
- Posts
- 227
Dave: I am flattered that you are keeping an eye on this build. I am also very happy that someone with your fabricating skills and eye for safety would be looking over my shoulder. As you know, this car will haul my family and safety is a primary concern.
Here are some progress pics and a some picture of my radiator mount setup. (I was never confident about just hanging the radiator off the thin aluminum flanges).
IMG_0924 comp.JPG
IMG_0925 comp.JPG
IMG_0926 comp.JPG
IMG_0928 comp.JPG
The taillights are 41 Chevy, the 3rd brake light is 40 Ford, and the reverse lights are led bullet license plate bolt lights that I mounted in the bumper bolts.
-
10-18-2009 04:07 PM #93
CHR Member
- Join Date
- Nov 2005
- Location
- Phoenix
- Car Year, Make, Model: 1937 Caddy LaSalle, 66 Lone Star Cobra
- Posts
- 227
It's Alive!!!!!!
I have been lousy about posting lately because I have been too busy thrashing on the car to get it ready for the Goodguys show in Phoenix the weekend before Thanksgiving.
Today I decided to attempt to start it myself. I had planned on having a shop that I trust do the initial start up, but as I have worked on it more and more I have become more confident. And I am glad I did. After wiring the fuel pump correctly I turned the key and it came back to life after being dormant for over a year.
Thank you for all the help. I will try to be better about posting as I finish it up and get it on the road.
Here is a link to some video. I still have that same smile on my face hours later.
http://sharing.theflip.com/session/2.../video/6767697
-
10-18-2009 06:49 PM #94
CHR Member
- Join Date
- Feb 2007
- Location
- Santa Monica
- Car Year, Make, Model: 37 Ford tudor humpback
- Posts
- 1,988
Congrats!!! What a great car! I look forward to the day when I can fire mine up too! Keep us posted on your progress... Originally Posted by 37 Caddy

"It is not much good thinking of a thing unless you think it out." - H.G. Wells
-
09-07-2010 10:29 PM #95
CHR Member
- Join Date
- Nov 2005
- Location
- Phoenix
- Car Year, Make, Model: 1937 Caddy LaSalle, 66 Lone Star Cobra
- Posts
- 227
If I make progress but I don't post does it really happen?
I can't believe it has been nearly a year since I last posted. I did get the car on the road in time for the Goodguys show last November, but had some difficulties and spent a good deal of time "working out the kinks. There are great stories to go with all of these but I have:
1. reinstalled the driveshaft (after picking it up off the street),
2. addressed the rear suspension and made some more room for the rear tires (blown tire/heavy father-in-law),
3. replaced the transmission (learned a lot about common mistakes with automatic transmissions),
4. installed a transmission cooler (still learning about transmissions),
5. added an access panel to the trunk from the cab (important stuff locked in trunk)
6. added a radiator overflow tank (at least there wasn't a leak)
7. installed an emergency brake using the original handle (I had to make it more difficult for myself)
...and now I can hopefully make some real progress.
After fixing and redoing alot of things I chose to tackle a project with some more immediate gratification...upholstery.
3 qtr prog pic 0810.jpg
-
09-07-2010 10:37 PM #96
CHR Member
- Join Date
- Nov 2005
- Location
- Phoenix
- Car Year, Make, Model: 1937 Caddy LaSalle, 66 Lone Star Cobra
- Posts
- 227
So here is my first attempts at upholstery. I am working from the back to the front. I had to do a great deal of woodworking to get to this point and then I bought a whole role of tan vinyl to start wrapping stuff with. When it comes time to start sewing stuff I will call in a friend to make the foam and leather from a 2004 Bravada work in my 73 year old car.
Here are the before pics of the package tray and the bare back seat. There is also a picture that shows how I recessed a pocket for the rear speakers to make them mount flush. I chose to make an upholstered speaker grill so that I could get access to the speakers without disassmbling the entire interior.
rear uph bare.jpg
rear uph pre pack tray.jpg
uph pack tray pieces bare.jpg
uph speaker recess pack tray.jpg
-
09-07-2010 10:43 PM #97
CHR Member
- Join Date
- Nov 2005
- Location
- Phoenix
- Car Year, Make, Model: 1937 Caddy LaSalle, 66 Lone Star Cobra
- Posts
- 227
Here is what some of the finished product looks like and a mockup of one side of the seat. You may also notice that I used a thinner luan lumber for the speaker grill. I wish I had taken some pictures of the armrests in their raw wood state, I am really proud of the way they came together. The armrests required a number of complex curves and molding to the body contours. I don't have a picture of it, but I have punched a pattern of holes in the vinyl for the speakers.
uph rear pack tray complete.jpg
uph rear seat progress 2.jpg
uph rear seat progress 1.jpg
-
09-08-2010 11:06 PM #98
CHR Member
- Join Date
- Nov 2005
- Location
- Phoenix
- Car Year, Make, Model: 1937 Caddy LaSalle, 66 Lone Star Cobra
- Posts
- 227
Since this is the family hot rod, it will need to be equipped to latch in some car seats. So before I went any further I need latching brackets. So that is what I started working on tonight. I bent some 1/4 inch rod into a rectangular shape, cut some grooves in a 2 in wide piece of 1/8 in flat stock and welded it rock solid. I will have pictures for you tomorrow.(The wife is going out of town tomorrow so I can stay up late and work in the garage.)
This was also the first night that it was comfortable to work in the garage. Temperatures were below a hundred here today, that is big deal for us in AZ.
Jay
-
09-09-2010 05:59 AM #99
CHR Member/Contributor
- Join Date
- Jul 2003
- Location
- Madison
- Car Year, Make, Model: '67 Ranchero, '57 Chevy, '82 Camaro,
- Posts
- 21,160
I really like the interior Jay, it looks fantastic! Your project has certainly come together nicely! Congrats and a big "well done" for taking your time and doing it right--and for doing so much of it yourself, even the upholstery!!!
BTW, 8 AM here in SoDak, temp is almost up to 60! If you could spare about 15 degrees could you please send it my way???Yesterday is history, tomorrow is a mystery, Live for Today!
Carroll Shelby
Learning must be difficult for those who already know it all!!!!
-
09-09-2010 05:02 PM #100
CHR Member
- Join Date
- Nov 2005
- Location
- Phoenix
- Car Year, Make, Model: 1937 Caddy LaSalle, 66 Lone Star Cobra
- Posts
- 227
Dave:
Thanks for the kind words. Knowing your attention to detail, that means alot.
The goals for tonight are to get the child seat latching hooks done and to start fashioning some new arm rests/door pulls for the front doors.
Wish me luck.
-
09-10-2010 12:19 AM #101
CHR Member
- Join Date
- Nov 2005
- Location
- Phoenix
- Car Year, Make, Model: 1937 Caddy LaSalle, 66 Lone Star Cobra
- Posts
- 227
Here is what I accomplished tonight. I got the child seat latching hooks fabricated and installed. They are probably sufficent but I think I may reinforce them further in the future. The latching hooks themselves are plenty stout, but the bolts that anchor them could be stronger. I used rivnuts because I am working alone and my arm isn't long enough to reach under the car. I am thinking I might weld some big nuts on the back of some flat stock that is long enough to connect both mounting points and then fasten the latching hook assembly with much stronger hardware.
latch 2.jpg
latch 1.jpg
I also did the armrests for the front seats, but I am not in love with them. The armrests seem uninspired and clunky. I will need to cut them down to hide the installation screws so they will get much thinner/shorter. That might help. I also want to deepen the finger pulls so that they feel more comfortable. I am open to criticism and advice.
armrest.jpg
Thanks.
-
09-10-2010 06:06 AM #102
CHR Member/Contributor
- Join Date
- Jul 2003
- Location
- Madison
- Car Year, Make, Model: '67 Ranchero, '57 Chevy, '82 Camaro,
- Posts
- 21,160
Good plan on the seat mounts, I like rivnuts, but a backing plate with nuts would be much stronger..Heck it's for kids, can't make it too strong!
On the armrest, maybe an inch shorter, then tapered to the bottom??? Thinkin' maybe something like 1/2 the angle on the seat back???Yesterday is history, tomorrow is a mystery, Live for Today!
Carroll Shelby
Learning must be difficult for those who already know it all!!!!
-
08-02-2018 01:31 PM #103
CHR Member
- Join Date
- Nov 2005
- Location
- Phoenix
- Car Year, Make, Model: 1937 Caddy LaSalle, 66 Lone Star Cobra
- Posts
- 227
Apparently, it has been 8 years since I last updated this thread. A lot has changed since then, yet kinda stayed the same.
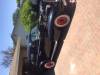
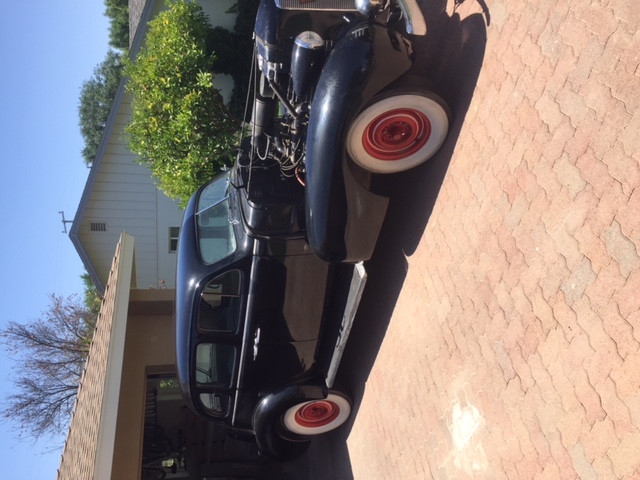
Let me explain. I sold the 1937 LaSalle featured in this thread about 2 years ago after purchasing another 1937 Lasalle. The new purchase is the exact same year, model and style as the previous one...but so much better. It is a complete car with no serious rot, a complete interior, engine, etc.
In fact, it is so good I decided to do what I call a "no compromises build". It will in fact have compromises as I am still pretty frugal, but I place a higher value on my time than I did way back when.
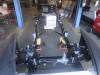
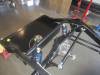
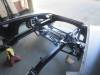
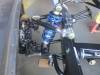
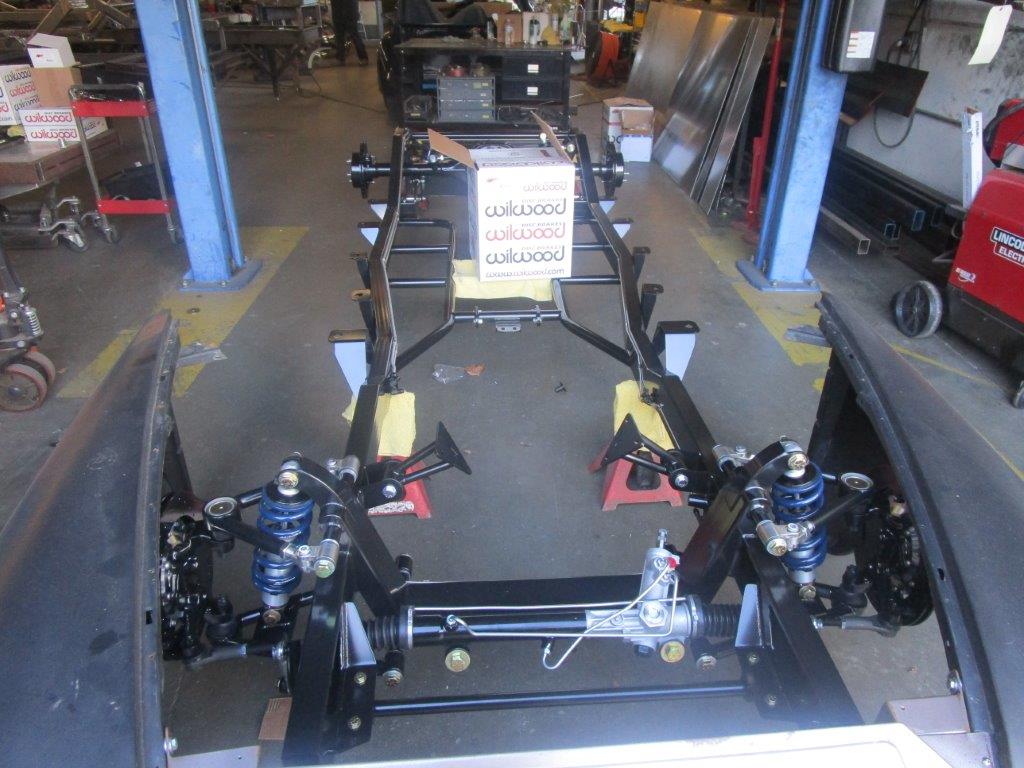
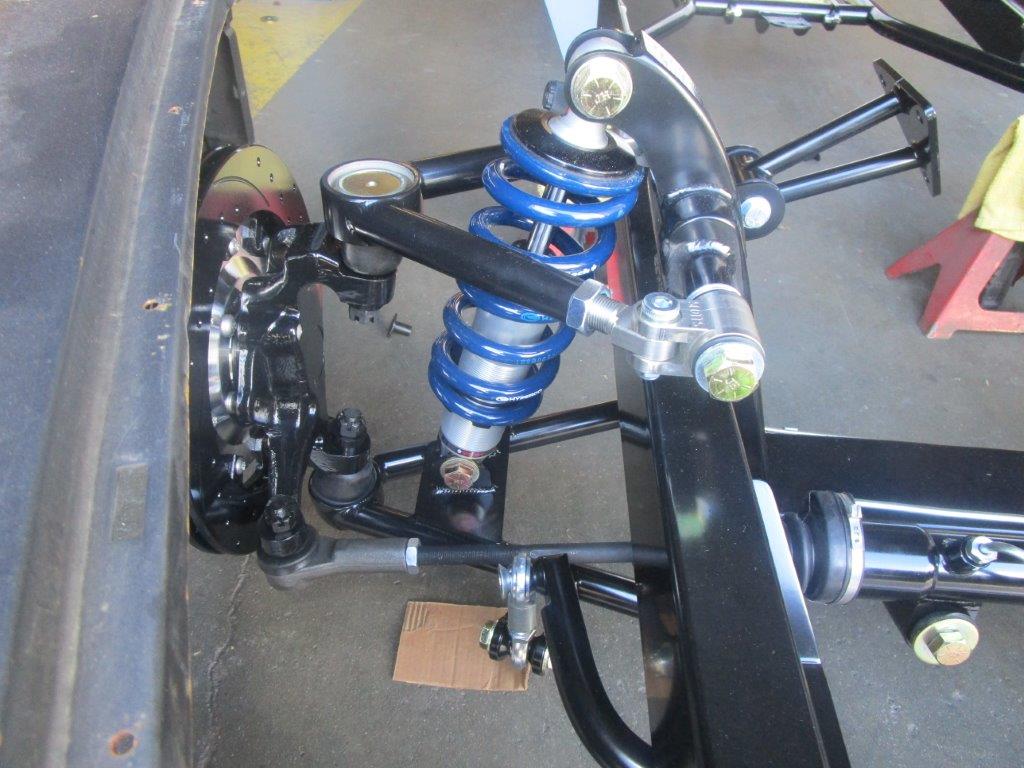
First step was to order a complete custom chassis from Scott's Hot Rods. My interactions with Scott's were good, not to say that there weren't some hiccups, but I am very pleased with the product they delivered: complete chassis, front susp, rear susp, 9 in, disc brakes, all the plumbing, fuel line, brake lines, fuel tank, fuel pump, motor mounts rack and pinion, powdercoated, and assembled. Not cheap, but after I added up all the parts and all the compromises it would take to update the original frame and my time it was a no-brainer.
I am trying to upload pictures, but I will need to refresh my knowledge on doing so.
A few weeks ago we completely disassembled a complete car and moved it on to the new chassis, and there it sits until I can wrap up some major home renovation projects.
-
08-02-2018 01:50 PM #104
CHR Member
- Join Date
- Nov 2005
- Location
- Phoenix
- Car Year, Make, Model: 1937 Caddy LaSalle, 66 Lone Star Cobra
- Posts
- 227
-
08-02-2018 05:51 PM #105
CHR Member
- Join Date
- Sep 2007
- Location
- New Bedford
- Car Year, Make, Model: 34 Ford 3W Coupe Replica
- Posts
- 14,754
WOW, look at all the new parts. That's cool.
Congrats and it's nice to see you here again.
And thanks for the pics.
 Reply With Quote


Posting Permissions
- You may not post new threads
- You may not post replies
- You may not post attachments
- You may not edit your posts

i've enjoyed the years here . made a lot of friends. most who have left. i see no reason to continue with this so hope to see you somewhere else. i dont think this site will ever be back. it's lived...
Dead!