


 1584Likes
Thread: Project Sebring GT Spyder


Results 136 to 150 of 838
 LinkBack URL
 About LinkBacks
-
12-07-2016 03:43 PM #136
 CHR Member

- Join Date
- Feb 2007
- Location
- Vidalia
- Car Year, Make, Model: 1946 Ford Coupe, 1962 Austin Healey 3000
- Posts
- 1,508
The first time I ran across TTY bolts was on a Ford Escort back in the 80's. I was warned by mechanics I knew not to reuse the bolts. I thought it was BS, but I bought new bolts from Ford on their recommendation. I was surprised that they were fairly cheap even at the dealer.
They had to be torqued to a some spec that I can't remember and then turned and additional 90* in two 45* increments. That second 45* really ramped up the pucker factor! I could feel the bolts stretching and it felt like they would strip out or break at any second. After that, I realized why they wouldn't survive another use.
I'll be replacing all the head bolts and the main cap bolts for sure. Actually, I think the short outside head bolts are reusable. The LS2 front cover and the new valley cover came from GM with new bolts.
Thanks for the comments on the LS Jerry. I'm an LS newb for sure. I'm learning that they have a few peculiarities from the old school engines I'm used to.
-
Advertising

- Google Adsense
- REGISTERED USERS DO NOT SEE THIS AD
-
12-07-2016 05:52 PM #137
CHR Member
- Join Date
- Nov 2016
- Location
- rocklin
- Posts
- 656
Wait till you do the harmonic balancer bolt, I had to use a 3 foot extension on the breaker bar. It's a big bolt that is crazy tight. I bought a book on ls motor rebuilding which was very useful.
-
02-18-2017 05:15 PM #138
CHR Member
- Join Date
- Feb 2007
- Location
- Vidalia
- Car Year, Make, Model: 1946 Ford Coupe, 1962 Austin Healey 3000
- Posts
- 1,508
As par for the course with me the last updates were awhile ago. The holidays always slow down progress in the shop and then we had a short spell of very cold weather for us.
My shop is really just a drafty metal shed with no insulation and when it gets below about 30*, my little heater just doesn't get the job done. Luckily now I can retreat to the small machine shop I added on the back. At least it's insulated and easy to keep warm. This year I rigged up a thermostatically controlled plug and used that to power my diesel fired heater. It does a pretty good job keeping it at "shirtsleeve" temp. Before this I had to start and stop the heater manually, so the temp varied a lot in the tiny little room. It cut my fuel usage in half, too. I finally got to use some of the "junk" I've been collecting. It took longer to find all the parts than to actually build this, though. And my wife says I'll never use all this junk.
")


Ok, so let's get on to some updates.
-
02-18-2017 05:26 PM #139
CHR Member
- Join Date
- Feb 2007
- Location
- Vidalia
- Car Year, Make, Model: 1946 Ford Coupe, 1962 Austin Healey 3000
- Posts
- 1,508
Even though I had the front brake mounts to carve out, I decided to make some wheel spacers. I finally decided on a set of wheels, but had to get away from the traditional styles that I favored. I wanted something in a Torque Thrust pattern, but no off the shelf wheels fit the way I wanted. I could have gone with custom built wheels, but they would have cost over $500 apiece delivered. That didn't fit my budget right now. I wanted wheels with a large negative offset for a deep dish look, but had to go with a more positive offset and use spacers to get the wheels positioned where I wanted them.
I not a big fan of wheel spacers. Thinner ones in the front are probably not too bad, but simple slip-ons on a driving wheel leaves the studs without a lot of support. There are those that are held on by the original studs and have studs of their own. Probably better, but still a lot of stress on the aluminum spacer body.
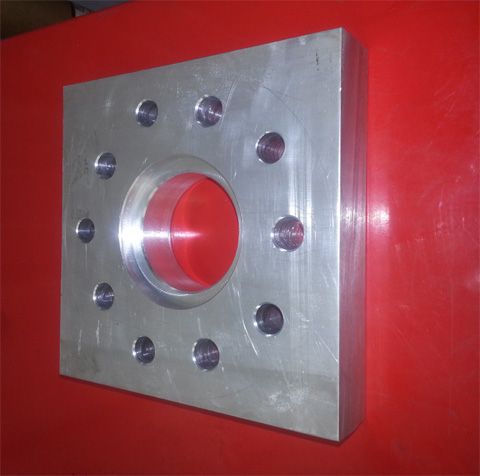
I decided to take a slightly different approach and combine the two types. Since my axles have a dual bolt pattern, used the extra bolt circle for additional clamping force. The main studs are still 3" long and the spacers sip over them, but they are supported by close fitting holes in the spacers. Five additional 1/2" grade 8 counter sunk bolts go through the spacer, brake rotor and axle flange and clamp everything together independent of the studs. Hopefully, this dual setup will be stronger than the other styles separately.
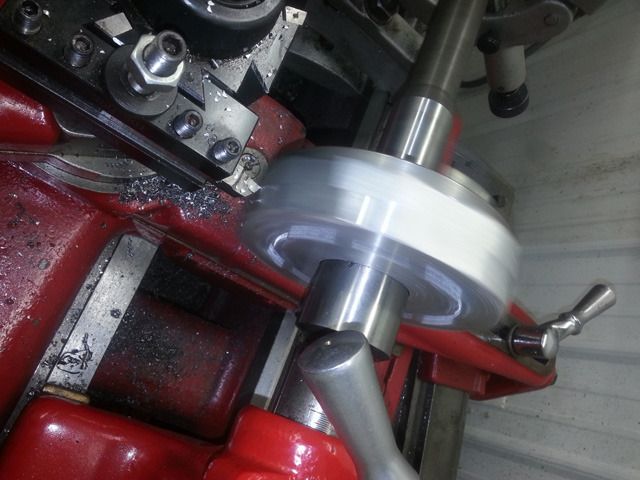
I carved the spacers out of 6061 T6. I used the axles as a mandrel in the lathe. I had to pull them anyhow to install the studs. Which brings me to my next item.

-
02-18-2017 05:30 PM #140
CHR Member
- Join Date
- Feb 2007
- Location
- Vidalia
- Car Year, Make, Model: 1946 Ford Coupe, 1962 Austin Healey 3000
- Posts
- 1,508
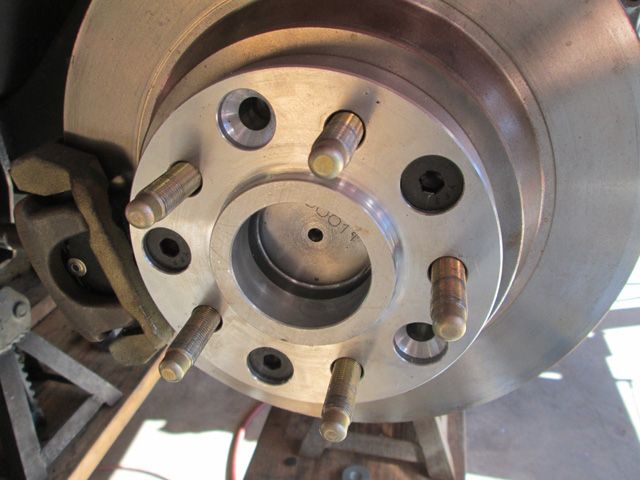
I needed some 3" studs and wanted to use ARP due to their reputation. I found the studs I needed which were the same as a Mustang. I was shocked to find out that they were $150 for 10!
Now $15 a stud sounds a little high to me so I went looking for a cheaper alternative. It turns out that ARP makes some studs for a Chrysler application that are 3" long and only $50 for 10! Same basic stud with a larger knurled section. Seems like a big price difference considering that the machine time difference couldn't be more than a few seconds on a CNC lathe and that's assuming they started with the same raw blank for both. If the Mustang stud started with a smaller blank (which is likely), then the Chrysler stud took more machine time.
Kind of left a bad taste in my mouth, so I decided to use the Chrysler studs, but that meant making a few mods to the axle flanges. I had to drill out the stud holes for the bigger knurl and relieve the rear of the flange to clear the larger stud head.
In all honesty, if I hadn't been able to do the work myself, it wouldn't have been worth it. I most likely had way more than a $100 worth of machine time in the work, but at least I didn't have to pay the extra c-note for the studs! Small victory.
I have learned a lesson though. The next time I order axles, I'll get them with screw-in studs. Cheaper to buy and easier to change.
-
02-18-2017 05:42 PM #141
CHR Member
- Join Date
- Feb 2007
- Location
- Vidalia
- Car Year, Make, Model: 1946 Ford Coupe, 1962 Austin Healey 3000
- Posts
- 1,508
Choosing a wheel style and size has been a real problem for me on this car. As a matter of fact, it's one of the things that started down the path of this rebuild.
I originally wanted something with a deep dish in a traditional muscle car style like a Torque Thrust or something similar. What I wound up with turned out to be entirely different.
I was surprised to see that a set of American Racing Torque Thrusts I tried out were made in China(cast right in the wheel). It's a real shame. I understand the economics, but it's still a shame. Considering the hit and miss nature of things made there, I worry a lot about quality control (or lack of) on a critical part like wheels. They fit OK, but didn't really hit the looks mark for me. They were the original 60's style TT's in 17", but were only available with a shallow front. Not what I wanted.
I wanted to run 17" wheels because that's about the smallest diameter that has a good selection of high performance street tires available. There are some in 16", but not as many as in the larger sizes. The tire companies just don't seem to be putting a lot of R and D into the older sizes. However, I ran into an issue with the 17's. I tried 2 different sets of them and only the AR wheels would just barely clear the big front brakes. Since there isn't a local place with a selection of wheels, I was having to order them. I was able to return what I didn't use, but return shipping was getting expensive. I decided to go up to 18's to make sure I had plenty of brake clearance. The downside of this decision is that I don't really like the traditional style wheels in sizes over 17".
The wheels I finally picked out are Drift R's by ROH. They are made in Australia. Considering the hoops our fellow rodders down under have to jump through to get their cars through inspection, I feel better about them than something made in China.
They are also "hub centric" and required a small shoulder on the spacer to locate them properly. These are the first set of hub centric wheels I've ever used on a project.
By juggling the offsets and spacer thickness, I was surprised that I was able to fit 18x9's in the front and 18x10's in the rear. They should allow for plenty of rubber all the way around. Right now it looks like I can fit 255's in the front and at least 275's in the back.
I already know that I'm going to have to add some small wheel tubs in the rear, but I was going to have to do that with anything much over 245 anyhow. The bigger wheels allowed for more control arm clearance up front, making the wide front wheels possible. I may have to limit rack travel slightly in front, but I'll have to wait for the tires to make sure.
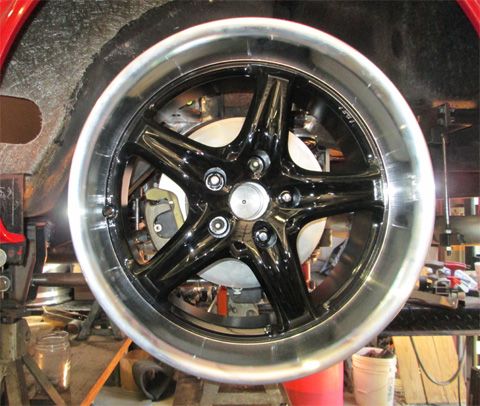
For better or worse, these are the wheels.
-
02-19-2017 02:54 AM #142
CHR Member
- Join Date
- Sep 2007
- Location
- New Bedford
- Car Year, Make, Model: 34 Ford 3W Coupe Replica
- Posts
- 14,754
Thanks for the update and pics. As always, unique solutions with an attention to the details! Way cool.
-
02-19-2017 05:35 AM #143
CHR Member
- Join Date
- Feb 2007
- Location
- Vidalia
- Car Year, Make, Model: 1946 Ford Coupe, 1962 Austin Healey 3000
- Posts
- 1,508
Thanks 34. I'm glad you're finding something interesting.
-
02-19-2017 06:00 AM #144
CHR Member
- Join Date
- Feb 2007
- Location
- Vidalia
- Car Year, Make, Model: 1946 Ford Coupe, 1962 Austin Healey 3000
- Posts
- 1,508
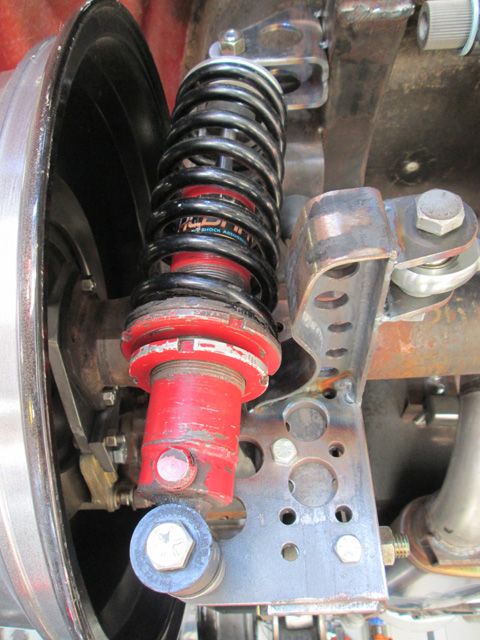
After getting the wheels in place, I saw that I had a little problem with the rear shock mounts. I had originally put the lower shock mounts up high so that I didn't have any interference with the Watts link.
That much worked out fine, but due to the wide wheels, there wasn't enough clearance for the coil spring at the top. I swapped out the lower mounts side to side (pass on driver). This lowered the shock mounts, but the shock now interfered with the Watts link mount on the driver side. Due to the link mount being low on the pass. side, it worked fine. There was nothing to do but fab a new link mount for the driver side with clearance for the shock. I was able to reuse the plate that the link mount was welded to.
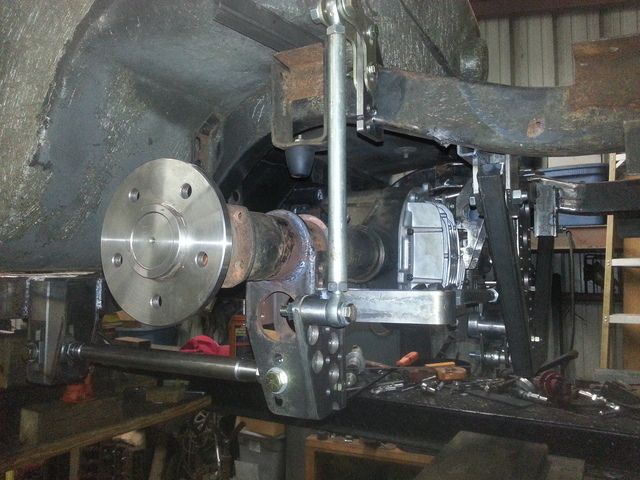
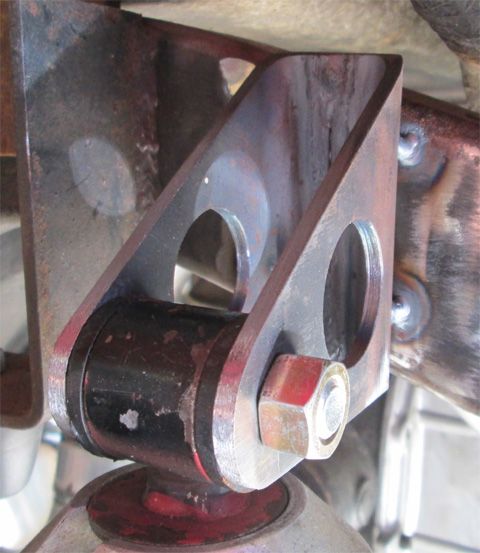
Here's a before shot of the driver's side mount.
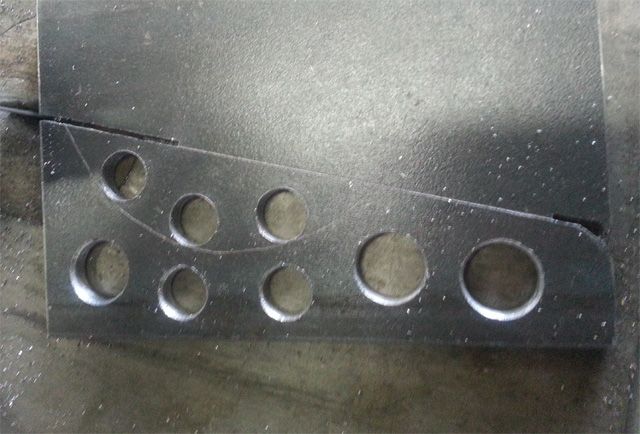
The new link mount had to have a relief in it to clear the shock.
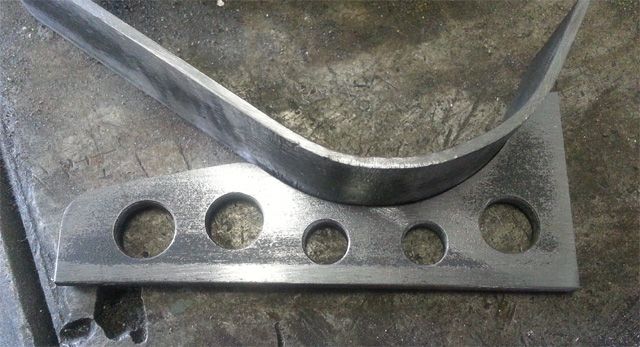
I used a ball peen hammer and formed the curve in the flange across the jaws of my vise.
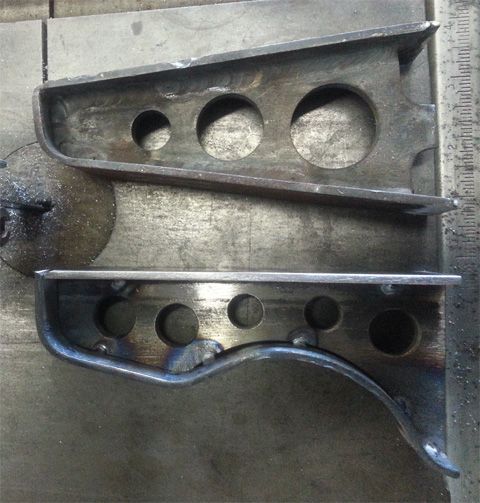
You can see the difference between the old part and the new one.
There shouldn't be any issues now. I tilted the axle to full bump in both directions and everything clears with room to spare.
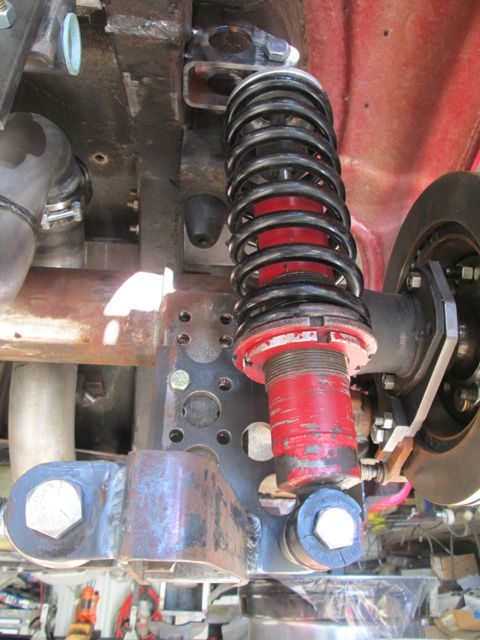
No issues with the passenger side.
-
02-19-2017 06:08 AM #145
CHR Member
- Join Date
- Feb 2007
- Location
- Vidalia
- Car Year, Make, Model: 1946 Ford Coupe, 1962 Austin Healey 3000
- Posts
- 1,508
The upper shock mounts had to be changed, too, since I wanted to pull them in a little closer to the frame. I had to ditch the original adjustable mounts. I didn't feel there was enough clearance with the wheel and shock with the old upper mounts. I fabbed new ones out of a piece of trimmed and reshaped 2x4 tubing. They're just tacked on for now. I'll weld them on later when I pull the body and have more room.
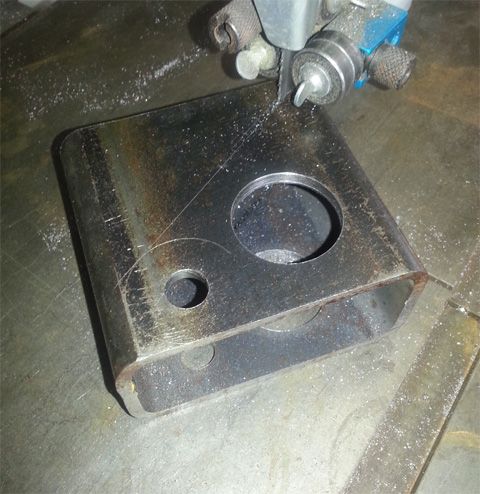
This is a shot of the tubing being trimmed into shape. I use this technique a lot for different brackets. I'm using a bandsaw, but it could be done with a torch, too.
After I shaped it, I split the tubing and rewelded it to the right width for the shocks. Actually, the shocks I'll be using will have bearings, so I'll have to add some spacers.
-
02-19-2017 09:46 AM #146
CHR Member
- Join Date
- Sep 2007
- Location
- New Bedford
- Car Year, Make, Model: 34 Ford 3W Coupe Replica
- Posts
- 14,754
"Something"? Maybe someday I might see it in person and crawl all over it. There are many things I'd like to see. Originally Posted by Hotrod46

-
02-19-2017 10:21 AM #147
CHR Member
- Join Date
- Feb 2007
- Location
- Vidalia
- Car Year, Make, Model: 1946 Ford Coupe, 1962 Austin Healey 3000
- Posts
- 1,508
34, my wife and I plan to travel a lot in this car and she says she wants to see New England (we've made it as far as DC on the MC). I hope one day we get close enough and I can look you up. It would be nice to meet some of the people you get to "talk" to on the net, especially those that share your interests.
-
02-19-2017 02:31 PM #148
CHR Member
- Join Date
- Sep 2007
- Location
- New Bedford
- Car Year, Make, Model: 34 Ford 3W Coupe Replica
- Posts
- 14,754
I'd be thrilled to have you drop in. I hope you can make it a reality!!!
You have so many details built into this ride..... I'd love to see'em up close.
-
02-19-2017 03:46 PM #149
CHR Member
- Join Date
- Jan 2005
- Location
- Doon, Ia
- Car Year, Make, Model: 53 Chevy 3100
- Posts
- 2,716
Very nice machine work, I always appreciate the talent of how you can just build something and it works.
-
02-19-2017 05:20 PM #150
CHR Member
- Join Date
- Feb 2007
- Location
- Vidalia
- Car Year, Make, Model: 1946 Ford Coupe, 1962 Austin Healey 3000
- Posts
- 1,508
53Chevy, thanks. I wish everything I did worked out, but many times it doesn't. I have generated several pieces of high precision scrap on this project.
I made my living doing machine and fab work for almost 20 years most of it without any kind of drawings. Many times someone would come in an ask if we could build something with little more than a general description of what it was supposed to do and the details were left up to the builder. Crazy, but that's how things worked in the oil patch back then.
For safety, we way overbuilt stuff. It's something that has been hard for me to get away from. I would have loved to do fab work for a race team, but after I added several pounds of iron to the car, they would most likely have fired me!
 Reply With Quote


Posting Permissions
- You may not post new threads
- You may not post replies
- You may not post attachments
- You may not edit your posts

i've enjoyed the years here . made a lot of friends. most who have left. i see no reason to continue with this so hope to see you somewhere else. i dont think this site will ever be back. it's lived...
Dead!