


 258Likes
Thread: 41 Willys Gasser project


Results 331 to 345 of 1724
 LinkBack URL
 About LinkBacks
-
07-28-2011 10:53 AM #331
 CHR Member

- Join Date
- Oct 2007
- Location
- Petaluma
- Car Year, Make, Model: 48 Ford F1
- Posts
- 9,795
Nice gift. Looks great there on the dash."  "No matter where you go, there you are!" Steve.
-
Advertising

- Google Adsense
- REGISTERED USERS DO NOT SEE THIS AD
-
07-28-2011 01:06 PM #332
CHR Member
- Join Date
- Jan 2006
- Location
- fort myers
- Car Year, Make, Model: '27 ford/'39 dodge/ '23 t
- Posts
- 11,033
Super nice gift, Steve. Are you at liberty to tell us who your benefactor is, or do you want to keep that between the two of you?
Don
-
07-28-2011 01:17 PM #333
CHR Member
- Join Date
- Feb 2010
- Location
- Pukekohe, New Zealand
- Car Year, Make, Model: '23 Ford T Roadster
- Posts
- 2,199
Very nice gift Steve and certainly looks good on top of that dash exactly where the Rev counter should be if not in the dash beside the speedo. Off topic now, the hospital phoned and my second knee replacement has been brought forward to the 8/8/2011 so heck I be out in that garage before I know it eh.I maybe a little crazy but it stops me going insane.
Isaiah 48: 17,18.
Mark.
-
07-28-2011 02:40 PM #334
CHR Member
- Join Date
- Apr 2009
- Location
- watford
- Car Year, Make, Model: 26T Coupe, 32 Roadster, 41 Willys Coupe
- Posts
- 2,363
To be honest Don i don't know his name even, He just pm'd me on the HAMB to say he was enjoying the build and that he had something i might like, next thing it came in the post, I replied thanking him for such a nice gift and havn't heard from him since. A very nice gesture i thought. I guess he prefers to stay in the background.Its aweful lonesome in the saddle since my horse died.
-
07-28-2011 02:41 PM #335
CHR Member
- Join Date
- Apr 2009
- Location
- watford
- Car Year, Make, Model: 26T Coupe, 32 Roadster, 41 Willys Coupe
- Posts
- 2,363
I hope so mate, best of luck with it.Its aweful lonesome in the saddle since my horse died.
-
07-28-2011 03:17 PM #336
CHR Member
- Join Date
- Jan 2006
- Location
- fort myers
- Car Year, Make, Model: '27 ford/'39 dodge/ '23 t
- Posts
- 11,033
You've got a secret admirer. Must have been the legs.
Whip, good luck with the surgery. Bet you are looking forward to getting it over with.
Don
-
07-28-2011 03:37 PM #337
CHR Member/Contributor
- Join Date
- Jul 2003
- Location
- Madison
- Car Year, Make, Model: '67 Ranchero, '57 Chevy, '82 Camaro,
- Posts
- 21,160
What a deal, Steve!!!! The tach is absolutely perfect for Willy, I'll betcha he likes it too! Another of those touches that go so far towards making the car "right" and further evidence that the only thing better then building your own Willy's Gasser is watching a real Craftsman build his!!!! Going to be a really first rate ride, Steve!Yesterday is history, tomorrow is a mystery, Live for Today!
Carroll Shelby
Learning must be difficult for those who already know it all!!!!
-
07-28-2011 11:18 PM #338
CHR Member
- Join Date
- Apr 2009
- Location
- watford
- Car Year, Make, Model: 26T Coupe, 32 Roadster, 41 Willys Coupe
- Posts
- 2,363
I'm making a note of all this piss taking Don revenge will be sweet !!!
Its aweful lonesome in the saddle since my horse died.
-
07-28-2011 11:21 PM #339
CHR Member
- Join Date
- Apr 2009
- Location
- watford
- Car Year, Make, Model: 26T Coupe, 32 Roadster, 41 Willys Coupe
- Posts
- 2,363
Thanks Dave, I was knocked out by the generosity shown by this guy, He contacted me by email last night and said he had it sitting on the shelf not doing anything and thought it would look cool in the Willys so donated it.Its aweful lonesome in the saddle since my horse died.
-
07-29-2011 12:42 AM #340
CHR Member
- Join Date
- Oct 2007
- Location
- Petaluma
- Car Year, Make, Model: 48 Ford F1
- Posts
- 9,795
A very nice gift for a guy who will use it well! Heck with a name like Steve you gotta be great!


" "No matter where you go, there you are!" Steve.
-
08-01-2011 01:58 AM #341
CHR Member
- Join Date
- Apr 2009
- Location
- watford
- Car Year, Make, Model: 26T Coupe, 32 Roadster, 41 Willys Coupe
- Posts
- 2,363

Its aweful lonesome in the saddle since my horse died.
-
08-01-2011 04:41 AM #342
CHR Member
- Join Date
- Mar 2007
- Location
- festus
- Car Year, Make, Model: 48 Plymouth, 48,54 Heap
- Posts
- 3,407
That looks great, Steve. This is one of the best builds I've seen on here. I'll bet you're itchin to pilot this baby down the strip!
-
08-01-2011 07:53 AM #343
CHR Member
- Join Date
- Jan 2006
- Location
- fort myers
- Car Year, Make, Model: '27 ford/'39 dodge/ '23 t
- Posts
- 11,033
 Originally Posted by roadster32


Don
-
08-03-2011 01:37 PM #344
CHR Member
- Join Date
- Apr 2009
- Location
- watford
- Car Year, Make, Model: 26T Coupe, 32 Roadster, 41 Willys Coupe
- Posts
- 2,363
Your not wrong there buddy, can't wait, thanks for the commentsIts aweful lonesome in the saddle since my horse died.
-
08-03-2011 01:40 PM #345
CHR Member
- Join Date
- Apr 2009
- Location
- watford
- Car Year, Make, Model: 26T Coupe, 32 Roadster, 41 Willys Coupe
- Posts
- 2,363
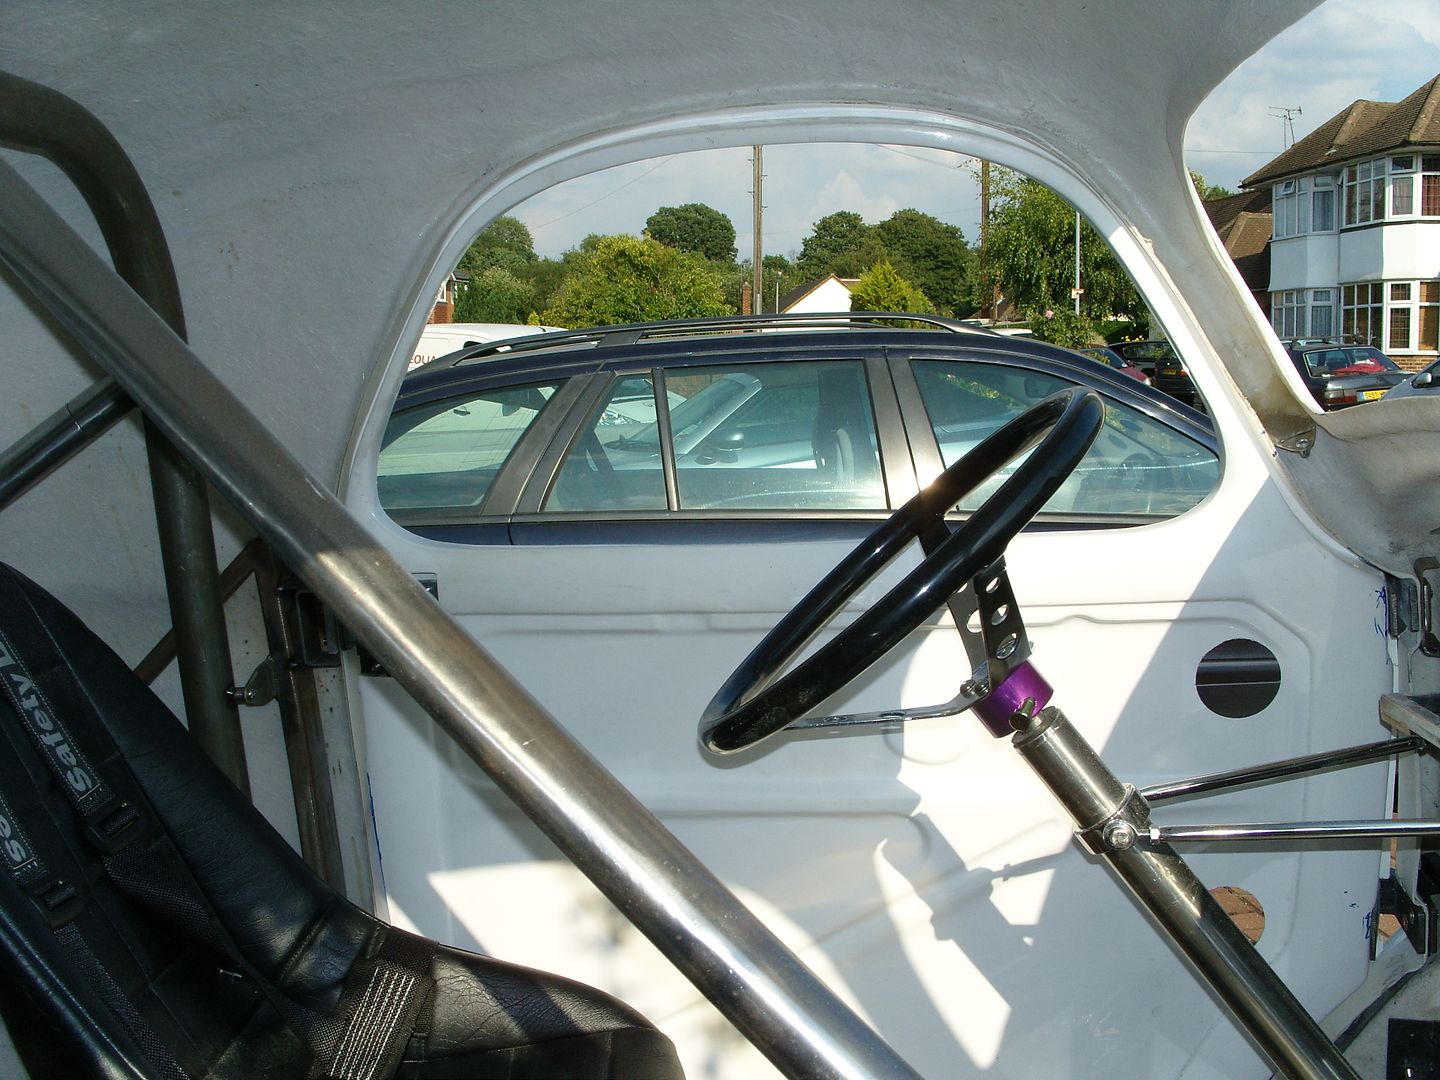
Well the sun has returned so i thought i would crack on with the doors.
A few people questioned why i made the firewall so strong, this installment should make it easier to understand.
I've not seen a Willys that doesn't have doors that drop when opened so the plan was to make the A post strong with no flex.
First job was to make up some supports for the door hinges, as the firewall was set back there was no room for a steel tube up the A post so they are tied into the firewall.
The framework was drilled and rivnuts inserted to take a plate.
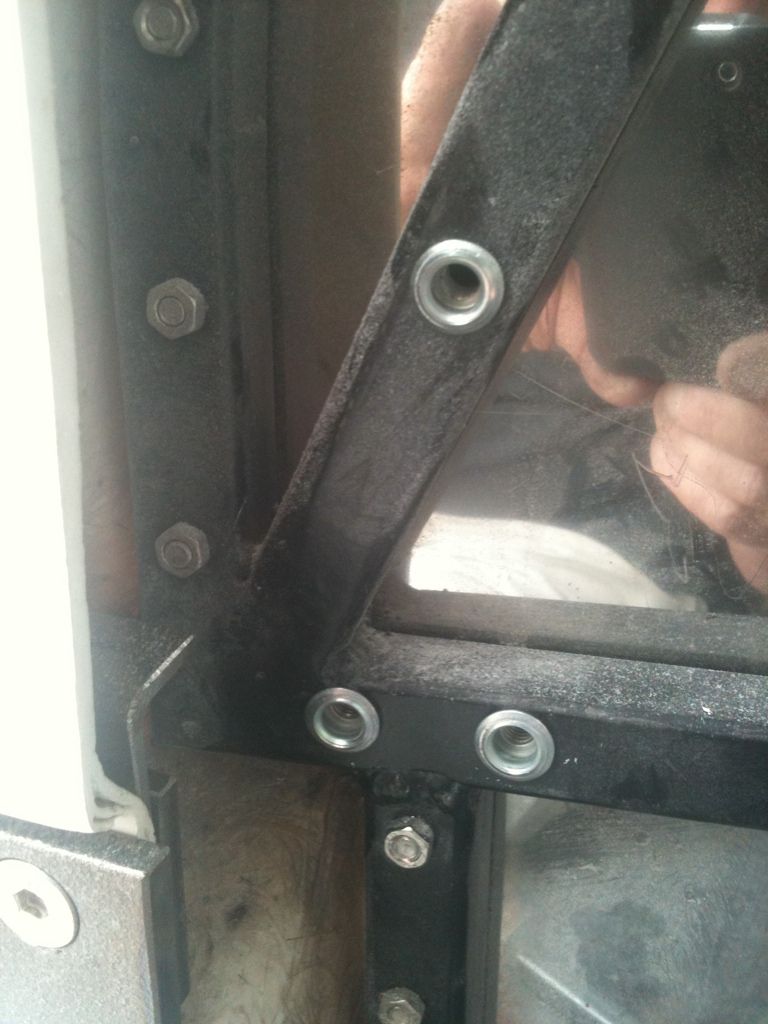


Then a piece of tube was welded between the plate and the hinge strengthner.
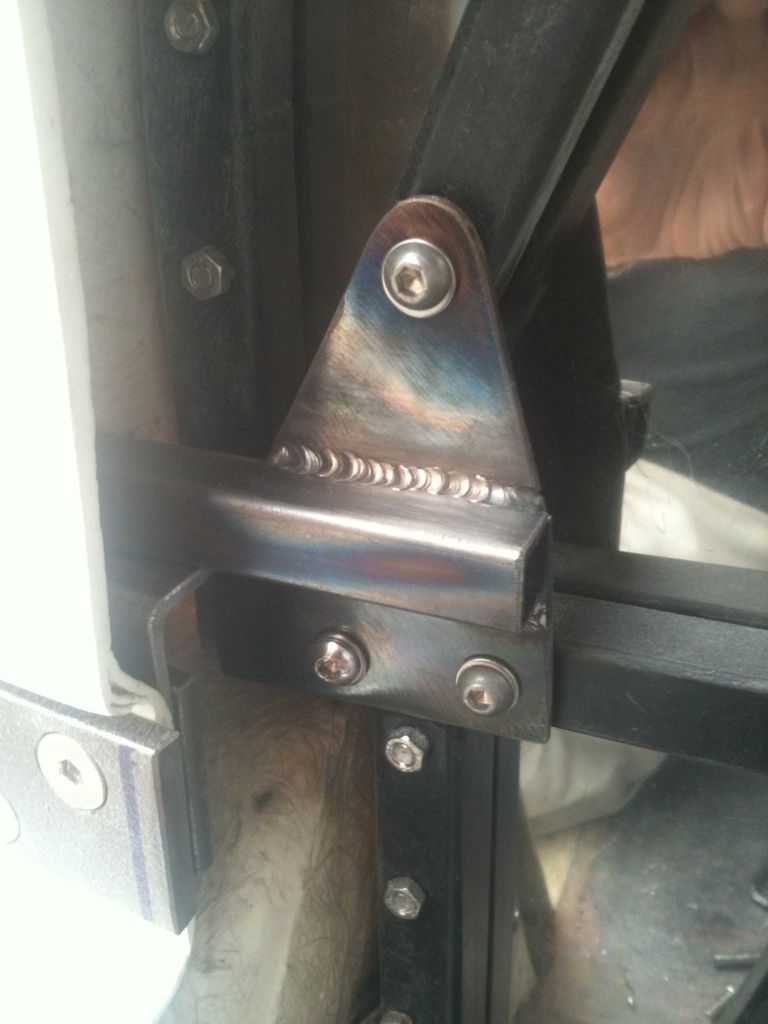
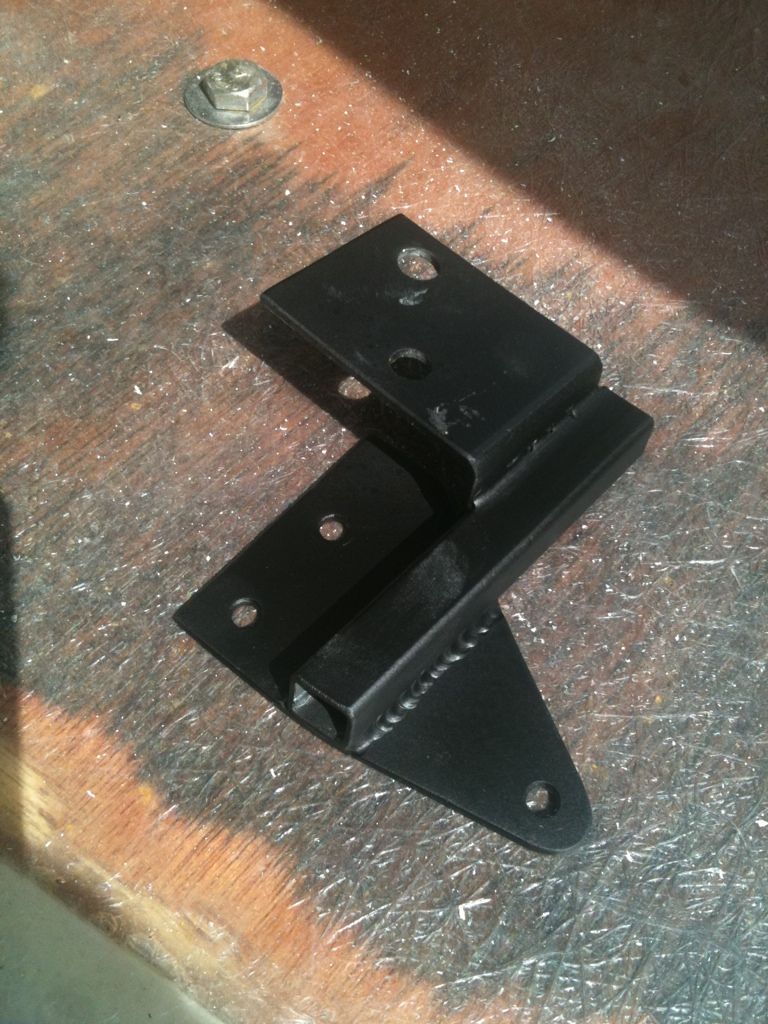
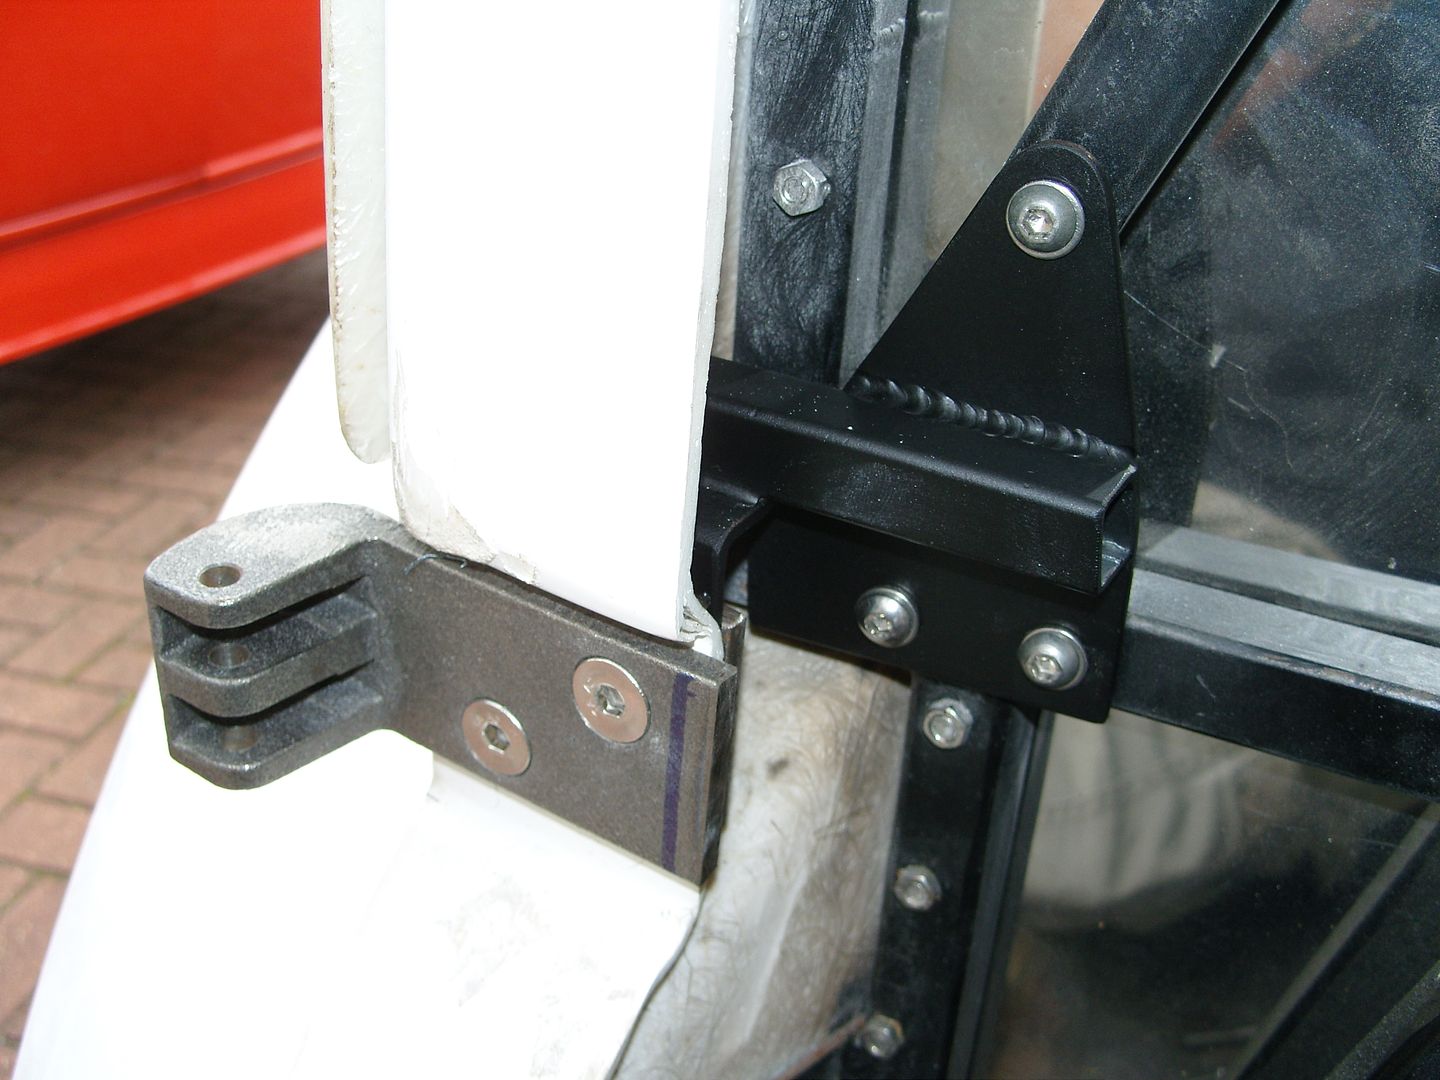
Once the hinges were installed holes were drilled in the doors and bolted to the hinges with a spreader plate, the spreader plate would give me something to weld the light gauge framework to.
The main frame is 3/4" x 16 swg thick tube, the rest is 5/8" x 16swg, this is really quite light but nice and strong.
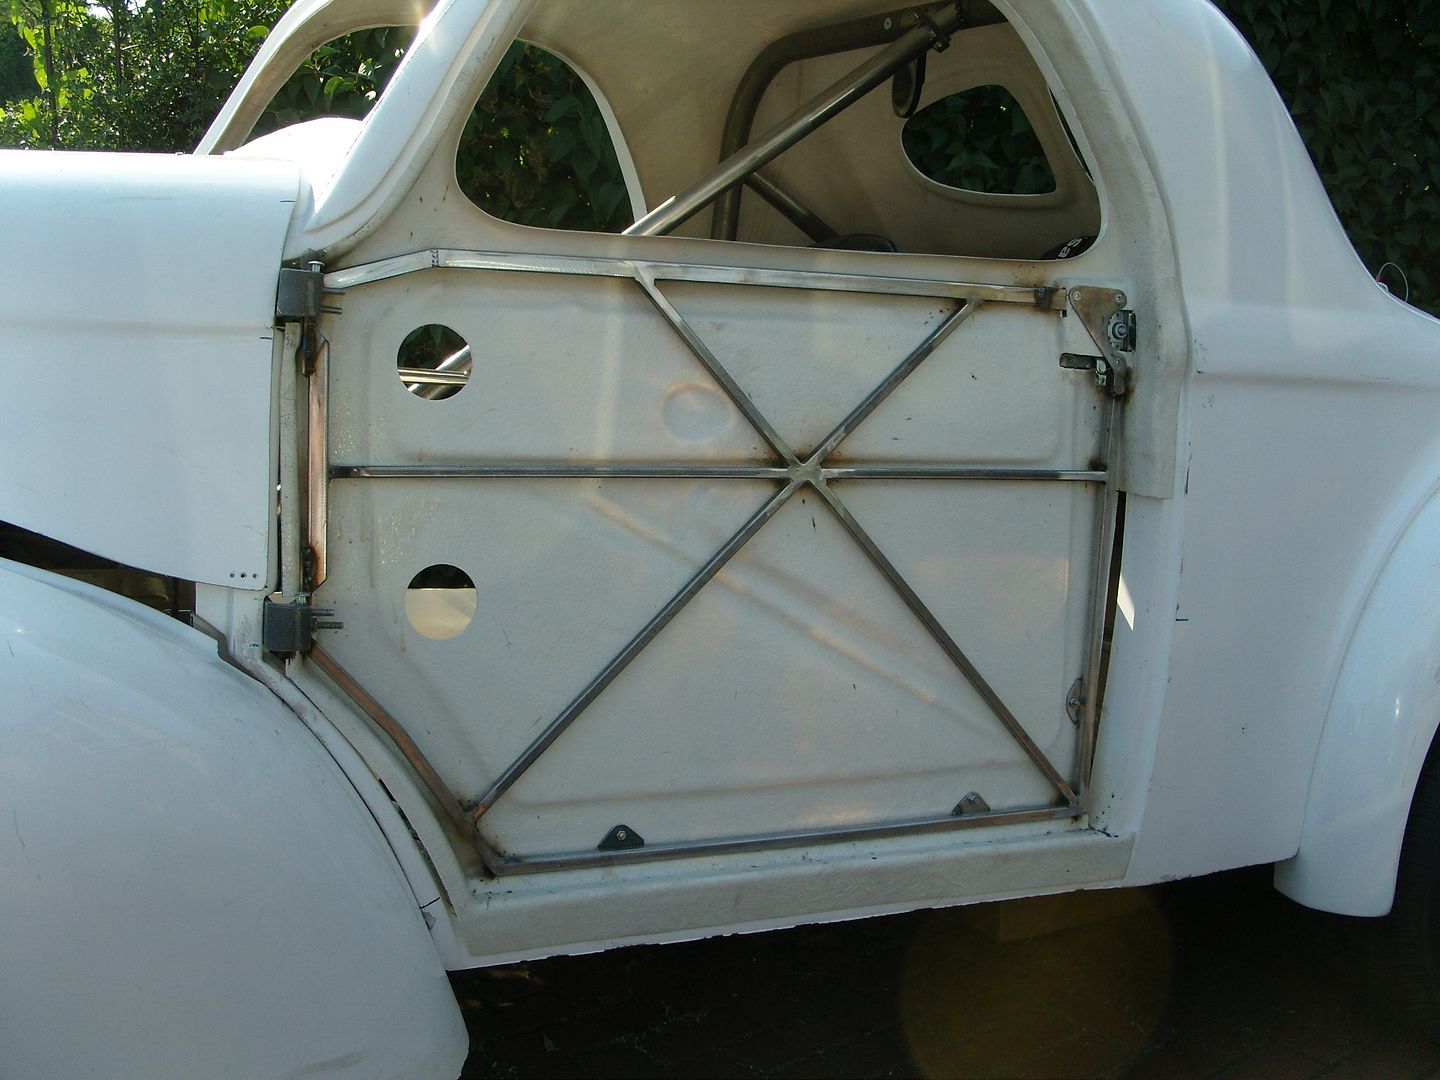
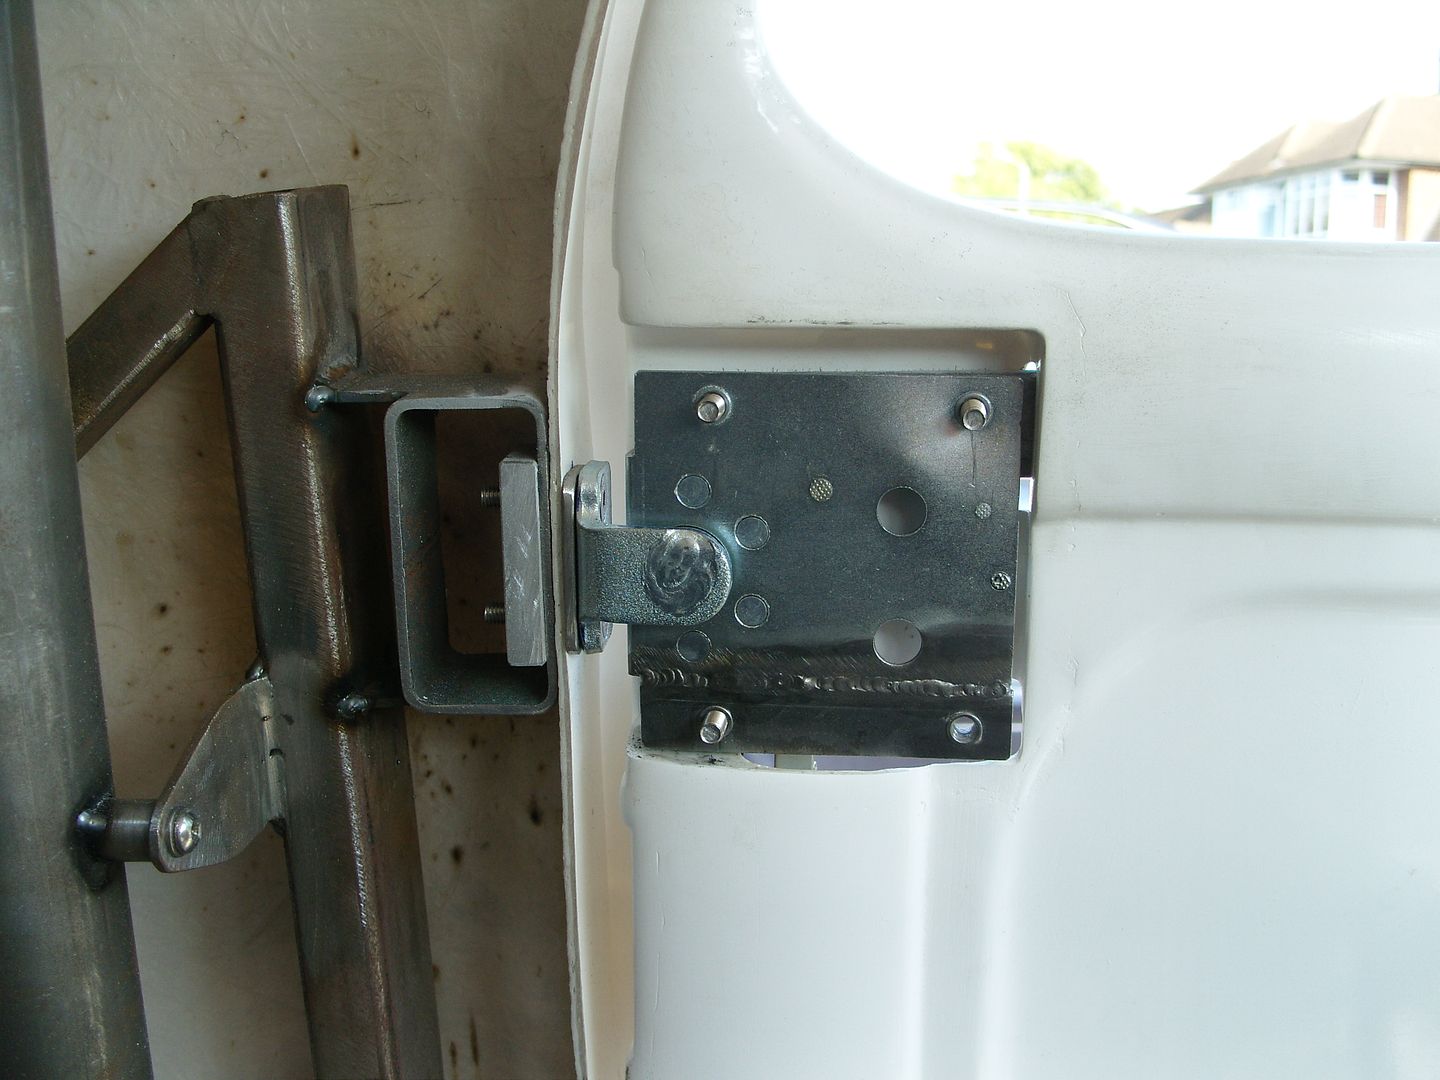
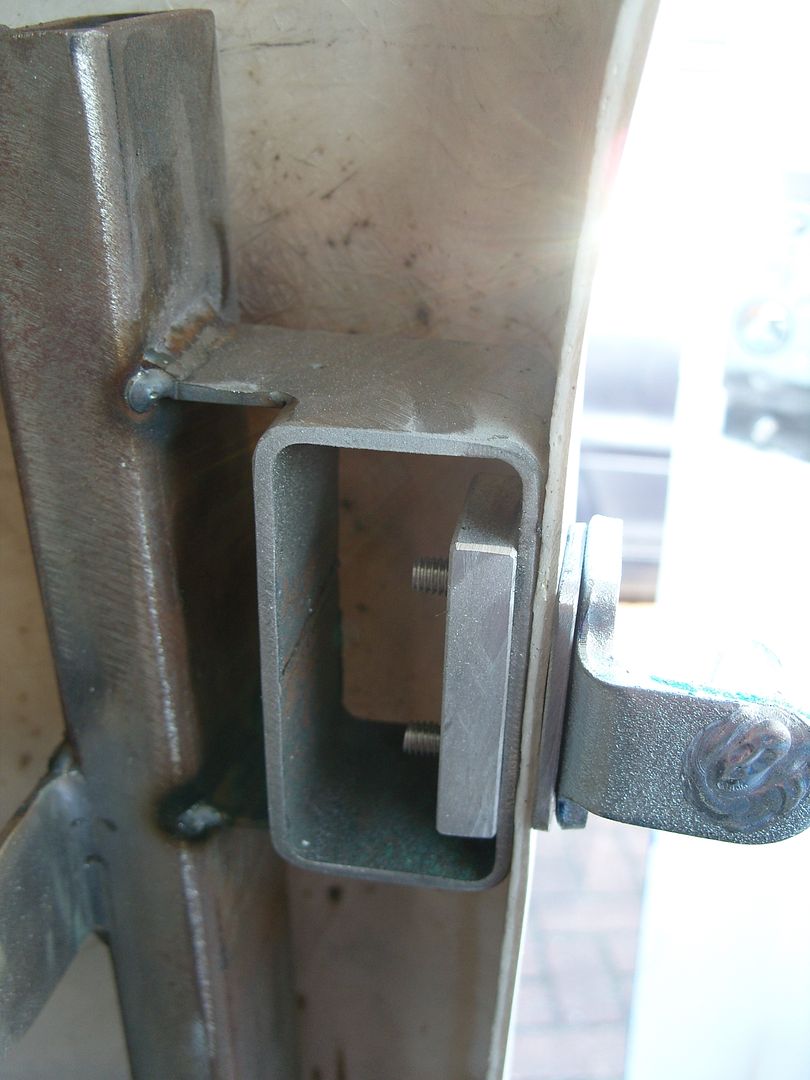
While the frame was being welded in the lock was put into place and plates made up to mount it off. Also the B post striker plate was made up and welded into place, this is tied into the B post steelwork which in turn is tied into the cage main hoop, Its all very strong !!!
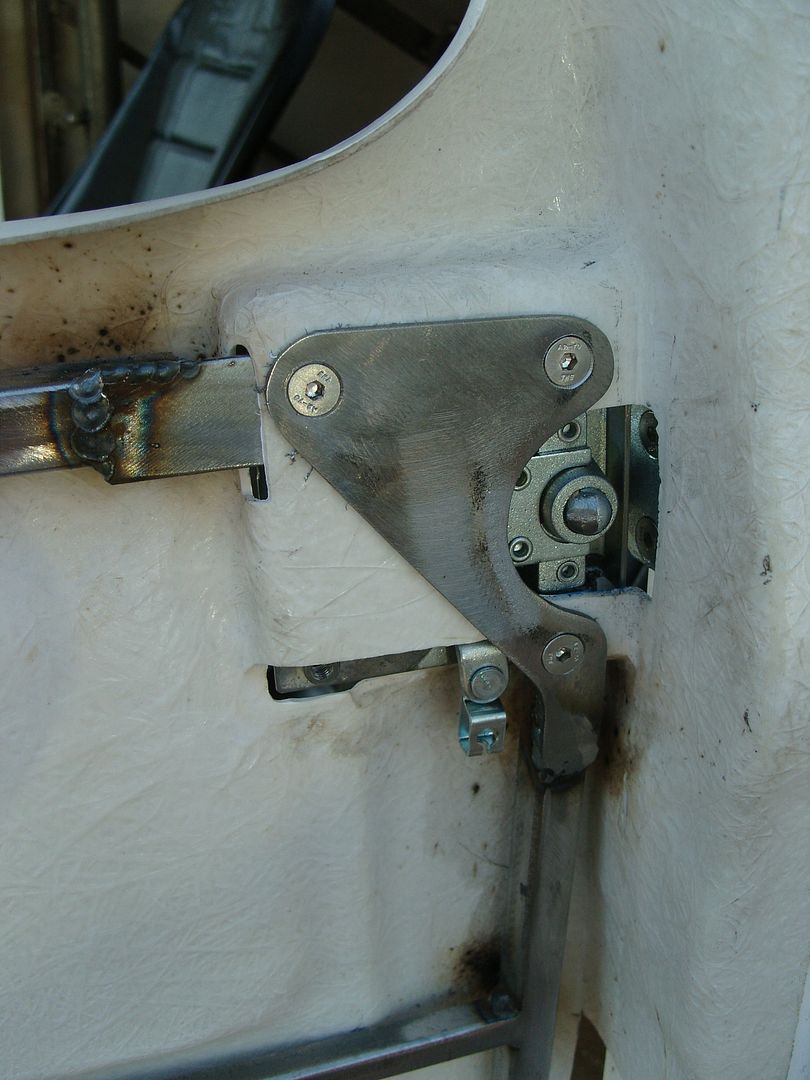
It seems every Willys i see the door when fully opened hits the fender, I cheated slightly with the hinges and angled them a couple of degrees, you can't notice it when you look but when the door opens it now swings it slightly up and away from the fender.
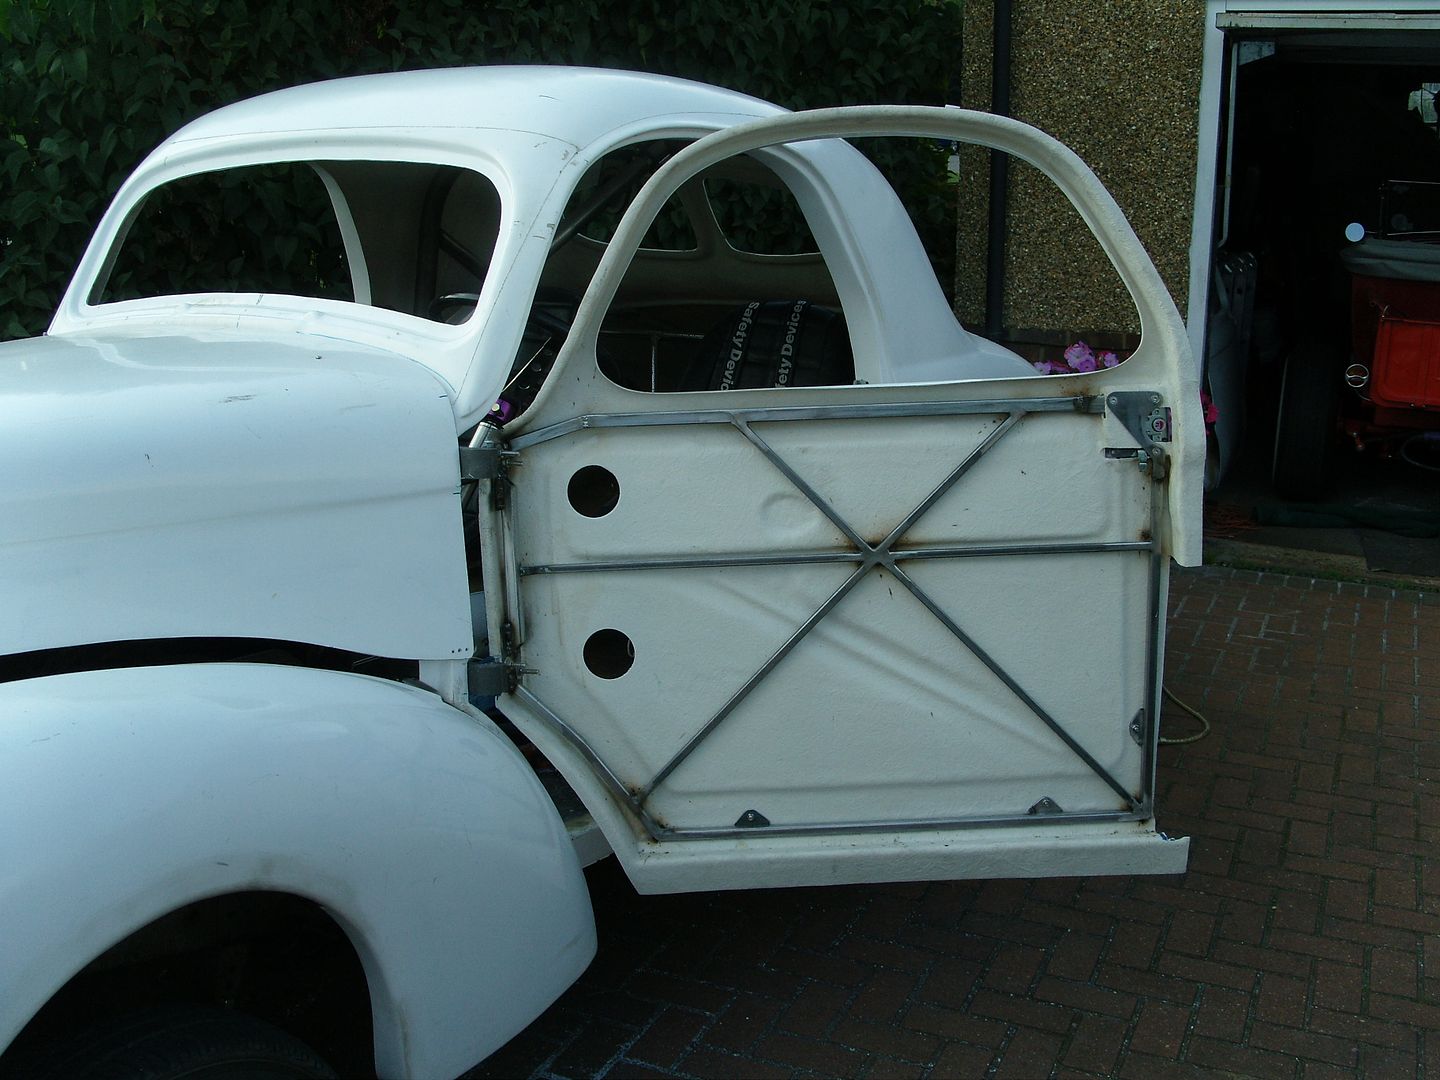
I now have a fairly even gap around the inner skin.
Next job is the window channels and winding mechanism

Its aweful lonesome in the saddle since my horse died.
 Reply With Quote

Posting Permissions
- You may not post new threads
- You may not post replies
- You may not post attachments
- You may not edit your posts

i've enjoyed the years here . made a lot of friends. most who have left. i see no reason to continue with this so hope to see you somewhere else. i dont think this site will ever be back. it's lived...
Dead!