Thread: 1932 Ford Coupe Project Thread
Hybrid View
-
05-26-2013 07:58 PM #1
Good for you Pat. Glad it all came together for you!! And that steak looked delicious
-
05-26-2013 08:03 PM #2
Worked out great, Pat!!! Don't ya just love it when a plan comes together?????Yesterday is history, tomorrow is a mystery, Live for Today!
Carroll Shelby
Learning must be difficult for those who already know it all!!!!
-
05-26-2013 08:04 PM #3
Thank you my friend. That steak was so awesome! Not as much as the Coupe on the dolly tho...LOL Thanks again for knowing me and sticking up for me. You're good people. As we say in Jersey, I'd kill for a guy like you.New Age Motorsports 32 5/W 521/C6
-
05-26-2013 08:08 PM #4
Yeah Dave!!! It was all Roger on this one. I owe him big time. I've been working every hour I could on this thing during my week's vacation that I had tunnel vision. These tie down straps were the best thing since slice bread. The thick rollup of those old t-shirts didn't put the slightest mark on my fiberglass too. Great day today!! Now I know what I have to do when I put the body back on after painting. Thanks so Jerry for that. All day today I was thinking, how is this going to work after paint.New Age Motorsports 32 5/W 521/C6
-
05-26-2013 08:36 PM #5
Glad the ratchet strap suggestion helped you get over the hump, Pat! By the time you're ready for the body to go back on after paint you may have a bunch of those new neighbors itching to help set it in place so they can claim rights to a ride!!
You might want to take a look at adapting a pair of engine stands for a chassis rotisserie now....Roger
Enjoy the little things in life, and you may look back one day and realize that they were really the BIG things.
-
Hi Pat! Ed & Chris here looks like your having alot of fun working on your project, hows dad doing, I think while you have the body off you should order from speedway stainless steel thru-frame brake line fittings (#910--31360) place behind rear crossmenber on each side it will look alot neater than tab above and below chassis rails, I forgot to tell you. To help with bleeding the brakes, just remember master cylinder, wheel cylinder and calipers are on the same level, use brake bleeder and vacuum pump kit it will make life easier just becareful when using it.
Now TP HVLP Turbine System is a nice unit, I have one since they first came out 20 years or so ago, no water problem, nice dry air but the more the unit is used for a complete paint job the hotter the air becomes, watch your outside temp because the air going thru the turbine will get much hotter the paint will dry faster so if reudcer is 70 -75 degrees move up to 80 - 85 degree limit. If it was a small part no problem, but larger overall paint job it will dry too fast on you.
Also, being your first paintwork, I'de advise using a basecoat/clearcoat system. Small parts are easier to achieve good metallic layout, but you could end up with zebra stripes and blotches. With a Basecoat System you have excellent control of the metallic layout. Basecoat tacks up very fast making it difficult to run or sag. Allow Basecoat to dry overnight to prevent solvent pops.
Also, should the car ever see chipped paint, you stand a good chance of touching it up, in many cases perfectly. With single stage, it's the whole panel or the whole piece. Do-over. Remember its not the paint or spraygun, its the painter that make job come out good. Call us for more info on painting, for more insight.
-
05-29-2013 03:26 AM #7
Hi Ed and Chris! Thanks for the reply. It's been a slow process since we picked her up, but I'm all settled in Maryland now, and I finally have everything in my garage to finish it, including the car. Thanks for the tips on the paint. I did buy the 85 degree reducer, anticipating the warmer weather and reading about the added heat generated for the turbine. With the little bit I spent practicing before the car came down, I think I will do okay with it. I also have a Saleen Mustang front air dam for my brother Joe to paint, so more practice. I will do all the metal parts as well, before I even attempted the body. I was going with the one stage thinking chips in the paint would be easier to fix. I didn't know it was the opposite. I'm going to leave Dad's brake job as is.I have to run to work now, but I will be in touch with you guys on the phone to catch up. Thanks again!
New Age Motorsports 32 5/W 521/C6
-
06-07-2013 11:31 AM #8
The metal ratchets near my fiberglass were too close for comfort. With the old t-shirts providing padding, I didn't really like what I did. I will work on making some spreader bars in the future. Here's a few more pics that I took while working on it after work. I'm entering another week of vacation next week, so I hope to start taking parts off to sandblast and paint. This is such a fun project!
New Age Motorsports 32 5/W 521/C6
-
06-08-2013 10:49 AM #9
Your doing a nice job with the pics and keeping everybody up to date on your build-----too bad so many have dropped out or left the site the last year or so------------Nice choice of fittings on the AN hoses---have you stuck any of the braid wires into your fingers--ouch!!!!!!!!!!!
-
06-08-2013 05:44 PM #10
Thanks for the pics Pat! Can I ask why the ball valve?
-
06-08-2013 06:31 PM #11
Ball valve, I didn't know we were talking toilets.I maybe a little crazy but it stops me going insane.
Isaiah 48: 17,18.
Mark.
-
06-08-2013 06:50 PM #12
its so he can shut off the fuel while he replaces the fuel pump ----------I was wondering why he chose electric water and fuel pump??????????
-
06-09-2013 08:00 PM #13
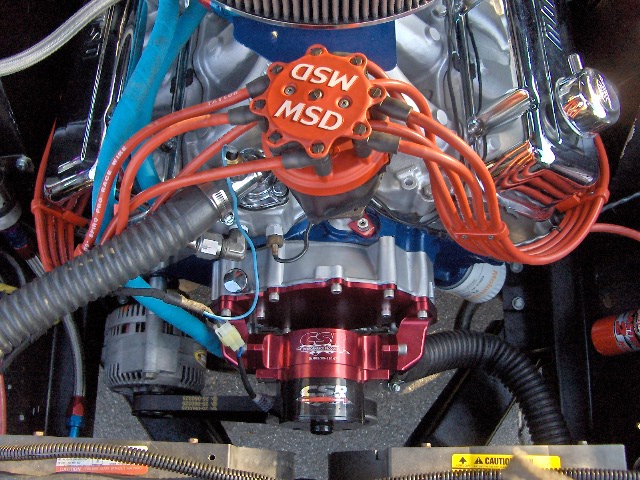
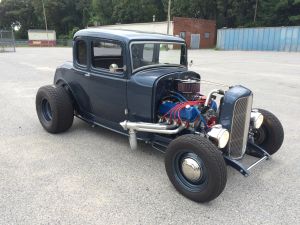
Yes Jerry, I did get those stainless lines in my finger one time on the -12 I had to cut with the hack saw. Ouch!!!! LOL I'm still on the fence with the ball valve, and that's why I didn't use the tape and thread it in. I was just thinking in case I wanted to clean the fuel filter or change the pump on the road. I plan on driving this car ALOT. The main reason I went to electric fuel and water pump, is because there's no mechanical fuel pump that can supply the close to 600HP engine I have, and the electric water pump, that I had on my Fairlane, was for clearance issues. It actually cooled the Fairlane better than a mechanical water pump, and now in the Coupe, I need the clearance. That's why I have the dual Optima batteries. I know that I can drive an hour with all my electric stuff and still make it home if my alternator died. Don't ask me how I know that.
Here's a picture of the clearance I had with my Fairlane and this engine.
Last edited by patfromjersey; 06-09-2013 at 08:08 PM.
New Age Motorsports 32 5/W 521/C6
-
06-10-2013 04:46 AM #14
I know it's not the same thing "exactly".. but... I've seen more than a few to many brass nipples break when hanging out like that in marine applications.
possibly exchange the nipple between the valve and tank for a "CLOSE" nipple in heavy red brass. Like I said, not really the same thing but, it just "jumped" out at me hanging out there with no support on the discharge side.
Just a comment Pat.. not a critique or anything else implied!!!
-
06-28-2013 04:35 PM #15
No, thank you for the advice! I never really thought about that, but I decided I will use a steel close nipple when I do the final assembly. I appreciate when someone steps up with things that don't look right.
I've been a busy little beaver on my car the past few weeks, so I have some more pics to share. After tomorrow, I will be ready to "blow" it apart and start sandblasting and painting everything on the chassis. I'm a total nut case, so I decided to redo my exhaust system. I never really liked the rush job on did on the exhaust, and those horrible hangers I had on the DynoMax mufflers. I decided to cut everything off and start fresh, with a set of 3" Summit glasspacks that I had on my brother's 47 Ford Truck. I cut out the Dynomax ones, and welded in those. I also bought a set of ball and socket connectors for the pipe from the header, to the muffler/tailpipe piece. I added a nice pipe hanger midway for support, and kept the tailpipe mount in the back. This system comes out 1-2-3 and is so simple. I also have a ton of room now for a driveshaft loop, which I still have to weld in. I also finished running the braided line for the fuel line. The regulator mount was another project, because it wasn't made for my MagnaFuel regulator like it said it was, so I had to modify that and stick it on the driver's side, which I really didn't want to do. All in all, I'm happy how it all turned out. Here's some pictures....
Old exhaust cut out, new tank to pump line run. I will be replacing that brass nipple with a steel close nipple
I will finish drilling and tapping for the screws that hold all the braided lines to the frame when I pull everything out. All my braided line will have those rubber insulated clamps. Home Depot had them on the shelf.
Here's the new exhaust system in place, tack welded, ready to come out and final weld. I can't wait to hear this big Ford cam through those glasspacks.
I did a leak test on each of the four exhaust pieces, before I painted them with High Temp Header paint. I found these pipe plugs in Lowes, that fit my 3" exhaust perfect. On one of the ends, I drilled a small 1/8" hole to blow air through to charge it up and spray with soapy water. Don't add too much air if it's tight, or you'll blow one of the plugs into something, like a house. LOLDon't ask me how I know that. I had a couple small leaks which I rewelded. I'm just an amatuer welder and don't get much practice time, but my exhaust will be leak free.
No more bubbles after firing up the welder again.
Here's where I had to modify my cool regulator bracket I bought. On the passenger side, the bracket was in the way of the AN fitting to the fuel bowl, and I couldn't screw the hose in. I had to move it to the drivers side, and use 180* fittings to keep everything tight. I think with the heater hoses, it would have been in the way of that too. I didn't want to mount it to the firewall, so that's why I went this route.
Here's some pics of the fuel line routing. I love braided line. It kind of goes with the theme of my project; overkill.
Here's my four exhaust pieces hanging and drying. I was going to Jet Hot Coat all of this, but my welds aren't pretty enough for that expense.I can take it off and touch everything up when I want. I did spend alot of time on the 90* drop under the frame, so that will look good from the outside. The other welds are under the body, so they won't be seen. I will just send the Jayster Headers back to Sanderson for a recoat, since I had cylinders 4 and 8 reworked. Also, I must have had a bad ground at one time with the Mig Welder, and I had the stainless fuel line drapped across the engine and headers. I had two burn marks from the line to the header pipe that needs to be retouched. LOL I chopped out those sections of braided line.
Lastly, how cool are my Maryland plates? My Dad and I are both Pat, so I thought this was fitting. I'm so glad my first choice wasn't taken.
New Age Motorsports 32 5/W 521/C6
That's going to be nice, like the color. .
Stude M5 build