


Thread: How To: Notching tubing


Results 1 to 11 of 11
 LinkBack URL
 About LinkBacks
-
06-28-2006 09:27 AM #1
 CHR Member

- Join Date
- Apr 2001
- Location
- Byron, Mi.
- Car Year, Make, Model: '88 Astro Van-BAD AST
- Posts
- 871
How To: Notching tubing
Hey guys, I don't know how many of you do your own cage or chassis work but this how I set up my jigs for notching tubing.
I set all of this up on one of my jig tables but it will work on any bench or table top you have handy.
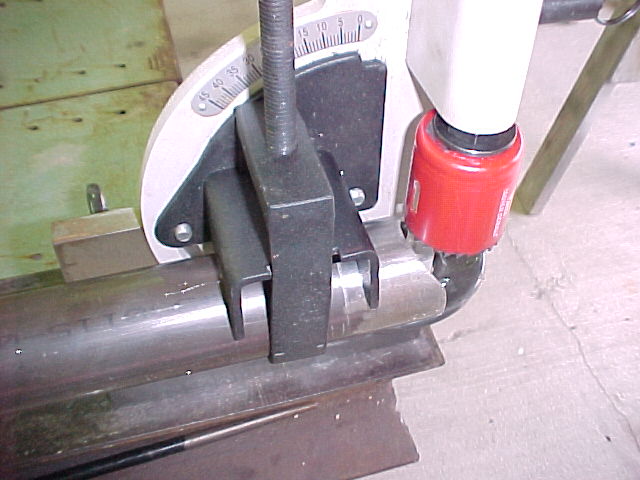
These pics show my Harbour Freight tubing notcher clamped to a 90* angle plate. This is simple to set up and doesn't require a lot of thought...
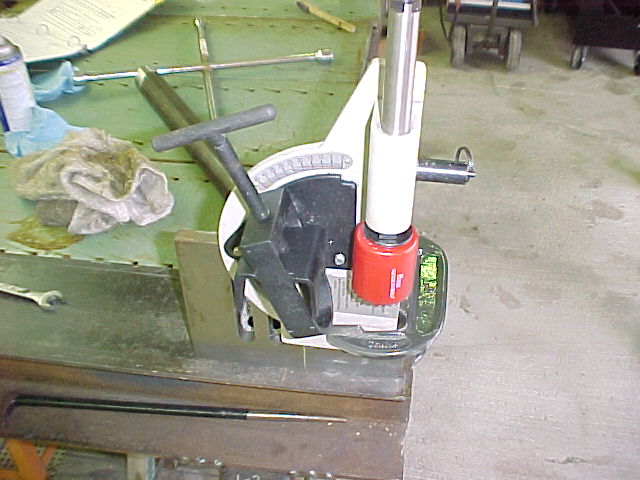
From the backside...
Cutting the first notch is the easy part. No orientation, no length to worry about. Just clamp the tube in the notcher and do the deed.
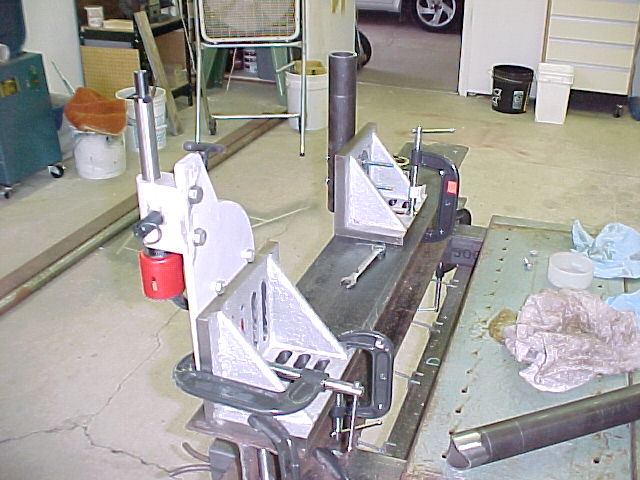
Cutting the second notch is where some planning needs to be done. Getting the LENGTH and the notch ORIENTATION correct is critical to having a usable part versus something to practice welding on...
To do the second notch I bolted a short piece of the mating tubing to another angle plate and use this to nest the "first" notch into while cutting the second notch.
This way I can establish the correct length AND notch orientation in one easy step... Set the tubing length between the outside diameter of the tubing and holesaw, in this case 23 inches, square up the jigs, clamp it all down and cut the second notch. Once it's set up any additional tubes will be identical to the first so measure twice and cut once...
Cutting the second notch...
Thanks for looking
MarkIf money is the root of all evil... Women must be the fertilizer...
Link to my BAD AST Build Thread:
http://www.clubhotrod.com/suspension...van-build.html
-
Advertising

- Google Adsense
- REGISTERED USERS DO NOT SEE THIS AD
-
07-06-2006 07:35 AM #2
CHR Member
- Join Date
- Apr 2001
- Location
- Byron, Mi.
- Car Year, Make, Model: '88 Astro Van-BAD AST
- Posts
- 871
Thanks guys,
I got a little bit done over the holiday weekend. Didn't have a lot of shop time but I did take advantage when I could...
Got the notcher fired up and ran the lower crossmembers through it. It took about half an hour to get the jigs set up and another half hour to run the tubing through.
I use Castrol wax lubricant on the hole saw. This stuff works really well and doesn't make the mess that WD-40 or cutting fluid does. It also cleans up easily.
I can do one notch in about 30 seconds running the notcher with my 1/2" Milwaukee drill. This set up makes for a clean cut and, with a little clean up with the angle grinder, I have some quality notches that fit well for Tig welding.
Thanks for looking.
MarkLast edited by astroracer; 07-06-2006 at 08:29 AM. Reason: Edited attachments
If money is the root of all evil... Women must be the fertilizer...
Link to my BAD AST Build Thread:
http://www.clubhotrod.com/suspension...van-build.html
-
07-06-2006 09:52 AM #3
CHR Member
- Join Date
- Aug 2004
- Location
- rustburg,
- Car Year, Make, Model: 1997 CHEVY.S10 LT1-350
- Posts
- 4,093
looks a lot better than doing it with a cutting torch.
Mike
check my home page out!!!
http://hometown.aol.com/kanhandco2/index.html
-
07-06-2006 02:20 PM #4
CHR Member/Contributor
- Join Date
- Jul 2003
- Location
- Madison
- Car Year, Make, Model: '67 Ranchero, '57 Chevy, '82 Camaro,
- Posts
- 21,160
I used to use much the same method, but a fixture on my drill press table and a stand to hold the other end of the pipe. For orientation of the second cut, I use a 90 degree magnet to hold another piece of tubing in the first notch I cut, then a magnetic base angle finder to set the correct degree of cut on the 2nd notch. Currently working on an indexed fixture to do my notching with an end mill on a vertical lathe, or a very heavy duty drill press...... Trying to make the process faster and more accurate.Yesterday is history, tomorrow is a mystery, Live for Today!
Carroll Shelby
Learning must be difficult for those who already know it all!!!!
-
07-12-2006 09:45 AM #5
CHR Member
- Join Date
- Apr 2001
- Location
- Byron, Mi.
- Car Year, Make, Model: '88 Astro Van-BAD AST
- Posts
- 871
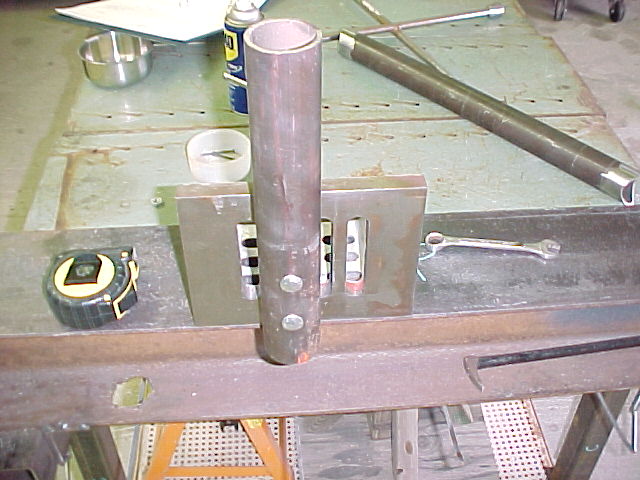
Hey Dave, this process is very quick. Once I got the jigs set-up I had all of the notches done (6 of them) in less then half an hour and that included cleaning them up with a grinder.
I did a quick mock-up of the new lower rails and crossmembers to see what the fit-up looks like. The notches came out great and I have some really nice, tight fitting joints for welding.

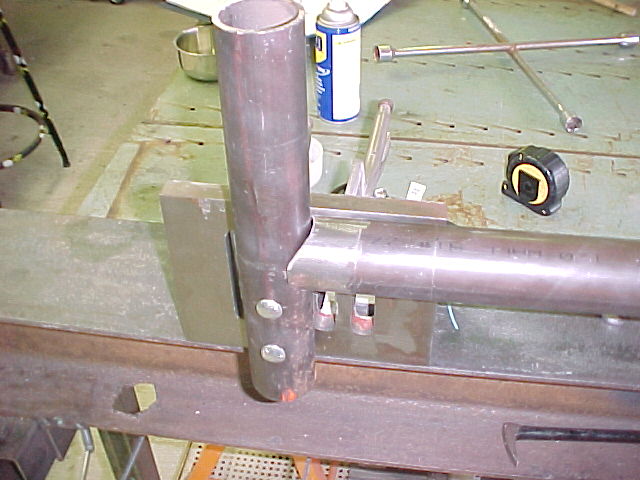
A couple more...
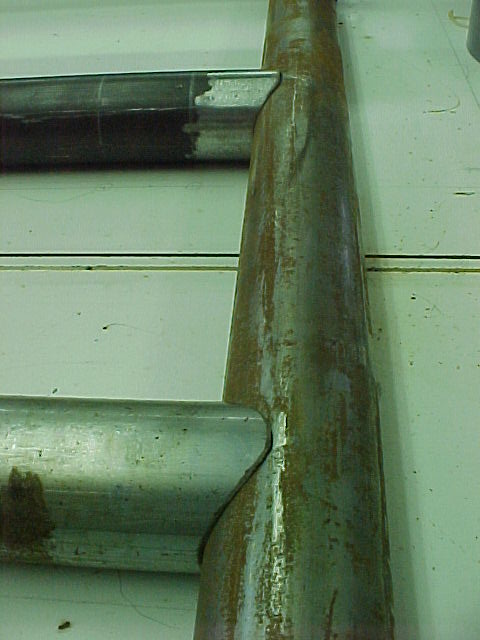
I still have to clean up all of the welding surfaces yet, this is just a look see for fit-up. I will go over all of the joints with a flap wheel on the die grinder to prep for welding...
MarkIf money is the root of all evil... Women must be the fertilizer...
Link to my BAD AST Build Thread:
http://www.clubhotrod.com/suspension...van-build.html
-
07-12-2006 11:11 AM #6
CHR Member/Contributor
- Join Date
- Dec 2004
- Location
- TX
- Car Year, Make, Model: hotrod
- Posts
- 1,830
Thats the way it used to be done.My Dad would probably frown at the use of these tubing notchers. Originally Posted by lt1s10

-
07-12-2006 04:10 PM #7
CHR Member
- Join Date
- Aug 2004
- Location
- rustburg,
- Car Year, Make, Model: 1997 CHEVY.S10 LT1-350
- Posts
- 4,093
they sure do make it pretty though. you're making it to easy for the welder. Originally Posted by BigTruckDriver
Mike
check my home page out!!!
http://hometown.aol.com/kanhandco2/index.html
-
07-24-2006 09:17 PM #8
 CHR Member
- Join Date
- Apr 2004
- Location
- St.Paul
- Car Year, Make, Model: 41 Willys pro street
- Posts
- 279
We have a notcher and use it alot. It works great and other than use up a hole saw at midnite after the stores are closed no real problems. My son was amazed when I finished the job by using some careful cuts with a band saw. Kinda like "big truck driver's " dad. haha " how did you do that??" he says. We built whole cars with nothing more than a band saw and flame saw.
older than dirt.41 Willys 350 sbc 6-71 blower t350, 9in, 4 link
99 Dodge ram 3500 dually 5 sp 4.10
Cummins turbo diesel . front license plate, black smoke on demand, Muffler KIA by friendly fire (O&A Torch co) fuel pump relocated, large fuel lines. silencer ring installed in glove box, Smarty
older than dirt
-
07-24-2006 09:34 PM #9
CHR Member
- Join Date
- Jan 2006
- Location
- fort myers
- Car Year, Make, Model: '27 ford/'39 dodge/ '23 t
- Posts
- 11,033
When you think about the tools we have at our disposal today, it is amazing. Back in the "day" if you owned a set of torches you were high tech.
Kind of reminds me of my Dad and Grandfather. They built our house with HANDSAWS. Electric circular saws weren't even invented yet I think in the '50's. How the heck did they cut all those 2 x 4's and other boards with a hand saw? If I cut one board with a handsaw today I would need a nap after. The people back then must have been in better shape than we are. How do you build an entire house with hammers and handsaws?
I remember when I bought my first LIncoln arc welder. I thought I had died and gone to heaven. Then I bought some torches, but had to save up to buy the tanks because the $ 300 investment was a heavy hit for me at the time.
No wonder the quality of our builds are so much improved over past years. The correct equipment just makes the jobs so much easier and professional looking.
Don
-
07-24-2006 09:45 PM #10
CHR Member/Contributor
- Join Date
- Dec 2004
- Location
- TX
- Car Year, Make, Model: hotrod
- Posts
- 1,830
I know,my Dad tig welded fuel dragsters(joints had to be perfect),so you could imagine how time cunsuming it was with out the speed of the tubing notchers we have today.But I guess thats why he was a pro.On my best day I would not be half as good as he was. Originally Posted by lt1s10
-
07-25-2006 04:51 AM #11
CHR Member
- Join Date
- Sep 2005
- Location
- Liberty
- Car Year, Make, Model: 1929 ford
- Posts
- 504
I use a sawzall,and have gotten pretty fair at notching,but I'd stop in a second if I had a jig like that. Hank
 Reply With Quote

Posting Permissions
- You may not post new threads
- You may not post replies
- You may not post attachments
- You may not edit your posts

Even though I know he won't see this, I still want to wish a Happy Birthday to my best friend, Richard Moore aka techinspector1
Happy Birthday techinspector1