


 52Likes

Results 76 to 90 of 109
 LinkBack URL
 About LinkBacks
-
06-27-2015 02:03 PM #76
 CHR Member/Contributor

- Join Date
- Mar 2005
- Location
- Tigard
- Car Year, Make, Model: 63 Nova SS
- Posts
- 2,591
I really hate oil leaks and I have chased a few. The chrome front covers can be problematic especially those made in the past ten years or so as theyre made in China and the quality control is nonexistent. As nice as the chrome pieces can look - I really shy away from them as they can be more problems than they're ever worth. I like the stock pieces as they've been designed to work well. A good cleaning and a couple coats of Chevy orange makes them look as good as new.
Since you don't have the original metal, it may be best to back up and replace both the front cover and the pan with new first tier products. I like Milodon and have had very good success with their metal products on multiple small block builds. Id recommend the following parts:
Front cover 65555 - http://www.summitracing.com/parts/mi...-size/5-7l-350
Front cover gasket kit - http://www.summitracing.com/parts/mil-65503/overview/
Stock replacement pan 30700 - http://www.summitracing.com/parts/mil-30700/overview/
Pan Gasket - http://www.summitracing.com/parts/mil-41000
This pan gasket has a thick front seal that is required for a nice tight fit with this pan. Most people dont know that there are two different pans for small blocks, one measures 2-1/4 from the pan rail to the lowest point of the front opening and the other measures 2-3/8. You can have real problems if you use the wrong gasket here.
I like this stud kit, but its not necessary, 81300 - http://www.summitracing.com/parts/mil-81300/overview/
Start by draining the oil and taking all the front end stuff off. Clean all the bolt holes and run a bottoming tap down each one to clean the threads. Blow out the holes with compressed air. Remove the pan and clean everything with lacquer thinner or acetone (use safety glasses and a cotton disposable respirator trust me here). Wipe everything down with soft cotton rags and then wait a half hour and repeat to make sure you get all the dribbles.
Press you new seal in the front cover and apply a thin layer of grease. I'd use Permatex Ultra Black or Gaskacinch on the front cover-to-block gaskets. Use a thin bead on the cover and the block and press the gasket into the sealer and assemble without letting the sealer set too long as it needs to adhere to all surfaces. Dont over tighten! 5-6 ft/pounds is what you want here no more! Most leaks that I have encountered are a result of someone tightening these bolts way too tight and distorting the metal to a point of no being able to ever properly seal again.
The one piece gasket snaps into the pan for proper alignment and has inserts in the holes that help prevent over tightening. Put this gasket on dry. The Milodon pan has nice thick rails and will pull down against the thick front seal to the timing cover. If you have a helper here it is great to have him hold the pan in place while you start the four corners. Get all the bolts started and tighten the pan to 12 ft/pounds. Again - don't over tighten these bolts.
I know it is pain to do this while the engine is in the car but it can be done successfully
Good luck here you need to catch a break on this one!
Glenn"Where the people fear the government you have tyranny. Where the government fears the people you have liberty." John Basil Barnhil
-
Advertising

- Google Adsense
- REGISTERED USERS DO NOT SEE THIS AD
-
06-27-2015 04:51 PM #77
CHR Member
- Join Date
- Jun 2015
- Location
- Boulder
- Posts
- 57
well just caught this above and thanks for the advice. Very thorough. Tried one more attempt and if that fails I'll fall back to the above.
bought new felpro timing cover gasket and new pan gasket. I've used the permatex gray in the past with success so went back to that instead of the "right stuff" I was using. Took everything off the front once more and cleaned with gasket cleaner, brake cleaner and acetone. Let it dry and applied a thin bead smoothed to the timing cover and attached the new gasket. Then applied thin smoothed bead to the timing cover block face. put on timing cover loosely... then slid on the harmonic adapter well lubed around the seal... pulled it on with a installer kit and then retightened the timing cover bolts... yes not to tight. then put the car up and applied the grey to the corners like I always do with a thin bead on the face of the black front separate gasket, applied the other gaskets, tucked them under the front of the seal put a dap of grey on top and attached the pan. slowly torqued everything on. It all looks very well sealed and covered.. nice and smooth... now for dinner...and tomorrow I will fill with fluids and put the water pump back on and everything else.
If it doesn't work I'll head down the road Glenn outlined instead of the shortcuts I'm trying here... just never have seen such a seal issue... Thanks again...
p.s. not really to much of a pain in the car since everything is wide open.....
-
06-27-2015 05:02 PM #78
CHR Member
- Join Date
- Jun 2015
- Location
- Boulder
- Posts
- 57

-
06-28-2015 07:09 PM #79
CHR Member
- Join Date
- Jun 2015
- Location
- Boulder
- Posts
- 57
Well the saga continues.... the front seal leak is fixed...yea. but... I have a leak behind the dizzy... that rear seal, and yes I has used the "right stuff" for that...kinda not liking that stuff... so guess I'll pull the intake and reseal the from and the back... not sure why oil is leaking from there but it is.... ugh.
and the worse issue... the engine is over heating. I didn't let it get up to high so not to hurt the vortec heads but its getting way to hot way to fast. I'll check the thermostat when I pull the intake... I had read something about certain age blocks needing a bypass hose... any thoughts there? according to the numbers I have a 72' block. thats it... one step at a time...
by the way I did not use gaskets front and rear, I used a large bead of the "right stuff" making sure I had squeeze out... cleaned it up using tape on the block and the manifold so it didn't goo everywhere... I'm tempted to do the pin punch trick, the two gaskets, and the grey rtv...Last edited by JbRat; 06-28-2015 at 07:13 PM.
-
06-28-2015 07:49 PM #80
CHR Member
- Join Date
- Sep 2005
- Location
- Hamilton
- Car Year, Make, Model: 69 nomad, 73 charger, 74 vega
- Posts
- 3,900
I have seen a couple of people's overheating issues caused by air pockets in the block..
Education is expensive. Keep that in mind, and you'll never be terribly upset when a project goes awry.
EG
-
06-28-2015 07:55 PM #81
CHR Member
- Join Date
- Jun 2015
- Location
- Boulder
- Posts
- 57
ok so how does one resolve that?
-
06-28-2015 08:13 PM #82
CHR Member
- Join Date
- Oct 2014
- Location
- Clinton
- Car Year, Make, Model: '32 Ford Hi Boy, '37 wildrod sedan
- Posts
- 561
I have had luck in the past by heading to Oriellys and renting there rent a tool program radiator pressure tester for FREE (deposit req) pressurized the radiator with it and then on the highest point on the motor, usually the intake (I do the temp sending unit) just loosen it and wobble it ever so slightly until you get all the air out, If you have a reducer for you sending unit you can get a air pocket there also and get false readings, this prevents this also, but just use enough pressure to push the air as I unscrewed the sending unit just a little to much and lost alot of fluidWhy is mine so big and yours so small, Chrysler FirePower
-
06-28-2015 08:17 PM #83
CHR Member
- Join Date
- Jun 2015
- Location
- Boulder
- Posts
- 57
got it... also read some suggestions raising the front end...
-
06-29-2015 08:59 AM #84
CHR Member
- Join Date
- May 2003
- Location
- Zephyrhills, Florida, USA
- Car Year, Make, Model: '32 Henway
- Posts
- 12,423
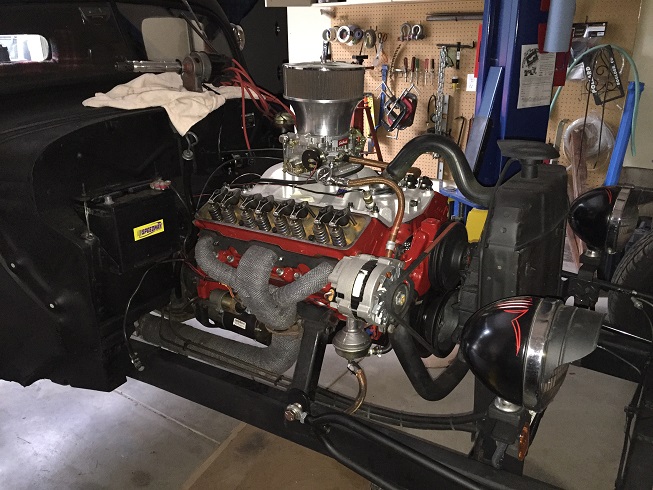
Can't see the fan in the photo you posted, but suspect it is pulling air from everywhere EXCEPT through the radiator due to the lack of a shroud.
Don't make the rookie mistake of dropping down to a 160 thermostat in the mistaken belief that it will lower operating temps. HINT: When is the last time you saw a motor from the factory with a 160 thermostat?.....Like NEVER. Use a minimum 195 thermostat and bring the rest of the cooling system up to par with good engineering principles. Internal combustion engines need to run at least 195 to achieve the desired efficiency the motor needs for good power and good gas mileage and also to burn off acids in the oil that blow past the rings as a result of the combustion process.
Here is a pretty good tutorial on cooling that I wrote originally and that has been added to by several other hot rodders.....
http://www.crankshaftcoalition.com/w...cooling_system
.Last edited by techinspector1; 06-29-2015 at 09:15 AM.
PLANET EARTH, INSANE ASYLUM FOR THE UNIVERSE.
-
06-29-2015 09:27 AM #85
CHR Member
- Join Date
- Jun 2015
- Location
- Boulder
- Posts
- 57
The fan has a shroud and is in a known good cooling system including thermostat. This engine is replacing a 305 that was running good except it had low compression in cylinders 1 & 3 and never had any cooling issues, not even close.Last edited by JbRat; 06-29-2015 at 09:29 AM.
-
06-29-2015 10:11 AM #86
CHR Member/Contributor
- Join Date
- Mar 2005
- Location
- Tigard
- Car Year, Make, Model: 63 Nova SS
- Posts
- 2,591
Bummer - Intake manifol leaks that show almost always mean there may be some that dont and they can lead to some real issues.
Heres a tried and true method that I have used for a lot of intake manifolds and I cannot remember the last one I had that even thought about a leak.
Use Fel-Pro intake gaskets when installing this intake manifold. I know there are some less expensive ones and those that you can get at NAPA but I like FelPro and have always had really good success with them.
Clean the cylinder head intake flanges and the engine block end surfaces with acetone.
Apply gasket sealer to the head flanges and to the head side of the gaskets, allow to air dry just a bit to let it get a bit tacky, and attach the intake gaskets. I use Gasgacinch.
Throw the cork or rubber end pieces in the trash.
Apply a ¼" bead of Permatex Ultra Black RTV sealer on the ends of the block. Put an extra blob at the four corners where the tab of the gasket meets the end of the block.
Set the intake manifold and loosely install all of the bolts. I like 12 point bolts - Moroso 38400 look good and are nickel plated so they stay rust free for a long time. Key is to use the accompanying washers to get a true torque reading. Put a small dab of Ultra Black on the threads of the eight inner bolts. Trust me here they can leak and its very annoying to have a little oil puddle in these hard to get to places that will smoke and stink.
Torque all the manifold bolts in two steps. Use 10 ft/pounds and start with the four center bolts and work out to the next two in the front and rear until all twelve are at 10 ft/pounds then set your torque wrench at 25 ft/pounds and repeat in the same sequence. Never exceed 25 ft/pounds! It's not good to see the RTV goosh out of the end of the manifold.
One more tip use a new distributor gasket. Fel-Pro 70194. They cost less than a buck and I buy a dozen or so at a time because it just makes good sense to replace them every time you R&R a distributor. A dab of Vaseline holds it in place on the distributor and then you dont have to worry about it slipping at the last minute and pinching.
Youre headed in the right direction my friend! Dont give up now.
Best,
Glenn"Where the people fear the government you have tyranny. Where the government fears the people you have liberty." John Basil Barnhil
-
06-29-2015 11:15 AM #87
CHR Member
- Join Date
- Jun 2015
- Location
- Boulder
- Posts
- 57
Bummer - Intake manifold leaks that show almost always mean there may be some that don’t and they can lead to some real issues. (got it... going to take top end off tonight and fix)
Use Fel-Pro intake gaskets when installing this intake manifold. I know there are some less expensive ones and those that you can get at NAPA but I like FelPro and have always had really good success with them. (yes, I used the expensive felpro gasket, ordered from jegs, reinforced I believe)
Clean the cylinder head intake flanges and the engine block end surfaces with acetone. (did that... very thoroughly but will again)
Apply gasket sealer to the head flanges and to the head side of the gaskets, allow to air dry just a bit to let it get a bit tacky, and attach the intake gaskets. I use Gasgacinch. ( Did not do this..., I'll look for Gasgacinch)
Throw the cork or rubber end pieces in the trash. (roger, did that)
Apply a ¼" bead of Permatex Ultra Black RTV sealer on the ends of the block. Put an extra blob at the four corners where the tab of the gasket meets the end of the block. (used "right stuff" which bit me on the timing cover. I'll switch but did it to the above procedure, maybe a little more than a 1/4" bead...)
Set the intake manifold and loosely install all of the bolts. I like 12 point bolts - Moroso 38400 look good and are nickel plated so they stay rust free for a long time. Key is to use the accompanying washers to get a true torque reading. Put a small dab of Ultra Black on the threads of the eight inner bolts. Trust me here – they can leak and it’s very annoying to have a little oil puddle in these hard to get to places that will smoke and stink. ( did all this including coating bolts)
Torque all the manifold bolts in two steps. Use 10 ft/pounds and start with the four center bolts and work out to the next two in the front and rear until all twelve are at 10 ft/pounds then set your torque wrench at 25 ft/pounds and repeat in the same sequence. Never exceed 25 ft/pounds! It's not good to see the RTV goosh out of the end of the manifold. ( yes torqued in a three setting sequence per the attached, remember its a vortec manifold
Vortec/E-Tec Manifold Bolt Torque Sequence
Torque Bolts to 11 ft/lbs.
Firing Order: 1-8-4-3-6-5-7-2
Turn Distributor Counter-Clockwise
to Advance Ignition Timing
One more tip – use a new distributor gasket. Fel-Pro 70194. They cost less than a buck and I buy a dozen or so at a time because it just makes good sense to replace them every time you R&R a distributor. A dab of Vaseline holds it in place on the distributor and then you don’t have to worry about it slipping at the last minute and pinching. (used new fel-pro gasket, leak was through the right stuff end seal or lack of seal)
You’re headed in the right direction my friend! Don’t give up now.
real concern now is the over heating...ugh. Using the water pump from my 305 that worked well... I keep wondering if there is supposed to be some hosing to replace heater hosing , etc.. that I'm not useing since everything is plugged except hose off top of manifold to the radiator and one from the bottom of the radiator to the waterpump, again same configuration as my 305. )
-
06-29-2015 11:17 AM #88
CHR Member
- Join Date
- Jun 2015
- Location
- Boulder
- Posts
- 57
That Gasgacinch looks like aviation sealer... I believe permatex makes a version..?
-
06-29-2015 11:38 AM #89
CHR Member/Contributor
- Join Date
- Mar 2005
- Location
- Tigard
- Car Year, Make, Model: 63 Nova SS
- Posts
- 2,591
Roger on the Vortec - old guys sometime space a bit! as such, you still need to torque inside to outside, but as you know keep the value at 11-12 ft/pounds.
Gasgacinch - http://www.summitracing.com/parts/ed...FRRlfgod3g0CGg
Keep at it!
Glenn"Where the people fear the government you have tyranny. Where the government fears the people you have liberty." John Basil Barnhil
-
06-29-2015 11:48 AM #90
CHR Member
- Join Date
- Jun 2015
- Location
- Boulder
- Posts
- 57
old guys...hmmm I'm probably older..lol... how about the permatex copper spray, have you ever used that?
 Reply With Quote

Posting Permissions
- You may not post new threads
- You may not post replies
- You may not post attachments
- You may not edit your posts

Yep. It’s pretty sad.
Dead!