


 9Likes
Thread: 355 build HP and Torque?


Results 46 to 60 of 66
 LinkBack URL
 About LinkBacks
-
08-15-2012 11:03 AM #46
 CHR Member/Contributor

- Join Date
- Apr 2005
- Location
- bay city
- Posts
- 10,546
if a 360 groove under cam bearing. i run them all at 3:00. for a low valve spring build on a sbc chevy it will not matter very much so i would not loose much sleep chevy been running them at 6:00 started back when moses was a kid . on the 455 buicks it is a big deal very poor oiling and use the T/A. dur-bond cam bearing that has grooves cut on the back of bearing for ideal clocking for oil or you can rework cam housing bores for clocking stock cam bearings on the 455 or any blocks that are not 360 grooved. finish on deck and heads is a bigger deal on the chevy as the deck and heads can be very choppy like in your photo of that head. the oil only gets were you point the oiling hole in cam bearing . the 360 on the housing bores lets you point it were you want. it matters more were the cam oiling hole is.then the 360 groove. you would not want to point all the bearing holes in at 12:00 up here you would have a hell of a leak and not much oil under the load . if the loading is at 6:00. for some oil ramping under cam getting loaded .... bearing load is down.... that.s were the most of the load is... so off setting the oil hole to load lets oil get under the cam with oil at lower psi and not worry about loading = oil pressure. not oil feeding the cam and drying or shut off oil all the way when cam bearing start to fail but like i said this is more race stuff were there hi loading or poor oiling and the chevy is not badLast edited by pat mccarthy; 08-18-2012 at 02:39 PM.
Irish Diplomacy ..the ability to tell someone to go to Hell ,,So that they will look forward to to the trip
-
Advertising

- Google Adsense
- REGISTERED USERS DO NOT SEE THIS AD
-
08-18-2012 02:46 PM #47
CHR Member
- Join Date
- May 2012
- Location
- Bellingham
- Car Year, Make, Model: 67 Camaro
- Posts
- 39
Thanks for the input Pat. Regarding the head and block surface, I was thinking the same thing, especially if I end up using a shim gasket and need the smoother surfaces for a better seal.
Today I mocked up a piston and rod and measured the gap between the top of piston and block deck on each corner. Using a straight edge and feeler gauge I took measurements on both sides of the piston inline with the wrist pin. I was able to rock the piston a little in the bore in line with the pin, so I took both minimum and maximum readings at each point. The averages are:
#1 - 0.023
#7 - 0.025
#2 - 0.024
#8 - 0.027
I guess my next step is to determine how much decking I need to do if any and coordinate that with various gasket thicknesses to obtain an ideal quench of 0.040. I'm guessing by looking at these measurements, I won't be able to use a 0.015 shim and still have room to clean up the surfaces, as I would need to be 0.025 in the hole to do that and some corners are already less then that. On the other hand, maybe these measurements are already close enough to work with. We will see.
I'm thinking of taking this information back to the shop and consulting with them as what combination of decking and gasket they suggest. I was thinking I wanted to cut as little material off as I could and he already has some good ideas on what gaskets he would use.
Here's a pic showing how I did the measurements:

I also mocked up the cam and a lifter to see how it fit a dogbone and to determine how much if any machining I need to do to the dogbone seating surface. The dogbone almost sits square except it is held up a bit on the back edge. My plan is to use my own milling machine, buy a bit long enough to reach and to touch up the surface a little and remove enough material on the back edge to get the dogbones to sit square and flat.
Here's a few pics which show it in the lower and upper cam limit positions:


Last edited by rollie715; 08-18-2012 at 03:05 PM.
-
08-18-2012 03:15 PM #48
CHR Member/Contributor
- Join Date
- Apr 2005
- Location
- bay city
- Posts
- 10,546
run the piston to TDC then push the piston down so there not rock measurse that then split that should be close .i deck with the BHJ tru -deck setup . that is how i do them . i would deck most all of your number off leave it 010 in the hole then go to a composite head gasket . not a steel shim B.S . no the finish on the heads will not fly it has to be much better then that .for cutting the lifter bores tops a key way cutter works for whatLast edited by pat mccarthy; 08-18-2012 at 03:18 PM.
Irish Diplomacy ..the ability to tell someone to go to Hell ,,So that they will look forward to to the trip
-
02-05-2013 11:22 AM #49
CHR Member
- Join Date
- May 2012
- Location
- Bellingham
- Car Year, Make, Model: 67 Camaro
- Posts
- 39
After a few months break, I finally got back to the engine. My brother who has a shop next door mounted the block in the mill and started leveling the area where the dogbones sit. So far it is going fairly well. Here's a rough photo showing the setup on the mill.

Here's a couple showing some details. He just barely took off enough material, mostly in the back, to allow the dogbones to sit square with the bore. He also touched the spider risers and drilled and tapped them, and also the front camshaft retaining plate mounting bolts.


Last edited by rollie715; 02-24-2013 at 08:31 AM.
-
02-05-2013 12:48 PM #50
CHR Member
- Join Date
- Sep 2007
- Location
- New Bedford
- Car Year, Make, Model: 34 Ford 3W Coupe Replica
- Posts
- 14,754
Glad to see you back and making progress! Thanks for the pics too..
-
02-18-2013 06:27 PM #51
CHR Member
- Join Date
- May 2012
- Location
- Bellingham
- Car Year, Make, Model: 67 Camaro
- Posts
- 39
I hope this isn't too many pictures. I will probably weed out a few and add more descriptions as I have time.
After getting the block back from the machine shop for the last time, I wanted to clean out all the threaded holes before doing a final washing before the assembly. I was able to do all the 3/8" headbolt and bearing cap holes, the 1/4-20 pan and timing cover and others, and the tapered pipe plugs, but didn't have the correct tap on hand to finish the 5/16" or what ever those mid size holes were, so I will need to clean them up carefully as I bolt on items using them.

I picked up a cheap nylon brush cleaning set from Harbor Freight which came with a bunch of different sizes. Since they were somewhat short, I was able to twist a couple wire handles together to make one long enough for the entire oil passage from front to back through the block.

My good wife let me use the toilet brush to scrub the cylinder walls. Using dish soap and boiling water, I cleaned out every passage I could get a brush into. I also used a little spray-on brake parts cleaner to wash the machining residue from some of the cracks. After alternating between scrubbing with soapy water, and spraying with cleaner, and compressed air, I believe I got most of the debri out of the block.

After multiple scrubbings and wiping with WD40, I finially got to the point where spraying WD40 on the cylinder walls and wiping them clean, resulting in no more gray residue shown on the paper towels.

Here's a shot of the cam bearing tool I picked up on Ebay. This particular one is not adjustable, but is already sized for Small Block Chevys. The moving parts are all brass and are fitted with o-rings to hold the bearing in place. Over all, I would say it seemed to work very well for me.

After reviewing many opinions on orientations of the cam bearings I decided to position them at the 3 o-clock position. (That would be 3 o-clock if the engine was sitting upright in it's running position and you were standing in the front of the vehicle looking at the engine). Since the cam bearings are installed when the engine is inverted, here's a shot showing the hole on the left side and a black mark I added to the top so I could maintain orientation as I got ready to drive the bearing into place.

Here's a shot showing orientation just before I drove the bearing into place.

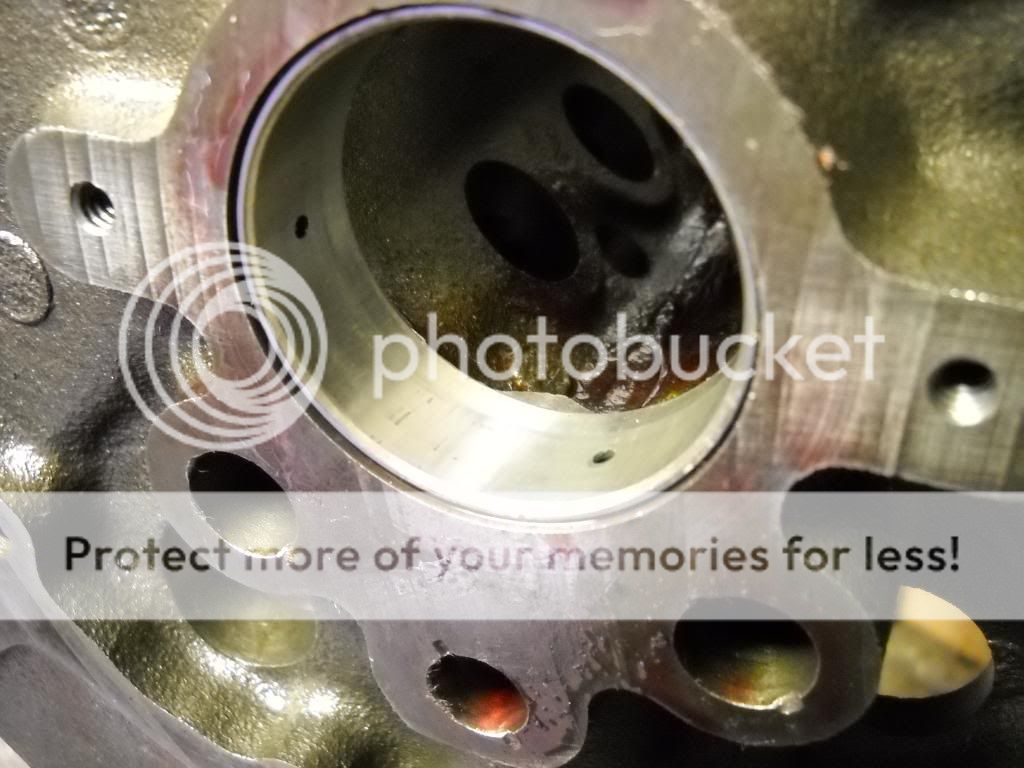
Here's a shot of the #1 or the front cam bearing. This one taught me a few things. First of all, it has two holes in it, which I chose to orient at 12 and 3 o-clock, but since the holes seem to be spaced greater then 90 degrees apart, it looks more like 11 and 3 o-clock. You may also notice this is not a DuroBond coated bearing like there other 4 I installed previously, as my first attempt at installing the DuroBond one resulted in damage to the bearing when I tried to drive it in from the front without it being perfect square to the block. My good friend at the machine shop had an open box with a single #1 regular Federal ? brand bearing which he gave me, and also advised me to install the front bearing by driving the bar in from the rear of the block and thus more easily maintain good alignment. This necessitated me removing the block from my engine stand to get access to the rear, but resulted in a much easier installation of the bearing without damage. With all the cam bearings in place, I was able to install the camshaft using liberal amounts of assembly lube, and the fully installed cam was fairly easy to turn by hand.
After wiping the main bearing saddles completely clean and dry, I installed all the main bearings in the block, carefully set the crankshaft into the dry bearings, put a piece of green plastigage (.001-.003 range) on each main journal and bolted on the main caps dry. With a three stage torque of 40, 55, and then 70 ft/pounds on each, and then removal of the caps, the plastigage readings were about the same for each main bearing which I interpret to be somewhere smaller then .002 and somewhat larger then .0015. From what I read, that seems to be in the ballpark of where new bearings should be.


After cleaning the smashed plastigage off the journals and main caps, I removed the crank from the bearings, did one last cleaning of each bearings surface and journal and reasembled it back together using assembly lube on all rotating surfaces.

I would have installed the freeze plugs in the block before I put in the cam and crank, but have not purchased any yet, and having today off for President's Day, wanted to make some progress.
Here it is:

Last edited by rollie715; 02-22-2013 at 09:32 AM.
-
02-18-2013 06:49 PM #52
CHR Member
- Join Date
- Sep 2007
- Location
- New Bedford
- Car Year, Make, Model: 34 Ford 3W Coupe Replica
- Posts
- 14,754
Not sure that you can post to many! 'Cause we love'em! And your project is looking good from here! Keep it up!
-
02-23-2013 08:12 PM #53
CHR Member
- Join Date
- May 2012
- Location
- Bellingham
- Car Year, Make, Model: 67 Camaro
- Posts
- 39
I went ahead and installed all the freeze plugs, 1/4" pipe plugs and the 3 drive in plugs in the front. I was thinking about tapping the front holes and using pipe plugs as others have done, but at this stage after everything has been cleaned and started to assemble, I decided not to take the chance of getting some of the metal filings in the engine. Instead I just drove in the factory type front plugs and staked them again with a chisel. The commonly forgotton drive in plug under the rear main bearing, I also forgot about and realized the original one was still in there. I didn't worry much about it as I had cleaned and blown out the oil passage fairly well all around it. I did measure down the hole where the oil pressure gauge normally screws in just to verify the plug was installed at the correct level to not cause any oil passage restrictions. It measured just under 8.5" inches down which I believe it correct.
Next step was to get ready to install the pistons in the cylinders. The KB piston directions say that for the type of hypereutectic pistons I have, the top ring gap should be .026" and the 2nd ring gap about .018". After placing a lone ring inside the cylinder, I measure about .015", so the ends would need to be ground. I decided to order a cheap grinder instead of manually filing them with a file.
While I'm waiting for the ring grinder to show up, I moved over and started working on the heads. The new Proform Tall Hite valve spring height micrometer I got needed to be modified to clear the wider valve seal bases on the vortec heads, which I did mostly by just trimming off a little material from the end of the inner threaded part. This reduced the tool's ability to read heights in the upper ranges, but still left it adequate for most typical uses I would need particular on most sbc heads.
Even though others have suggested I not lap the valves if they are already in good sealing condition, I felt more comfortable polishing them a bit with fine lapping compound to remove any rust or grit that may have accumulated in the last year since I disassembled the heads. I did a quick and easy touch up lap, with out removing much material.

After the lapping was complete and everything wiped clean, I miced all the valves to check existing installed valve heights. CompCams says for my cam and beehive springs I would need about 120lbs on the seat which could be made with a 1.75" installed height. After micing them all, most of them measured in the 1.77 to 1.78 range, with one near 1.79. I ordered a hardened shim set from Alex's which should be here any day. I assume I should shim each spring separately to match as close to the 1.75" as I can. The shim set includes thicknesses of .015, .030, and .060, I assume between the .015 or .030, I should have what I need.

Last edited by rollie715; 02-23-2013 at 08:59 PM.
-
02-27-2013 07:14 AM #54
CHR Member
- Join Date
- May 2012
- Location
- Bellingham
- Car Year, Make, Model: 67 Camaro
- Posts
- 39
The piston ring grinder arrived today, so I was able to get back to working on the shortblock. This little tool was a lifesaver. I can't imagine filing the ring ends manually with a file, as the top rings measured close to .015 and needed to be filed to .026 per KB's chart for the pistons I'm using. The instructions with the grinder said to be very careful not to take off too much, so the first couple rings took a long time as I filed, deburred, and checked multiple times before I got the full gap. After that, I got a better feel for how much I was grinding, and the last few rings were done with only a couple grinds each with the tool.

The 2nd compression rings all measured close to .018 or greater which is right where they should be so I left them as is and didn't need to grind them. I methodically checked each ring gap in the bore it would be installed and then assembled them on their perspective pistons. It took some time to figure out an easy way to put the rings on the pistons, but by the time I was half way through, I had figured out a system and got pretty good at quickly putting them on.

I clocked the rings first with the oil ring components evenly spaced around the circle or about 120 degrees between parts. The compression rings were clocked 180 degress from each other and 45 degrees from the wrist pin. I heard that they all tend to rotate and shift when the engine was running, but that I should avoid having them line up with each other during the initial install. With the bearing dry fitted in place on the rod and a couple pieces of fuel hose over the threads to protect the cylinder walls and bearing journal, a lot of oil on the cylinder and piston, and the ring compressor in place, I was ready to place the new piston in the bore.

With the compressor as tight as I could reasonably get it and square with the block, the pistons were tapped into the bores with the wooden handle of my hammer. I noticed on a few of the installs, the rod bearing would come lose from the rod and either fall off or rotate a little and needed to be reinstalled or straightened before I could fully seat it against the journal.


I checked the first two rod bearings with the plastigage and they both showed a little less then .002 clearance. After that I decided not to check every rod as it seemed like a lot of extra steps to first assemble the bearing dry, do the plastigage thing and then to back off, lube up the journals and reassemble and retorque the caps. I hope I don't regret this in the future, but it does remind me of how impatient I get when some of these details are taking so long and I just want to hurry and move on to the next step. By this point in my evening, it was already getting late, I was tired, and I had spend a lot more time on the ring gapping then I had imagined.

By the end of the evening, most of the pistons were installed and the bearing caps torqued to 35 ft/lbs in a 3 stage torquing. I did notice at this point that the bottom end of the block was getting quite heavy and my homemade engine stand was requiring a lot more manual effort to rotate the block upside down. I think in the future it would be nice to have one of those fancy ones with the rotating cranks to help save my back. Actually I'm thinking I could probably modify my homemade one to bring the engine higher so the center of gravity is closer to the pivot point at this stage in the build. My theory, is that after the pan is installed and the heads and manifolds are added, giving more weight to the top, that the need to rotate the assembly upside down should not be necessary.

Last edited by rollie715; 02-27-2013 at 08:01 AM.
-
02-27-2013 08:19 AM #55
CHR Member
- Join Date
- Sep 2007
- Location
- New Bedford
- Car Year, Make, Model: 34 Ford 3W Coupe Replica
- Posts
- 14,754
Thanks for the update and all the great pics. Nice too that you've got each pic seperated with a description. 8-)
-
02-27-2013 08:59 AM #56
CHR Member
- Join Date
- Feb 2006
- Location
- Bartlett
- Posts
- 6,831
 you should clean your fingernails before working on bottom end---------


-
02-27-2013 10:39 AM #57
CHR Member
- Join Date
- May 2012
- Location
- Bellingham
- Car Year, Make, Model: 67 Camaro
- Posts
- 39
As always, I appreciate your input and advice. This is the first time I've attempted this depth of work and am learning a lot of things by trial and error as I go. You guys have lots more skill and experience then I do. If it weren't for the internet, I wouldn't have nearly the information as I am able to stumble upon. Most of me is really enjoying this experience, while part of me is reminded there is a lot better mechanics out there doing these things regularly, while I struggle, redo, and make mistakes that need redone.
-
02-27-2013 10:48 AM #58
CHR Member
- Join Date
- Feb 2006
- Location
- Bartlett
- Posts
- 6,831
I hope I haven't offended you-----------
I have mostly been reading this thread and staying out of it, but my name was mentioned and I knew then that I must contribute something-----so----staying away from technical opinions---what could I say??????????? comment about your self made engine stand????????or fingernail??????????
Seems your doing an OK job and trying not to take any short cuts-of course tho---I think you meant 7/16 when you wrote 3/8 one time-----------
-
02-27-2013 11:04 AM #59
CHR Member
- Join Date
- Sep 2007
- Location
- New Bedford
- Car Year, Make, Model: 34 Ford 3W Coupe Replica
- Posts
- 14,754
With a lot of things in life - the devil is in the details - that means cleanliness counts and you can't skip steps.
Your doing fine. Keep up the good work, just watch the details.
-
02-27-2013 11:57 AM #60
CHR Member
- Join Date
- May 2003
- Location
- Zephyrhills, Florida, USA
- Car Year, Make, Model: '32 Henway
- Posts
- 12,423
You're doin' fine, especially the step where you cleaned the bores until there was no more color on the paper towel. Very important. The last few motors we built as a father/son team while racing go-karts, we picked up a tip from one of the engine builders in the sport. He would rub the bore vigorously with a piece of paper bag from the grocery store after honing. The courseness of that heavyweight brown paper would break loose small dingleberries that would be left after the honing process that would otherwise be dislodged by the rings and cause microscopic ripping and tearing of the bore and the rings. Made sense to me. I realize that the microscopic ripping and tearing is part of the breaking-in process, but it seems to me that if you can remove the bigger chunks with course paper, that the end result will be a smoother coupling of the parts and better ring seal.PLANET EARTH, INSANE ASYLUM FOR THE UNIVERSE.
 Reply With Quote

Posting Permissions
- You may not post new threads
- You may not post replies
- You may not post attachments
- You may not edit your posts

Yep. It’s pretty sad.
Dead!